2017 MERCEDES-BENZ CLS-Class light
[x] Cancel search: lightPage 56 of 206

Basic settings
Selecting the route type
XTo switch to navigation mode:press the
Ø button.
XTo show the menu: slide6the controller.
XTo select Options: turn and press the con-
troller.
XTo select Route Settings: press the con-
troller.
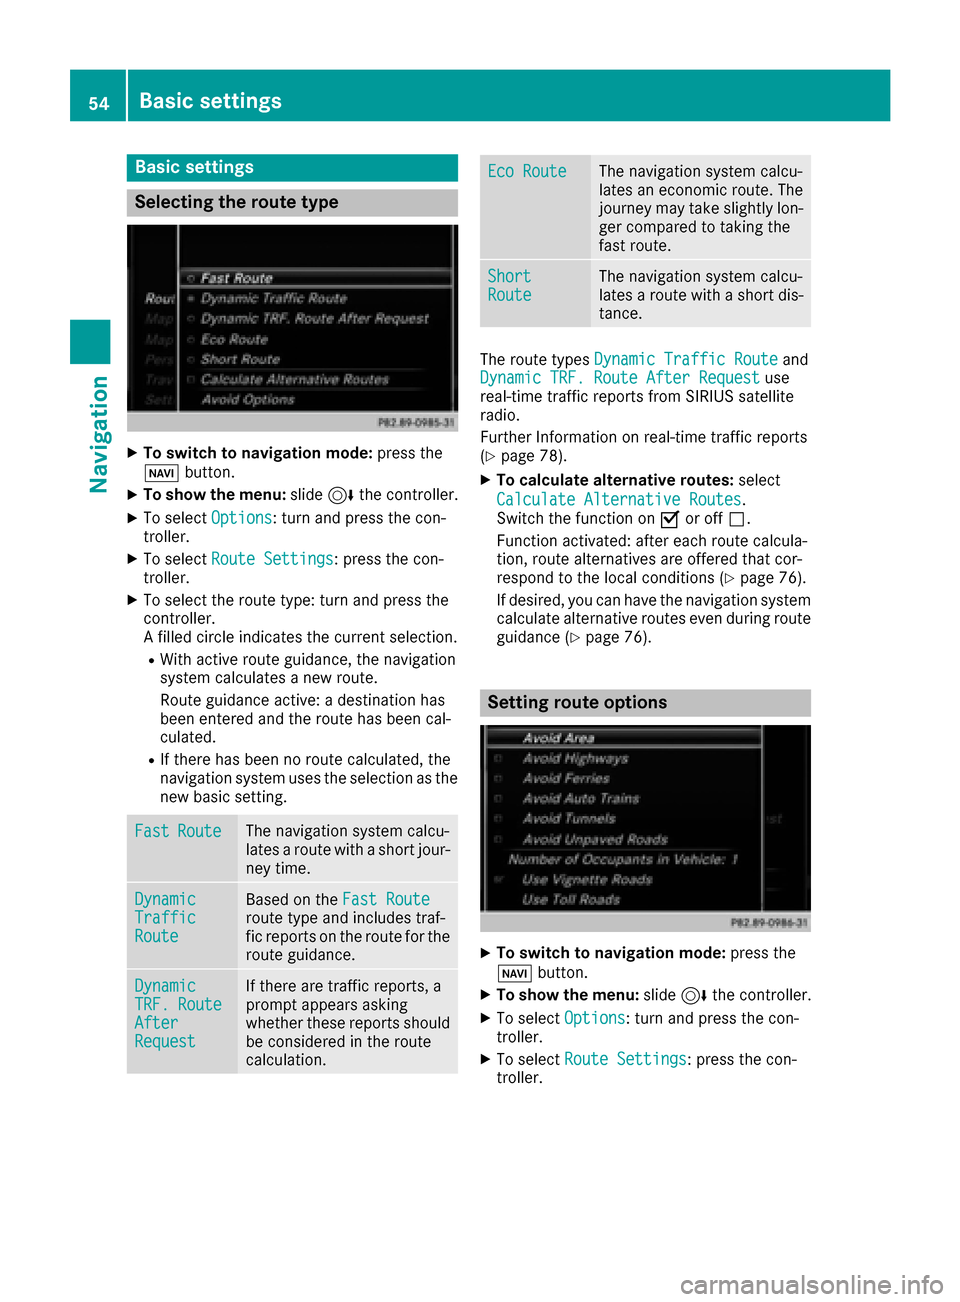
XTo select the route type: turn and press the
controller.
A filled circle indicates the current selection.
RWith active route guidance, the navigation
system calculates a new route.
Route guidance active: a destination has
been entered and the route has been cal-
culated.
RIf there has been no route calculated, the
navigation system uses the selection as the
new basic setting.
FastRouteThe navigation system calcu-
lates a route with a short jour-
ney time.
DynamicTrafficRoute
Based on the Fast Routeroute type and includes traf-
fic reports on the route for the
route guidance.
DynamicTRF.RouteAfterRequest
If there are traffic reports, a
prompt appears asking
whether these reports should
be considered in the route
calculation.
Eco RouteThe navigation system calcu-
lates an economic route. The
journey may take slightly lon-
ger compared to taking the
fast route.
ShortRouteThe navigation system calcu-
lates a route with a short dis-
tance.
The route types Dynamic Traffic Routeand
Dynamic TRF. Route After Requestuse
real-time traffic reports from SIRIUS satellite
radio.
Further Information on real-time traffic reports
(
Ypage 78).
XTo calculate alternative routes: select
Calculate Alternative Routes
.
Switch the function on Oor off ª.
Function activated: after each route calcula-
tion, route alternatives are offered that cor-
respond to the local conditions (
Ypage 76).
If desired, you can have the navigation system
calculate alternative routes even during route
guidance (
Ypage 76).
Setting route options
XTo switch to navigation mode: press the
Ø button.
XTo show the menu: slide6the controller.
XTo select Options: turn and press the con-
troller.
XTo select Route Settings: press the con-
troller.
54Basic settings
Navigation
Page 61 of 206

destination and opens the intermediate des-
tinations list.
iThe route is calculated using the digital map
data. The calculation time depends on the
distance from the destination, for example.
The route may differ from the ideal route, e.g. due to incomplete map data. Please also refer
to the notes about the digital map
(
Ypage 88).
Calling up the keyword search
XTo select the magnifying glass symbol: while
in the address entry menu, slide 6, turn and
then press the controller.
Keyword search
Entering keywords
The keyword search is used to help find desti-
nations using fragments of words. If you enable
the appropriate setting in the search options,
the keyword search is tolerant of errors
(
Ypage 60).
It can be used for an address or a POI. For exam- ple, you can search for the Empire State Building
in New York.
The keyword search finds geographically toler-
ant hits. If, for example, you are searching for a
street located on the edge of a major city, the
search will also cover adjacent smaller cities.
The keyword search supports the character sets
of the system languages available.
XTo switch to navigation mode: press the
Ø button.
XTo show the menu: slide6the controller.
XTo select Destination: turn and press the
controller.
XSelect Keyword Search.
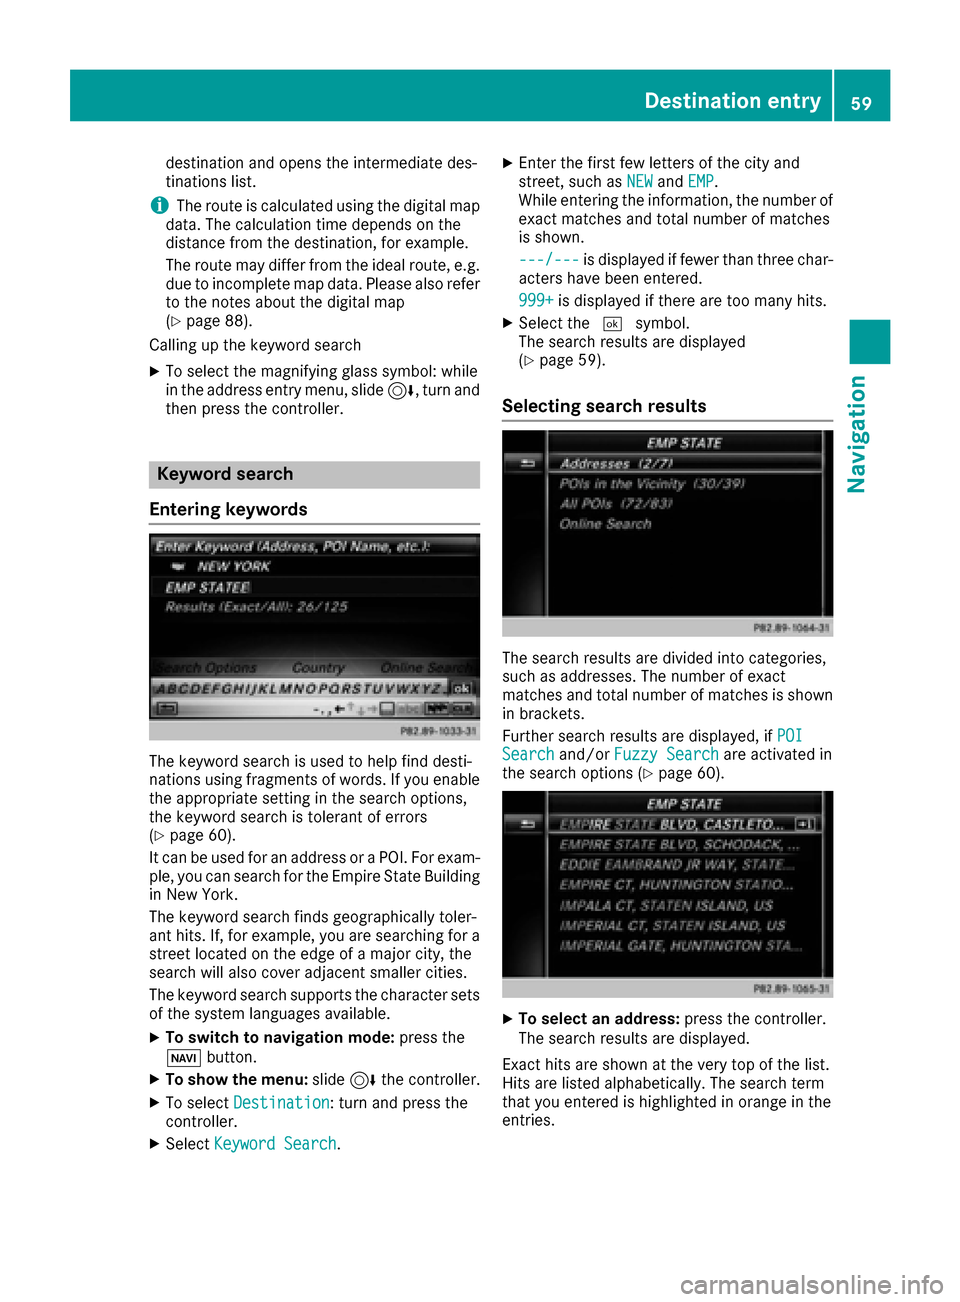
XEnter the first few letters of the city and
street, such as NEWandEMP.
While entering the information, the number of
exact matches and total number of matches
is shown.
---/---
is displayed if fewer than three char-
acters have been entered.
999+
is displayed if there are too many hits.
XSelect the ¬symbol.
The search results are displayed
(
Ypage 59).
Selecting search results
The search results are divided into categories,
such as addresses. The number of exact
matches and total number of matches is shown
in brackets.
Further search results are displayed, if POI
Searchand/orFuzzy Searchare activated in
the search options (Ypage 60).
XTo select an address: press the controller.
The search results are displayed.
Exact hits are shown at the very top of the list.
Hits are listed alphabetically. The search term
that you entered is highlighted in orange in the
entries.
Destination entry59
Navigation
Z
Page 67 of 206

XTo select a POI category orOther: turn and
press the controller.
After selecting one of the eight POI catego-
ries, available POIs are displayed:
Ralong the route
Rin the vicinity
The multimedia system first searches for des-
tinations on the route. The search for desti-
nations is then initiated in the area around the
current vehicle position.
XAfter selecting Other, select one of the des-
tination entry options.
SelectionStep
AddressEntryXEnter a destination by
address (Ypage 57).
KeywordSearchXSelect a destination
using a keyword search
(
Ypage 59).
From Previ‐ous Destina‐tions
XSelect a destination
from the list of last des-
tinations (
Ypage 60).
FromContactsXSelect a contact from
the address book as the
destination (
Ypage 61).
From POIsXSelect a point of interest (Ypage 61).
Using MapXEnter a destination using
the map (Ypage 64).
From MemoryCardXSelect a personal POI
(Ypage 69).
SelectionStep
FromMercedes-Benz Apps
XEnter a destination from
Mercedes-Benz Apps
(
Ypage 67).
Using Geo-CoordinatesXEnter a destination using
the geo-coordinates
(
Ypage 67).
XTo select a POI: turn the controller and pressto confirm.
After selecting a POI or entering a destination,
the address of the intermediate destination is
displayed.
After entering a destination using the map,
the address entry menu is displayed. Start
is
highlighted.
XTo call up a map: selectMapby turning and
pressing the controller.
You can move the map and select the desti-
nation.
XTo make a call: selectCall.
If the intermediate destination has a tele-
phone number and a mobile phone is con-
nected to the multimedia system
(
Ypage 94), the call is connected.
Destination entry65
Navigation
Z
Page 70 of 206

XTo switch to navigation mode:press the
ß button.
XTo show the menu: slide6the controller.
XTo select Options: turn and press the con-
troller.
XSelect Personal POIs.
XSelectDisplay on the Map.
The menu displays the categories available on
the SD memory card.
XTo select a category: turn the controller and
press to confirm.
All personal POIs in the selected category are
displayed Oor not displayed ª, depending
on the previous status.
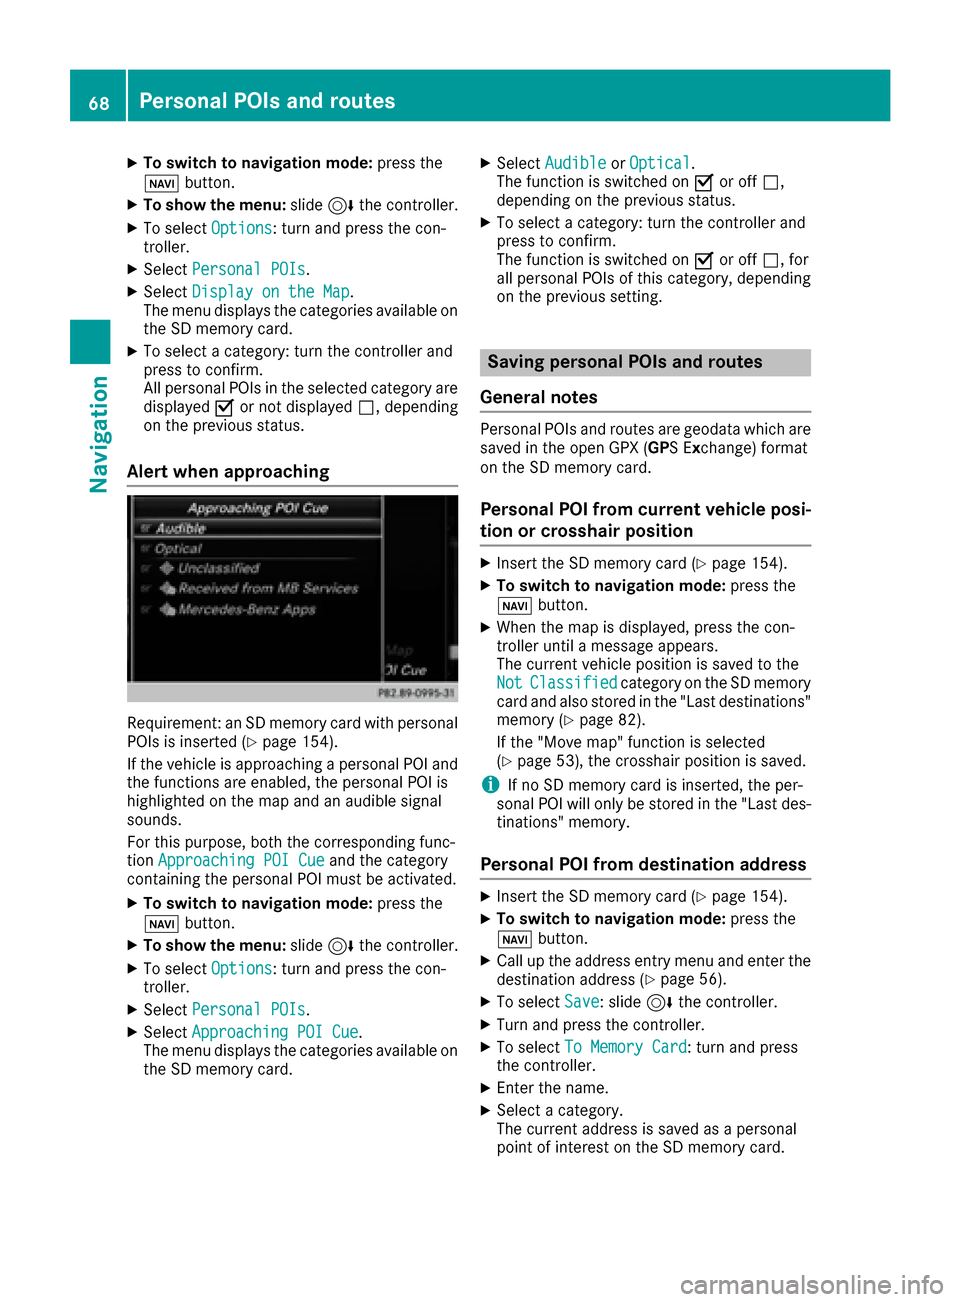
Alert when approaching
Requirement: an SD memory card with personal
POIs is inserted (Ypage 154).
If the vehicle is approaching a personal POI and
the functions are enabled, the personal POI is
highlighted on the map and an audible signal
sounds.
For this purpose, both the corresponding func-
tion Approaching POI Cue
and the category
containing the personal POI must be activated.
XTo switch to navigation mode: press the
ß button.
XTo show the menu: slide6the controller.
XTo select Options: turn and press the con-
troller.
XSelect Personal POIs.
XSelectApproaching POI Cue.
The menu displays the categories available on
the SD memory card.
XSelect AudibleorOptical.
The function is switched on Oor off ª,
depending on the previous status.
XTo select a category: turn the controller and
press to confirm.
The function is switched on Oor off ª, for
all personal POIs of this category, depending
on the previous setting.
Saving personal POIs and routes
General notes
Personal POIs and routes are geodata which are
saved in the open GPX ( GPS Ex change) format
on the SD memory card.
Personal POI from current vehicle posi-
tion or crosshair position
XInsert the SD memory card (Ypage 154).
XTo switch to navigation mode: press the
ß button.
XWhen the map is displayed, press the con-
troller until a message appears.
The current vehicle position is saved to the
Not
Classifiedcategory on the SD memory
card and also stored in the "Last destinations" memory (
Ypage 82).
If the "Move map" function is selected
(
Ypage 53), the crosshair position is saved.
iIf no SD memory card is inserted, the per-
sonal POI will only be stored in the "Last des-
tinations" memory.
Personal POI from destination address
XInsert the SD memory card (Ypage 154).
XTo switch to navigation mode: press the
ß button.
XCall up the address entry menu and enter the
destination address (Ypage 56).
XTo select Save: slide6the controller.
XTurn and press the controller.
XTo select To Memory Card: turn and press
the controller.
XEnter the name.
XSelect a category.
The current address is saved as a personal
point of interest on the SD memory card.
68Personal POIs and routes
Navigation
Page 73 of 206

XTo selectDestination: turn and press the
controller.
XSelect From Memory Card.
XSelectPersonal Routes.
Previously recorded routes are displayed.
XTo select a route: turn and press the control-
ler.
The map appears with a menu. The recorded
route is shown on the map in blue.
XTo start route calculation: selectStart.
XTo change the name and symbol: select
Edit
.
XSelect Change NameorEdit Icon.
XTo change name: enter character (Ypage 29).
XTo change symbol: select a symbol.
The symbol is saved.
Route guidance
General notes
Always observe the traffic regulations when
driving. Road and traffic rules and regulations
always have priority over system driving recom-
mendations.
The multimedia system calculates the route to
the destination without taking account of the
following, for example:
Rtraffic lights
Rstop and yield signs
Rparking or stopping restrictions
Rroad narrowing
Rtemporary traffic rules and regulations
The multimedia system may give differing navi-
gation commands if the actual street/traffic sit-
uation does not correspond with the digital
map's data. For example, if the road layout or
the direction of a one-way street has been
changed.
Route guidance begins once a route has been
calculated (
Ypage 58).
The multimedia system guides you to your des-
tination by means of navigation announcements
in the form of audible navigation announce-
ments and route guidance displays.
Navigation messages guide you during the jour-
ney without distracting you from traffic condi-
tions or driving. Please always use this feature
instead of consulting the map display for direc- tions. The symbols or the map display could dis-
tract you from traffic conditions and driving.
The route guidance displays can be seen if nav-
igation mode is switched on.
If you do not follow the navigation announce-
ments or if you leave the calculated route, the
multimedia system automatically calculates a
new route to the destination.
If the digital map contains the corresponding
information, the following applies:
RDuring route guidance, the multimedia sys-
tem tries to avoid roads with restricted
access. These include, for example, roads
which are closed to through-traffic.
RRoads that have time restrictions (e.g. closed
on Sundays and public holidays) are consid-
ered for route guidance on days when they are
open. For this purpose, the relevant times
must be correctly stored in the database.
Change of direction
Overview
Changes of direction have three phases:
RPreparation phase
RAnnouncement phase
RChange-of-direction phase
Changes in direction are also shown in the mul-
tifunction display of the instrument cluster (see
the vehicle Operator's Manual).
Preparation phase
The multimedia system prepares you for the
upcoming driving maneuver, e.g. with the
announcement "Prepare to turn right". You see
the full-screen map.
Route guidance71
Navigation
Z
Page 74 of 206

Announcement phase
:Pointat whic hth echang eof direction takes
plac e(whit edot )
;Change of direction (turn right here)
=Distanc eto th enext chang eof direction
The multimedia system announce sth eimmi-
nent chang eof direction .The chang eof direc -
tion is announce dahead of time, wit hth e
announcemen t"Turn right in 30 0meters", for
example.
The display is no wspli tint otwo sectors. The
map is shown on th elef tside of th edisplay, and
a detailed imag eof th eintersection or a3D
imag eof th eimminent chang eof direction is
shown on th eright side of th edisplay.
Change-of-directi onphase
The multimedia system announce sth eimmedi-
ate chang eof direction .The chang eof direction
is announce dahead of time, e.g. wit hth e
announcemen t"Now tur nright".
The display is spli tin two lik ein th eannounce -
men tphase.
The chang eof direction is performed when th e
light-colored bar on th eright drops down to 0ft
and th ecurren tvehicl eposition symbol has
reached th ewhit echange-of-direction point. When th
echang eof direction is completed, th e
map will appear in full scree nmod eagain .
Display onhighways
The imag eshows an exampl eof rout eguidance
at ahighway intersection when drivin gon a
highway.
Lane rec ommendations
Display on multi-lane roads
:Lanes no trecommended (dar kgray)
;Possibl elan e(ligh tgray)
=Recommended lanes (white)
If th edigital map contain sth erelevan tdata, th e
multimedia system can display lan erecommen -
dation son multi-lane road sfor th enext chang e
of direction .
Lan eno trecommended ::you will no tbe able
to complete th enext chang eof direction if you
stay in this lane.
Possibl elan e;: you will be able to complete
th enext chang eof direction in this lane.
Recommended lan e=: in this lan eyou will be
able to complete th enext chang eof direction
and th eon eafter that.
72Route guidance
Navigation
Page 75 of 206

Lane recommendations are also shown in the
multifunction display of the instrument cluster
(see the vehicle Operator's Manual).
Approaching new lanes
:Approaching new lane
During the change of direction, new lanes may
be added. These will be shown in the display of
lane recommendations with a lower boundary
line.
Highway information
Display mode
Requirement: the Highway Informationmap
content must be enabled (Ypage 83).
While driving on the highway, gas stations, rest
stops, rest areas and highway exits are dis-
played along with their immediate distances
from the current vehicle position.
Calling up the selection mode
XWhen highway information is displayed, slide 9 the controller.
The marker is on the highway information. The
associated position is highlighted on the map.
XTo select the desired rest stop/freeway exit:
turn and press the controller.
The available POIs are displayed.
Starting route guidance to a POI
Highway information enables route guidance to
a POI and other functions.
XTo select a POI: turn the controller and press to confirm.
The POI details are displayed.
You can perform the following functions:
RStoring in the address book (Ypage 81)
RSaving to the SD memory card
(Ypage 82)
RViewing on the map (Ypage 86)
RCalling if a mobile phone is connected and
a phone number is available (Ypage 100)
RUSA: view the vicinity of the destination if
street images are available and mbrace is
activated for Internet access
(
Ypage 126)
Route guidance73
Navigation
Z
Page 81 of 206

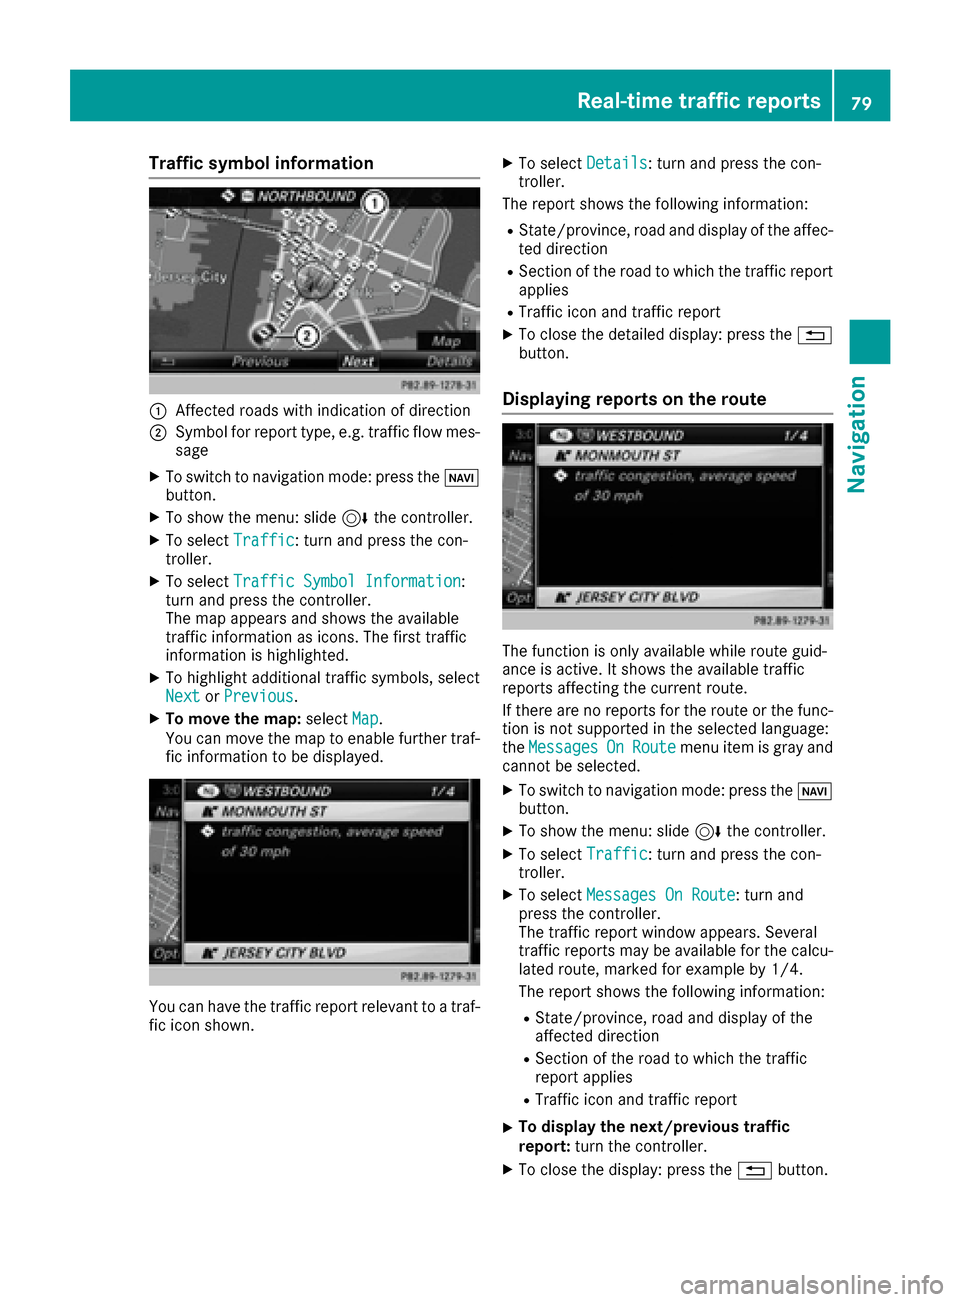
Traffic symbol information
:Affected roads with indication of direction
;Symbol for report type, e.g. traffic flow mes-
sage
XTo switch to navigation mode: press theØ
button.
XTo show the menu: slide 6the controller.
XTo select Traffic: turn and press the con-
troller.
XTo select Traffic Symbol Information:
turn and press the controller.
The map appears and shows the available
traffic information as icons. The first traffic
information is highlighted.
XTo highlight additional traffic symbols, select
Nextor Previous.
XTo move the map: selectMap.
You can move the map to enable further traf-
fic information to be displayed.
You can have the traffic report relevant to a traf-
fic icon shown.
XTo select Details: turn and press the con-
troller.
The report shows the following information:
RState/province, road and display of the affec-
ted direction
RSection of the road to which the traffic report applies
RTraffic icon and traffic report
XTo close the detailed display: press the %
button.
Displaying reports on the route
The function is only available while route guid-
ance is active. It shows the available traffic
reports affecting the current route.
If there are no reports for the route or the func-
tion is not supported in the selected language:
the Messages
OnRoutemenu item is gray and
cannot be selected.
XTo switch to navigation mode: press the Ø
button.
XTo show the menu: slide 6the controller.
XTo select Traffic: turn and press the con-
troller.
XTo select Messages On Route: turn and
press the controller.
The traffic report window appears. Several
traffic reports may be available for the calcu-
lated route, marked for example by 1/4.
The report shows the following information:
RState/province, road and display of the
affected direction
RSection of the road to which the traffic
report applies
RTraffic icon and traffic report
XTo display the next/previous traffic
report: turn the controller.
XTo close the display: press the %button.
Real-time traffic reports79
Navigation
Z