Page 49 of 178
.Switching automatic mode of the
360° camera on/off
This function activa")
Switching the display on automatically
X You can automatically switch the 360° Cam-
era display using reverse gear (Y page 47).Switching automatic mode of the
360° camera on/off
This function activates the 360° camera when
reverse gear is engaged.
X Press the 00D4button.
or X Press Vehicle Vehicle in the main function bar.
The vehicle menu is displayed.
X To switch to the menu bar:slide 6the
controller.
X To select System Settings
System Settings: turn and press
the controller.
X To select 360° Camera
360° Camera: turn and press the
controller.
The menu 360° Camera
360° Camera appears.
X Select Activation by R gear Activation by R gear.
The function is switched on 0073or off 0053,
depending on the previous status. Opening the camera cover for clean-
ing
X To select Open Camera Cover
Open Camera Cover in the 360°
camera menu: turn the controller and press to confirm.
The Please Wait...
Please Wait... message appears for
approximately three seconds.
The camera cover opens.
The camera cover closes automatically if:
R the ignition is switched off
R the vehicle exceeds a moderate speed Rear view camera
General notes
The rear view camera covers the immediate sur- roundings behind the vehicle and assists you
when parking.
The rear view camera is only an aid. It is not a
replacement for your attention to your immedi-
ate surroundings. You are always responsible
for safe maneuvering and parking. When maneu- vering or parking, make sure that there are no
persons, animals or objects in the area in which
you are maneuvering.
You can find further information about the rear
view camera in the vehicle Operator's Manual. Switching automatic mode of the rear
view camera on/off
This function activates the rear view camera
when reverse gear is engaged.
X Press the 00D4button.
or X Press Vehicle Vehicle in the main function bar.
The vehicle menu is displayed.
X Slide 6the controller.
X To select System Settings
System Settings: turn and press
the controller.
X Select Rear View Camera
Rear View Camera.
X Select Activation by R gear
Activation by R gear.
The function is switched on 0073or off 0053,
depending on the previous status.
When you start the vehicle and engage
reverse gear, the camera cover opens auto-
matically if the function is activated. The area
behind the vehicle is shown with guide lines in the display; see the vehicle Operator's Man-
ual.
For further information on the rear view camera;
see the vehicle Operator's Manual. Object detection
The rear view camera can detect moving and
stationary objects. If, for example, a pedestrian or another vehicle is detected, these objects are
marked with bars. The system is able to detect
and mark stationary objects when your vehicle
is moving. Moving objects will always be detec- ted and marked.
Switching object detection on/off
X To select Object ObjectDetection
Detection in the rear view
camera menu: turn and press the controller.
The function is switched on 0073or off 0053,
depending on the previous status. Rear view camera
47Vehicle functions Z
Page 50 of 178

Opening the camera cover for clean-
ing
X To select Open Camera Cover
Open Camera Cover in the rear
view camera menu: turn and press the con-
troller.
The Please Wait...
Please Wait... message appears for
approximately three seconds.
The camera cover opens.
The camera cover closes automatically if: R the ignition is switched off
R the vehicle pulls away Climate control settings
Overview
You can adjust the climate control settings
using the climate control bar (Y page 48) or
the climate control menu (Y page 49).
You can set the most important climate control
functions, such as temperature (Y page 48),
airflow (Y page 48) and air distribution
(Y page 48) using the climate control bar. The
climate control bar is visible in most displays.
You can find all available climate control func-
tions in the climate control menu. You can use
the climate control bar (Y page 48) to switch
to the climate control menu. Settings in the climate control bar
Overview Example
0043 Adjusts temperature and air distribution on
the left and airflow and displays the current
setting 0044
Calls up the climate control menu, displays
the current cooling and climate mode set-
ting
0087 Adjusts temperature and air distribution on
the right and displays the current setting
Calling up the climate control bar X
Press the 00D4button.
or X Press Vehicle Vehicle in the main function bar.
The vehicle menu is displayed.
X Slide 6the controller repeatedly until the
climate control bar is activated.
Setting the temperature X
Call up the climate control bar (Y page 48).
X To select the current temperature on the left
or right: turn and press the controller.
The temperature setting scale appears.
X To change the setting: turn the controller.
X To close the temperature setting scale: press
the controller.
i You can also use the climate control menu
to set the temperature (Y page 49).
Setting the air distribution X
Call up the climate control bar (Y page 48).
X To select the current air distribution display
on the left or right, e.g. 009B: turn and press
the controller.
The air distribution setting scale appears.
X To change the setting: turn the controller.
X To close the temperature setting scale: press
the controller.
i You can also use the climate control menu
(Y page 49) to set the air distribution.
Setting the airflow X
Call up the climate control bar (Y page 48).
X To select 0096: turn and press the controller.
The airflow setting scale appears.
X To change the setting: turn the controller.
X To close the temperature setting scale: press
the controller.
i You can also use the climate control menu
(Y page 49) to set the airflow. 48
Climate control settingsVehicle functions
Page 51 of 178

Calling up the climate control menu
Example
X Press the 00D4button.
or X Press Vehicle
Vehicle in the main function bar.
The vehicle menu is displayed.
X Slide 6the controller repeatedly until the
climate control bar is activated.
X To select from climate control bar 0044: turn
and press the controller.
The menu for selecting climate control func-
tions is activated.
X To select a climate function: turn and press
the controller.
The selected climate control function
appears. Settings in the climate menu
Adjusting the climate mode settings By setting the climate mode you determine the
type of airflow. The setting is active when the air
conditioning system is set to 0058, see the vehi-
cle Operator's Manual.
X Call up the climate control menu (Y page 49).
X To select Climate Mode Climate Mode: turn and press the
controller.
X To change the setting: turn the controller.
X To exit the menu: press the 0038button.
The current airflow setting is shown in the cli-
mate control bar: DIFFUSE
DIFFUSE, MEDIUM
MEDIUMorFOCUS
FOCUS
(Y page 48).
Starting/stopping the perfume atom-
izer The perfume atomizer makes it possible to scent
the air in individual compartments in the vehicle interior. Further information (see the vehicle
Operator's Manual).
X Call up the climate control menu (Y page 49).
X To select Air
Air Freshener Freshener: turn and press the
controller.
The setting element is active.
X To start/stop the perfume atomizer: press
the controller.
X To set the intensity: turn the controller when
the atomizer is switched on.
X To exit the menu: press the 0038button.
Switching ionization on/off The ionization has a cleansing effect on the air in
the vehicle interior. Further information (see the vehicle Operator's Manual).
X Call up the climate control menu (Y page 49).
X To select Ionization Ionization: turn and press the
controller.
The setting element is active.
X To switch the ionization on or off: turn the
controller.
X To exit the menu: press the 0038button.
Pre-entry climate control via SmartKey This function is available for PLUG
‑IN HYBRID
vehicles.
Before getting in, the driver's seat area or the
whole interior can be briefly warmed or ventila-
ted in advance with the air from the air vents
being pre-cooled.
X Call up the climate control menu (Y page 49).
X To select Pre-entry Climate Control Pre-entry Climate Control
via Key
via Key : turn and press the controller.
X To switch on or off: turn the controller.
X To exit the menu: press the 0038button.
Further information on pre-entry climate con-
trol; see the vehicle Operator's Manual.
Pre-entry climate control at time of
departure This function is available for PLUG
‑IN HYBRID
vehicles.
You can climatize the driver's seat and the vehi- cle interior in time for the departure time set. Climate control settings
49Vehicle functions Z
Page 52 of 178
.
X To select Pre-entry Climate Ctrl. at
Pre-entry Climate Ctrl. at
Departure
Departure Time
Time: turn and press the control-
ler.
A rotary menu appears.")
X
Call up the climate control menu (Y page 49).
X To select Pre-entry Climate Ctrl. at
Pre-entry Climate Ctrl. at
Departure
Departure Time
Time: turn and press the control-
ler.
A rotary menu appears.
X To select the setting: turn the controller.
The menu symbol, text and image show the
selected setting.
X To exit the menu: press the 0038button. Settings in the bottom bar of the cli-
mate control menu
Activating/deactivating climate con-
trol This setting is made in the bottom bar of the
climate control menu.
X Call up the climate control menu (Y page 49).
X Slide 6the controller repeatedly until the
bottom bar is activated.
X To select 0073
0073 Climate Ctrl On Climate Ctrl On: turn and
press the controller.
The climate control is switched on 0073or off
0053 depending on the settings.
If the climate control is switched off: R the climate control setting functions are
deactivated.
R the blower is switched off.
R the air recirculation flaps are closed.
Switching cooling with air dehumidifi-
cation on/off This setting is made in the bottom bar of the
climate control menu.
X Call up the climate control menu (Y page 49).
X Slide 6the controller repeatedly until the
bottom bar is activated.
X To select 0073
0073 A/C A/C: turn and press the control-
ler.
X Switch cooling with air dehumidification on
0073 or off 0053.
i The current status of the cooling function is
displayed in the climate control bar: A/C ON
– activated, A/C OFF – deactivated
(Y page 48). i
Deactivating the cooling with air dehumidi-
fication function reduces fuel consumption.
Synchronizing the climate control set-
tings Use
0073 0073Sync
Sync (synchronization) to select the cli-
mate control setting for all zones together 0073or
separately 0053.
This setting is made in the bottom bar of the
climate control menu.
X Call up the climate control menu (Y page 49).
X Slide 6the controller repeatedly until the
bottom bar is activated.
X To select 0073 0073Sync
Sync: turn and press the con-
troller.
X Switch the synchronization function on 0073or
off 0053.
For further information on synchronizing climate
control settings (see the vehicle Operator's
Manual). DYNAMIC SELECT
General notes
You can use DYNAMIC SELECT
DYNAMIC SELECT to configure the
following settings for the Individual drive pro-
gram:
R Drive system
R Suspension
R Steering
R Climate control
R ECO start/stop function
In addition, current vehicle and engine data is
visualized via the Vehicle Data Vehicle DataandEngine
Engine
Data
Data menus.
i In a few countries, the ECO start/stop func-
tion is deactivated at the factory due to the
available fuel grade. In this case, the ECO
start/stop function is not available regardless of the display in the multimedia system dis-
play.
The ECO Assist setting is available on
PLUG‑IN HYBRID vehicles.
In Mercedes-AMG vehicles, you can use
DYNAMIC
DYNAMIC SELECT SELECTto configure the following set-
tings for the Individual drive program:
R Drive system
R Suspension 50
DYNAMIC SELECTVehicle functions
Page 53 of 178

R
Transmission
R Sports exhaust system
R Electronic Stability Program ESP ®
There may be fewer settings or set values, or
none, depending on your vehicle's equipment.
For further information on the Individual drive
program; see the vehicle Operator's Manual. Configuration via the DYNAMIC
SELECT switch
X Use the DYNAMIC SELECT switch to select
the Individual drive program; see the vehicle
Operator's Manual.
A window appears after a short while.
X To confirm Adjust
Adjust: press the controller.
The Individual Configuration Individual Configuration menu for
setting the drive program appears.
X To select Drive
Drive, Suspension
Suspension, Steering
Steering,
Climate Control
Climate Control orEco Start/Stop
Eco Start/Stop
Function
Function: turn and press the controller.
X Select individual settings.
The menu symbol, text and image show the
selected setting.
In Mercedes-AMG vehicles, you can configure
the settings of the drive system, suspension,
transmission, sports exhaust system and Elec-
tronic Stability Program ESP ®
. Displaying vehicle data
X Press the 00D4button.
or X Press Vehicle Vehicle in the main function bar.
The vehicle menu is displayed.
X To select DYNAMIC SELECT
DYNAMIC SELECT: turn and press
the controller.
The Individual
Individual Configuration Configuration, Vehicle
Vehicle
Data
Data andEngine Data
Engine Data menus appear.
X Select Vehicle Data
Vehicle Data.
Updates of the following data are displayed:
R Road type analogous to the selected drive
program
R G-force display of longitudinal and lateral
acceleration
R Accelerator and brake pedal activity
R Activity of the suspension struts R
Wheel angle
R Overrun mode animation
The G-force display is not available in all of the
drive programs.
Daytime or night-time view is shown depending
on the automatic light sensor. Displaying engine data
X Press Vehicle Vehicle in the main function bar.
The vehicle menu is displayed.
X To select DYNAMIC SELECT
DYNAMIC SELECT: turn and press
the controller.
The Individual Individual Configuration
Configuration, Vehicle
Vehicle
Data
Data andEngine Data
Engine Data menus appear.
X Select Engine Data
Engine Data.
The following current data is displayed:
R Engine output
R Engine torque
R Engine oil temperature
R On-board electrical system voltage
i The values for engine output and engine tor-
que may deviate from the nominal values.
Items that can influence this are, for example:
R Engine speed
R Sea level
R Fuel grade
R Outside temperature
In Mercedes-AMG vehicles you will see current
data on the transmission oil temperature
instead of the on-board electrical system volt-
age. Setting options
You can choose from the following settings for
the drive: C Comfort
S Sport
S+ Sport +
M Manual
E EcoDYNAMIC SELECT
51Vehicle functions Z
Page 54 of 178

You can make the following settings for the sus-
pension: C Comfort
S Sport
S+ Sport +
You can make the following settings for the
steering:
C Comfort
S Sport
You can choose from the following settings for
climate control:
E Eco
C Comfort
You can choose from the following settings for
the ECO start/stop function:
On Switches the ECO
start/stop function
on
Off Switches the ECO
start/stop function
off
You can make the following settings for ECO
Assist (PLUG-IN HYBRID vehicles):
On Switches ECO Assist
on
Off Switches ECO Assist
off
Setting options for Mercedes-AMG
vehicles
You can choose from the following settings for
the drive: R Race
C Comfort S Sport
S+ Sport +
You can make the following settings for the sus-
pension: C Comfort
S Sport
S+ Sport +
You can choose from the following settings for
the transmission:
D Automatic
M Manual
You can make the following settings for the
sports exhaust system:
C Comfort
S Sport
S+ Sport +
You can choose from the following settings for
the Electronic Stability Program ESP
®
: S Sport
On Activates the Electronic Sta-
bility Program ESP
® For further information on the Individual drive
program; see the vehicle Operator's Manual.52
DYNAMIC SELECTVehicle functions
Page 55 of 178

Your multimedia system equipment
These operating instructions describe all the
standard and optional equipment of your multi-
media system, as available at the time of going
to press. Country-specific differences are pos-
sible. Bear in mind that your vehicle may not
feature all functions described here. This also
applies to safety-relevant systems and func-
tions.
Read the information on qualified specialist
workshops in the vehicle Operator's Manual. Introduction
Important safety notes
G
WARNING
If you operate information systems and com-
munication equipment integrated in the vehi- cle while driving, you will be distracted from
traffic conditions. You could also lose control of the vehicle. There is a risk of an accident.
Only operate the equipment when the traffic
situation permits. If you are not sure that this
is possible, park the vehicle paying attention
to traffic conditions and operate the equip-
ment when the vehicle is stationary.
You must observe the legal requirements for the country in which you are currently driving whenoperating the multimedia system.
The multimedia system calculates the route to
the destination without taking the following into
account, for example:
R traffic lights
R stop and yield signs
R merging lanes
R parking or stopping in a no parking/no stop-
ping zone
R other road and traffic rules and regulations
R narrow bridges
The multimedia system may give incorrect nav-
igation commands if the actual street/traffic
situation does not correspond with the digital
map's data. For example, a route may have been
diverted or the direction of a one-way street may have changed. For this reason, you must always observe road
and traffic rules and regulations during your
journey. Road and traffic rules and regulations
always have priority over the system's driving
recommendations.
Navigation announcements are intended to
direct you while driving without diverting your
attention from the road and driving.
Please always use this feature instead of con-
sulting the map display for directions. Looking
at the icons or map display can distract you from traffic conditions and driving, and increase the
risk of an accident. General notes
Operational readiness of the navigation system The navigation system must determine the posi-
tion of the vehicle before first use or whenever
operational status is restored. Therefore, you
may have to drive for a while before precise
route guidance is possible.
GPS reception Among other things, correct functioning of the
navigation system depends on GPS reception. In
certain situations, GPS reception may be
impaired, there may be interference or there
may be no reception at all, e.g. in tunnels or
parking garages.
i Using roof carriers may impair the correct
functioning of a roof antenna (phone, satellite
radio, GPS).
Entry restriction For vehicles in certain countries, there is a data
entry restriction.
The restriction is active from a vehicle speed of
above approximately 3 mph (5 km/h).As soon
as the speed falls below approximately 2 mph
(3 km/h), the restriction becomes inactive.
When the restriction is active, certain entries
cannot be made. Menu items are shown in gray and cannot be selected.
For example:
R entering the destination city and street
R entering a destination via the map Introduction
53Navigation Z
Page 56 of 178

R
entering POIs in the vicinity of a city or via a
name search
R editing entries
Other entries are possible, such as entering
points of interest in the vicinity of the destina-
tion or current position. Switching to navigation mode
0043
Traffic reports can be received or traffic
reports are available
X Press the 00CBbutton.
If route guidance is active, the map is shown
in full-screen mode. The map shows the vehi- cle's current position.
If no route guidance is active, the menu is also
displayed. Destination
Destination is highlighted.
Access from one of the other main functions: X To activate the menu: slide5the con-
troller (e.g. in radio mode).
X To select Navi
Navi: turn and press the controller.
The navigation menu appears.
X Press the controller.
The map shows the vehicle's current position.
Access within navigation:
X From any menu, press the 00CBbutton.
The navigation menu appears.
X Press the controller. Showing/hiding the menu
Using the menu, you can make a destination
entry or select the navigation settings, for exam-
ple. X
To show: slide6the controller when the
map appears.
or X Swipe down the touchpad with one finger.
If there has been no route calculated, Des‐
Des‐
tination tination is marked.
If a route has been calculated, 008Fis
marked. X
To hide: press the 0038button.
or X Slide 5the controller.
Full screen symbol 0043appears.
X Press the controller. Moving the map
Requirement: the map is in full screen mode, the
menu is faded out (Y page 54).
X Press the controller.
The crosshair is shown.
X Slide 1, 4or2 the controller.
The map moves in the corresponding direc-
tion under the crosshair.
i Enter a destination using the map
(Y page 64). 54
IntroductionNavigation
 1
1 2
2 3
3 4
4 5
5 6
6 7
7 8
8 9
9 10
10 11
11 12
12 13
13 14
14 15
15 16
16 17
17 18
18 19
19 20
20 21
21 22
22 23
23 24
24 25
25 26
26 27
27 28
28 29
29 30
30 31
31 32
32 33
33 34
34 35
35 36
36 37
37 38
38 39
39 40
40 41
41 42
42 43
43 44
44 45
45 46
46 47
47 48
48 49
49 50
50 51
51 52
52 53
53 54
54 55
55 56
56 57
57 58
58 59
59 60
60 61
61 62
62 63
63 64
64 65
65 66
66 67
67 68
68 69
69 70
70 71
71 72
72 73
73 74
74 75
75 76
76 77
77 78
78 79
79 80
80 81
81 82
82 83
83 84
84 85
85 86
86 87
87 88
88 89
89 90
90 91
91 92
92 93
93 94
94 95
95 96
96 97
97 98
98 99
99 100
100 101
101 102
102 103
103 104
104 105
105 106
106 107
107 108
108 109
109 110
110 111
111 112
112 113
113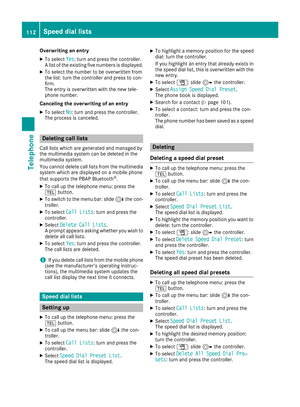 114
114 115
115 116
116 117
117 118
118 119
119 120
120 121
121 122
122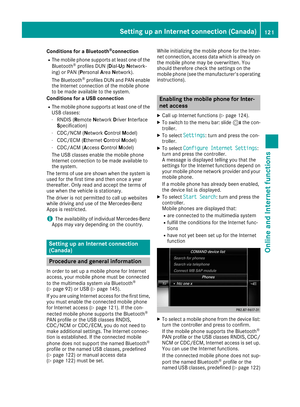 123
123 124
124 125
125 126
126 127
127 128
128 129
129 130
130 131
131 132
132 133
133 134
134 135
135 136
136 137
137 138
138 139
139 140
140 141
141 142
142 143
143 144
144 145
145 146
146 147
147 148
148 149
149 150
150 151
151 152
152 153
153 154
154 155
155 156
156 157
157 158
158 159
159 160
160 161
161 162
162 163
163 164
164 165
165 166
166 167
167 168
168 169
169 170
170 171
171 172
172 173
173 174
174 175
175 176
176 177
177