2017 MERCEDES-BENZ B-Class flap ac
[x] Cancel search: flap acPage 127 of 290

cable is connected or during the charging
process.
Removing the charging cable !
Before driving away, you must ensure that,
for your own safety and to avoid damage, the charging cable has been removed from the
vehicle socket. Otherwise, you cannot shift
the transmission out of position P.
When the charge level display reaches 100%,
the battery is fully charged (Y page 153).When the battery is charged:
X Press and hold button 006Con the charging
cable connector and remove the charging
cable from vehicle socket 0084.
X Close socket cap 0087.
X Close the charge socket flap.
X Remove the charging cable from the electrical
outlet.
X Stow the charging cable safely in the vehicle
(Y page 122). Charging high-voltage battery at a
charging station/wallbox
General notes Only use charging cables that have been tested
and approved by the manufacturer for charging
the high-voltage battery in an electric vehicle.
Pay attention to the "Important safety notes"
(Y page 117).
Charging communication at a charging
station The charging station first has to be activated
before you can charge at a charging station. You can activate the charging station by using an
RFID card or via telephone activation. Observe
the on-site operator instructions for the charg-
ing station.
When the vehicle is connected to the charging
station, information and details on technical
parameters are exchanged. It can thus take up
to 30 seconds for the charging process to begin.
Connecting the charging cable 0043
To open the charge socket flap
0044 Tire pressure table
0087 Socket cap
0085 Fastener
0083 Reference sticker (voltage range)
0084 Vehicle socket
006B Warning sticker (charging cable)
X Shift the DIRECT SELECT lever to position P.
X Switch the ignition off.
X Press the charge socket flap in the direction
of arrow 0043.
The charge socket flap swings up.
X Slide fastener 0085to the right.
Socket cap 0087is open.
X Insert the charging cable connector into vehi-
cle socket 0084to the stop.
The high-voltage battery is being charged. High-voltage battery
125Driving and parking Z
Page 128 of 290
The vehicle must not be moved while the charg-
ing cable is connected or during charging.
i Depending on the temperature, the engine
cooling system and battery cooling system
may audibly switch on when the charging
cable is connected or during the charging
process.
Removing the charging cable !
Before driving away, you must ensure that,
for your own safety and to avoid damage, the
charging cable has been removed from the
vehicle socket. Otherwise, you cannot shift
the transmission out of position P.
When the charge level display reaches 100%,
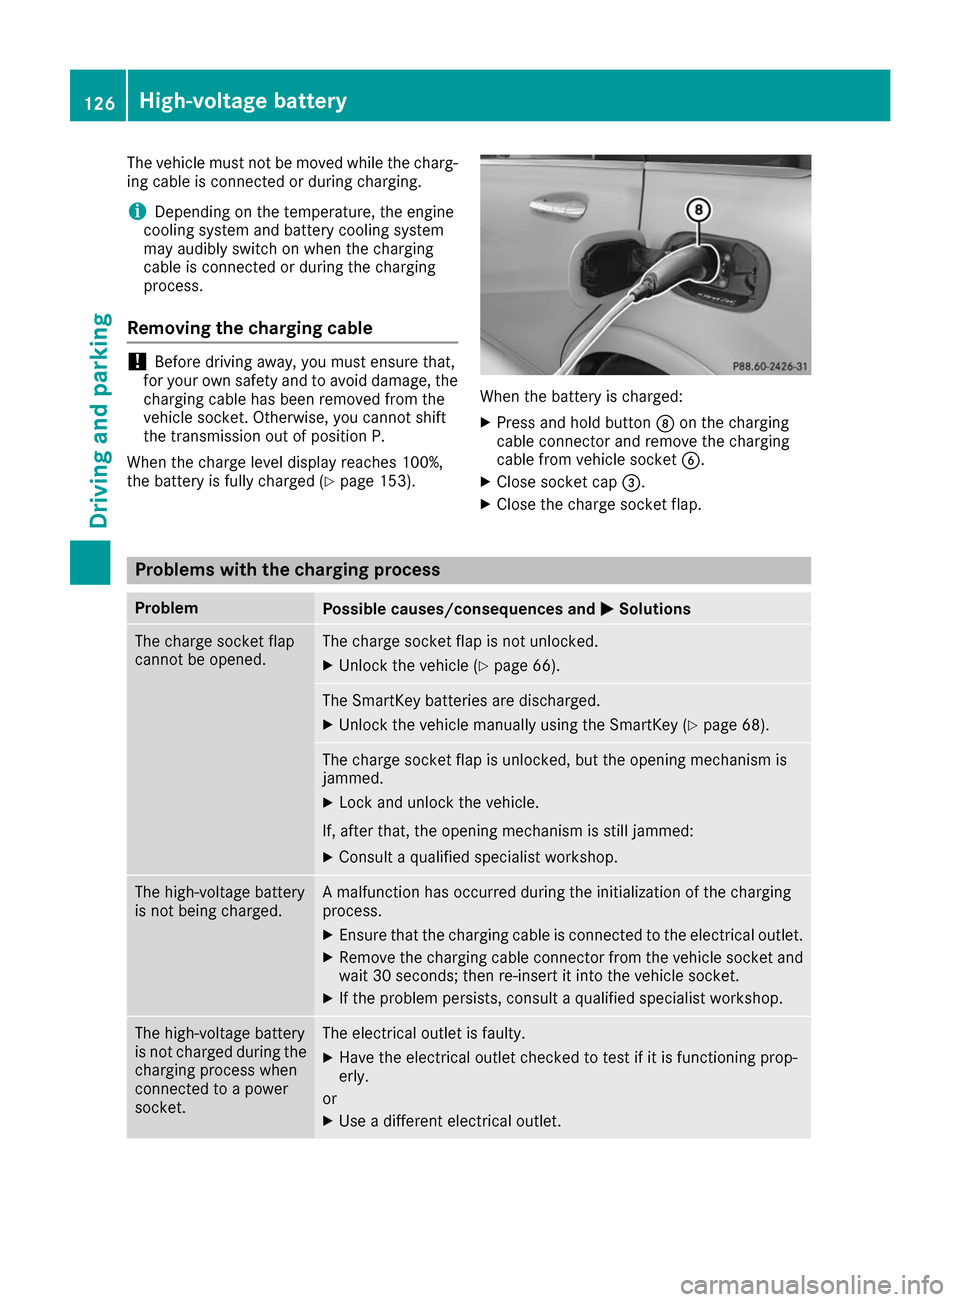
the battery is fully charged (Y page 153). When the battery is charged:
X Press and hold button 006Con the charging
cable connector and remove the charging
cable from vehicle socket 0084.
X Close socket cap 0087.
X Close the charge socket flap. Problems with the charging process
Problem
Possible causes/consequences and
0050 0050Solutions The charge socket flap
cannot be opened. The charge socket flap is not unlocked.
X Unlock the vehicle (Y page 66). The SmartKey batteries are discharged.
X Unlock the vehicle manually using the SmartKey (Y page 68).The charge socket flap is unlocked, but the opening mechanism is
jammed.
X Lock and unlock the vehicle.
If, after that, the opening mechanism is still jammed:
X Consult a qualified specialist workshop. The high-voltage battery
is not being charged. A malfunction has occurred during the initialization of the charging
process.
X Ensure that the charging cable is connected to the electrical outlet.
X Remove the charging cable connector from the vehicle socket and
wait 30 seconds; then re-insert it into the vehicle socket.
X If the problem persists, consult a qualified specialist workshop. The high-voltage battery
is not charged during the
charging process when
connected to a power
socket. The electrical outlet is faulty.
X Have the electrical outlet checked to test if it is functioning prop-
erly.
or X Use a different electrical outlet. 126
High-voltage batteryDriving and parking
Page 210 of 290

Stowage compartments in the front
Glove box
X
To open: pull handle 0043and open glove box
flap 0044.
X To close: fold glove box flap 0044upwards until
it engages.
There is a pen holder at the top of the glove box
flap.
Eyeglasses compartment X
To open: press marking 0043.
Make sure that the eyeglasses compartment is
always closed while the vehicle is in motion. Stowage compartment in the front center
console X
To open: press the marking on cover 0043.
i Depending on the vehicle equipment, there
may be an ashtray in the center console
instead of a storage compartment.
Stowage compartment in front of the arm-
rest (vehicles with automatic transmis-
sion) X
To open: press the marking on cover 0043.
i You can remove the non-slip mat and the
insert for cleaning. When removing the insert
you will have to overcome some slight resist-
ance. 208
Stowage areasStowage and features
Page 213 of 290

X
Slide locking mechanism 0087in the direction
of the arrow.
X Swing flap 0044fully to the side.
Flap 0044is held open by a magnet.
X To close: swing flap 0044in the cargo compart-
ment back until it engages.
X Fold armrest 0043up fully if necessary.
Observe the loading guidelines (Y page 207).Cargo compartment enlargement
Important safety notes G
WARNING
If the rear bench seat/rear seat and seat
backrest are not engaged they could fold for- wards, e.g. when braking suddenly or in the
event of an accident.
R The vehicle occupant would thereby be
pushed into the seat belt by the rear bench
seat/rear seat or by the seat backrest. The
seat belt can no longer offer the intended
level of protection and could even cause
injuries.
R Objects or loads in the trunk/cargo com-
partment cannot be restrained by the seat
backrest.
There is an increased risk of injury.
Before every trip, make sure that the seat
backrests and the rear bench seat/rear seat
are engaged.
! Before folding the backrest in the rear com-
partment forwards, make sure that the rear
compartment armrest and the cupholder are
folded in. They may otherwise be damaged.
Observe the loading guidelines (Y page 207).
The left-hand and right-hand rear seat backrests can be folded forwards separately to increase
the cargo compartment capacity. Folding the rear seat backrest forwards
and back Folding the rear seat backrests forward
X
Fully insert the backrest head restraints if
necessary (Y page 81).
X Move the driver's or front-passenger seat
forward if necessary.
X Pull left-hand or right-hand release handle 0044
of the seat backrest forwards.
Corresponding seat backrest 0043is released.
X Fold backrest 0043forwards.
X Move the driver's or front-passenger seat
back if necessary.
Folding the rear seat backrest back
! Make sure that the seat belt does not
become trapped when folding the rear seat
backrest back. Otherwise, it could be dam-
aged. X
Move the driver's or front-passenger seat
forward if necessary.
X Fold seat backrest 0043back until it engages.
Red lock status indicator 0044is no longer visi-
ble. Stowage areas
211Stowage and features Z
Page 247 of 290

Tire pressure reached
G
WARNING
A tire temporarily sealed with tire sealant
impairs the driving characteristics and is not
suitable for higher speeds. There is a risk of
accident.
You should therefore adapt your driving style
accordingly and drive carefully. Do not exceed the specified maximum speed with a tire that
has been repaired using tire sealant.
The maximum permissible speed for a tire
sealed with tire sealant is 50 mph (80 km/h).
The upper part of the TIREFIT sticker must be
affixed to the instrument cluster in the driver's
field of vision.
If a tire pressure of 200 kPa (2.0 bar/29 psi) has been attained after ten minutes:
X Switch off the tire inflation compressor.
X Unscrew the filler hose from the valve of the
faulty tire.
Note that tire sealant may escape when you
unscrew the filler hose.
X Stow the tire sealant bottle and the tire infla-
tion compressor.
X Pull away immediately.
X Stop after driving for approximately ten
minutes and check the tire pressure with the
tire inflation compressor.
The tire pressure must now be at least
130 kPa (1.3 bar/19 psi). G
WARNING
If the required tire pressure is not reached
after driving for a short period, the tire is too
badly damaged. The tire sealant cannot repair the tire in this instance. Damaged tires and a
tire pressure that is too low can significantly
impair the vehicle's braking and driving char-
acteristics. There is a risk of accident.
Do not continue driving. Contact a qualified
specialist workshop.
i In cases such as the one mentioned above,
contact an authorized Mercedes-Benz Cen-
ter. Or call 1-800-FOR-MERCedes (in the
USA) or 1-800-387-0100 (in Canada). X
Correct the tire pressure if it is still at least
130 kPa (1.3 bar/19 psi). See the Tire and
Loading Information placard on the driver's
side B-pillar or the tire pressure table in the
charge socket flap for values.
X To increase the tire pressure: switch on the
tire inflation compressor. X
To reduce the tire pressure: depress pres-
sure release button 0043next to pressure
gauge 0044.
X When the tire pressure is correct, unscrew the
filler hose from the valve of the sealed tire.
Note that tire sealant may escape when you
unscrew the filler hose.
X Screw the valve cap onto the tire valve of the
sealed tire. X
To remove the tire sealant bottle from the tire
inflation compressor, press together the lock- ing tabs on the yellow cap.
X Pull the tire sealant bottle out of the tire infla-
tion compressor.
The filler hose remains attached to the tire
sealant bottle. Flat tire
245Breakdown assistance Z
Page 259 of 290

Important safety notes
G
WARNING
If wheels and tires of the wrong size are used, the wheel brakes or suspension components
may be damaged. There is a risk of an acci-
dent.
Always replace wheels and tires with those
that fulfill the specifications of the original
part.
When replacing wheels, make sure to use the
correct:
R designation
R model
When replacing tires, make sure to use the
correct:
R designation
R manufacturer
R model G
WARNING
A flat tire severely impairs the driving, steer-
ing and braking characteristics of the vehicle.
There is a risk of accident.
Tires without run-flat characteristics:
R do not drive with a flat tire.
R immediately replace the flat tire with your
emergency spare wheel or spare wheel, or
consult a qualified specialist workshop.
Tires with run-flat characteristics:
R pay attention to the information and warn-
ing notices on MOExtended tires (tires with
run-flat characteristics).
Accessories that are not approved for your vehi-
cle by Mercedes-Benz or are not being used cor- rectly can impair the operating safety.
Before purchasing and using non-approved
accessories, visit a qualified specialist work-
shop and inquire about:
R suitability
R legal stipulations
R factory recommendations Further information regarding wheels and tires
can be found under "Wheel/tire combinations"
(Y page 279).
You can ask for information regarding permitted
wheel-tire combinations at an authorized
Mercedes-Benz Center.
Information on tire pressure can be found:
R on the Tire and Loading Information placard
on the B-pillar on the driver's side
(Y page 266)
R in the tire pressure table in the charge socket
flap (Y page 124)
R under "Tire pressure" (Y page 260) Operation
Information on driving
Check the tire pressure when the vehicle is
heavily laden and adjust prior to a trip.
While driving, pay attention to vibrations, noises
and unusual handling characteristics, e.g. pull-
ing to one side. This may indicate that the
wheels or tires are damaged. If you suspect that a tire is defective, reduce your speed immedi-
ately. Stop the vehicle as soon as possible to
check the wheels and tires for damage. Hidden tire damage could also be causing the unusual
handling characteristics. If you find no signs of
damage, have the tires and wheels checked at a
qualified specialist workshop.
When parking your vehicle, make sure that the
tires do not get deformed by the curb or other
obstacles. If they cannot be avoided, drive over
obstacles such as curbs slowly and at an obtuse
angle. Otherwise, you may damage the wheels
or tires. Regular checking of wheels and tires
G
WARNING
Damaged tires can cause tire inflation pres-
sure loss. As a result, you could lose control of your vehicle. There is a risk of accident.
Check the tires regularly for signs of damage
and replace any damaged tires immediately. Operation
257Wheels and ti res Z
Page 263 of 290

Tire and Loading Information placard
0043
Recommended tire pressures
The Tire and Loading Information placard is on
the B-pillar on the driver's side (Y page 266).
The Tire and Loading Information placard con-
tains the recommended tire pressures for cold
tires. The recommended tire pressures are valid for the maximum permissible load and up to the
maximum permissible vehicle speed.
Tire pressure table The tire pressure table is on the inside of the
charge socket flap. It shows the tire pressure for
all tires permitted at the factory for this vehicle;see illustration (example). The tire pressure table contains the recommen-
ded pressures for cold tires for various operat-
ing conditions, i.e. differing load and speed con-
ditions.
If a tire size precedes a tire pressure, the fol-
lowing tire pressure information is only valid for that tire size; see illustration (example). The load conditions "partially laden" and "fully
laden" are defined in the table for different num- bers of occupants and amounts of luggage. The
actual number of seats may differ. Some tire pressure tables show only the rim
diameters instead of the full tire size, e.g.
R18.
Rim diameter is part of the tire size and can be
found on the tire sidewall (Y page 270).
If the tire pressures have been set to the lower
values for lighter loads and/or lower road
speeds, the pressures should be reset to the
higher values:
R if you want to drive with an increased load
and/or
R if you want to drive at higher speeds
i The tire pressures for increased loads and/
or higher road speeds, shown in the tire pres-
sure table, may have a negative effect on driv-
ing comfort.
If the tire pressure is not set correctly, this can
lead to an excessive build up of heat and a sud- den loss of pressure.
For more information, contact a qualified spe-
cialist workshop. Tire pressure
261Wheels and tires Z
Page 264 of 290

Important notes on tire pressure
G
WARNING
If the tire pressure drops repeatedly, the
wheel, valve or tire may be damaged. Tire
pressure that is too low may result in a tire
blow-out. There is a risk of an accident. R Check the tire for foreign objects.
R Check whether the wheel is losing air or the
valve is leaking.
If you are unable to rectify the damage, con-
tact a qualified specialist workshop. G
WARNING
If you fit unsuitable accessories onto tire
valves, the tire valves may be overloaded and malfunction, which can cause tire pressure
loss. Due to their design, retrofitted tire pres- sure monitors keep the tire valve open. This
can also result in tire pressure loss. There is a
risk of an accident.
Only screw the standard valve cap or other
valve caps approved by Mercedes-Benz for
your vehicle onto the tire valve.
Use a suitable pressure gauge to check the tire
pressure. The outer appearance of a tire does
not permit any reliable conclusion about the tire pressure. You can also check the tire pressure
using the on-board computer.
The tire temperature and pressure increase
when the vehicle is in motion. This is dependent
on the driving speed and the load.
Therefore, you should only correct tire pres-
sures when the tires are cold.
The tires are cold:
R if the vehicle has been parked with the tires
out of direct sunlight for at least three hours
and
R if the vehicle has been driven less than 1 mile
(1.6 km)
The tire temper ature changes depending on the
outside temperature, the vehicle speed and the
tire load. If the tire temperature changes by
18 ‡ (10 †), the tire pressure changes by
approximately 10 kPa (0.1 bar/1.5 psi). Take
this into account when checking the pressure of
warm tires. Only correct the tire pressure if it is too low for the current operating conditions. If you check the tire pressure when the tires are
warm, the resulting value will be higher than if
the tires were cold. This is normal. Do not
reduce the tire pressure to the value specified
for cold tires. The tire pressure would otherwise
be too low.
Observe the recommended tire pressures for
cold tires:
R on the Tire and Loading Information placard
on the B-pillar on the driver's side
R in the tire pressure table in the charge socket
flap (Y page 124) Underinflated or overinflated tires
Underinflated tires G
WARNING
Tires with pressure that is too low can over-
heat and burst as a consequence. In addition, they also suffer from excessive and/or irreg-
ular wear, which can severely impair the brak-ing properties and the driving characteristics.There is a risk of an accident.
Avoid tire pressures that are too low in all the
tires, including the spare wheel.
Underinflated tires may:
R overheat, leading to tire defects
R adversely affect handling
R wear excessively and/or unevenly
R have an adverse effect on energy consump-
tion
Overinflated tires G
WARNING
Tires with excessively high pressure can burst
because they are damaged more easily by
road debris, potholes etc. In addition, they
also suffer from irregular wear, which can
severely impair the braking properties and the driving characteristics. There is a risk of an
accident.
Avoid tire pressures that are too high in all the
tires, including the spare wheel. 262
Tire pressureWheels and tires