2017 MAZDA MODEL CX-9 ECU
[x] Cancel search: ECUPage 501 of 612

7–17
If Trouble Arises
Flat Tire
7 . (Vehicles except for Mexico)
Secure the fl at tire in the luggage
compartment using the fl at tire belt.
1. Pull the fl at tire belts out of the
buckle to separate them into two
belts.
2. Hook the clips of the fl at tire belts to
the hooks under the third-row seat.
3. Place the fl at tire in the luggage
compartment so that it leans against
the luggage board.
4. Pass the fl at tire belts through the
wheel of the fl at tire.
CX-9_8FS7-EA-16K_Edition2.indb 17CX-9_8FS7-EA-16K_Edition2.indb 172016/12/15 18:36:322016/12/15 18:36:32
Page 502 of 612

7–18
If Trouble Arises
Flat Tire
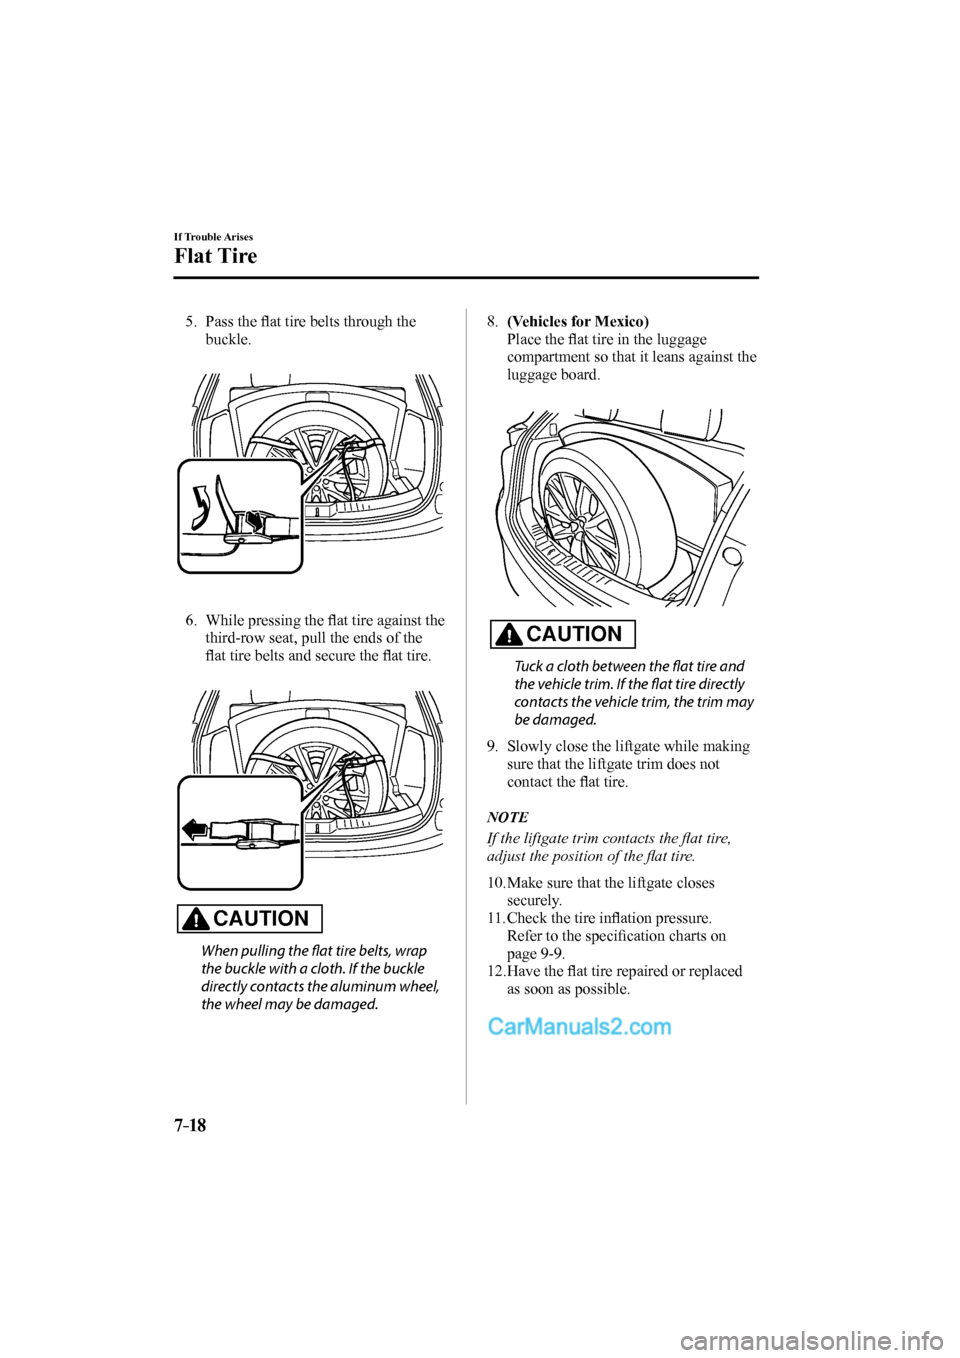
5. Pass the fl at tire belts through the
buckle.
6. While pressing the fl at tire against the
third-row seat, pull the ends of the
fl at tire belts and secure the fl at tire.
CAUTION
When pulling the fl at tire belts, wrap
the buckle with a cloth. If the buckle
directly contacts the aluminum wheel,
the wheel may be damaged.
8 . (Vehicles for Mexico)
Place the fl at tire in the luggage
compartment so that it leans against the
luggage board.
CAUTION
Tuck a cloth between the fl at tire and
the vehicle trim. If the fl at tire directly
contacts the vehicle trim, the trim may
be damaged.
9. Slowly close the liftgate while making
sure that the liftgate trim does not
contact the fl at tire.
NOTE
If the liftgate trim contacts the fl at tire,
adjust the position of the fl at tire.
10. Make sure that the liftgate closes
securely.
11. Check the tire infl ation pressure.
Refer to the specifi cation charts on
page 9-9 .
12. Have the fl at tire repaired or replaced
as soon as possible.
CX-9_8FS7-EA-16K_Edition2.indb 18CX-9_8FS7-EA-16K_Edition2.indb 182016/12/15 18:36:332016/12/15 18:36:33
Page 506 of 612

7–22
If Trouble Arises
Battery Runs Out
1. Remove the battery cover.
2. Make sure the booster battery is 12
V and that its negative terminal is
grounded.
3. If the booster battery is in another
vehicle, do not allow both vehicles
to touch. Turn off the engine of the
vehicle with the booster battery and
all unnecessary electrical loads in both
vehicles.
4. Connect the jumper cables in the exact
sequence as in the illustration.
Connect one end of a cable to the
positive terminal on the discharged
battery (1).
Attach the other end to the positive
terminal on the booster battery (2).
Connect one end of the other cable to
the negative terminal of the booster
battery (3).
Connect the other end to the ground
point indicated in the illustration
away from the discharged battery (4).
5. Start the engine of the booster vehicle
and run it a few minutes. Then start the
engine of the other vehicle.
6. When fi nished, carefully disconnect the
cables in the reverse order described in
the illustration. 7. If the battery cover has been removed,
install it in the reverse order of
removal.
NOTE
Verify that the covers are securely
installed.
CX-9_8FS7-EA-16K_Edition2.indb 22CX-9_8FS7-EA-16K_Edition2.indb 222016/12/15 18:36:352016/12/15 18:36:35
Page 512 of 612

7–28
If Trouble Arises
Emergency Towing
Towing Hooks
1. Remove the towing eyelet and the lug
wrench from the luggage compartment
(page 7-3 ).
2. Wrap a fl athead screwdriver or similar
tool with a soft cloth to prevent damage
to a painted bumper, and open the cap
located on the front or rear bumper.
Front
Rear
CAUTION
Do not use excessive force as it may
damage the cap or scratch the painted
bumper surface.
NOTE
Remove the cap completely and store it so
as not to lose it.
3. Securely install the towing eyelet using
the lug wrench.
Front
Lug wrench
Towing eyelet
Rear
Lug wrench
Towing eyelet
CX-9_8FS7-EA-16K_Edition2.indb 28CX-9_8FS7-EA-16K_Edition2.indb 282016/12/15 18:36:382016/12/15 18:36:38
Page 513 of 612

7–29
If Trouble Arises
Emergency Towing
4. Hook the towing rope to the towing
eyelet.
CAUTION
If the towing eyelet is not securely
tightened, it may loosen or disengage
from the bumper when towing the
vehicle. Make sure that the towing eyelet
is securely tightened to the bumper.
Be careful not to damage the towing
eyelet and towing hook, vehicle body, or
transaxle system when towing under the
following conditions:
Do not tow a vehicle heavier than
yours.
Do not suddenly accelerate your
vehicle as it will apply a severe shock
to the towing eyelet and towing hook
or rope.
Do not attach any rope other than to
the towing eyelet and towing hook.
CX-9_8FS7-EA-16K_Edition2.indb 29CX-9_8FS7-EA-16K_Edition2.indb 292016/12/15 18:36:392016/12/15 18:36:39
Page 518 of 612

7–34
If Trouble Arises
Warning/Indicator Lights and Warning Sounds
*Some models.
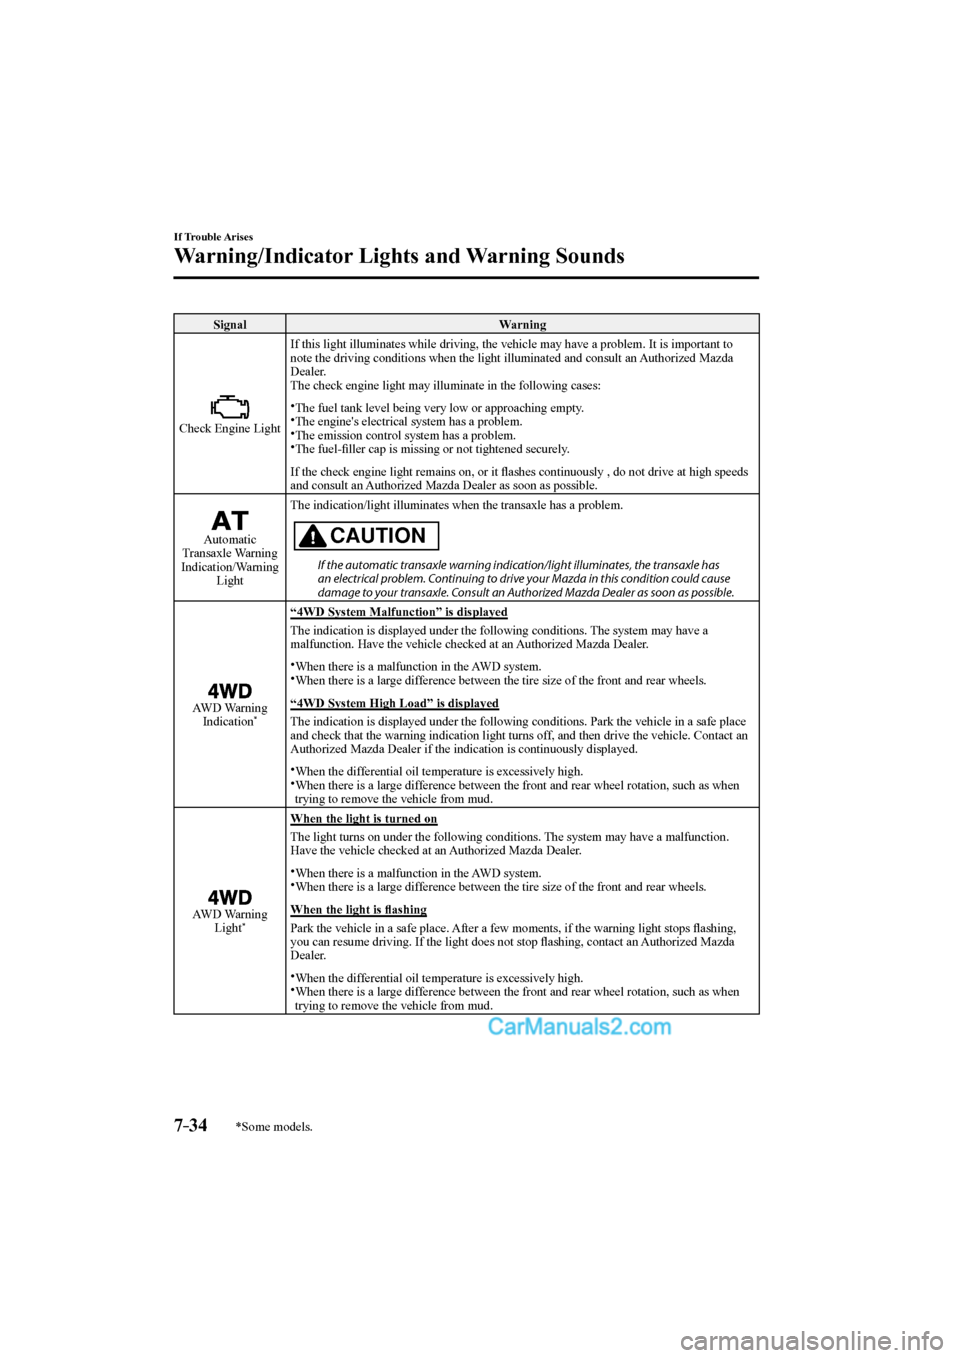
Signal Warning
Check Engine Light If this light illuminates while driving, the vehicle may have a problem. It is important to
note the driving conditions when the light illuminated and consult an Authorized Mazda
Dealer.
The check engine light may illuminate in the following cases:
The fuel tank level being very low or approaching empty.
The engine's electrical system has a problem.
The emission control system has a problem.
The fuel-fi ller cap is missing or not tightened securely.
If the check engine light remains on, or it fl ashes continuously , do not drive at high speeds
and consult an Authorized Mazda Dealer as soon as possible.
Automatic
Transaxle Warning
Indication/Warning
Light The indication/light illuminates when the transaxle has a problem. CAUTION
If the automatic transaxle warning indication/light illuminates, the transaxle has
an electrical problem. Continuing to drive your Mazda in this condition could cause
damage to your transaxle. Consult an Authorized Mazda Dealer as soon as possible.
AWD Warning
Indication
*
“4WD System Malfunction” is displayed
The indication is displayed under the following conditions. The system may have a
malfunction. Have the vehicle checked at an Authorized Mazda Dealer.
When there is a malfunction in the AWD system.
When there is a large difference between the tire size of the front and rear wheels.
“4WD System High Load” is displayed
The indication is displayed under the following conditions. Park the vehicle in a safe place
and check that the warning indication light turns off, and then drive the vehicle. Contact an
Authorized Mazda Dealer if the indication is continuously displayed.
When the differential oil temperature is excessively high.
When there is a large difference between the front and rear wheel rotation, such as when
trying to remove the vehicle from mud.
AWD Warning
Light
*
When the light is turned on
The light turns on under the following conditions. The system may have a malfunction.
Have the vehicle checked at an Authorized Mazda Dealer.
When there is a malfunction in the AWD system.
When there is a large difference between the tire size of the front and rear wheels.
When the light is fl ashing
Park the vehicle in a safe place. After a few moments, if the warning light stops fl ashing,
you can resume driving. If the light does not stop fl ashing, contact an Authorized Mazda
Dealer.
When the differential oil temperature is excessively high.
When there is a large difference between the front and rear wheel rotation, such as when
trying to remove the vehicle from mud.
CX-9_8FS7-EA-16K_Edition2.indb 34CX-9_8FS7-EA-16K_Edition2.indb 342016/12/15 18:36:412016/12/15 18:36:41
Page 525 of 612

7–41
If Trouble Arises
Warning/Indicator Lights and Warning Sounds
*Some models.
Signal Warning Action to be taken
Engine Oil Level Warning
Light This warning light indicates that the engine
oil level is around the MIN mark (page
6-29 ). Add 1 L (0.3 US gal, 0.2 Imp gal) of
engine oil (page 6-26 ).
Low Washer Fluid Level
Warning Indication/
Warning Light
* This warning light indicates that little
washer fl uid remains. Add washer fl uid (page 6-31 ).
Door-Ajar/Liftgate-Ajar
Warning Indication/
Warning Light The light turns on if any door/liftgate is not
closed securely. Close the door/liftgate securely.
KEY Warning Light
*
Take the appropriate action and verify that the warning light turns off.
Signal Cause Action to be taken
(Red)
(Flashing) The key battery is dead. Replace the key battery (page 6-40 ).
The key is not within the operation range.
Bring the key into the operation range
(page 3-7 ). The key is placed in areas inside the
cabin where it is diffi cult for the key to be
detected.
A key from another manufacturer similar to
the key is in the operation range. Take the key from another manufacturer
similar to the key out of the operation
range.
Without the ignition switched off, the key is
taken out of the cabin, and then all the doors
are closed. Bring the key back into the cabin.
CX-9_8FS7-EA-16K_Edition2.indb 41CX-9_8FS7-EA-16K_Edition2.indb 412016/12/15 18:36:452016/12/15 18:36:45
Page 608 of 612

10–6
L
Label Information ................................. 9-2
Lane Departure Warning sound .......... 7-49
Lane-change Signals ........................... 4-55
Lane-keep Assist System (LAS) & Lane
Departure Warning System (LDWS)
... 4-116
Laser Sensor (Front) ......................... 4-142
Leaving Home Light ........................... 4-53
Liftgate ................................................ 3-19
When Liftgate Cannot be Opened ... 7-50
Light Bulbs
Replacement .................................. 6-47
Specifi cations .................................. 9-7
Lighting Control.................................. 4-48
Lights-on Reminder ............................ 7-45
Lubricant Quality .................................. 9-4
Luggage Compartment ........................ 5-91
Cargo Securing Loops ................... 5-91
Cargo Sub-Compartment .............. 5-91
Luggage Compartment Light .............. 5-82
M
Maintenance
Information ...................................... 6-2
Scheduled ........................................ 6-4
Maintenance Monitor .......................... 6-19
Map Lights .......................................... 5-82
Mazda Radar Cruise Control
(MRCC) ............................................ 4-105
Close proximity warning ............. 4-108
Cruise control function ................ 4-114
Display indication ....................... 4-108
Setting the system ....................... 4-109
Mazda Radar Cruise Control (MRCC)
System warnings ................................. 7-48
Message Indicated in Multi-information
Display ................................................ 7-44
Message Indicated on Display ............ 7-42
Meters and Gauges .............................. 4-12
Mirror Defogger .................................. 4-60 Mirrors
Outside mirrors.............................. 3-33
Rearview mirror ............................ 3-34
Moonroof ............................................ 3-42
Multi-information Display .................. 4-21
Average fuel economy ................... 4-26
Blind Spot Monitoring (BSM)
Display .......................................... 4-27
Compass Display ........................... 4-28
Cruise Control Set Vehicle Speed
Display .......................................... 4-28
Current fuel economy .................... 4-26
Distance Recognition Support System
(DRSS) Display ............................. 4-27
Distance-to-empty ......................... 4-25
Engine Coolant Temperature
Gauge ............................................ 4-24
Fuel Gauge .................................... 4-24
Lane-keep Assist System (LAS) &
Lane Departure Warning System
(LDWS) Display ........................... 4-28
Maintenance Monitor .................... 4-26
Mazda Radar Cruise Control (MRCC)
Display .......................................... 4-27
Odometer and Trip Meter .............. 4-23
Outside Temperature Display ........ 4-25
Warning (Display Indication) ........ 4-28
O
Odometer and Trip Meter ........... 4-14, 4-23
Outside Mirrors ................................... 3-33
Outside Temperature Display ..... 4-18, 4-25
Overhead Console ............................... 5-90
Overhead Lights .................................. 5-82
Overheating ......................................... 7-24
Overloading ......................................... 3-54
Owner Maintenance
Closing the hood ........................... 6-24
Engine compartment overview ..... 6-25
Key battery replacement ............... 6-40
Opening the hood .......................... 6-23
Owner maintenance precautions ... 6-21
Index
CX-9_8FS7-EA-16K_Edition2.indb 6CX-9_8FS7-EA-16K_Edition2.indb 62016/12/15 18:37:202016/12/15 18:37:20