2017 LINCOLN CONTINENTAL warning
[x] Cancel search: warningPage 326 of 584

BRAKE FLUID CHECK
WARNINGS
Do not use any fluid other than the
recommended brake fluid as this will
reduce brake efficiency. Use of incorrect fluid
could result in the loss of vehicle control,
serious personal injury or death. Only use brake fluid from a sealed
container. Contamination with dirt,
water, petroleum products or other materials
may result in brake system damage or failure.
Failure to adhere to this warning could result
in the loss of vehicle control, serious
personal injury or death. Do not allow the fluid to touch your
skin or eyes. If this happens, rinse the
affected areas immediately with plenty of
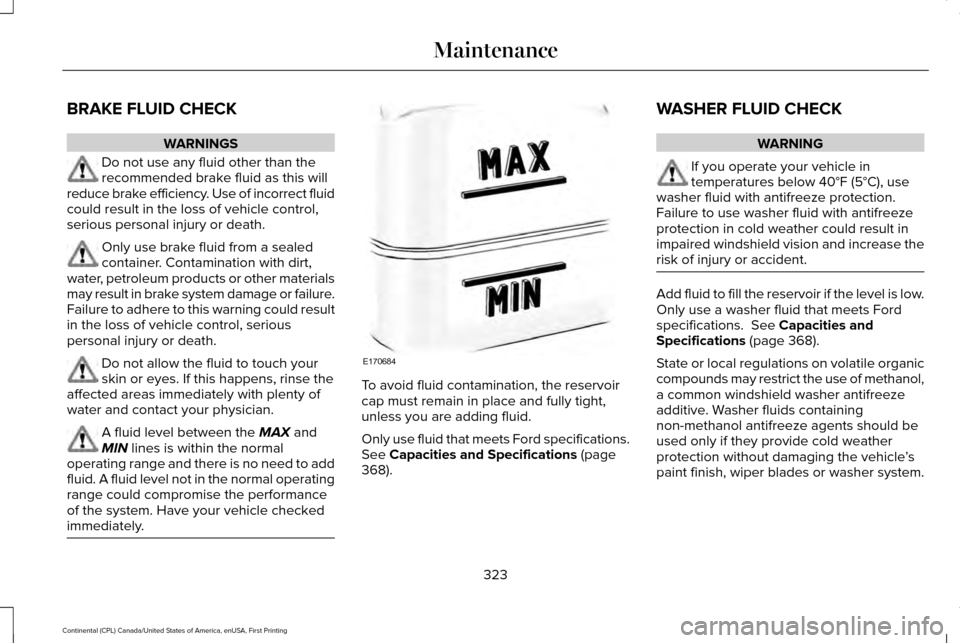
water and contact your physician. A fluid level between the MAX and
MIN lines is within the normal
operating range and there is no need to add
fluid. A fluid level not in the normal operating
range could compromise the performance
of the system. Have your vehicle checked
immediately. To avoid fluid contamination, the reservoir
cap must remain in place and fully tight,
unless you are adding fluid.
Only use fluid that meets Ford specifications.
See Capacities and Specifications (page
368). WASHER FLUID CHECK WARNING
If you operate your vehicle in
temperatures below 40°F (5°C), use
washer fluid with antifreeze protection.
Failure to use washer fluid with antifreeze
protection in cold weather could result in
impaired windshield vision and increase the
risk of injury or accident. Add fluid to fill the reservoir if the level is low.
Only use a washer fluid that meets Ford
specifications.
See Capacities and
Specifications (page 368).
State or local regulations on volatile organic
compounds may restrict the use of methanol,
a common windshield washer antifreeze
additive. Washer fluids containing
non-methanol antifreeze agents should be
used only if they provide cold weather
protection without damaging the vehicle ’s
paint finish, wiper blades or washer system.
323
Continental (CPL) Canada/United States of America, enUSA, First Printing MaintenanceE170684
Page 327 of 584

FUEL FILTER
The fuel filter on your vehicle must be
replaced at the specified service interval.
CHANGING THE 12V BATTERY
WARNINGS
Batteries normally produce explosive
gases which can cause personal injury.
Therefore, do not allow flames, sparks or
lighted substances to come near the battery.
When working near the battery, always shield
your face and protect your eyes. Always
provide correct ventilation. When lifting a plastic-cased battery,
excessive pressure on the end walls
could cause acid to flow through the vent
caps, resulting in personal injury and damage
to the vehicle or battery. Lift the battery with
a battery carrier or with your hands on
opposite corners. WARNINGS
Keep batteries out of reach of children.
Batteries contain sulfuric acid. Avoid
contact with skin, eyes or clothing. Shield
your eyes when working near the battery to
protect against possible splashing of acid
solution. In case of acid contact with skin or
eyes, flush immediately with water for a
minimum of 15 minutes and get prompt
medical attention. If acid is swallowed, call a
physician immediately. Battery posts, terminals and related
accessories contain lead and lead
compounds. Wash hands after handling. Your vehicle is fitted with a Motorcraft
maintenance-free battery which normally
does not require additional water.
When a battery replacement is required, you
must use a recommended replacement
battery that matches the electrical
requirements of the vehicle.
Note:
If your vehicle has a battery cover,
after cleaning or replacing the battery, make
sure you reinstall it. Note:
See an authorized dealer for battery
access, testing, or replacement.
To make sure the battery management
system works correctly, do not connect an
electrical device ground connection directly
to the battery negative post. This can cause
inaccurate measurements of the battery
condition and potential incorrect system
operation.
Note: If you add electrical accessories or
components to the vehicle, it may adversely
affect battery performance and durability.
This may also affect the performance of
other electrical systems in the vehicle.
If you see any corrosion on the battery or
terminals, remove the cables from the
terminals and clean with a wire brush. You
can neutralize the acid with a solution of
baking soda and water.
Because your vehicle ’s engine is
electronically-controlled by a computer,
some engine control settings are maintained
by power from the battery. Some engine
computer settings, like the idle trim and fuel
trim strategy, optimize the driveability and
324
Continental (CPL) Canada/United States of America, enUSA, First Printing Maintenance
Page 330 of 584

4. There is a distinct cut-off (change from
light to dark) in the left portion of the
beam pattern. Position the top edge of
this cut-off 2 inches (5 centimeters) below
the horizontal reference line. 5. Locate the vertical adjuster on each
headlamp. Use a Phillips #2 screwdriver
to turn the adjuster either clockwise or
counterclockwise to adjust the vertical
aim of the headlamp. The horizontal edge
of the brighter light should touch the
horizontal reference line.
6. Repeat Steps 3 through 7 to adjust the other headlamp.
7. Close the hood and turn off the lamps.
Horizontal Aim Adjustment
Horizontal aim is not required for this vehicle
and is not adjustable. CHANGING A BULB WARNINGS
Bulbs can become hot. Let the bulb
cool down before removing it. Failure
to do so could result in personal injury. Switch the lamps and the ignition off.
Failure to follow this warning could
result in serious personal injury. Use the correct specification bulb. See Bulb
Specification Chart (page 328).
Install in the reverse order unless otherwise
stated.
High-Intensity Discharge Headlamps
These lamps operate at a high voltage. See
an authorized dealer if they fail.
327
Continental (CPL) Canada/United States of America, enUSA, First Printing MaintenanceE142465 E167359
Page 333 of 584

CHANGING THE ENGINE AIR
FILTER - 3.7L
WARNING
To reduce the risk of vehicle damage
and/or personal burn injuries do not
start your engine with the air cleaner
removed and do not remove it while the
engine is running. When changing the air filter element, use
only the air filter element listed. See
Capacities and Specifications (page 368).
For EcoBoost equipped vehicles: When
servicing the air cleaner, it is important that
no foreign material enter the air induction
system. The engine and turbocharger are
susceptible to damage from even small
particles.
Change the air filter element at the proper
interval. See Scheduled Maintenance (page
508
). Note:
Failure to use the correct air filter
element may result in severe engine
damage. The customer warranty may be
void for any damage to the engine if the
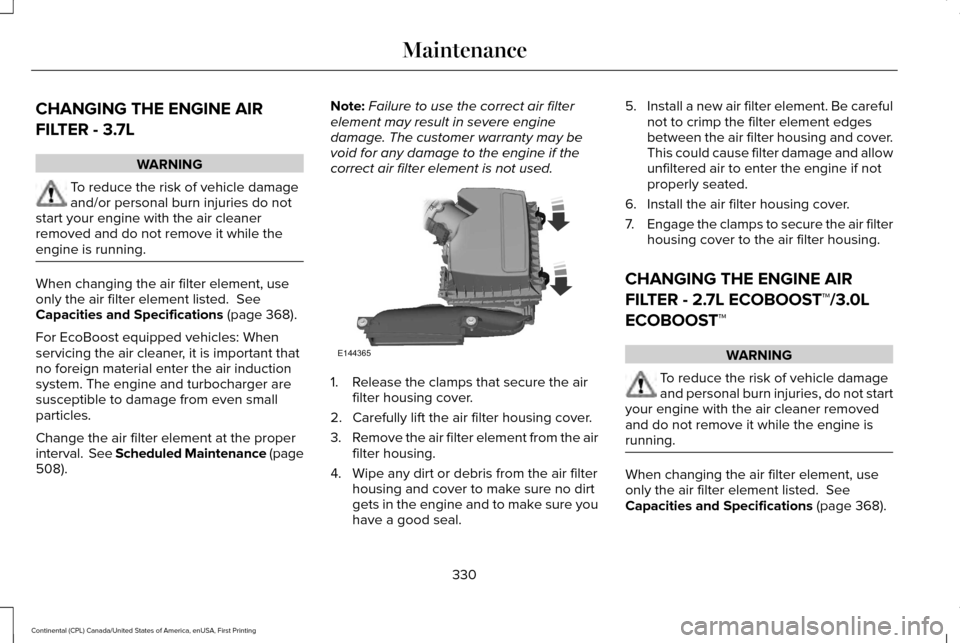
correct air filter element is not used. 1. Release the clamps that secure the air
filter housing cover.
2. Carefully lift the air filter housing cover.
3. Remove the air filter element from the air
filter housing.
4. Wipe any dirt or debris from the air filter housing and cover to make sure no dirt
gets in the engine and to make sure you
have a good seal. 5.
Install a new air filter element. Be careful
not to crimp the filter element edges
between the air filter housing and cover.
This could cause filter damage and allow
unfiltered air to enter the engine if not
properly seated.
6. Install the air filter housing cover.
7. Engage the clamps to secure the air filter
housing cover to the air filter housing.
CHANGING THE ENGINE AIR
FILTER - 2.7L ECOBOOST™/3.0L
ECOBOOST™ WARNING
To reduce the risk of vehicle damage
and personal burn injuries, do not start
your engine with the air cleaner removed
and do not remove it while the engine is
running. When changing the air filter element, use
only the air filter element listed.
See
Capacities and Specifications (page 368).
330
Continental (CPL) Canada/United States of America, enUSA, First Printing MaintenanceE144365
Page 339 of 584

CLEANING THE WINDOWS AND
WIPER BLADES
Car wash chemicals and environmental
fallout can result in windshield and wiper
blade contamination. Dirty windshield and
wipers will result in poor windshield wiper
operation. Keep the windshield and wiper
blades clean to maintain windshield wiper
performance.
To clean the windshield and wiper blades:
•
Clean the windshield with a non-abrasive
glass cleaner. When cleaning the interior
of the windshield, avoid getting any glass
cleaner on the instrument panel or door
panels. Wipe any glass cleaner off these
surfaces immediately.
• For windshields contaminated with tree
sap, chemicals, wax or bugs, clean the
entire windshield using steel wool (no
greater than 0000 grade) in a circular
motion and rinse with water.
• Clean the wiper blades with isopropyl
rubbing alcohol or windshield washer
concentrate. Note:
Do not use razor blades or other
sharp objects to clean or remove decals from
the inside of the heated rear window. The
vehicle warranty does not cover damage
caused to the heated rear window grid lines.
CLEANING THE INTERIOR WARNINGS
Do not use cleaning solvents, bleach
or dye on the vehicle
’s safety belts, as
these actions may weaken the belt webbing. On vehicles equipped with
seat-mounted airbags, do not use
chemical solvents or strong detergents. Such
products could contaminate the side airbag
system and affect performance of the side
airbag in a collision. For fabric, carpets, cloth seats, safety belts
and seats equipped with side airbags:
•
Remove dust and loose dirt with a
vacuum cleaner.
• Remove light stains and soil with
Motorcraft Professional Strength Carpet
& Upholstery Cleaner. •
If grease or tar is present on the material,
spot-clean the area first with Motorcraft
Spot and Stain Remover. In Canada, use
Motorcraft Multi-Purpose Cleaner.
• If a ring forms on the fabric after spot
cleaning, clean the entire area
immediately (but do not oversaturate) or
the ring will set.
• Do not use household cleaning products
or glass cleaners, which can stain and
discolor the fabric and affect the flame
retardant abilities of the seat materials.
CLEANING THE INSTRUMENT
PANEL AND INSTRUMENT
CLUSTER LENS WARNING
Do not use chemical solvents or strong
detergents when cleaning the steering
wheel or instrument panel to avoid
contamination of the airbag system. 336
Continental (CPL) Canada/United States of America, enUSA, First Printing Vehicle Care
Page 345 of 584

depends upon the actual conditions of
their use, however, and may depart
significantly from the norm due to
variations in driving habits, service
practices, and differences in road
characteristics and climate.
Traction AA A B C
WARNING
The traction grade assigned to this
tire is based on straight-ahead
braking traction tests, and does not
include acceleration, cornering,
hydroplaning or peak traction
characteristics. The traction grades, from highest to
lowest are AA, A, B, and C. The grades
represent the tire
’s ability to stop on wet
pavement as measured under controlled
conditions on specified government test
surfaces of asphalt and concrete. A tire
marked C may have poor traction
performance. Temperature A B C WARNING
The temperature grade for this tire
is established for a tire that is
properly inflated and not overloaded.
Excessive speed, underinflation, or
excessive loading, either separately or
in combination, can cause heat buildup
and possible tire failure. The temperature grades are A (the
highest), B and C, representing the tire
’s
resistance to the generation of heat and
its ability to dissipate heat when tested
under controlled conditions on a
specified indoor laboratory test wheel.
Sustained high temperature can cause
the material of the tire to degenerate
and reduce tire life, and excessive
temperature can lead to sudden tire
failure. The grade C corresponds to a
level of performance which all passenger car tires must meet under the
Federal Motor Vehicle Safety Standard
No. 139. Grades B and A represent
higher levels of performance on the
laboratory test wheel than the minimum
required by law.
Glossary of Tire Terminology
•
Tire label: A label showing the
original equipment tire sizes,
recommended inflation pressure and
the maximum weight the vehicle can
carry.
• Tire Identification Number:
A
number on the sidewall of each tire
providing information about the tire
brand and manufacturing plant, tire
size and date of manufacture. Also
referred to as DOT code.
• Inflation pressure: A measure of the
amount of air in a tire.
342
Continental (CPL) Canada/United States of America, enUSA, First Printing Wheels and Tires
Page 349 of 584

K. Maximum Load: Indicates the
maximum load in kilograms and pounds
that can be carried by the tire. See the
Safety Compliance Certification Label
(affixed to either the door hinge pillar,
door-latch post, or the door edge that
meets the door-latch post, next to the
driver's seating position), for the correct
tire pressure for your vehicle.
L.
Treadwear, Traction and
Temperature Grades: •
Treadwear
The treadwear grade is
a comparative rating based on the
wear rate of the tire when tested
under controlled conditions on a
specified government test course.
For example, a tire graded 150 would
wear one and one-half times as well
on the government course as a tire
graded 100.
• Traction:
The traction grades, from
highest to lowest are AA, A, B, and
C. The grades represent the tire's
ability to stop on wet pavement as
measured under controlled
conditions on specified government
test surfaces of asphalt and concrete.
A tire marked C may have poor
traction performance.
• Temperature:
The temperature
grades are A (the highest), B and C,
representing the tire's resistance to
the generation of heat and its ability
to dissipate heat when tested under
controlled conditions on a specified
indoor laboratory test wheel. M.
Maximum Inflation Pressure:
Indicates the tire manufacturers'
maximum permissible pressure or the
pressure at which the maximum load
can be carried by the tire. This pressure
is normally higher than the vehicle
manufacturer's recommended cold
inflation pressure which can be found
on the Safety Compliance Certification
Label (affixed to either the door hinge
pillar, door-latch post, or the door edge
that meets the door-latch post, next to
the driver's seating position), or Tire
Label which is located on the B-Pillar or
the edge of the driver’ s door. The cold
inflation pressure should never be set
lower than the recommended pressure
on the vehicle label.
The tire suppliers may have additional
markings, notes or warnings such as
standard load or radial tubeless.
Additional Information Contained on
the Tire Sidewall for LT Type Tires
Note: Tire Quality Grades do not apply
to this type of tire.
346
Continental (CPL) Canada/United States of America, enUSA, First Printing Wheels and Tires
Page 351 of 584

A. T: Indicates a type of tire, designated
by the Tire and Rim Association, that is
intended for temporary service on cars,
sport utility vehicles, minivans and light
trucks.
B.
145: Indicates the nominal width of
the tire in millimeters from sidewall edge
to sidewall edge. In general, the larger
the number, the wider the tire.
C.
80: Indicates the aspect ratio which
gives the tire's ratio of height to width.
Numbers of 70 or lower indicate a short
sidewall.
D.
D: Indicates a diagonal type tire.
R:
Indicates a radial type tire.
E.
16: Indicates the wheel or rim
diameter in inches. If you change your
wheel size, you will have to purchase
new tires to match the new wheel
diameter. Location of the Tire Label
You will find a Tire Label containing tire
inflation pressure by tire size and other
important information located on the
B-Pillar or the edge of the driver’
s door.
Inflating Your Tires
Safe operation of your vehicle requires
that your tires are properly inflated.
Remember that a tire can lose up to half
of its air pressure without appearing flat.
Every day before you drive, check your
tires. If one looks lower than the others,
use a tire gauge to check pressure of all
tires and adjust if required.
At least once a month and before long
trips, inspect each tire and check the tire
pressure with a tire gauge (including
spare, if equipped). Inflate all tires to the
inflation pressure recommended by Ford
Motor Company. You are strongly urged to buy a reliable
tire pressure gauge, as automatic
service station gauges may be
inaccurate. Ford recommends the use
of a digital or dial-type tire pressure
gauge rather than a stick-type tire
pressure gauge.
Use the recommended cold inflation
pressure for optimum tire performance
and wear. Under-inflation or
over-inflation may cause uneven
treadwear patterns
WARNING
Under-inflation is the most common
cause of tire failures and may result
in severe tire cracking, tread separation
or blowout, with unexpected loss of
vehicle control and increased risk of
injury. Under-inflation increases sidewall
flexing and rolling resistance, resulting
in heat buildup and internal damage to
the tire. It also may result in unnecessary
tire stress, irregular wear, loss of vehicle
control and accidents. A tire can lose up
to half of its air pressure and not appear
to be flat! 348
Continental (CPL) Canada/United States of America, enUSA, First Printing Wheels and Tires