Page 72 of 640
721-1. For safe use
RC300h_EE(OM24740E)
◆Installing child restraint system using a seat belt
Install the child restraint system in accordance to the operation manual
enclosed with the child restraint system.
When using the front seat: Adjust the seatback
If there is gap between the child seat and the seatback, adjust the seatback until
good contact is achieved.
Remove the head restraint if it
interferes with your child restraint
system. ( P. 186)
Place the child restraint system
on the seat.
Run the seat belt through the
child restraint system and insert
the plate into the buckle. Make
sure that the belt is not twisted.
Securely fix the seat belt to the
child restraint system in accor-
dance to the directions enclosed
with the child restraint system.
1
2
3
4
Page 79 of 640

791-1. For safe use
1
For safety and security
RC300h_EE(OM24740E)
Key of letters inserted in the above table:
IUF: Suitable for ISOFIX forward-facing child restraint systems of universal cat-
egory approved for use in this mass group.
IL: Suitable for ISOFIX child restraint systems of the categories for “specific
vehicles”, “restricted”, or “semi-universal”, approved for use in this mass
group.
X: ISOFIX position not suitable for ISOFIX child restraint systems in this mass
group and/or this size class.
*1: When installing an ISOFIX child restraint system on a rear seat, move the front seat as
far forward as possible.
*2: If the head restraint interferes with your child restraint system, and the head restraint
can be removed, remove the head restraint.
When using a “LEXUS MINI” or “LEXUS MIDI”, adjust the support leg and
ISOFIX connectors as follows:
Lock the ISOFIX connectors
where numbers 5 can be seen.
Lock the support leg where
3rd hole can be seen.
●Adjust the front seat so that it does not interfere with the child or child restraint
system.
●The child restraint systems mentioned in the table may not be available out-
side of the EU area.
●Other child restraint systems different from the systems mentioned in the
table can be used, but the suitability of the systems must be carefully checked
with the child restraint system manufacturer and retailer.
1
2
Page 80 of 640
801-1. For safe use
RC300h_EE(OM24740E)
■Installation with ISOFIX rigid anchor (ISOFIX child restraint system)
Install the child restraint system in accordance to the operation manual
enclosed with the child restraint system.
Remove the head restraint if it
interferes with your child restraint
system. ( P. 186)
Check the positions of the exclu-
sive fixing bars, and install the
child restraint system to the seat.
After installing the child restraint system, rock it back and forth to ensure
that it is installed securely.
1
2
3
Page 82 of 640
821-1. For safe use
RC300h_EE(OM24740E)
■Anchor brackets (for top strap)
Anchor brackets are provided for the each rear seat.
Use anchor brackets when fixing the
top strap.
■Fixing the top strap to the anchor bracket
Install the child restraint system in accordance to the operation manual
enclosed with the child restraint system.
Remove the head restraint if it
interferes with your child restraint
system. ( P. 186)
Open the anchor bracket cover,
latch the hook onto the anchor
bracket and tighten the top strap.
Make sure the top strap is
securely latched.
Using an anchor bracket (for top strap)
Top strap
Anchor brackets
1
Hook
Top strap
2
Page 84 of 640

841-1. For safe use
RC300h_EE(OM24740E)
Exhaust gas precautions
Harmful substance to the human body is included in exhaust gases if inhaled.
WARNING
Exhaust gases include harmful carbon monoxide (CO), which is colorless and odorless. Observe the following precautions.Failure to do so may cause exhaust gases enter the vehicle and may lead to an accident
caused by light-headedness, or may lead to death or a serious health hazard.
■Important points while driving
●Keep the trunk lid closed.
●If you smell exhaust gases in the vehicle even when the trunk lid is closed, open the windows and have the vehicle inspected at any authorized Lexus dealer or repairer,or another duly qualified and equipped professional as soon as possible.
■When parking
●If the vehicle is in a poorly ventilated area or a closed area, such as a garage, stop the hybrid system.
●Do not leave the vehicle with the hybrid system on for a long time.If such a situation cannot be avoided, park the vehicle in an open space and ensurethat exhaust fumes do not enter the vehicle interior.
●Do not leave the hybrid system operating in an area with snow build-up, or where it is snowing. If snowbanks build up around the vehicle while the hybrid system is operat- ing, exhaust gases may collect and enter the vehicle.
■Exhaust pipe
The exhaust system needs to be checked periodically. If there is a hole or crack caused by corrosion, damage to a joint or abnormal exhaust noise, be sure to have the vehicle
inspected and repaired by any authorized Lexus dealer or repairer, or another duly qualified and equipped professional.
Page 111 of 640

1112. Instrument cluster
2
Instrument cluster
RC300h_EE(OM24740E)
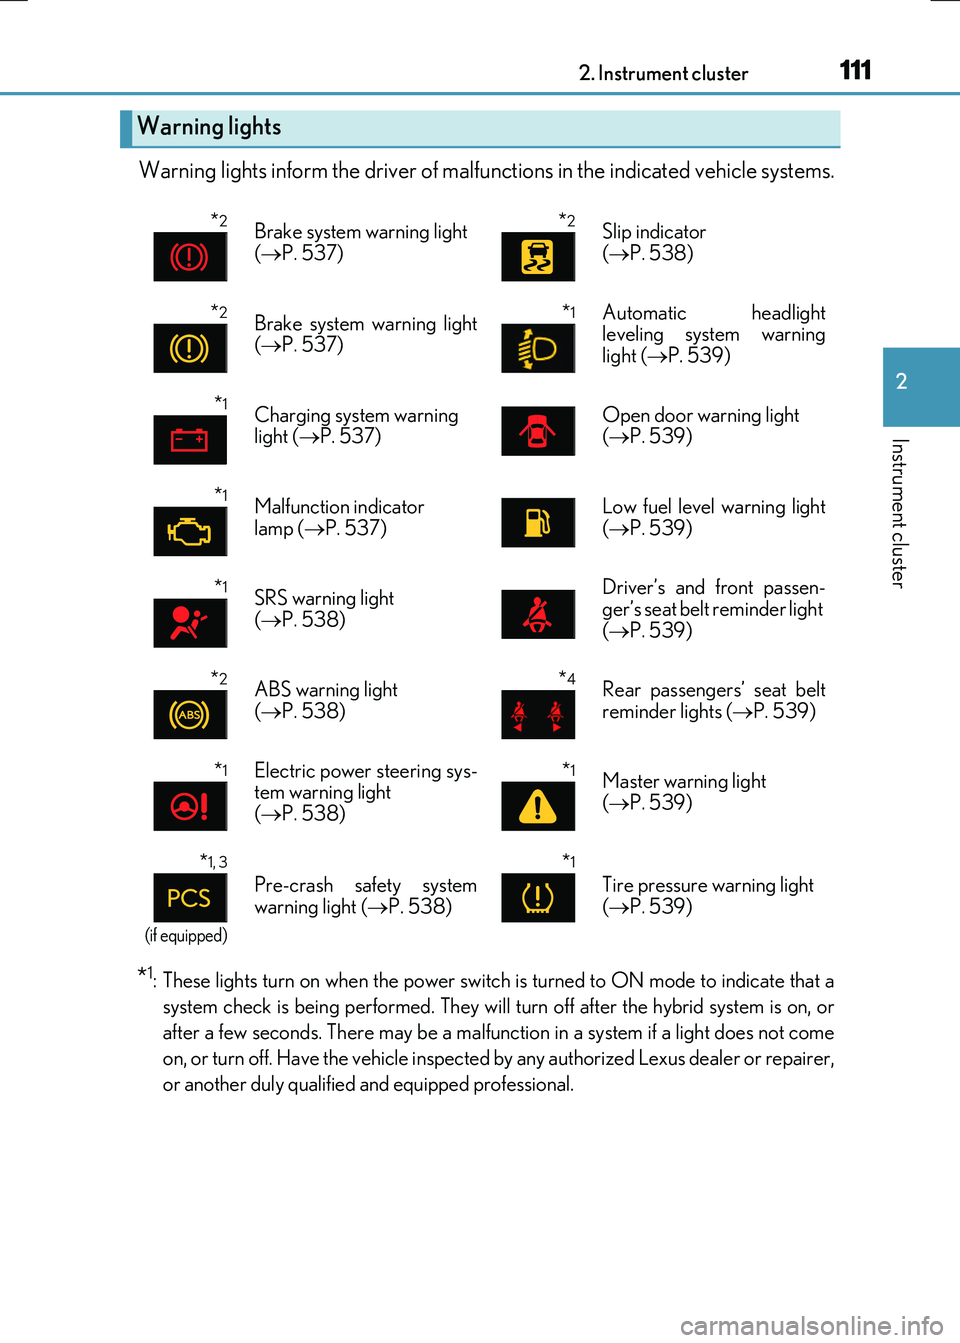
Warning lights inform the driver of malfunctions in the indicated vehicle systems.
*1: These lights turn on when the power switch is turned to ON mode to indicate that a
system check is being performed. They will turn off after the hybrid system is on, or
after a few seconds. There may be a malfunct ion in a system if a light does not come
on, or turn off. Have the vehicle inspected by any authorized Lexus dealer or repairer,
or another duly qualified and equipped professional.
Warning lights
*2Brake system warning light
( P. 537)
*2Slip indicator
( P. 538)
*2Brake system warning light ( P. 537)
*1 Automatic headlight leveling system warning
light ( P. 539)
*1Charging system warning light ( P. 537)Open door warning light ( P. 539)
*1Malfunction indicator
lamp ( P. 537)
Low fuel level warning light
( P. 539)
*1SRS warning light ( P. 538)
Driver’s and front passen- ger’s seat belt reminder light
( P. 539)
*2ABS warning light ( P. 538)
*4Rear passengers’ seat belt reminder lights ( P. 539)
*1Electric power steering sys- tem warning light( P. 538)
*1Master warning light
( P. 539)
*1, 3
(if equipped)
Pre-crash safety system
warning light ( P. 538)
*1
Tire pressure warning light
( P. 539)
Page 112 of 640

1122. Instrument cluster
RC300h_EE(OM24740E)
*2: These lights turn on when the power switch is turned to ON mode to indicate that a
system check is being perfor med. They will turn off after the “READY” indicator turns
on. There may be a malfunction in a system if a light does not come on, or turn off.
Have the vehicle inspected by any authorized Lexus dealer or repairer, or another
duly qualified and equipped professional.
*3: The light flashes to indicate a malfunction.
*4: This light illuminates on the center panel.
The indicators inform the driver of the operating state of the vehicle’s various sys-
tems.
Indicators
Turn signal indicator ( P. 229) Cruise control “SET” indica- tor ( P. 253, 257)
Tail light indicator ( P. 232) (if equipped)
LDA (Lane Departure Alert) indicator ( P. 273)
Headlight high beam indi-
cator ( P. 232)
Lexus parking assist-sensor
indicator ( P. 279)
(if equipped)
Automatic High Beam indi-
cator ( P. 235)
*2, 3 Slip indicator
( P. 305)
(if equipped)
Front fog light indicator
( P. 239)
*1VSC OFF indicator
( P. 307)
Rear fog light indicator ( P. 239)
*1, 4
(if equipped)
Pre-crash safety system warning light ( P. 312)
Cruise control indicator ( P. 253, 257)
*5, 7
(if equipped)
BSM (Blind Spot Monitor) outside rear view mirror
indicators ( P. 319)
(if equipped)
Dynamic radar cruise con- trol indicator ( P. 257)
*8Security indicator ( P. 95, 102)
Page 122 of 640

1222. Instrument cluster
RC300h_EE(OM24740E)
■Menu icons
Displays the following information when an icon is selected.
Drive information ( P. 124)
Select to display various drive data.
Navigation system-linked display (if equipped)
Select to display the following navigation system-linked information. • Route guidance• Compass display (north-up display/heading-up display)
Audio system-linked display
Select to enable selection of an audio source or track on the meter using themeter control switches.
Dynamic radar cruise control operation guide
(vehicles with dynamic radar cruise control)
• Select to display operation procedures of the dynamic radar cruise control. ( P. 257) • When the vehicle is in constant speed control mode ( P. 263), the menu
icon will change to .
• Vehicles with LDA (Lane Departure Alert): If the LDA system ( P. 275) is
activated, its operational stat us will also be displayed.
LDA (Lane Departure Alert) operational status
(vehicles with LDA but without a dynamic radar cruise control)
Select to display the operational status of the LDA system. ( P. 275)
Warning message display (P. 542)
Select to display warning messages and measures to be taken if a malfunction is
detected.
Settings display ( P. 126)
Select to change the meter display settings.