2017 Lexus IS200t height
[x] Cancel search: heightPage 37 of 676

371-1. For safe use
1
For safety and security
IS200t_EE(OM53D77E)
Push the seat belt shoulder anchor
down while pressing the release but-
ton.
Push the seat belt shoulder anchor
up.
Move the height adjuster up and down
as needed until you hear a click.
The pretensioners help the seat belts to
quickly restrain the occupants by
retracting the seat belts when the vehi-
cle is subjected to certain types of
severe frontal collision.
The seat belt pretensioners also activate
when the vehicle is subjected to certain
types of severe side collision.
The pretensioners do not activate in the
event of a minor frontal impact, a minor
side impact, a rear impact or a vehicle
rollover.
Adjusting the seat belt shoulder anchor height (front seats)
1
2
Seat belt pretensioners (front seats)
Page 55 of 676

551-1. For safe use
1
For safety and security
IS200t_EE(OM53D77E)
■Pop Up Hood precautions
●Before scrapping your vehicle, make sure to contact any authorized Lexus retailer or
Lexus authorized repairer, or any reliable repairer.
●The Pop Up Hood system cannot be reused once it has operated. Have it replaced by
any authorized Lexus retailer or Lexus author ized repairer, or any reliable repairer.
■Conditions under which the Pop Up Hood may not operate properly
The Pop Up Hood may not operate properly under the following conditions:
●If a pedestrian collides with the right or left corner of the front bumper or the side of the
vehicle. As such impacts may be difficul t to detect, the system may not operate.
●If the vehicle speed is not detected correctly, such as if the vehicle is sliding sideways,
the system may not operate properly.
■Conditions under wh ich the Pop Up Hood may not operate
The Pop Up Hood may not operate in the following situations:
●Colliding with a lying pedestrian
●A frontal impact applied to the front bumper while driving at speeds outside of the
operational speed range
●A side impact or rear impact
●A vehicle rollover (In some accident situations, the Pop Up Hood may operate.)
NOTICE
■Pop Up Hood precautions
●Make sure to close the hood before driving, as the system may not operate properly if
the hood is not fully closed.
●Make sure that all 4 tires are of the specif ied size and inflated to the specified tire
pressure ( P. 638). If tires of a different size are used, the system may not operate
properly.
●If something has hit the area around the front bumper, the sensors may be damaged
even if the Pop Up Hood has not operated. Have the vehicle inspected by any autho-
rized Lexus retailer or Lexus authorized repairer, or any reliable repairer.
●Do not remove or repair the parts or wiring of the Pop Up Hood, as doing so may
cause accidental operation or prevent the sy stem from operating properly. If repair or
replacement is necessary, contact any authorized Lexus retailer or Lexus authorized
repairer, or any reliable repairer.
●Do not remove such components as the front bumper, hood or suspension, or
replace them with non-genuine parts, as doing so may prevent the system from oper-
ating properly.
●Do not install anything to the front bumper or hood, as doing so may prevent the sen-
sors from detecting an impact correctly and prevent the system from operating prop-
erly.
●Do not close the hood with force or apply load to the lifters, as doing so may damage
the lifters and prevent the system from operating properly.
●Do not modify the suspension, as changes made to the vehicle height may prevent
the system from operating properly.
Page 157 of 676

157
3
Operation of each component
IS200t_EE(OM53D77E)3-3. Adjusting the seats
Power seat
Manual seat
Front seats
Adjustment procedure
Seat position adjustment
Seatback angle adjustment
Seat cushion (front) angle adjust-
ment
Seat cushion (rear) angle adjust-
ment
Lumbar support adjustment (if
equipped)
Vertical height adjustment1
2
3
4
5
6
Page 167 of 676

1673-3. Adjusting the seats
3
Operation of each component
IS200t_EE(OM53D77E)
■Removing the head restraints
■Installing the head restraints
Front seats
Rear seats
Pull the head restraint up while pressing the lock
release button.
If the head restraint to
uches the ceiling, making
the removal difficult, change the seat height or
angle.
Align the head restraint with the installation
holes and push it down to the lock position.
Press and hold the lock release button when
lowering the head restraint.
Align the head restraint with the installation
holes and push it down to the lowest lock posi-
tion while pressing the lock release button.
Lock release button
Lock release button
Lock release button
Page 168 of 676

1683-3. Adjusting the seats
IS200t_EE(OM53D77E)
■Adjusting the height of the head restraints
■Adjusting the rear seat head restraint
Always raise the head restraint one level from the stowed position when using. Make sure that the head restraints are adjusted
so that the center of the head restraint is closest
to the top of your ears.
WARNING
■Head restraint precautions
Observe the following precautions regarding the head restraints. Failure to do so may
result in death or serious injury.
●Use the head restraints designed for each respective seat.
●Adjust the head restraints to the correct position at all times.
●After adjusting the head restraints, push down on them and make sure they are
locked in position.
●Do not drive with the head restraints removed.
Page 171 of 676

1713-4. Adjusting the steering wheel and mirrors
3
Operation of each component
IS200t_EE(OM53D77E)
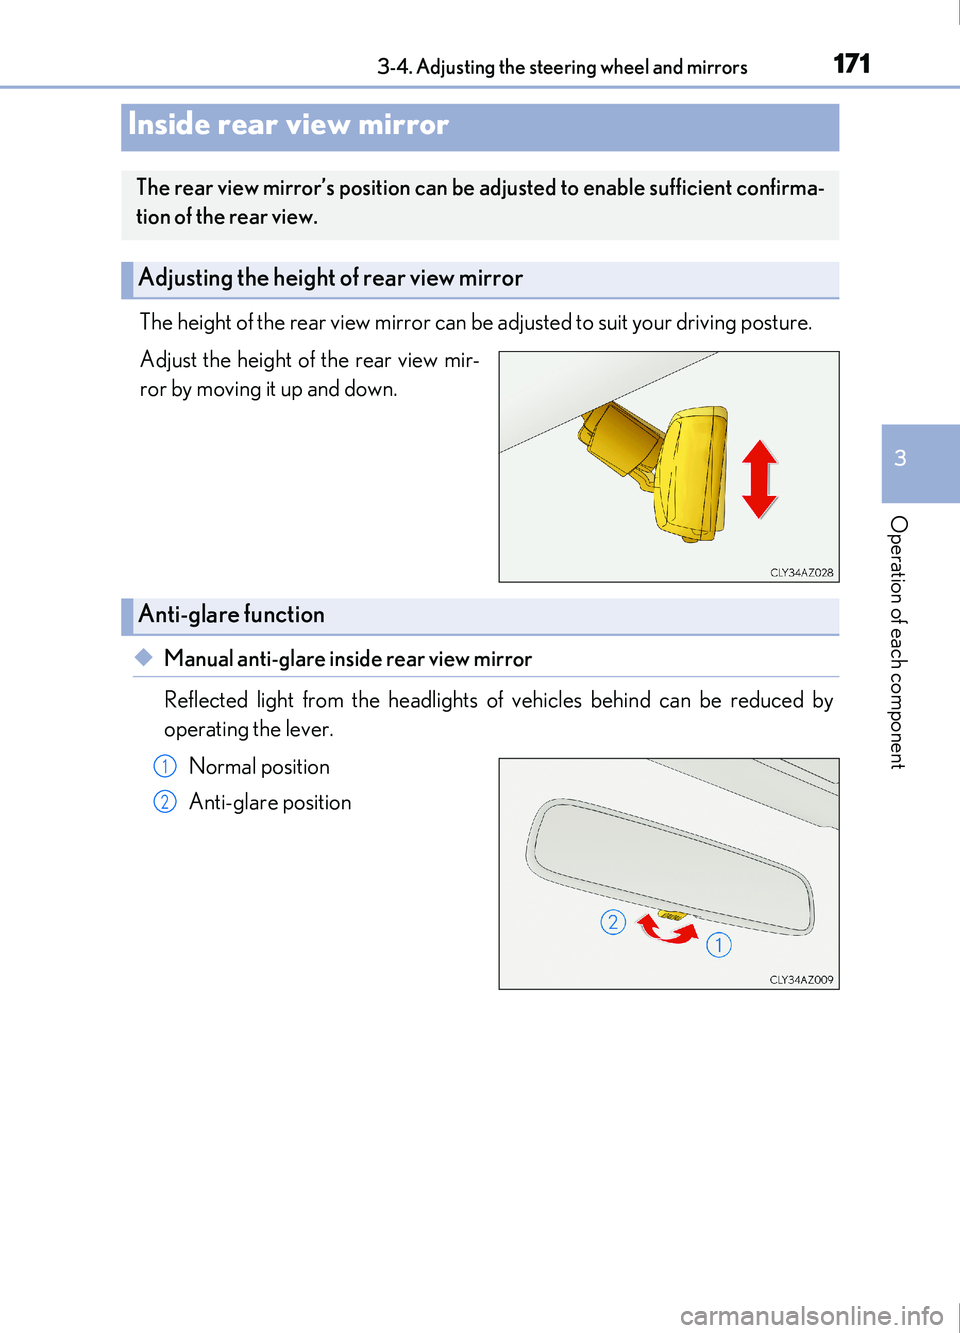
The height of the rear view mirror can be adjusted to suit your driving posture.
Adjust the height of the rear view mir-
ror by moving it up and down.
◆Manual anti-glare inside rear view mirror
Reflected light from the headlights of vehicles behind can be reduced by
operating the lever.Normal position
Anti-glare position
Inside rear view mirror
The rear view mirror’s position can be adjusted to enable sufficient confirma-
tion of the rear view.
Adjusting the height of rear view mirror
Anti-glare function
1
2
Page 332 of 676

3324-5. Using the driving support systems
IS200t_EE(OM53D77E)
■Conditions under which the BSM function may not function correctly
●The BSM function may not detect vehicles correctly in the following situations:
• When the sensor is misaligned due to a strong impact to the sensor or its surround-ing area
• When mud, snow, ice, a sticker, etc. is covering the sensor or surrounding area on the rear bumper
• When driving on a road surface that is wet with standing water during bad weather, such as heavy rain, snow, or fog
• When multiple vehicles are approaching wi th only a small gap between each vehicle
• When the distance between your vehicle and a following vehicle is short
• When there is a significant difference in speed between your vehicle and the vehicle that enters the detection area
• When the difference in speed between your vehicle and another vehicle is changing
• When a vehicle enters a detection area traveling at about the same speed as your vehicle
• As your vehicle starts from a stop, a vehicle remains in the detection area
• When driving up and down consecutive steep inclines, such as hills, dips in the road,
etc.
• When driving on roads with sharp bends, consecutive curves, or uneven surfaces
• When vehicle lanes are wide, or when driving on the edge of a lane, and the vehicle in an adjacent lane is far away from your vehicle
• When towing a trailer (vehicles with towing package)
• When items such as a bicycle carrier are installed on the rear of the vehicle
• When there is a significant difference in height between your vehicle and the vehicle that enters the detection area
• Immediately after the BSM function is turned on
●Instances of the BSM function unnecessarily detecting a vehicle and/or object may
increase in the following situations:
• When the sensor is misaligned due to a strong impact to the sensor or its surround- ing area
• When the distance between your vehicle and a guardrail, wall, etc. that enters the
detection area is short
• When driving up and down consecutive steep inclines, such as hills, dips in the road,
etc.
• When vehicle lanes are narrow, or when driving on the edge of a lane, and a vehicle traveling in a lane other than the adjacent lanes enters the detection area
• When driving on roads with sharp bends, consecutive curves, or uneven surfaces
• When the tires are slipping or spinning
• When the distance between your vehicle and a following vehicle is short
• When a bicycle carrier or other accessory is installed to the rear of the vehicle
• When towing a trailer (vehicles with towing package)
Page 603 of 676

6038-2. Steps to take in an emergency
8
When trouble arises
IS200t_EE(OM53D77E)
WARNING
■Using the tire jack
Observe the following precautions.
Improper use of the tire jack may cause the vehicle to suddenly fall off the jack, leading
to death or serious injury.
●Do not use the tire jack for any purpose other than replacing tires or installing and
removing tire chains.
●Only use the tire jack that comes with this vehicle for replacing a flat tire.
Do not use it on other vehicles, and do not use other tire jacks for replacing tires on
this vehicle.
●Put the jack properly in its jack point.
●Do not put any part of your body under the vehicle while it is supported by the jack.
●Do not start the engine or drive the vehicle while the vehicle is supported by the jack.
●Do not raise the vehicle while someone is inside.
●When raising the vehicle, do not put an object on or under the jack.
●Do not raise the vehicle to a height greater than that required to replace the tire.
●Use a jack stand if it is necessary to get under the vehicle.
●When lowering the vehicle, make sure that there is no-one near the vehicle. If there
are people nearby, warn them vocally before lowering.