Page 391 of 584
ES350_OM_OM33C68U_(U)
3896-4. Using the other interior features
6
Interior features
The clock can be adjusted.Pressing and holding will move the
clock hands backward.
Pressing and holding will move the
clock hands forward.
The power outlets can be used for 12V accessories that run on less than 10A.
■Front
Open the lid.
■Rear
Open the lid.
The power outlets can be used when the engine switch is in ACCESSORY or IGNI-
TION ON mode.
Clock
1
2
Power outlets
Page 397 of 584

395
ES350_OM_OM33C68U_(U)6-4. Using the other interior features
6
Interior features
Garage door opener
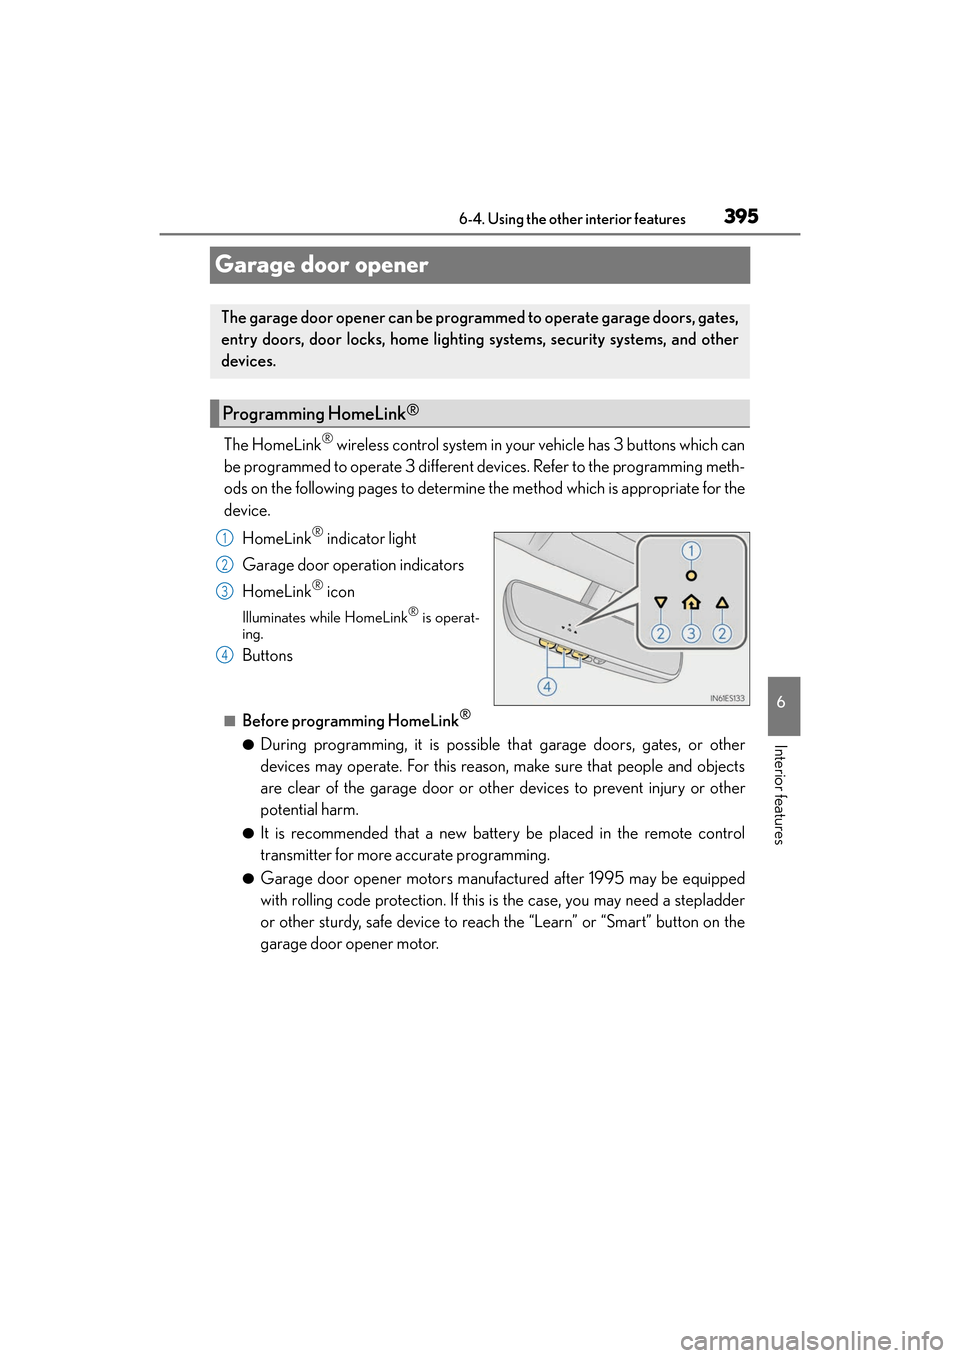
The HomeLink® wireless control system in your vehicle has 3 buttons which can
be programmed to operate 3 different devices. Refer to the programming meth-
ods on the following pages to determine the method which is appropriate for the
device.
HomeLink
® indicator light
Garage door operation indicators
HomeLink
® icon
Illuminates while HomeLink® is operat-
ing.
Buttons
■Before programming HomeLink®
●During programming, it is possible that garage doors, gates, or other
devices may operate. For this reason, make sure that people and objects
are clear of the garage door or other devices to prevent injury or other
potential harm.
●It is recommended that a new battery be placed in the remote control
transmitter for more accurate programming.
●Garage door opener motors manufactured after 1995 may be equipped
with rolling code protection. If this is the case, you may need a stepladder
or other sturdy, safe device to reach the “Learn” or “Smart” button on the
garage door opener motor.
The garage door opener can be progra mmed to operate garage doors, gates,
entry doors, door locks, home lighting systems, security systems, and other
devices.
Programming HomeLink®
1
2
3
4
Page 406 of 584

404
ES350_OM_OM33C68U_(U)6-4. Using the other interior features
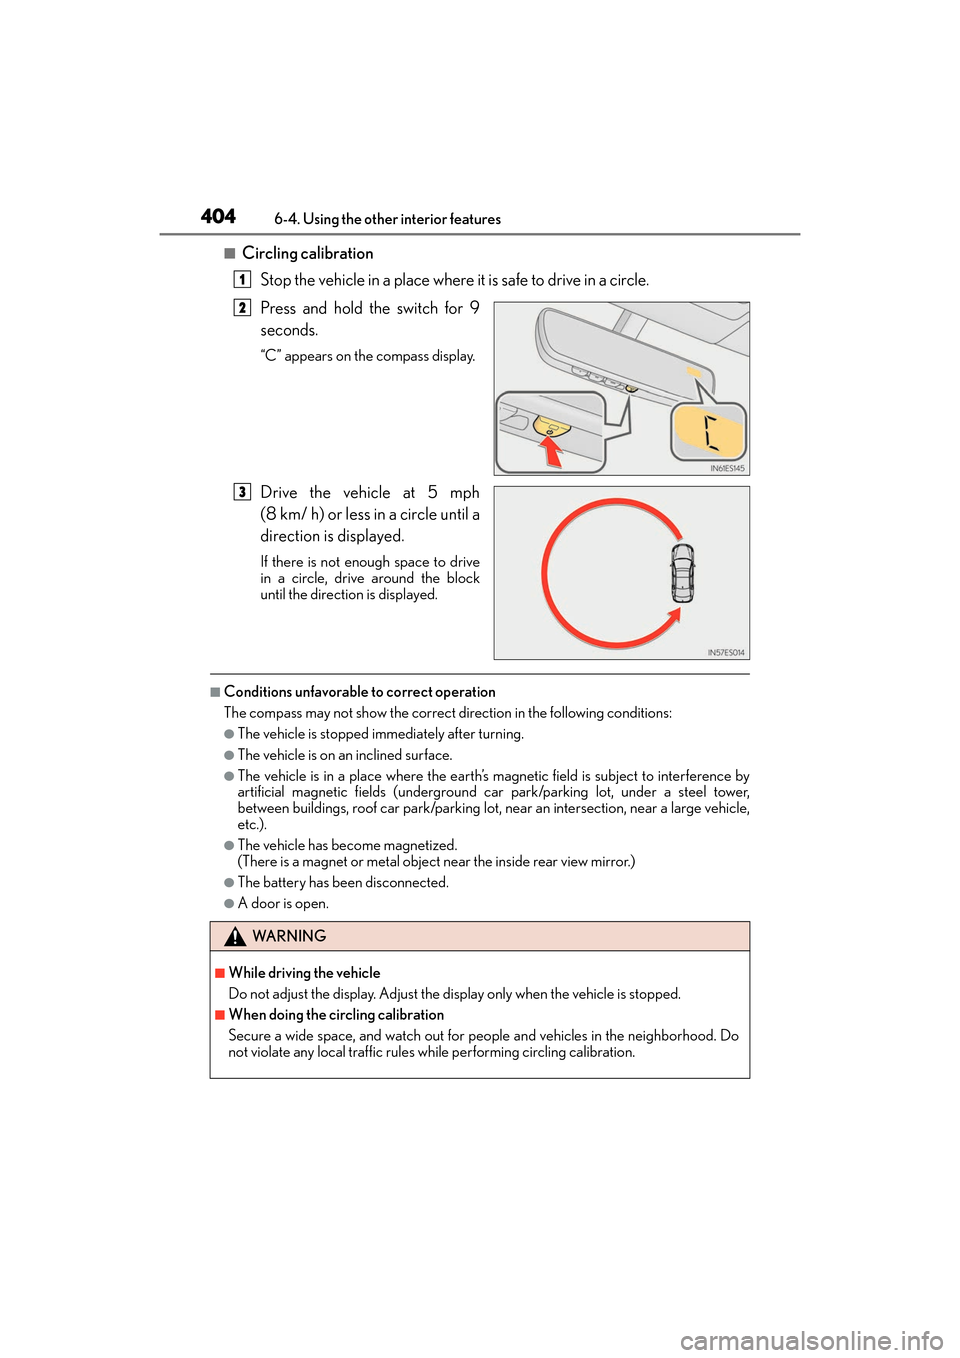
■Circling calibration
Stop the vehicle in a place where it is safe to drive in a circle.
Press and hold the switch for 9
seconds.
“C” appears on the compass display.
Drive the vehicle at 5 mph
(8 km/ h) or less in a circle until a
direction is displayed.
If there is not enough space to drive
in a circle, drive around the block
until the direction is displayed.
■Conditions unfavorable to correct operation
The compass may not show the correct direction in the following conditions:
●The vehicle is stopped immediately after turning.
●The vehicle is on an inclined surface.
●The vehicle is in a place where the earth’s magnetic field is subject to interference by
artificial magnetic fields (underground car park/parking lot, under a steel tower,
between buildings, roof car park/parking lot, near an intersection, near a large vehicle,
etc.).
●The vehicle has become magnetized.
(There is a magnet or metal object near the inside rear view mirror.)
●The battery has been disconnected.
●A door is open.
1
2
3
WA R N I N G
■While driving the vehicle
Do not adjust the display. Adjust the di splay only when the vehicle is stopped.
■When doing the circling calibration
Secure a wide space, and watch out for people and vehicles in the neighborhood. Do
not violate any local traffic rules while performing circling calibration.
Page 416 of 584

414
ES350_OM_OM33C68U_(U)7-1. Maintenance and care
Cleaning and protecting the vehicle exterior
●Working from top to bottom, liberally
apply water to the vehicle body, wheel
wells and underside of the vehicl e to remove any dirt and dust.
●Wash the vehicle body using a sponge or soft cloth, such as a chamois.
●For hard-to-remove marks, use car wash soap and rinse thoroughly with
water.
●Wipe away any water.
●Wax the vehicle when the waterproof coating deteriorates.
If water does not bead on a clean surface, apply wax when the vehicle body is cool.
■Self-restoring coat
The vehicle body has a self-restoring coating that is resistant to small surface scratches
caused in a car wash etc.
●The coating lasts for 5 to 8 years from when the vehicle is delivered from the plant.
●The restoration time differs depending on the depth of the scratch and outside temper-
ature. The restoration time may become shor ter when the coating is warmed by apply-
ing warm water.
●Deep scratches caused by keys, coins, etc. cannot be restored.
●Do not use wax that contain abrasives.
■Automatic car washes
●Fold the mirrors before washing the vehicle. Start washing from the front of the vehicle.
Make sure to extend the mirrors before driving.
●Brushes used in automatic car washes may scratch the vehicle surface and harm your
vehicle’s paint.
●Rear spoiler (if equipped) may not be washable in some automatic car washes. There
may also be an increased risk of damage to vehicle.
■High pressure car washes
●Do not allow the nozzles of the car wash to come within close proximity of the windows.
●Before using the car wash, check that the fuel filler door on your vehicle is closed prop-
erly.
■Notes for a smart access system with push-button start
If the door handle becomes wet while the electr onic key is within the effective range, the
door may lock and unlock repeatedly. In that case, follow the following correction proce-
dures to wash the vehicle:
●Place the key in a position 6 ft. (2 m) or more separate from the vehicle while the vehi-
cle is being washed. (Take care to ensure that the key is not stolen.)
●Set the electronic key to battery-saving mode to disable the smart access system with
push-button start. ( →P. 110)
Perform the following to protect the vehicle and maintain it in prime condi-
tion:
Page 426 of 584

424
ES350_OM_OM33C68U_(U)7-2. Maintenance
Vehicle interior
ItemsCheck points
Accelerator pedal• The accelerator pedal should move smoothly (with-
out uneven pedal effort or catching).
Automatic transmission
“Park” mechanism• When parked on a slope and the shift lever is in P, is
the vehicle securely stopped?
Brake pedal
• Does the brake pedal move smoothly?
• Does the brake pedal have appropriate clearance
from the floor? (→ P. 5 2 1 )
• Does the brake pedal have the correct amount of
free play? (→ P. 5 2 1 )
Brakes
• The vehicle should not pull to one side when the
brakes are applied.
• The brakes should work effectively.
• The brake pedal should not feel spongy.
• The brake pedal should not get too close to the floor when the brakes are applied.
Head restraints• Do the head restraints move smoothly and locksecurely?
Indicators/buzzers• Do the indicators and buzzers function properly?
Lights• Do all the lights come on?
• Are the headlights aimed correctly?
Parking brake
• Does the parking brake pedal move smoothly?
• When parked on a slope and the parking brake is on,is the vehicle securely stopped?
Seat belts• Do the seat belts operate smoothly?
• The seat belts should not be damaged.
Seats• Do the seat controls operate properly?
Steering wheel
• Does the steering wheel rotate smoothly?
• Does the steering wheel have the correct amount offree play?
• There should not be any strange sounds coming
from the steering wheel.
Page 427 of 584
ES350_OM_OM33C68U_(U)
4257-2. Maintenance
7
Maintenance and care
Vehicle exterior
ItemsCheck points
Doors/trunk• Do the doors/trunk operate smoothly?
Engine hood• Does the engine hood lock system work properly?
Fluid leaks• There should not be any signs of fluid leakage afterthe vehicle has been parked.
Ti r e s
• Is the tire inflation pressure correct?
• The tires should not be damaged or excessivelyworn.
• Have the tires been rotated according to the mainte- nance schedule?
• The wheel nuts should not be loose.
Windshield wipers
• The wiper blades should not show any signs of crack-
ing, splitting, wear, contamination or deformation.
• The wiper blades should clear the windshield without streaking or skipping.
WA R N I N G
■If the engine is running
Turn the engine off and ensure that there is adequate ventilation before performing
maintenance checks.
Page 431 of 584
429
ES350_OM_OM33C68U_(U)7-3. Do-it-yourself maintenance
7
Maintenance and care
Hood
Pull the hood lock release lever.
The hood will pop up slightly.
Pull up the auxiliary catch lever and
lift the hood.
Release the lock from the inside of the vehicle to open the hood.
1
2
WA R N I N G
■Pre-driving check
Check that the hood is fully closed and locked.
If the hood is not locked properly, it may open while the vehicle is in motion and cause
an accident, which may result in death or serious injury.
Page 436 of 584
434
ES350_OM_OM33C68U_(U)7-3. Do-it-yourself maintenance
■Adding engine oil
If the oil level is below or near the
low level mark, add engine oil of the
same type as that already in the
engine.
Make sure to check the oil type and prepare the items needed before adding
oil.
Remove the oil filler cap by turning it counterclockwise.
Add engine oil slowly, checking the dipstick.
Install the oil filler cap by turning it clockwise.
Engine oil selection →P. 5 1 9
Oil quantity (Low → Full) 1.6 qt. (1.5 L, 1.3 Imp.qt.)
Items Clean funnel
1
2
3