Page 543 of 595
875
Maintenance
Fuse NameFuse ratingCircuit Protected
FUSE
B+ 450ASmart Junction Block (Fuse - AWD, P/SEAT (DRV), P/SEAT (PASS), TAIL GATE OPEN, DOOR
LOCK, Leak Current Autocut Device Relay)
COOLING FAN 150ACooling Fan 1 Relay
ABS 140AESC Control Module, Multipurpose Check Connector
POWER
TAIL GATE40APower Tail Gate Module
ABS 240AESC Module
COOLING FAN 340ACooling Fan 1 Relay
E-CVVT 120APCM
E-CVVT 220APCM
WIPER FRT 130A[W/O Smart Key] Ignition Switch, [With Smart Key] PDM (IG2) Relay
TCU 115APCM
WIPER FRT 210ABCM, PCM
Page 544 of 595
Maintenance
76
8
Fuse NameFuse ratingCircuit Protected
FUSE
ECU 320APCM
HORN15AHorn Relay
BATTERY
MANAGEMENT10ABattery Sensor
SENSOR 210AFuel Pump Relay, Oil Control Valve, Purge Control Solenoid Valve, Variable Intake Solenoid Valve, RCV
Control Solenoid Valve
SENSOR 115AOxygen Sensor (Up/Down)
ECU 2 20AIgnition Coil #1/#2/#3/#4
ECU 415APCM
SENSOR 310AE/R Junction Block (Cooling Fan 1 Relay), Canister Close Valve
FUEL PUMP20AFuel Pump Relay
AEB10AAEB Sensor
MODULE7.5AStop Lamp Switch
Page 545 of 595
877
Maintenance
Fuse NameFuse ratingCircuit Protected
FUSE
B/ALARMHORN10AE/R Junction Block (B/Alarm Horn Relay)
H/LAMP HI10ABI-Function H/LP Relay
ABS 310AESC Module
POWER
OUTLET 120AFront Power Outlet #2
ECU 610APCM
TCU 215ATransaxle Range Switch
B/UP LAMP10ARear Bumper Lamp LH/RH, Electro Chromic Mirror
POWER
OUTLET 220ARear Power Outlet
ECU 130AEngine Control Relay
DEICER15AE/R Junction Block (Deicer Relay)
VACUUM PUMP 120AVacuum Pump
VACUUMPUMP 215AVacuum Pump, Cooling Fan Motor, Vacuum Switch
Page 548 of 595

Maintenance
80
8
LIGHT BULBS
Bulb replacement precaution
Please keep extra bulbs on hand
with appropriate wattage ratings in
case of emergencies.
Refer to “Bulb Wattage” in chapter 9.
When changing lamps, first turn off
the engine at a safe place, firmly
apply the parking brake and detach
the battery’s negative (-) terminal.
Use only bulbs of the specified
wattage.✽ ✽ NOTICE
• If the light bulb or lamp connector
is removed while the lamp is still
on, the fuse box's electronic sys-
tem may log it as a malfunction.
Therefore, a lamp malfunction
incident may be recorded as a
Diagnostic Trouble Code (DTC) in
the fuse box.
• It is normal for an operating lamp to flicker momentarily. This is due
to a stabilization function of the
vehicle’s electronic control device.
If the lamp lights up normally
after momentarily blinking, then
it is functioning as normal.
However, if the lamp continues to
flicker several times or turns off
completely, there may be an error
in the vehicle’s electronic control
device. Please have the vehicle
checked by an authorized Kia
dealer immediately.
WARNING- Working on
the lights
Prior to working on the light,
firmly apply the parking brake,
ensure that the ignition switch
is turned to the LOCK position
and turn off the lights to avoid
sudden movement of the vehi-
cle and burning your fingers or
receiving an electric shock.
CAUTION -Light replace-
ment
Be sure to replace the burned- out bulb with one of the samewattage rating. Otherwise, itmay cause damage to the fuseor electric wiring system.
CAUTION -Headlamp
Lens
To prevent damage, do notclean the headlamp lens withchemical solvents or strongdetergents.
Page 552 of 595
Maintenance
84
8
Headlamp (High/Low beam)
bulb replacement
1. Open the hood.
2. Remove the headlamp bulb cover
by turning it counterclockwise.
3. Disconnect the headlamp bulb socket-connector.
4. Remove the bulb-socket from the headlamp assembly by turning the
bulb-socket counterclockwise until
the tabs on the bulb-socket align
with the slots on the headlamp
assembly. 5. Install a new bulb-socket assem-
bly in the headlamp assembly by
aligning the tabs on the bulb-sock-
et with the slots in the headlamp
assembly. Push the bulb-socket
into the headlamp assembly and
turn the bulb-socket clockwise.
6. Install the headlamp bulb cover by turning it clockwise.
Headlamp bulb
OQL075049
OQL075058
WARNING- Halogen
bulbs
Handle halogen bulbs with care.
Halogen bulbs contain pres- surized gas that will produce
flying pieces of glass if bro-
ken.
Page 553 of 595

885
Maintenance
Always handle them carefully, andavoid scratches and abrasions. If
the bulbs are lit, avoid contact with
liquids. Never touch the glass with
bare hands. Residual oil may
cause the bulb to overheat and
burst when lit. A bulb should be
operated only when installed in a
headlamp.
If a bulb becomes damaged or cracked, replace it immediately
and carefully dispose of it.
Wear eye protection when chang- ing a bulb. Allow the bulb to cool
down before handling it.Front turn signal lamp bulb
replacement
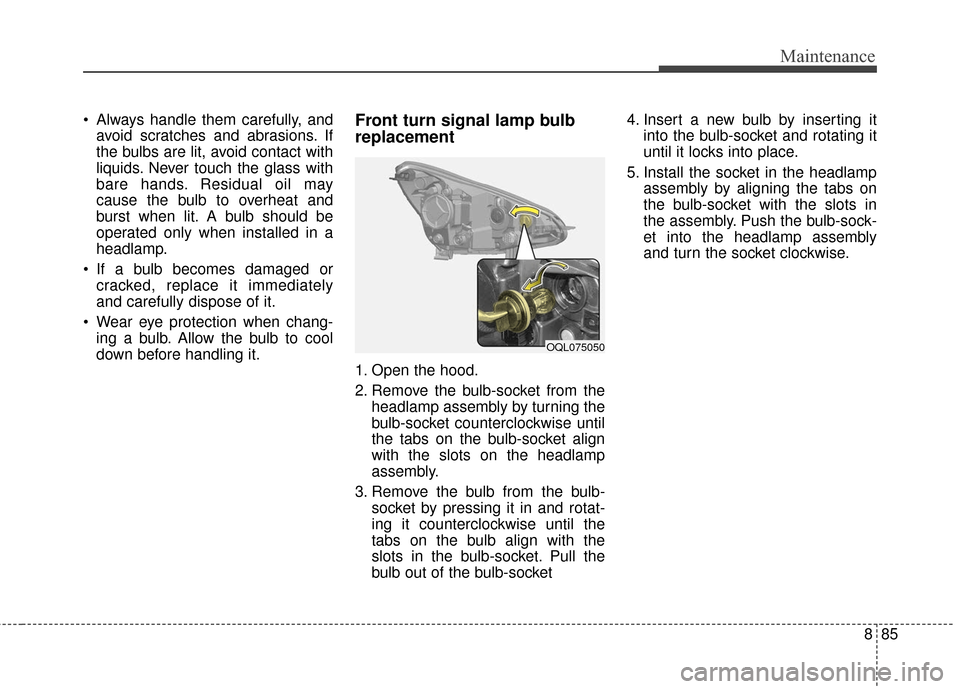
1. Open the hood.
2. Remove the bulb-socket from the headlamp assembly by turning the
bulb-socket counterclockwise until
the tabs on the bulb-socket align
with the slots on the headlamp
assembly.
3. Remove the bulb from the bulb- socket by pressing it in and rotat-
ing it counterclockwise until the
tabs on the bulb align with the
slots in the bulb-socket. Pull the
bulb out of the bulb-socket 4. Insert a new bulb by inserting it
into the bulb-socket and rotating it
until it locks into place.
5. Install the socket in the headlamp assembly by aligning the tabs on
the bulb-socket with the slots in
the assembly. Push the bulb-sock-
et into the headlamp assembly
and turn the socket clockwise.
OQL075050
Page 554 of 595
Maintenance
86
8
Position lamp + DRL bulb
replacement
1. Open the hood.
2. Remove the bulb-socket from the
headlamp assembly by turning the
bulb-socket counterclockwise until
the tabs on the bulb-socket align
with the slots on the headlamp
assembly.
3. Remove the bulb from the bulb- socket by pressing it in and rotat-
ing it counterclockwise until the
tabs on the bulb align with the
slots in the bulb-socket. Pull the
bulb out of the bulb-socket 4. Insert a new bulb by inserting it
into the bulb-socket and rotating it
until it locks into place.
5. Install the socket in the headlamp assembly by aligning the tabs on
the bulb-socket with the slots in
the assembly. Push the bulb-sock-
et into the headlamp assembly
and turn the socket clockwise.
Front fog lamp (Bulb and LED
type) bulb replacement
If the front fog lamp (Bulb and LED
type) does not operate, we recom-
mend that you checked an author-
ized Kia dealer.
OQL075051
OQL075052
OQL075053
■Type A
■Type B
Page 555 of 595
887
Maintenance
Stop and tail lamp bulb
replacement
1. Open the tailgate.
2. Open the service cover.
3. Loosen the light assembly retain-ing screws with a cross-tip screw-
driver. 4. Remove the rear combination
lamp assembly from the body of
the vehicle.
5. Disconnect the rear combination lamp connector. 6. Remove the socket from the
assembly by turning the socket
counterclockwise until the tabs on
the socket align with the slots on
the assembly.
7. Remove the bulb from the socket by pressing it in and rotating it counter-
clockwise until the tabs on the bulb
align with the slots in the socket.
Pull the bulb out of the socket.
8. Insert a new bulb by inserting it into the socket and rotating it until
it locks into place.
OQL075059
OQL075060OQL075061