Page 449 of 595
717
What to do in an emergency
Changing tires (if equipped)
1. Park on a level surface and applythe parking brake firmly.
2. Place the transaxle shift lever in P (Park) with automatic transaxle.
3. Activate the hazard warning flash- ers. 4. Remove the wheel lug nut wrench,
jack and spare tire from the vehi-
cle.
5. Block both the front and rear of the wheel that is diagonally opposite
from the jack position.
WARNING- Jack location
To reduce the possibility of
injury, be sure to use only the
jack provided with the vehicle in
the correct jack position; never
use any other part of the vehicle
for jack support.
WARNING- Changing a tire
• To prevent vehicle movement while changing a tire, always
set the parking brake fully,
and always block the wheel
diagonally opposite the wheel
being changed.
We recommend that the wheels of the vehicle be
blocked, and that no person
remain in a vehicle that is
being jacked.
1VQA4022
1VQA4023
Page 450 of 595
What to do in an emergency
18
7
6. Loosen the wheel lug nuts coun-
terclockwise one turn each, but do
not remove any nut until the tire
has been raised off the ground.
7. Place the jack at the front (1) orrear (2) jacking position closest to
the tire you are changing. Place
the jack at the designated loca-
tions under the frame. The jacking
positions are plates welded to the
frame with two tabs and a raised
dot to line up with the jack. 8. Insert the wheel lug nut wrench
into the jack and turn it clockwise,
raising the vehicle until the tire just
clears the ground. This measure-
ment is approximately 30 mm (1
in.).
Before removing the wheel lug
nuts, make sure the vehicle is sta-
ble and that there is no chance for
movement or slippage.
OQL065029
OQL065026
OQL065027
OQL065028
Page 451 of 595
719
What to do in an emergency
9. Loosen the wheel nuts andremove them with your fingers.
Slide the wheel off the studs and
lay it flat so it cannot roll away. To
put the wheel on the hub, pick up
the spare tire, line up the holes
with the studs and slide the wheel
onto them. If this is difficult, tip the
wheel slightly and get the top hole
in the wheel lined up with the top
stud. Jiggle the wheel back and
forth until the wheel can slide over
the other studs. Wheels may have sharp edges.
Handle them carefully to avoid possi-
ble severe injury. Before putting the
wheel into place, be sure that there
is nothing on the hub or wheel (such
as mud, tar, gravel, etc.) that pre-
vents the wheel from fitting solidly
against the hub.
10. To install the wheel, hold it on the
studs, put the wheel nuts on the
studs and tighten them finger
tight. Jiggle the tire to be sure it is
completely seated, then tighten
the nuts as much as possible
with your fingers again.
11. Insert the wrench into the jack and lower the vehicle to the
ground by turning the wheel nut
wrench counterclockwise.
WARNING- Installing a
wheel
Make sure the wheel makes
good contact with the hub when
installed. If the contact of the
mounting surface between the
wheel and hub is not good, the
wheel nuts could come loose
and cause the loss of a wheel.
Loss of a wheel may result in
loss of control of the vehicle.
Page 464 of 595
What to do in an emergency
32
7
TOWING
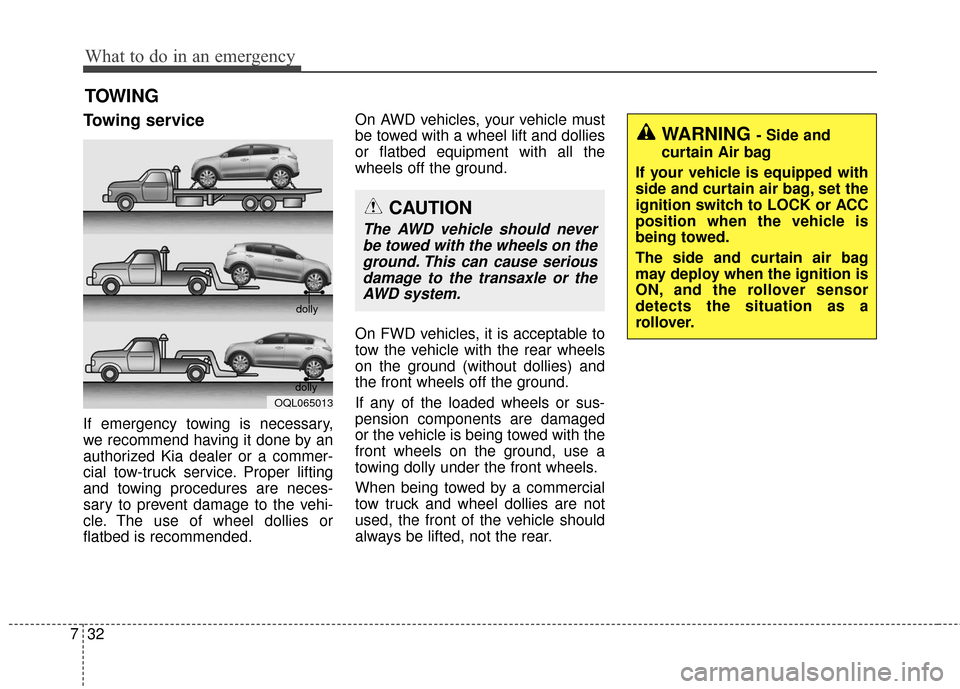
Towing service
If emergency towing is necessary,
we recommend having it done by an
authorized Kia dealer or a commer-
cial tow-truck service. Proper lifting
and towing procedures are neces-
sary to prevent damage to the vehi-
cle. The use of wheel dollies or
flatbed is recommended. On AWD vehicles, your vehicle must
be towed with a wheel lift and dollies
or flatbed equipment with all the
wheels off the ground.
On FWD vehicles, it is acceptable to
tow the vehicle with the rear wheels
on the ground (without dollies) and
the front wheels off the ground.
If any of the loaded wheels or sus-
pension components are damaged
or the vehicle is being towed with the
front wheels on the ground, use a
towing dolly under the front wheels.
When being towed by a commercial
tow truck and wheel dollies are not
used, the front of the vehicle should
always be lifted, not the rear.
OQL065013
dolly
dolly
WARNING - Side and
curtain Air bag
If your vehicle is equipped with
side and curtain air bag, set the
ignition switch to LOCK or ACC
position when the vehicle is
being towed.
The side and curtain air bag
may deploy when the ignition is
ON, and the rollover sensor
detects the situation as a
rollover.
CAUTION
The AWD vehicle should never be towed with the wheels on theground. This can cause seriousdamage to the transaxle or theAWD system.
Page 466 of 595
What to do in an emergency
34
7
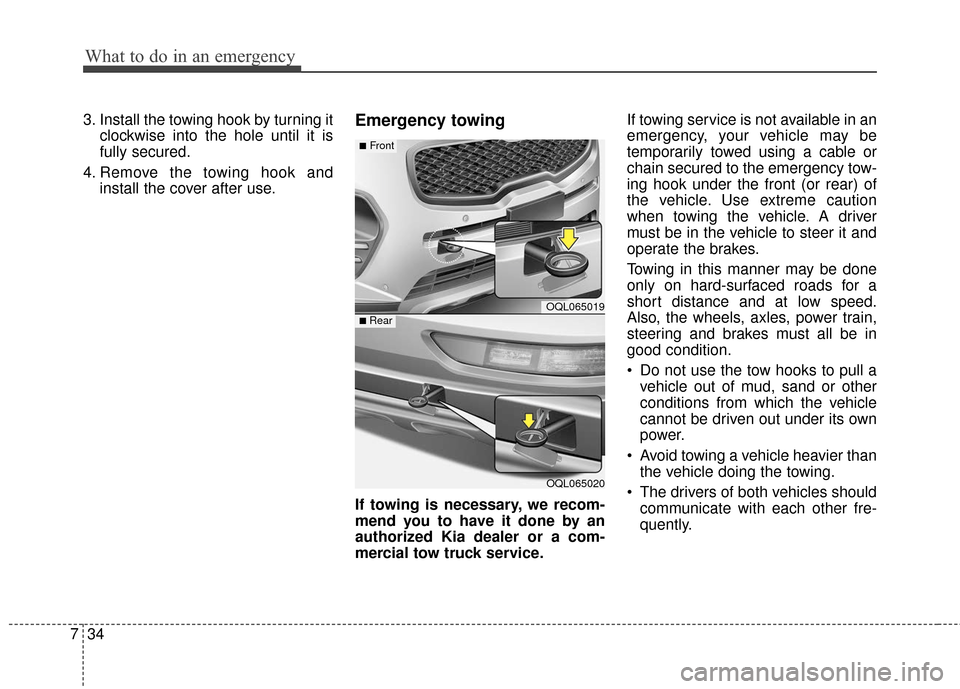
3. Install the towing hook by turning it
clockwise into the hole until it is
fully secured.
4. Remove the towing hook and install the cover after use.Emergency towing
If towing is necessary, we recom-
mend you to have it done by an
authorized Kia dealer or a com-
mercial tow truck service. If towing service is not available in an
emergency, your vehicle may be
temporarily towed using a cable or
chain secured to the emergency tow-
ing hook under the front (or rear) of
the vehicle. Use extreme caution
when towing the vehicle. A driver
must be in the vehicle to steer it and
operate the brakes.
Towing in this manner may be done
only on hard-surfaced roads for a
short distance and at low speed.
Also, the wheels, axles, power train,
steering and brakes must all be in
good condition.
Do not use the tow hooks to pull a
vehicle out of mud, sand or other
conditions from which the vehicle
cannot be driven out under its own
power.
Avoid towing a vehicle heavier than the vehicle doing the towing.
The drivers of both vehicles should communicate with each other fre-
quently.
OQL065019
OQL065020
■Front
■ Rear
Page 468 of 595
Emergency towing precautions
Turn the ignition switch to ACC sothe steering wheel isn’t locked.
Place the transaxle shift lever in N (Neutral).
Release the parking bake.
Press the brake pedal with more force than normal since you will
have reduced brake performance.
More steering effort will be required because the power steer-
ing system will be disabled.
If you are driving down a long hill, the brakes may overheat and brake
performance will be reduced. Stop
often and let the brakes cool off. If the car is being towed with all
four wheels on the ground, it can
be towed only from the front. Be
sure that the transaxle is in neutral.
Be sure the steering is unlocked by
placing the ignition switch in the
ACC position. A driver must be in
the towed vehicle to operate the
steering and brakes.
CAUTION - Automatictransaxle
To avoid serious damage to
the automatic transaxle, limitthe vehicle speed to 15 km/h(10 mph) and drive less than 1km (1.5 mile) when towing.
Before towing, check the auto- matic transaxle for fluid leaksunder your vehicle. If the auto-matic transaxle fluid is leak-ing, flatbed equipment or atowing dolly must be used.
736
What to do in an emergency
Page 475 of 595
87
Maintenance
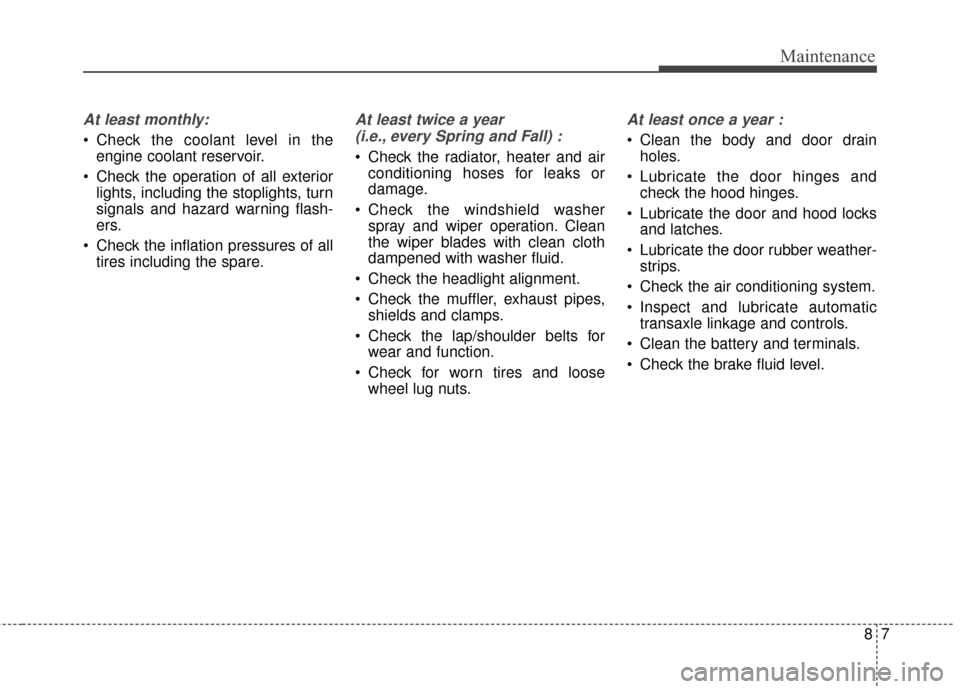
At least monthly:
Check the coolant level in theengine coolant reservoir.
Check the operation of all exterior lights, including the stoplights, turn
signals and hazard warning flash-
ers.
Check the inflation pressures of all tires including the spare.
At least twice a year
(i.e., every Spring and Fall) :
Check the radiator, heater and air conditioning hoses for leaks or
damage.
Check the windshield washer spray and wiper operation. Clean
the wiper blades with clean cloth
dampened with washer fluid.
Check the headlight alignment.
Check the muffler, exhaust pipes, shields and clamps.
Check the lap/shoulder belts for wear and function.
Check for worn tires and loose wheel lug nuts.
At least once a year :
Clean the body and door drainholes.
Lubricate the door hinges and check the hood hinges.
Lubricate the door and hood locks and latches.
Lubricate the door rubber weather- strips.
Check the air conditioning system.
Inspect and lubricate automatic transaxle linkage and controls.
Clean the battery and terminals.
Check the brake fluid level.
Page 477 of 595
89
Maintenance
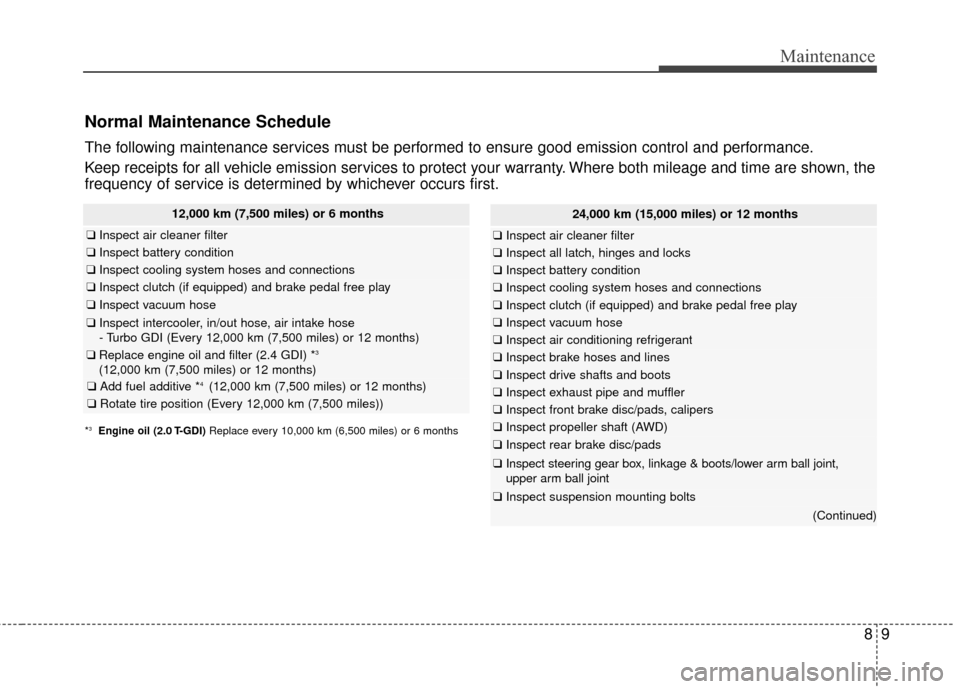
Normal Maintenance Schedule
The following maintenance services must be performed to ensure good emission control and performance.
Keep receipts for all vehicle emission services to protect your warranty. Where both mileage and time are shown, the
frequency of service is determined by whichever occurs first.
12,000 km (7,500 miles) or 6 months
❑Inspect air cleaner filter
❑Inspect battery condition
❑Inspect cooling system hoses and connections
❑Inspect clutch (if equipped) and brake pedal free play
❑Inspect vacuum hose
❑Inspect intercooler, in/out hose, air intake hose
- Turbo GDI (Every 12,000 km (7,500 miles) or 12 months)
❑Replace engine oil and filter (2.4 GDI) *3
(12,000 km (7,500 miles) or 12 months)
❑ Add fuel additive *4 (12,000 km (7,500 miles) or 12 months)
❑Rotate tire position (Every 12,000 km (7,500 miles))
24,000 km (15,000 miles) or 12 months
❑Inspect air cleaner filter
❑Inspect all latch, hinges and locks
❑Inspect battery condition
❑Inspect cooling system hoses and connections
❑Inspect clutch (if equipped) and brake pedal free play
❑Inspect vacuum hose
❑Inspect air conditioning refrigerant
❑Inspect brake hoses and lines
❑Inspect drive shafts and boots
❑Inspect exhaust pipe and muffler
❑Inspect front brake disc/pads, calipers
❑Inspect propeller shaft (AWD)
❑Inspect rear brake disc/pads
❑Inspect steering gear box, linkage & boots/lower arm ball joint,
upper arm ball joint
❑ Inspect suspension mounting bolts
(Continued)
*3Engine oil (2.0 T-GDI) Replace every 10,000 km (6,500 miles) or 6 months