2017 KIA SOUL length
[x] Cancel search: lengthPage 38 of 589
Safety features of your vehicle
20
3
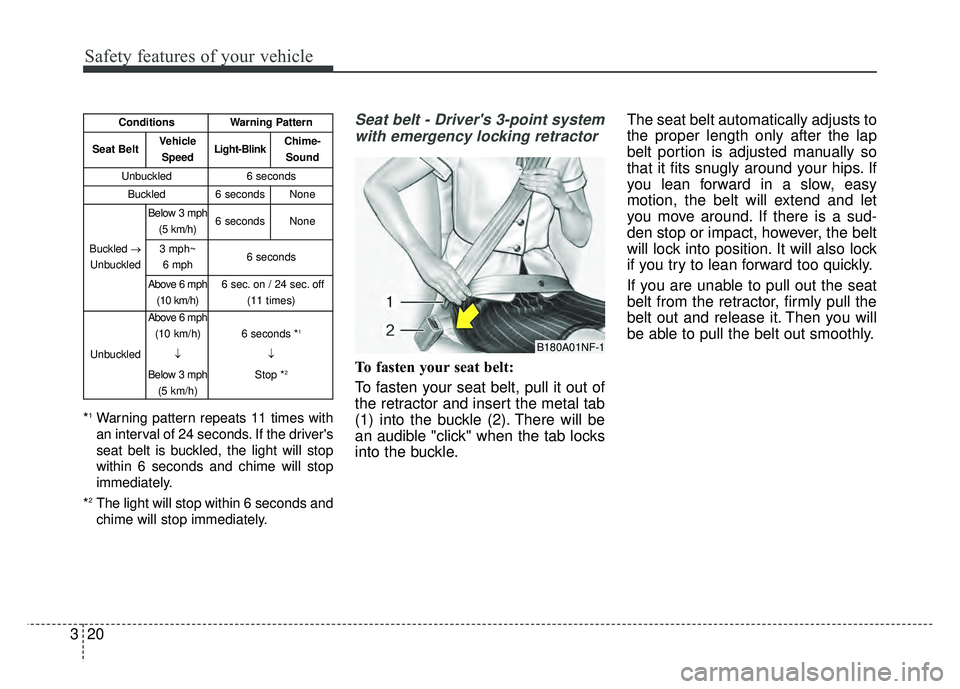
*1Warning pattern repeats 11 times with
an interval of 24 seconds. If the driver's
seat belt is buckled, the light will stop
within 6 seconds and chime will stop
immediately.
*
2The light will stop within 6 seconds and
chime will stop immediately.
Seat belt - Driver's 3-point system with emergency locking retractor
To fasten your seat belt:
To fasten your seat belt, pull it out of
the retractor and insert the metal tab
(1) into the buckle (2). There will be
an audible "click" when the tab locks
into the buckle. The seat belt automatically adjusts to
the proper length only after the lap
belt portion is adjusted manually so
that it fits snugly around your hips. If
you lean forward in a slow, easy
motion, the belt will extend and let
you move around. If there is a sud-
den stop or impact, however, the belt
will lock into position. It will also lock
if you try to lean forward too quickly.
If you are unable to pull out the seat
belt from the retractor, firmly pull the
belt out and release it. Then you will
be able to pull the belt out smoothly.
B180A01NF-1
ConditionsWarning Pattern
Seat BeltVehicle
SpeedLight-BlinkChime-Sound
Unbuckled6 seconds
Buckled6 secondsNone
Buckled →
Unbuckled
Below 3 mph (5 km/h)6 secondsNone
3 mph~6 mph6 seconds
Above 6 mph (10 km/h)6 sec. on / 24 sec. off (11 times)
Unbuckled
Above 6 mph(10 km/h)
↓
Below 3 mph (5 km/h)
6 seconds *1
↓
Stop *
2
Page 40 of 589
Safety features of your vehicle
22
3
Seat belts - Front passenger and
rear seat 3-point system withcombination locking retractor
To fasten your seat belt:
Combination retractor type seat belts
are installed in the rear seat posi-
tions to help accommodate the
installation of child restraint systems.
Although a combination retractor is
also installed in the front passenger
seat position, it is strongly recom-
mended that children always be
seated in the rear seat. NEVER
place any infant restraint system in
the front seat of the vehicle.
This type of seat belt combines the
features of both an emergency lock-
ing retractor seat belt and an auto-
matic locking retractor seat belt. To
fasten your seat belt, pull it out of the
retractor and insert the metal tab into
the buckle. There will be an audible
"click" when the tab locks into the
buckle. When not securing a child
restraint, the seat belt operates in the
same way as the driver's seat belt
(Emergency Locking Retractor Type). It automatically adjusts to the proper
length only after the lap belt portion
of the seat belt is adjusted manually
so that it fits snugly around your hips.
When the seat belt is fully extended
from the retractor to allow the instal-
lation of a child restraint system, the
seat belt operation changes to allow
the belt to retract, but not to extend
(Automatic Locking Retractor Type).
Refer to “Using a child restraint sys-
tem” in this section.
✽ ✽
NOTICE
Although the combination retractor
provides the same level of protection
for seated passengers in either emer-
gency or automatic locking modes,
have the seated passengers use the
emergency locking feature for
improved convenience. The auto-
matic locking function is intended to
facilitate child restraint installation.
To convert from the automatic lock-
ing feature to the emergency locking
operation mode, allow the unbuck-
led seat belt to fully retract.
Do NOT fold down the left portion of
the rear seat back when the rear
center seat belt is buckled. ALWAYS
UNBUCKLE the rear center seat belt
before folding down the left portion of
the rear seat back. If the rear center
seat belt is buckled when the left por-
tion of the rear seat back is folded
down, distortion and damage to the
top portion of the seat back and seat
belt garnish may result, causing the
seat back to lock into the folded
down position.
Page 43 of 589
325
Safety features of your vehicle
There will be an audible “click” when
the tab locks in the buckle. The seat
belt automatically adjusts to the
proper length only after the lap belt is
adjusted manually so that it fits snug-
ly around your hips, if you lean for-
ward in a slow, easy motion, the belt
will extend and let you move around.
If there is a sudden stop or impact,
the belt will lock into position. It will
also lock if you try to lean forward too
quickly.
When using the rear seat center belt,
you must lock all tongue plates and
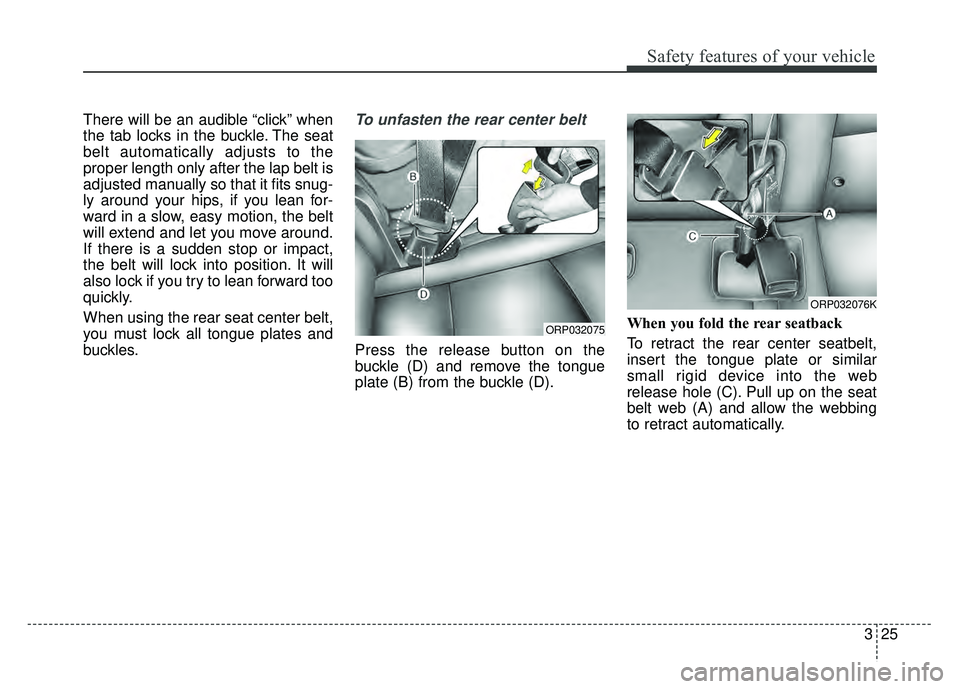
buckles.To unfasten the rear center belt
Press the release button on the
buckle (D) and remove the tongue
plate (B) from the buckle (D).When you fold the rear seatback
To retract the rear center seatbelt,
insert the tongue plate or similar
small rigid device into the web
release hole (C). Pull up on the seat
belt web (A) and allow the webbing
to retract automatically.
ORP032075
ORP032076K
Page 233 of 589
4147
Features of your vehicle
EXTERIOR FEATURES
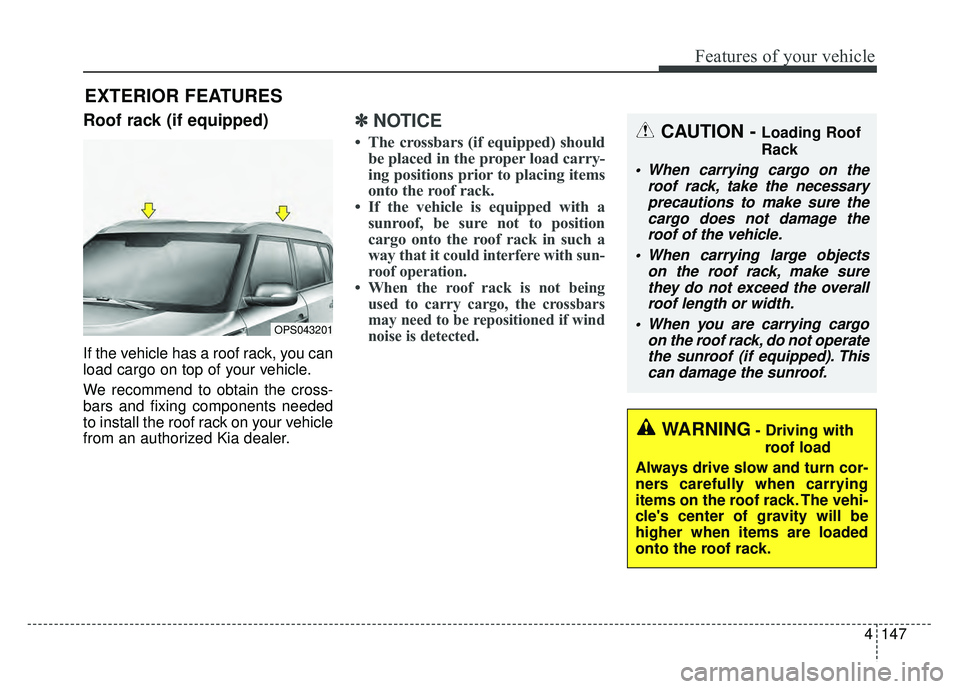
Roof rack (if equipped)
If the vehicle has a roof rack, you can
load cargo on top of your vehicle.
We recommend to obtain the cross-
bars and fixing components needed
to install the roof rack on your vehicle
from an authorized Kia dealer.
✽ ✽NOTICE
• The crossbars (if equipped) should
be placed in the proper load carry-
ing positions prior to placing items
onto the roof rack.
• If the vehicle is equipped with a sunroof, be sure not to position
cargo onto the roof rack in such a
way that it
could interfere with sun-
roof operation.
• When the roof rack is not being used to carry cargo, the crossbars
may need to be repositioned if wind
noise is detected.
OPS043201
CAUTION - Loading Roof
Rack
When carrying cargo on the
roof rack, take the necessaryprecautions to make sure thecargo does not damage theroof of the vehicle.
When carrying large objects on the roof rack, make surethey do not exceed the overallroof length or width.
When you are carrying cargo on the roof rack, do not operatethe sunroof (if equipped). Thiscan damage the sunroof.
WARNING- Driving with
roof load
Always drive slow and turn cor-
ners carefully when carrying
items on the roof rack. The vehi-
cle's center of gravity will be
higher when items are loaded
onto the roof rack.
Page 235 of 589
4149
Features of your vehicle
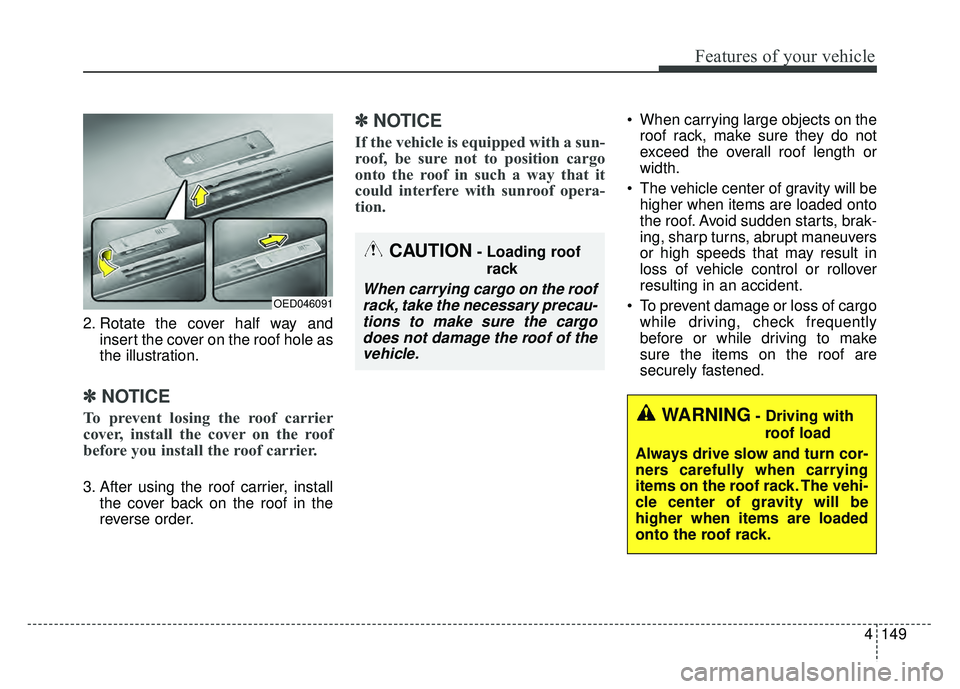
2. Rotate the cover half way andinsert the cover on the roof hole as
the illustration.
✽ ✽NOTICE
To prevent losing the roof carrier
cover, install the cover on the roof
before you install the roof carrier.
3. After using the roof carrier, install
the cover back on the roof in the
reverse order.
✽ ✽NOTICE
If the vehicle is equipped with a sun-
roof, be sure not to position cargo
onto the roof in such a way that it
could interfere with sunroof opera-
tion.
When carrying large objects on the
roof rack, make sure they do not
exceed the overall roof length or
width.
The vehicle center of gravity will be higher when items are loaded onto
the roof. Avoid sudden starts, brak-
ing, sharp turns, abrupt maneuvers
or high speeds that may result in
loss of vehicle control or rollover
resulting in an accident.
To prevent damage or loss of cargo while driving, check frequently
before or while driving to make
sure the items on the roof are
securely fastened.
WARNING- Driving with
roof load
Always drive slow and turn cor-
ners carefully when carrying
items on the roof rack. The vehi-
cle center of gravity will be
higher when items are loaded
onto the roof rack.
OED046091
CAUTION- Loading roof rack
When carrying cargo on the roofrack, take the necessary precau-tions to make sure the cargodoes not damage the roof of thevehicle.
Page 560 of 589

Specifications, Consumer information, Reporting safety defects
29
DIMENSIONS
Itemin (mm)
Overall length
162.9 (4,140)
Overall width
70.9 (1,800)
Overall height Without Roof rack
205/60R1663.0 (1,600)
215/55R1763.3 (1,607)
235/45R1863.5 (1,613)
With Roof rack
205/60R1663.4 (1,612)
215/55R1763.7 (1,619)
235/45R1864.0 (1,625)
Tread Front
205/60R1662.1 (1,576)
215/55R1761.7 (1,568)
235/45R1861.4 (1,560)
Rear
205/60R1662.5 (1,588)
215/55R1762.2 (1,580)
235/45R1861.9 (1,573)
Wheelbase
101.2 (2,570)