2017 KIA SOUL ECO mode
[x] Cancel search: ECO modePage 2 of 589
Kia, THE COMPANY
Thank you for becoming the owner of a new Kia vehicle.
As a global car manufacturer focused on building high-quality vehi-
cles with exceptional value, Kia Motors is dedicated to providing you
with a customer service experience that exceeds your expectations.
All information contained in this Owner’s Manual was accurate at the
time of publication. However, Kia reserves the right to make changes
at any time so that our policy of continual product improvement can
be carried out.
This manual applies to all models of this vehicle and includes descrip-
tions and explanations of optional as well as standard equipment. As a
result, you may encounter material in this manual that is not applica-
ble to your specific Kia vehicle.Drive safely and enjoy your Kia!
Page 3 of 589
i
Thank you for choosing a Kia vehicle.
When you require service, remember that your Kia dealer
knows your vehicle best. Your dealer has factory-trained tech-
nicians, recommended special tools and genuine Kia replace-
ment parts. It is dedicated to your complete customer satisfac-
tion.
Because subsequent owners require this important information
as well, this publication should remain with the vehicle if it is
sold.
This manual will familiarize you with operational, mainte-
nance and safety information about your new vehicle. It is sup-
plemented by a Warranty and Consumer Information manual
that provides important information on all warranties regarding
your vehicle.
We urge you to read these publications carefully and follow the
recommendations to help assure enjoyable and safe operation
of your new vehicle.
Kia offers a great variety of options, components and features
for its various models. Therefore, some of the equipment
described in this manual, along with the various illustrations,
may not be applicable to your particular vehicle.
The information and specifications provided in this manual
were accurate at the time of printing. Kia reserves the right to
discontinue or change specifications or design at any time
without notice and without incurring any obligation. If you
have questions, always check with your Kia dealer.
We assure you of our continuing interest in your motoring
pleasure and satisfaction in your Kia vehicle.
© 2016 Kia MOTORS AMERICA, Inc.
All rights reserved. May not be reproduced or translated in
whole or in part without the written consent of Kia Motors
America, Inc.
Printed in Korea
Foreword
Page 40 of 589
Safety features of your vehicle
22
3
Seat belts - Front passenger and
rear seat 3-point system withcombination locking retractor
To fasten your seat belt:
Combination retractor type seat belts
are installed in the rear seat posi-
tions to help accommodate the
installation of child restraint systems.
Although a combination retractor is
also installed in the front passenger
seat position, it is strongly recom-
mended that children always be
seated in the rear seat. NEVER
place any infant restraint system in
the front seat of the vehicle.
This type of seat belt combines the
features of both an emergency lock-
ing retractor seat belt and an auto-
matic locking retractor seat belt. To
fasten your seat belt, pull it out of the
retractor and insert the metal tab into
the buckle. There will be an audible
"click" when the tab locks into the
buckle. When not securing a child
restraint, the seat belt operates in the
same way as the driver's seat belt
(Emergency Locking Retractor Type). It automatically adjusts to the proper
length only after the lap belt portion
of the seat belt is adjusted manually
so that it fits snugly around your hips.
When the seat belt is fully extended
from the retractor to allow the instal-
lation of a child restraint system, the
seat belt operation changes to allow
the belt to retract, but not to extend
(Automatic Locking Retractor Type).
Refer to “Using a child restraint sys-
tem” in this section.
✽ ✽
NOTICE
Although the combination retractor
provides the same level of protection
for seated passengers in either emer-
gency or automatic locking modes,
have the seated passengers use the
emergency locking feature for
improved convenience. The auto-
matic locking function is intended to
facilitate child restraint installation.
To convert from the automatic lock-
ing feature to the emergency locking
operation mode, allow the unbuck-
led seat belt to fully retract.
Do NOT fold down the left portion of
the rear seat back when the rear
center seat belt is buckled. ALWAYS
UNBUCKLE the rear center seat belt
before folding down the left portion of
the rear seat back. If the rear center
seat belt is buckled when the left por-
tion of the rear seat back is folded
down, distortion and damage to the
top portion of the seat back and seat
belt garnish may result, causing the
seat back to lock into the folded
down position.
Page 59 of 589
341
Safety features of your vehicle
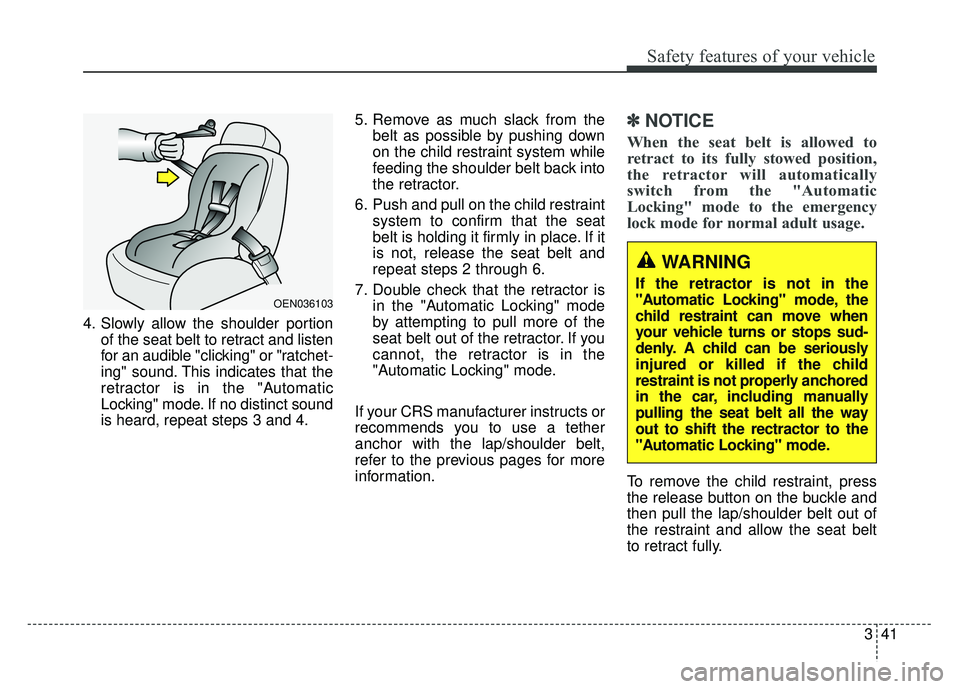
4. Slowly allow the shoulder portionof the seat belt to retract and listen
for an audible "clicking" or "ratchet-
ing" sound. This indicates that the
retractor is in the "Automatic
Locking" mode. If no distinct sound
is heard, repeat steps 3 and 4. 5. Remove as much slack from the
belt as possible by pushing down
on the child restraint system while
feeding the shoulder belt back into
the retractor.
6. Push and pull on the child restraint system to confirm that the seat
belt is holding it firmly in place. If it
is not, release the seat belt and
repeat steps 2 through 6.
7. Double check that the retractor is in the "Automatic Locking" mode
by attempting to pull more of the
seat belt out of the retractor. If you
cannot, the retractor is in the
"Automatic Locking" mode.
If your CRS manufacturer instructs or
recommends you to use a tether
anchor with the lap/shoulder belt,
refer to the previous pages for more
information.
✽ ✽ NOTICE
When the seat belt is allowed to
retract to its fully stowed position,
the retractor will automatically
switch from the "Automatic
Locking" mode to the emergency
lock mode for normal adult usage.
To remove the child restraint, press
the release button on the buckle and
then pull the lap/shoulder belt out of
the restraint and allow the seat belt
to retract fully.
OEN036103
WARNING
If the retractor is not in the
"Automatic Locking" mode, the
child restraint can move when
your vehicle turns or stops sud-
denly. A child can be seriously
injured or killed if the child
restraint is not properly anchored
in the car, including manually
pulling the seat belt all the way
out to shift the rectractor to the
"Automatic Locking" mode.
Page 75 of 589
357
Safety features of your vehicle
These sensors provide the ability to
control the SRS deployment based on
whether or not the seat belts are fas-
tened, and how severe the impact is.
The advanced SRS offers the ability
to control the air bag inflation with
two levels. A first stage level is pro-
vided for moderate-severity impacts.
A second stage level is provided for
more severe impacts.
The passenger’s front air bag is
designed to help reduce the injury of
children sitting close to the instru-
ment panel in low speed collisions.
However, children are safer if they
are restrained in the rear seat.According to the impact severity and
seat belt usage, the SRSCM (SRS
Control Module) controls the air bag
inflation. Failure to properly wear seat
belts can increase the risk or severity of
injury in an accident.
Additionally, your vehicle is equipped
with an occupant detection system in
the front passenger's seat. The occu-
pant detection system detects the pres-
ence of a passenger in the front pas-
senger's seat and will turn off the front
passenger's air bag under certain con-
ditions. For more detail, see "Occupant
detection system" in this section.
Modification to the seat structure can
cause the air bag to deploy at a dif-
ferent level than should be provided.
Manufacturers are required by gov-
ernment regulations to provide a
contact point concerning modifica-
tions to the vehicle for persons with
disabilities, which modifications may
affect the vehicle’s advanced air bag
system. That contact is Kia’s toll-free
Customer Assistance center at 1-
800-333-4Kia. However, Kia does
not endorse nor will it support any
changes to any part or structure of
the vehicle that could affect the
advanced air bag system, including
the occupant detection system.
WARNING- Replacement /
Modifications
The front passenger seat, dash-
board or door should not be
replaced except by an authorized
Kia dealer using original Kia parts
designed for this vehicle and
model. Any other such replace-
ment or modification could
adversely affect the operation of
the occupant detection system
and your advanced air bags.
Page 128 of 589
Features of your vehicle
42
4
FLEX STEER (if equipped)
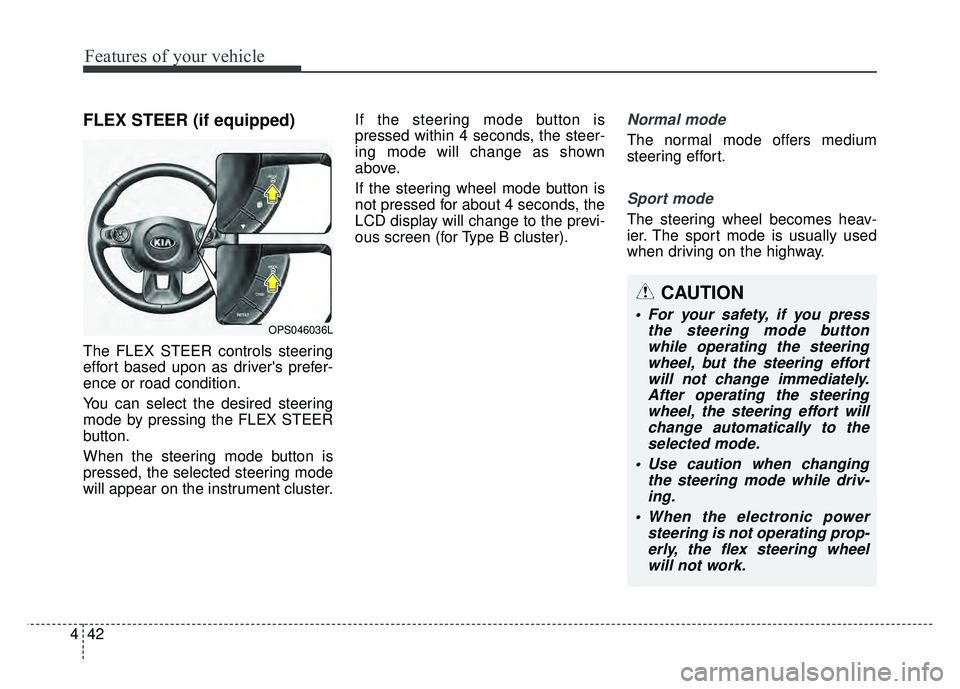
The FLEX STEER controls steering
effort based upon as driver's prefer-
ence or road condition.
You can select the desired steering
mode by pressing the FLEX STEER
button.
When the steering mode button is
pressed, the selected steering mode
will appear on the instrument cluster. If the steering mode button is
pressed within 4 seconds, the steer-
ing mode will change as shown
above.
If the steering wheel mode button is
not pressed for about 4 seconds, the
LCD display will change to the previ-
ous screen (for Type B cluster).
Normal mode
The normal mode offers medium
steering effort.
Sport mode
The steering wheel becomes heav-
ier. The sport mode is usually used
when driving on the highway.
OPS046036L
CAUTION
For your safety, if you press
the steering mode buttonwhile operating the steeringwheel, but the steering effortwill not change immediately.After operating the steeringwheel, the steering effort willchange automatically to theselected mode.
Use caution when changing the steering mode while driv-ing.
When the electronic power steering is not operating prop-erly, the flex steering wheelwill not work.
Page 139 of 589

453
Features of your vehicle
Odometer
The odometer Indicates the total dis-
tance that the vehicle has been driv-
en and should be used to determine
when periodic maintenance should
be performed.
- Odometer range : 0 ~ 999999 milesor kilometers.
Outside Temperature Gauge
This gauge indicates the current out-
side air temperatures by 1°F (1°C).
- Temperature range : -40°F ~ 140°F
(-40°C ~ 60°C) The outside temperature on the dis-
play may not change immediately
like a general thermometer to pre-
vent the driver from being inattentive.
To change the temperature unit (from
°C to °F or from °F to °C)
Type A Cluster
Change the trip modes to Distance
To Empty mode and then press and
hold the RESET button for 5 seconds
and more.
Type B Cluster
The temperature unit can be
changed by using the “User Settings”
mode of the LCD display
❈
For more details, refer to “LCD
Display” in this chapter.
OPS043112
OPS046431N
■Type A
■ Type B
OPS043114N
OPS046432N
■Type A
■ Type B
Page 142 of 589
Features of your vehicle
56
4
LCD DISPLAY (IF EQUIPPED)
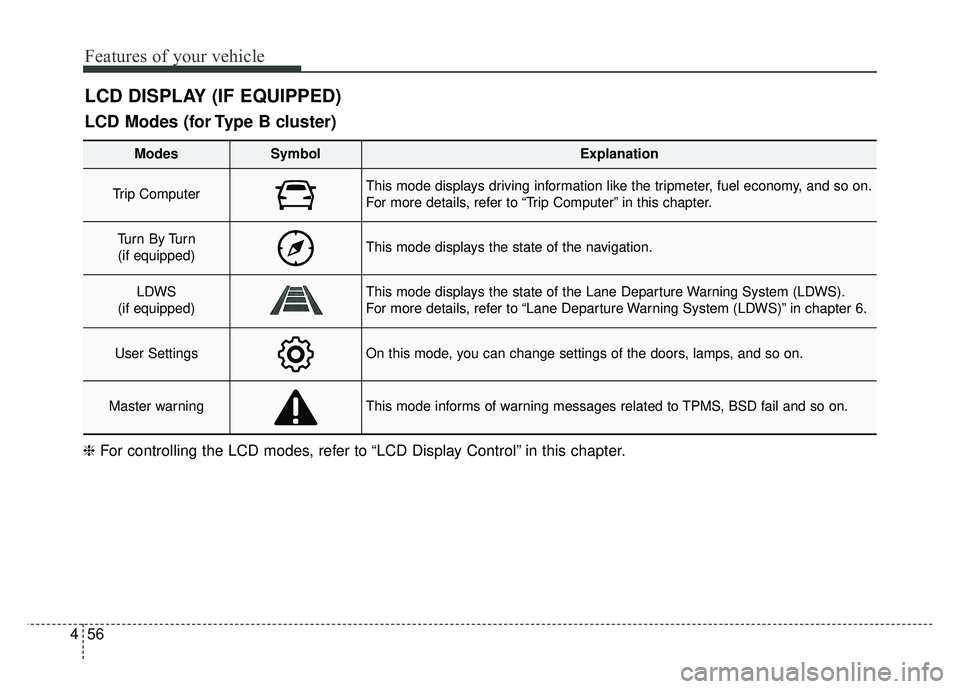
❈ For controlling the LCD modes, refer to “LCD Display Control” in this chapter.
LCD Modes (for Type B cluster)
Modes SymbolExplanation
Trip Computer This mode displays driving information like the tripmeter, fuel economy, and so on.
For more details, refer to “Trip Computer” in this chapter.
Tu r n B y Tu r n
(if equipped)This mode displays the state of the navigation.
LDWS
(if equipped)This mode displays the state of the Lane Departure Warning System (LDWS).
For more details, refer to “Lane Departure Warning System (LDWS)” in chapter 6.
User SettingsOn this mode, you can change settings of the doors, lamps, and so on.
Master warningThis mode informs of warning messages related to TPMS, BSD fail and so on.