2017 KIA SOUL ECO mode
[x] Cancel search: ECO modePage 298 of 589
Audio system
563
✽
✽NOTICE - Using the iPod®
Devices
• To use the audio system’s iPod®
control function, use the dedicated
cable provided with your iPod®.
• Connecting the iPod®to the vehi-
cle during play may result in a
loud noise that lasts about one to
two seconds. Connect the iPod
®to
the vehicle after stopping or paus-
ing play.
• Connect the iPod
®with the vehicle
in the ACC ON state to begin
charging.
• When connecting the iPod
®cable,
be sure to fully push the cable into
the port.
• When EQ effects are enabled simultaneously on external
devices, such as iPod
®s and the
audio system, the EQ effects may
overlap, causing sound quality
deterioration or distortion.
Deactivate the EQ function for all
external devices, if possible.
• Noise may occur when your iPod
®
or the AUX port is connected.
Disconnect and store separately
when not in use. (Continued)(Continued)
• There may be noise if the audio
system is used with an iPod
®or
AUX external device connected to
the power jack. In these cases, dis-
connect the iPod
®or external
device from the power jack.
• Play may be interrupted, or device malfunctions may occur depend-
ing on the characteristics of your
iPod
®/iPhone®.
• Play may fail if your iPhone®is
connected through both
Bluetooth
®Wireless Technology
and USB. In this case, select Dock
connector or Bluetooth
®Wireless
Technology on your iPhone®to
change the sound output settings.
• If your software version does not support the communication proto-
col or your iPod
®is not recognized
due to device failure, anomalies or
defects, iPod
®mode cannot be
used.
• iPod
®nano (5th generation)
devices may not be recognized if
the battery is low. Charge suffi-
ciently before use. (Continued)(Continued)
• The search and song play order in
the iPod
®device may be different
from the search order in the audio
system.
• If the iPod
®has failed due to an
internal defect, please reset the
iPod
®(consult your iPod®manu-
al).
• Depending on the software ver- sion, the iPod
®may fail to sync
with the system. If the media is
removed or disconnected before
recognition, the previous mode
may not be restored (iPad
®cannot
be charged).
• Cables other than the 1-meter cable provided with iPod
®/iPhone®
products may not be recognized.
• When other music apps are used on your iPod
®, the system sync
function may fail due to malfunc-
tion of the iPod
®application.
Page 311 of 589
Audio system
76
5
✽
✽
NOTICE
The 6-digit passkey in the image
above is an example. Refer to your
vehicle for the actual passkey.
Pairing a second Bluetooth®Wireless
Technology device
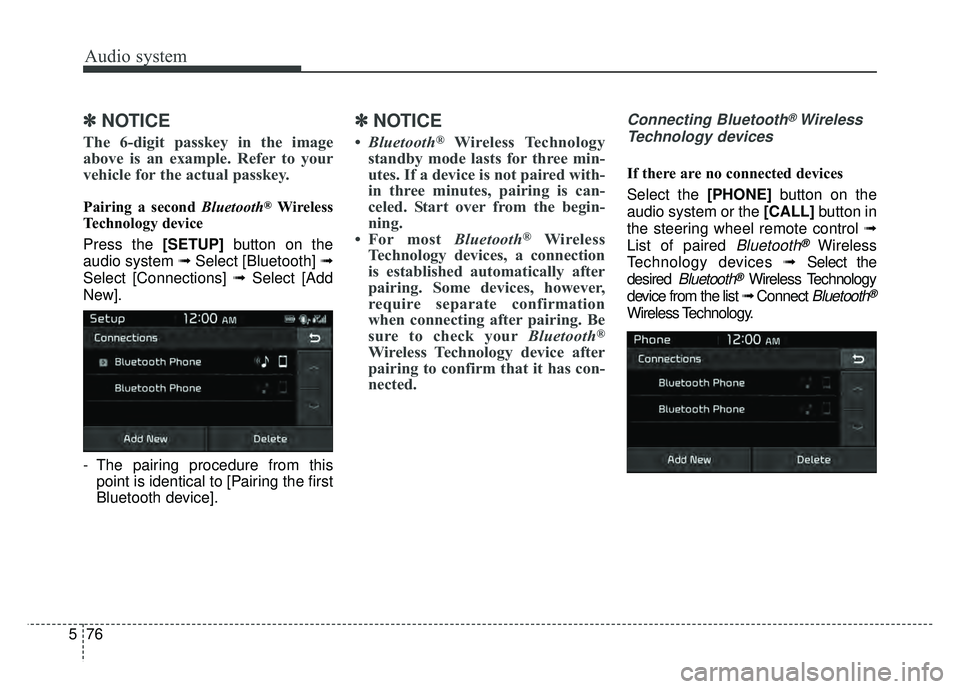
Press the [SETUP] button on the
audio system ➟ Select [Bluetooth] ➟
Select [Connections] ➟ Select [Add
New].
- The pairing procedure from this point is identical to [Pairing the first
Bluetooth device].
✽ ✽ NOTICE
•Bluetooth®Wireless Technology
standby mode lasts for three min-
utes. If a device is not paired with-
in three minutes, pairing is can-
celed. Start over from the begin-
ning.
• For most Bluetooth
®Wireless
Technology devices, a connection
is established automatically after
pairing. Some devices, however,
require separate confirmation
when connecting after pairing. Be
sure to check your Bluetooth
®
Wireless Technology device after
pairing to confirm that it has con-
nected.
Connecting Bluetooth®Wireless
Technology devices
If there are no connected devices
Select the [PHONE] button on the
audio system or the [CALL] button in
the steering wheel remote control ➟
List of paired
Bluetooth®Wireless
Technology devices ➟Select the
desired
Bluetooth®Wireless Technology
device from the list ➟ Connect
Bluetooth®
Wireless Technology.
Page 327 of 589
Driving your vehicle
86
Manual Transaxle
To start the vehicle, keep the clutch
pedal and brake pedal depressed, and
make sure the engine RPM is within
normal range (under 1000 rpm). After
checking, shift the transaxle shift lever
to the desired position.
Unlock the parking brake, and take
your foot off the clutch pedal. Then,
lightly depress the accelerator pedal
and slowly start the vehicle.
4.Do not wait for the engine to warmup while the vehicle remains sta-
tionary.
Start driving at moderate engine
speeds. (Steep accelerating and
decelerating should be avoided.) Do not engage the starter for more
than 10 seconds. If the engine stalls
or fails to start, wait 5 to 10 seconds
before re-engaging the starter.
Improper use of the starter may
damage it. Stopping manual transaxle vehicles
1. After safely parking the vehicle,
press the clutch pedal and brake
pedal at the same time.
2. While depressing the clutch pedal and brake pedal at the same time,
shift the transaxle lever to ‘N’.CAUTION- Starter
If the engine stalls while you arein motion, do not attempt tomove the shift lever to the P(Park) position. If traffic androad conditions permit, you mayput the shift lever in the N(Neutral) position while thevehicle is still moving and turnthe ignition switch to the STARTposition in an attempt to restartthe engine.
WARNING- Steering
wheel
Never reach for any controls
through the steering wheel
while the vehicle is in motion.
The presence of your hand or
arm in this area could cause a
loss of vehicle control.
Page 331 of 589
Driving your vehicle
12
6
Manual Transaxle
To start the vehicle, keep the clutch
pedal and brake pedal depressed, and
make sure the engine RPM is within
normal range (under 1000 rpm). After
checking, shift the transaxle shift lever
to the desired position.
Unlock the parking brake, and take
your foot off the clutch pedal. Then,
lightly depress the accelerator pedal
and slowly start the vehicle.
5.Do not wait for the engine to warm
up while the vehicle remains sta-
tionary.
Start driving at moderate engine
speeds. (Steep accelerating and
decelerating should be avoided.) Even if the smart key is in the vehi-
cle, if it is far away from you, the
engine may not start.
When the ENGINE START/STOP button is in the ACC position or
above, if any door is opened, the
system checks for the smart key. If
the smart key is not in the vehicle,
a message "key is not in the vehi-
cle" will appear on the LCD display.
And if all doors are closed, the
chime will sound for 5 seconds. The
indicator or warning will turn off
while the vehicle is moving. Always
have the smart key with you. Stopping manual transaxle vehicles
1. After safely parking the vehicle,
press the clutch pedal and brake
pedal at the same time.
2. While depressing the clutch pedal and brake pedal at the same time,
shift the transaxle lever to ‘N’.
CAUTION- Starter
If the engine stalls while thevehicle is in motion, do notattempt to move the shift leverto the P (Park) position. If thetraffic and road conditions per-mit, you may put the shift leverin the N (Neutral) position whilethe vehicle is still moving andpress the ENGINE START/STOPbutton in an attempt to restartthe engine.
Page 339 of 589
Driving your vehicle
20
6
- Parking in N (Neutral) gear
Follow below steps when parking
and you want the vehicle to move
when pushed.
1.After parking your vehicle, step on
the brake pedal and move the shift
lever to [P] with the ignition button in
[ON] or while the engine is running.
2.If the parking brake is applied unlock the parking brake.
3.While pressing the brake pedal, turn the ignition button [OFF].
- For smart key equipped vehicles,the ignition switch can be moved
to [OFF] only when the shift lever
is in [P].
4.Change the gear shift lever to [N] (Neutral) while pressing the brake
pedal and pushing [SHIFT LOCK
RELEASE] button or inserting,
pressing down a tool (e.g. flathead
screw-driver) into the [SHIFT LOCK
RELEASE] access hole at the same
time. Then, the vehicle will move
when external force is applied. D (Drive)
This is the normal forward driving
position. The transaxle will automati-
cally shift through a 6-gear
sequence, providing the best fuel
economy and power.
For extra power when passing anoth-
er vehicle or climbing grades, depress
the accelerator fully, at which time the
transaxle will automatically downshift
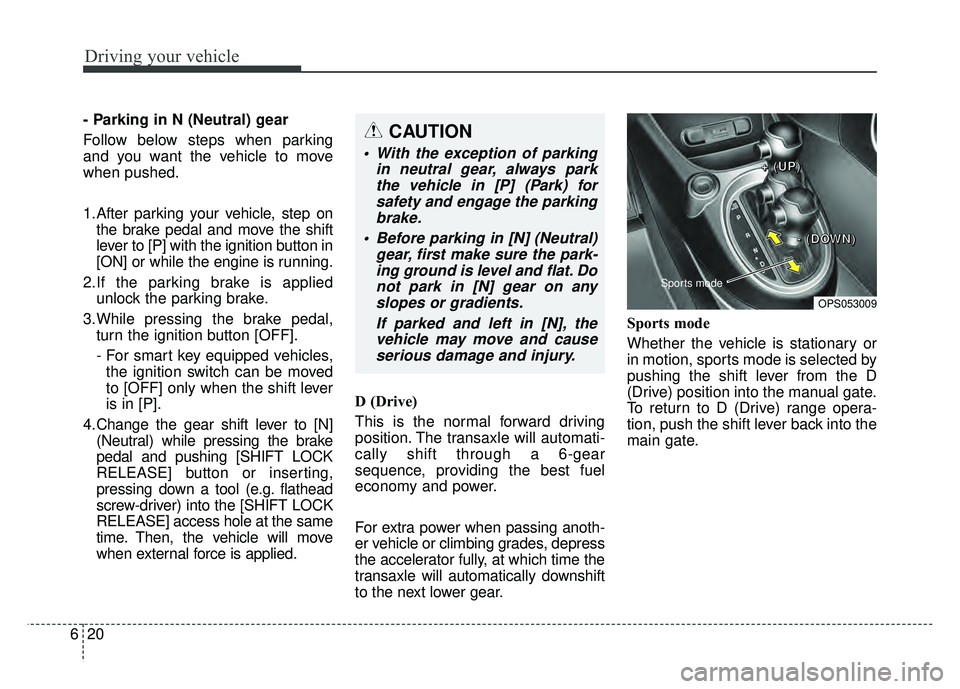
to the next lower gear. Sports mode
Whether the vehicle is stationary or
in motion, sports mode is selected by
pushing the shift lever from the D
(Drive) position into the manual gate.
To return to D (Drive) range opera-
tion, push the shift lever back into the
main gate.CAUTION
With the exception of parking
in neutral gear, always parkthe vehicle in [P] (Park) forsafety and engage the parkingbrake.
Before parking in [N] (Neutral) gear, first make sure the park-ing ground is level and flat. Donot park in [N] gear on anyslopes or gradients.
If parked and left in [N], thevehicle may move and causeserious damage and injury.
OPS053009
Sports mode
+
+
+
+
(
(
(
(
U
U
U
U
P
P
P
P
)
)
)
)
-
-
-
-
(
(
(
(
D
D
D
D
O
O
O
O
W
W
W
W
N
N
N
N
)
)
)
)
Page 345 of 589
Driving your vehicle
26
6
To hold the vehicle on a hill use the
foot brake or the parking brake. If
the vehicle is held by applying the
accelerator pedal on a hill the
clutch and transmission will be
overheated resulting in damage.
At this time, a warning message
(“Steep grade! Press brake pedal”)
will appear on the LCD display and
you may feel a vibration.
If the clutch becomes overheated by excessive use of the clutch to
hold on a hill, you may notice a
shudder feeling and a blinking dis-
play on the instrument cluster.
When this occurs, the clutch is dis-
abled until the clutch cools to nor-
mal temperatures. If this occurs,
pull over to a safe location, shift
into P (Park) and apply the foot
brake for a few minutes.
If the LCD warning is active, the foot brake must be applied.
Ignoring the warnings can lead to damage to the transmission. If the display continues to blink, for
your safety, we recommend that you
contact an authorized Kia dealer.
Under certain conditions such as repeated launch on steep grades,
the clutch in the transmission could
overheat. When the clutch is over-
heated, the safe protection mode
engages.
If the safe protection mode
engages, the gear position indica-
tor on the cluster blinks with a
chime sound.
At this time, a warning message
(“Transmission temp. is high! Stop
safely”, “Trans Hot! Park with
engine on”, “Trans Cooling.
Remain parked for 00 min.”, “Trans
cooled. Resume driving”) will
appear on the LCD display and
driving may not be smooth.
If you ignore this warning, the driv-
ing condition may become worse.
To return the normal driving condi-
tion, stop the vehicle and apply the
foot brake for a few minutes before
driving off. Gear shifts may be more notice-
able than a conventional automatic
transmission. This is a normal
characteristic of this type of dual
clutch transmission.
Repetitive kick downs may lead to overheating of the transmission.
This will lead to change in the vehi-
cle speed shift pattern, and illumi-
nate some warning message.
To return the normal driving condi-
tion, refrain from kick down speed
changes. When the warning mes-
sage illuminates, park the vehicle
at a safe location.
During the first 1,500 km (1,000 miles), you may feel that the vehi-
cle may not be smooth when accel-
erating at low speed. During this
break-in period, the shift quality
and performance of your new vehi-
cle is continuously optimized.
Always come to a complete stop before shifting into D (Drive) or R
(Reverse).
Do not put the shift lever in N (Neutral) while driving.
Page 348 of 589
629
Driving your vehicle
D (Drive)
This is the normal driving position.
The transmission will automatically
shift through a seven-gear
sequence, providing the best fuel
economy and power.
For extra power when passing anoth-
er vehicle or driving uphill depress
the accelerator pedal further until
you feel the transmission downshift
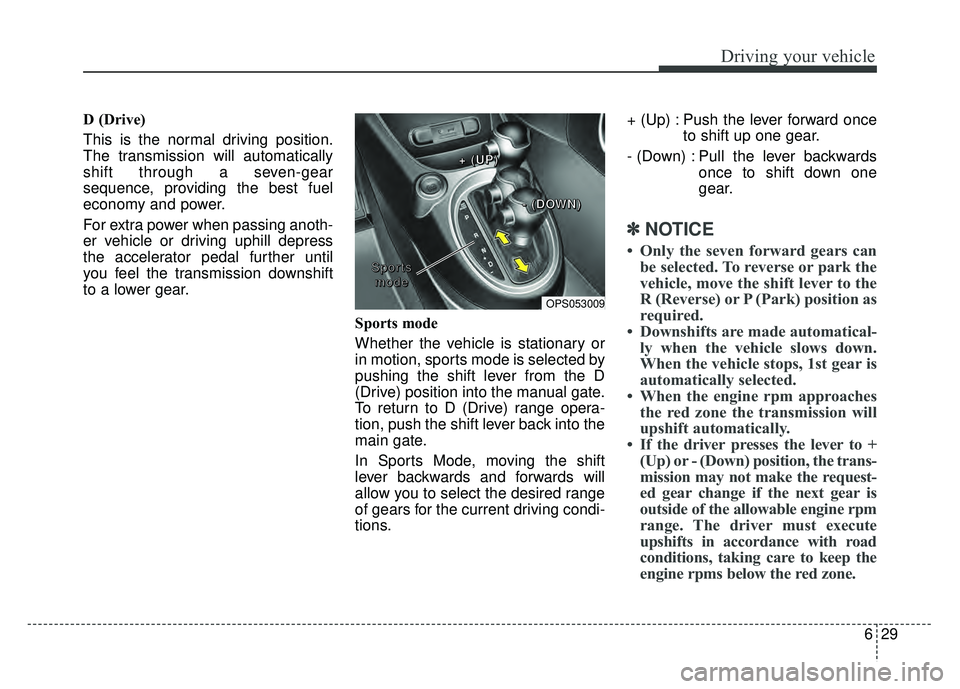
to a lower gear.Sports mode
Whether the vehicle is stationary or
in motion, sports mode is selected by
pushing the shift lever from the D
(Drive) position into the manual gate.
To return to D (Drive) range opera-
tion, push the shift lever back into the
main gate.
In Sports Mode, moving the shift
lever backwards and forwards will
allow you to select the desired range
of gears for the current driving condi-
tions.+ (Up) : Push the lever forward once
to shift up one gear.
- (Down) : Pull the lever backwards once to shift down one
gear.
✽ ✽NOTICE
• Only the seven forward gears can
be selected. To reverse or park the
vehicle, move the shift lever to the
R (Reverse) or P (Park) position as
required.
• Downshifts are made automatical- ly when the vehicle slows down.
When the vehicle stops, 1st gear is
automatically selected.
• When the engine rpm approaches the red zone the transmission will
upshift automatically.
• If the driver presses the lever to + (Up) or - (Down) position, the trans-
mission may not make the request-
ed gear change if the next gear is
outside of the allowable engine rpm
range. The driver must execute
upshifts in accordance with road
conditions, taking care to keep the
engine rpms below the red zone.
OPS053009
S
S
S
S
p
p
p
p
o
o
o
o
r
r
r
r
t
t
t
t
s
s
s
s
m
m
m
m
o
o
o
o
d
d
d
d
e
e
e
e +
+
+
+
(
(
(
(
U
U
U
U
P
P
P
P
)
)
)
)
-
-
-
-
(
(
(
(
D
D
D
D
O
O
O
O
W
W
W
W
N
N
N
N
)
)
)
)
Page 369 of 589
Driving your vehicle
50
6
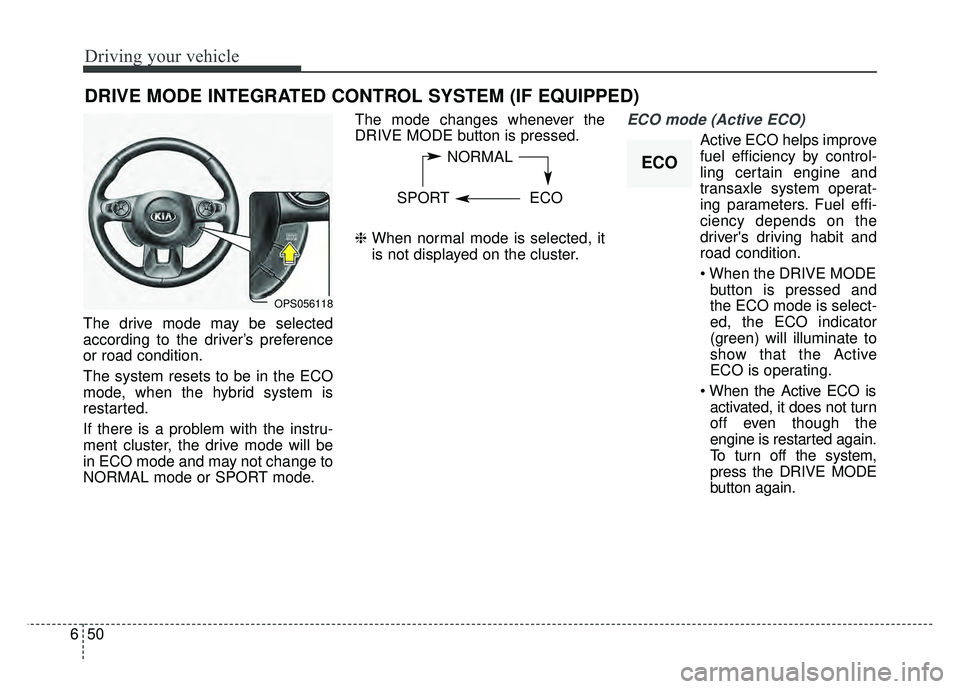
The drive mode may be selected
according to the driver’s preference
or road condition.
The system resets to be in the ECO
mode, when the hybrid system is
restarted.
If there is a problem with the instru-
ment cluster, the drive mode will be
in ECO mode and may not change to
NORMAL mode or SPORT mode. The mode changes whenever the
DRIVE MODE button is pressed.
❈
When normal mode is selected, it
is not displayed on the cluster.
ECO mode (Active ECO)
Active ECO helps improve
fuel efficiency by control-
ling certain engine and
transaxle system operat-
ing parameters. Fuel effi-
ciency depends on the
driver's driving habit and
road condition.
button is pressed and
the ECO mode is select-
ed, the ECO indicator
(green) will illuminate to
show that the Active
ECO is operating.
activated, it does not turn
off even though the
engine is restarted again.
To turn off the system,
press the DRIVE MODE
button again.
DRIVE MODE INTEGRATED CONTROL SYSTEM (IF EQUIPPED)
NORMAL
SPORT ECO
OPS056118
ECO