Page 621 of 686
Fuse NameSymbolFuse ratingCircuit Protected
FUSE IGN COIL
20A Ignition Coil #1/#2/#3/#4
ECU 2
10A PCM
TCU 1
10A PCM
HEV ECU 2
HEV
ECU
210A HPCU, E/R Junction Block (Battery C/Fan Relay)
ECU 3
10A PCM
POWER OUTLET2
20A Front Power Outlet #1
HORN
20A Horn Relay, ICM Relay Box (Burglar Alarm Horn Relay)
WIPER 1
130A Wiper Power Relay
BATTERY C/FAN
BATTERY C/FAN15A E/R Junction Block (Battery C/Fan Relay)
Relay
SymbolRelay NameType
COOLING FAN Relay MINI
BLOWER RelayMICRO
BATTERY
C/FANBATTERY C/FAN Relay MICRO
POWER OUTLET Relay MICRO
H/LAMP WASHER Relay MICRO
DEICER RelayMICRO
Maintenance
9-68
Page 628 of 686

6. Install the bulb-socket in the head‐lamp assembly by aligning the tabs
on the bulb-socket with the slots in
the headlamp assembly. Push the
bulb-socket into the headlamp as‐
sembly and turn the bulb-socket
clockwise.
7. Install the headlamp bulb cover by turning it clockwise.
Headlamp bulb
�0�)�%������������
WARNING
nHalogen bulbs
•Halogen bulbs contain pressurizedgas that will produce flying piecesof glass if broken.
•Always handle them carefully, andavoid scratches and abrasions. Ifthe bulbs are lit, avoid contactwith liquids. Never touch the glasswith bare hands. Residual oil maycause the bulb to overheat andburst when lit.A bulb should be operated onlywhen installed in a headlight.
•If a bulb becomes damaged orcracked, replace it immediatelyand carefully dispose of it.
•Wear eye protection when chang‐ing a bulb. Allow the bulb to cooldown before handling it.
Headlamp (high beam) bulb
replacement
�0�+�'������������
1. Open the hood.
2. Remove the headlamp bulb coverby turning it counterclockwise.
3. Disconnect the headlamp bulb socket-connector.
4. Remove the bulb-socket from the headlamp assembly by turning the
bulb-socket counterclockwise until
the tabs on the bulb-socket align
with the slots on the headlamp as‐
sembly.
9-75
9
Maintenance
Page 639 of 686

�0�+�#������������
CAUTION
•Water washing in the engine com‐partment including high pressurewater washing may cause the fail‐ure of electrical circuits located inthe engine compartment.
•Never allow water or other liquidsto come in contact with electrical/electronic components inside thevehicle as this may damage them.
Waxing
Wax the vehicle when water will no lon‐
ger bead on the paint. Always wash and dry the vehicle before
waxing. Use a good quality liquid or
paste wax, and follow the manufactur‐
er’s instructions. Wax all metal trim to protect it and to maintain its luster.
Removing oil, tar, and similar materials
with a spot remover will usually strip
the wax from the finish. Be sure to re- wax these areas even if the rest of the
vehicle does not yet need waxing.
Do not apply wax on embossed unpain‐
ted unit, as it may tarnish the unit.
CAUTION
•Wiping dust or dirt off the bodywith a dry cloth will scratch thefinish.
•Do not use steel wool, abrasivecleaners, acid detergents or strongdetergents containing high alkalineor caustic agents on chrome-plat‐ed or anodized aluminum parts.This may result in damage to theprotective coating and cause dis‐coloration or paint deterioration.
Finish damage repair
Deep scratches or stone chips in the
painted surface must be repaired
promptly. Exposed metal will quickly rust and may develop into a major re‐
pair expense.
NOTICE
If your vehicle is damaged and re‐
quires any metal repair or replace‐
ment, be sure the body shop applies
anti-corrosion materials to the parts
repaired or replaced.
Bright-metal maintenance
• To remove road tar and insects, use a tar remover, not a scraper or other
sharp object.
• To protect the surfaces of bright- metal parts from corrosion, apply a
coating of wax or chrome preserva‐
tive and rub to a high luster.
• During winter weather or in coastal areas, cover the bright metal parts
with a heavier coating of wax or preservative. If necessary, coat the
parts with non-corrosive petroleum
jelly or other protective compound.
Maintenance
9-86
Page 642 of 686

Don't neglect the interior
Moisture can collect under the floor
mats and carpeting and cause corro‐
sion. Check under the mats periodically to be sure the carpeting is dry. Use
particular care if you carry fertilizers,
cleaning materials or chemicals in the vehicle.
These should be carried only in proper
containers and any spills or leaks
should be cleaned up, flushed with clean water and thoroughly dried.
Interior care
Interior general precautions
Prevent chemicals such as perfume,
cosmetic oil, sun cream, hand cleaner, and air freshener from contacting the
interior parts because they may cause
damage or discoloration. If they do con‐ tact the interior parts, wipe them off
immediately. If necessary, use a vinyle
cleaner, see instructions for correct us‐ age.
CAUTION
Never allow water or other liquids tocome in contact with electrical/elec‐
(Continued)
(Continued)
tronic components inside the vehicleas this may damage them.
CAUTION
When cleaning leather products(steering wheel, seats etc.), useneutral detergents or low alcoholcontent solutions. If you use high al‐cohol content solutions or acid/alka‐line detergents, the color of theleather may fade or the surface mayget stripped off.
Cleaning the upholstery and
interior trim
Vinyl
Remove dust and loose dirt from vinyl
with a whisk broom or vacuum cleaner. Clean vinyl surfaces with a vinyl clean‐
er.
Fabric
Remove dust and loose dirt from fabric
with a whisk broom or vacuum cleaner. Clean with a mild soap solution recom‐
mended for upholstery or carpets. Re‐
move fresh spots immediately with a fabric spot cleaner. If fresh spots do
not receive immediate attention, fabric
can be stained and its color can be af‐ fected. Also, its fire-resistant proper‐
ties can be reduced if the material is
not properly maintained.
CAUTION
Using anything but recommendedcleaners and procedures may affectthe fabric’s appearance and fire-re‐sistant properties.
Cleaning the lap/shoulder belt
webbing
Clean the belt webbing with any mild
soap solution recommended for clean‐ ing upholstery or carpet. Follow the in‐
structions provided with the soap. Do
not bleach or re-dye the webbing be‐ cause this may weaken it.
9-89
9
Maintenance
Page 643 of 686
Cleaning the interior window glass
If the interior glass surfaces of the ve‐
hicle become fogged (that is, covered
with an oily, greasy or waxy film), they should be cleaned with a glass cleaner.
Follow the directions on the glass
cleaner container.
CAUTION
Do not scrape or scratch the insideof the rear window. This may resultin damage of the rear window de‐froster grid.
Maintenance
9-90
Page 658 of 686
RECOMMENDED LUBRICANTS AND CAPACITIES
LubricantVolumeClassification
Engine oil *1
*2
(drain and refill)
Recommends
4.1 l
(4.33 US qt.) ACEA A5 or above / 5W-30 (C)
*1
Automatic transaxle fluid 6.0 l
(6.34 US qt.) - ATF SP-IV
(Recommended SK ATF SP-IV, MICHANG ATF SP-IV, NOCA ATF SP-IV)
Coolant 6.744 l
(7.12 US qt.) Mixture of antifreeze and water
(Ethylene glycol base coolant for aluminum radiator)
Inverter coolant 3.13 l
(3.30 US qt.) Mixture of antifreeze and water
(Ethylene glycol base coolant for aluminum radiator)
Brake/Clutch fluid 0.49 ± 0.02 l
(0.52 ± 0.02 US qt.) DOT 3 or DOT 4
Fuel Hybrid
60 l
(63.42 US qt.) Refer to L
Page 659 of 686

Recommended SAE viscosity number
CAUTION
Always be sure to clean the area around any filler plug, drain plug, or dipstick before checking or draining any lubricant.This is especially important in dusty or sandy areas and when the vehicle is used on unpaved roads. Cleaning the plug anddipstick areas will prevent dirt and grit from entering the engine and other mechanisms that could be damaged.
Engine oil viscosity (thickness) has an effect on fuel economy and cold weather operating (engine start and engine oil flowabil‐
ity). Lower viscosity engine oils can provide better fuel economy and cold weather performance, however, higher viscosity en‐ gine oils are required for satisfactory lubrication in hot weather.
Using oils of any viscosity other than those recommended could result in engine damage. When choosing an oil, consider the
range of temperature your vehicle will be operated in before the next oil change. Proceed to select the recommended oil vis‐ cosity from the chart.
�5�F�N�Q�F�S�B�U�V�S�F���3�B�O�H�F���G�P�S���4�"�&���7�J�T�D�P�T�J�U�Z���/�V�N�C�F�S�T
�5�F�N�Q�F�S�B�U�V�S�FFú�$
� Fú�'�
�$
*1 : For better fuel economy, it is recommended to use the engine oil of a viscosity grade SAE 5W-30 (ACEA A5). However, if
the engine oil is not available in your country, select the proper engine oil using the engine oil viscosity chart.
Specifications & Consumer information
10-12
Page 664 of 686
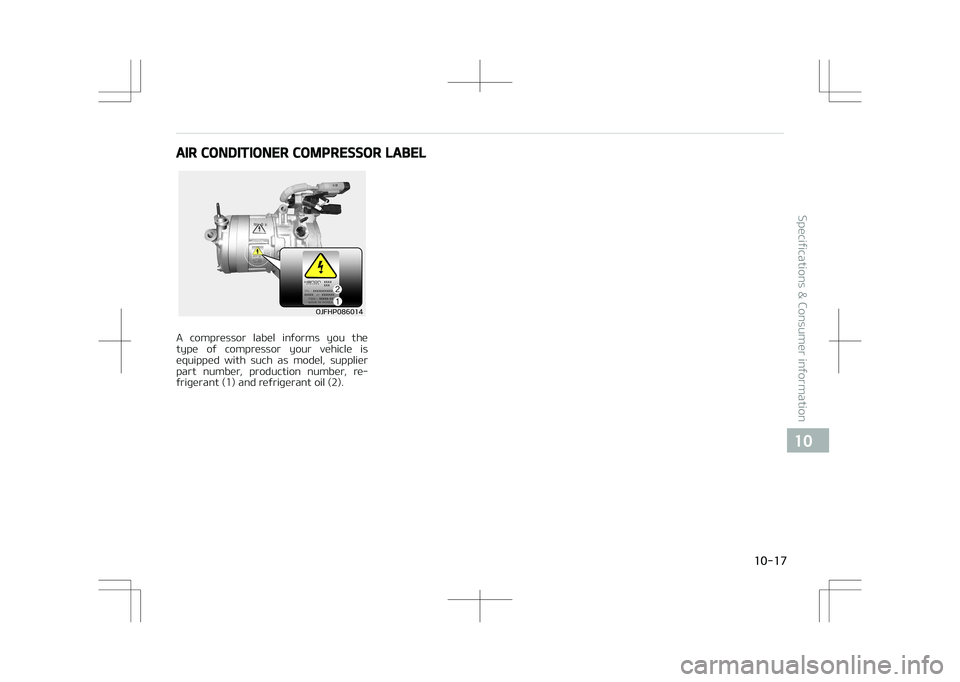
AIR CONDITIONER COMPRESSOR LABEL
�0�+�'�)�1������������
A compressor label informs you the
type of compressor your vehicle is equipped with such as model, supplier
part number, production number, re‐
frigerant (1) and refrigerant oil (2).
10-17
10
Specifications & Consumer information

ECU 3
10A PCM")
, they should be cleaned wi")

Recommends
4.1 l
(4.33 US qt.) ACEA A5 or above / 5W-30 (C)
*1
Automatic transaxle fluid 6.0")