Page 33 of 54

31*IF EQUIPPED ALWAYS CHECK THE OWNER’S MANUAL FOR COMPLETE OPER ATING INFORMATION AND SAFET Y WARNINGS .
REMINDERS:
•
Avoid placing other metal items in the bin while charging as to not impede the charging area
•
This vehicle is equipped with wireless charging technology which allows for a device to be charged using inductive charging, however, device compatibility varies . See your owner’s manual for more detailed information and the back page for legal disclaimers
•
Inductive charging systems are less ef ficient than conventional charging through cable . As a result, higher device operating temperatures may be experienced during use
•
Charging Performance - Device position on the wireless charging system can affect charging performance . Other factor that may affect the charging rate includes foreign objects, such as coins or pens, and phone case thickness
Wireless Charging Video To view a video on your mobile device, snap this QR Code or visit the listed website .
Refer to page 2 for more information .
www.KuTechVideos.com/de23/2017
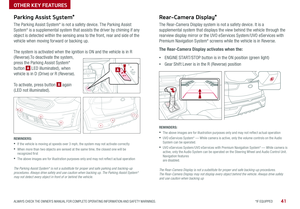
QR CODEWireless Smartphone Charging System*
1 . Slide open tray cover
2 . Place smartphone on the center of the charging pad
3 . Indicator light B will change to amber once the wireless charging begins
4 . Once charging is complete, the orange light will change to green
12V 180WAUX USB
12V 180W
(Located in front of Gear Shift)
Requires QI enabled device or QI enabled case
B
If wireless charging does not work, move smartphone around the pad until the charging indicator turns amber
. Avoid placing other metal items in the bin while charging as to not impede the charging area .
QUICK TIP
CENTER PANEL
Page 34 of 54

Your Automatic Climate Control system may differ from those in the illustrations. See your Owner’s Manual for more detail")
Automatic Climate Control*
(Type B – Vehicles equipped with UVO eServices)
Your Automatic Climate Control system may differ from those in the illustrations. See your Owner’s Manual for more details.
A Climate Control display
B Mode Selection button
C ECON (Economy Air Conditioning) button
D Dual Climate Control Button
E Dual Temperature Control knob
F Air Conditioning On/Off button
G Recirculated Air button
H Fan Speed Control buttons
I System OFF button
J Automatic Climate Control button
K Temperature Control knob
L Front Windshield Defroster
M Driver Only Fan Control
N Rear Windshield Defroster
Automatic Climate Control*
(Type A – Vehicles equipped with UVO eServices with Premium Navigation)
A Mode Selection button
B ECON (Economy Air Conditioning) button
C Dual Climate Control Button
D Dual Temperature Control knob
E Air Conditioning On/Off button
F Recirculated Air button
G Rear Windshield Defroster
H Fan Speed Control buttons
I System OFF button
J Climate information screen selection button
K Automatic Climate Control button
L Temperature Control knob
M Driver Only Fan Control
N Front Windshield Defroster
A
G
DE
F
FFG
HI
IHH
MJK
LN
J
KCDLMNE
CENTER PANEL
NIRO FEATURES & FUNCTIONS GUIDE32*IF EQUIPPED
Page 35 of 54

33*IF EQUIPPED ALWAYS CHECK THE OWNER’S MANUAL FOR COMPLETE OPER ATING INFORMATION AND SAFET Y WARNINGS .
Climate Control Auto Function
1 . Press AUTO to select Full Auto Operation . The Auto setting automatically controls the airflow modes, fan
speeds, air intake and air conditioning according to the temperature setting selected
2 . Set desired Temperature
3 . Press SYNC to synchronize driver and passenger temperature
Defrost Outside Windshield:
1 .
Set Fan Speed to the highest position
2 . Set Temperature to Hot
3 .
Press the Front Defrost button
Defog Inside Windshield:
1 . Set Fan Speed to desired position
2 . Set desired Temperature
3 . Press the Front Defrost button
Air Flow Modes:
To select Air Flow Modes, press the Mode
selection buttons:
Face-Level
Bi-Level
F lo o r- L evel
Floor/Defrost-Level
Your Automatic Climate Control system may differ from those in the illustrations. See your Owner’s Manual for more details.
REMINDERS:
•MA X A /C Mode automatically engages Recirculated Air
•
Pressing any button during AUTO operation will deactivate the AUTO function and switch to manual mode, except for Temperature Control
•
When in AUTO mode, Air Flow mode and Fan Speed do not display on the Climate Control Display
•
Warm air may flow in through vents if Recirculated Air button is not pressed ON (LED lit)
•Defrost mode [~] activates A /C and opens Fresh Air Vent to help dehumidify the air and improve Defroster performance •During Auto Operation, the A /C indicator will NOT illuminate . The fan speed, air intake, air flow and air conditioning may automatically be engaged at any time to reach desired temperature and reduce humidity •Keep inside glass as clean as possible to reduce window fogging
QUICK TIPS
Driver Only Ventilation:
Driver Only Ventilation restricts air flow to the driver’s side vents only . This helps to
optimize driving range by limiting the power drawn from the battery .
Press DRIVER ONLY button M to enable air flow through the driver’s side vents only .
Automatic Climate Control*
CENTER PANEL
Page 36 of 54
![KIA NIRO 2017 Features and Functions Guide NIRO FEATURES & FUNCTIONS GUIDE34*IF EQUIPPED
Automatic Gear Shift with Sportmatic® Shifting
P: Park
R: Reverse
N: Neutral
D: Drive (ECO Mode)
D: Drive, left gate (Sport Mode)
[+]: Manual Sport Mo](/manual-img/2/54823/w960_54823-35.png "KIA NIRO 2017 Features and Functions Guide NIRO FEATURES & FUNCTIONS GUIDE34*IF EQUIPPED
Automatic Gear Shift with Sportmatic® Shifting
P: Park
R: Reverse
N: Neutral
D: Drive (ECO Mode)
D: Drive, left gate (Sport Mode)
[+]: Manual Sport Mo")
NIRO FEATURES & FUNCTIONS GUIDE34*IF EQUIPPED
Automatic Gear Shift with Sportmatic® Shifting
P: Park
R: Reverse
N: Neutral
D: Drive (ECO Mode)
D: Drive, left gate (Sport Mode)
[+]: Manual Sport Mode Upshift
[–]: Manual Sport Mode Downshift
Sport Mode: To enter Sport Mode, move shift lever from D to left gate .
When in Sport Mode, If the shift lever is not moved up or down, then the
vehicle will automatically shift gears . To shift while in Manual Sport mode,
move shift lever up [+] to upshift or down [–] to downshift . See page 10
for more information on the Drive Modes .
•With the seat warmer switch in the ON position, the heating system in the seat turns OFF or ON automatically depending on the seat temperature •System is OFF by default
QUICK TIPS
To view these videos on your mobile device, snap these QR codes .
Refer to page 2 for more information .
Sportmatic® Shifting Video
Heated and Ventilated Seats Video
QR CODES
www.KuTechVideos.com/de23/2017
www.KuTechVideos.com/de23/2017
Yellow Color: Warming
Blue Color: Ventilating
Seat Warmers / Ventilated Seats*
Seat Warmers — Press top of button once for high setting (3 LEDs
lit), again for middle setting (2 LEDs lit), again for low setting (1 LED
lit) . Press again to turn OFF .
Ventilated Seats — Press bottom of button once for high setting
(3 LEDs lit), again for middle setting (2 LEDs lit), again for low
setting (1 LED lit) . Press again to turn OFF .
MANUAL SPORT
ECO
SPORT
CENTER PANEL
Page 37 of 54
35*IF EQUIPPED ALWAYS CHECK THE OWNER’S MANUAL FOR COMPLETE OPER ATING INFORMATION AND SAFET Y WARNINGS .
Driver Position Memory System*
To store a seating position into memory, first place the shifter into P (Park)
while the ignition switch is ON . Then:
1 . Adjust the driver’s seat
2 . Press the SET button A on the control panel . System will beep once
3 . Press one of the memory buttons B within 5 seconds . The system will
beep twice when memory has been stored
4 . “Driver (1 or 2) set is memorized” will appear on the instrument cluster
LCD screen
C
Front Seat Headrest Adjustment
To raise headrest: Pull headrest up .
To lower headrest: Press lock C, then press the headrest down .
SET
1
2
A
B
SEATING
Page 38 of 54
NIRO FEATURES & FUNCTIONS GUIDE36*IF EQUIPPED
SEATING
D
E
G
F
SeatbackLumbarSeatSeat Cushion
Power Adjustable Driver’s Seat*
Move/Press controls to adjust Seat forward/backward, Seat Cushion tilt up/down,
Seatback forward/backward or Lumbar forward/backward
AABC
ABC
6-Way Manual Adjustable
Driver’s Seat*
Pull lever D to slide Seat forward/backward .
Pull/press lever E to adjust Seat height .
Pull lever F to adjust Seatback recline .
When adjusting seat forward or backwards, ensure seat clicks or locks into place before driving vehicle .
QUICK TIP
Page 39 of 54

37*IF EQUIPPED ALWAYS CHECK THE OWNER’S MANUAL FOR COMPLETE OPER ATING INFORMATION AND SAFET Y WARNINGS .
Smart Key*
Smart Key Fob:
A Press to lock All Doors
B Press to unlock Driver’s Door . Press twice in
4 seconds to unlock All Doors
C Press and hold for more than 1 second to unlock Liftgate . Then
lift the lid to manually open Liftgate . REMINDER:
The Liftgate unlocks when the Smart Key fob is within close proximity of the vehicle .
D Press and hold more than 1 second for Panic Alarm .
To turn off Alarm, press any button
E Press to release Mechanical Key (on reverse side of fob)
Driver’s Door Lock/Unlock button G:
•
Press button once to unlock Driver’s Door
•Press again within 4 seconds to unlock All Doors
•Press again to lock All Doors
Mechanical Key F:
•Use to unlock Driver’s Door
•
Use to enable/disable Child Safety Locks
Engine Start/Stop Button & Smart Key Video To view a video on your mobile device, snap this QR Code or visit the listed website .
Refer to page 2 for more information .
QR CODE
www.KuTechVideos.com/de23/2017
•If the Smart Key battery is weak or not working properly, hold the Smart Key fob up to the ENGINE START/STOP button (Lock button side closest) and press to start engine •The Smart Key’s signal can be blocked by the normal operation of a cell phone or smartphone . To help prevent this, store each device separately
QUICK TIPS
REMINDER: Remote button configuration may vary depending on vehicle options .
Double-Turn Lock/Unlock All
•Turn clockwise once to unlock Driver’s Door
•Turn clockwise again within
4 seconds to unlock All Doors
•Turn counterclockwise once
to lock All Doors
LockUnlock
OTHER KEY FEATURES
HOLDG
A
B
C
D
F
E
Page 40 of 54
NIRO FEATURES & FUNCTIONS GUIDE38*IF EQUIPPED
Remote Keyless Entry (Folding Key)*
A Press the release button to unfold the key
B Press to lock All Doors
C Press to unlock Driver’s Door: Press twice in 4 seconds to unlock
All Doors and Rear Hatch
D Manual Liftgate*: Press and hold for more than 1 second to unlock
Liftgate . Then lift by the handle to manually open Liftgate .
D Power Liftgate*: Press and hold for more than1 second to open
E Press and hold more than a half second for Panic Alarm .
Remote button configuration may vary depending on vehicle options.
To turn OFF Alarm, press any button.
HOLD
OTHER KEY FEATURES
A
B
C
D
E


*
A Press the release button to unfold the key
B Press to lock All Doors
C Press to unlock Driver’s Door: Press twi")