2017 KIA CARENS RHD light
[x] Cancel search: lightPage 130 of 723
Features of your vehicle
34
4
Power windows
The ignition switch must be in the ON
position for power windows to oper-
ate. Each door has a power window
switch that controls the door’s win-
dow. The driver’s door has a master
power window switch that controls all
the windows in the vehicle. Also, the
driver has a power window lock
switch which can block the operation
of rear passenger windows.
The power windows can be operated
for approximately 30 seconds after
the ignition key is removed or turned
to the ACC or LOCK position.
However, if the front doors are
opened, the power windows cannot
be operated even within the 30 sec-
onds period.✽✽
NOTICE
Whilst driving with the rear win-
dows down or with the sunroof (if
equipped) in an open (or partially
open position), your vehicle may
demonstrate a wind buffeting or
pulsation noise. This noise is a nor-
mal occurrence and can be reduced
or eliminated by taking the follow-
ing actions. If the noise occurs with
one or both of the rear windows
down, partially lower both front
windows approximately one inch.
If you experience the noise with the
sunroof open, slightly reduce the
size of the sunroof opening. Window opening and closing
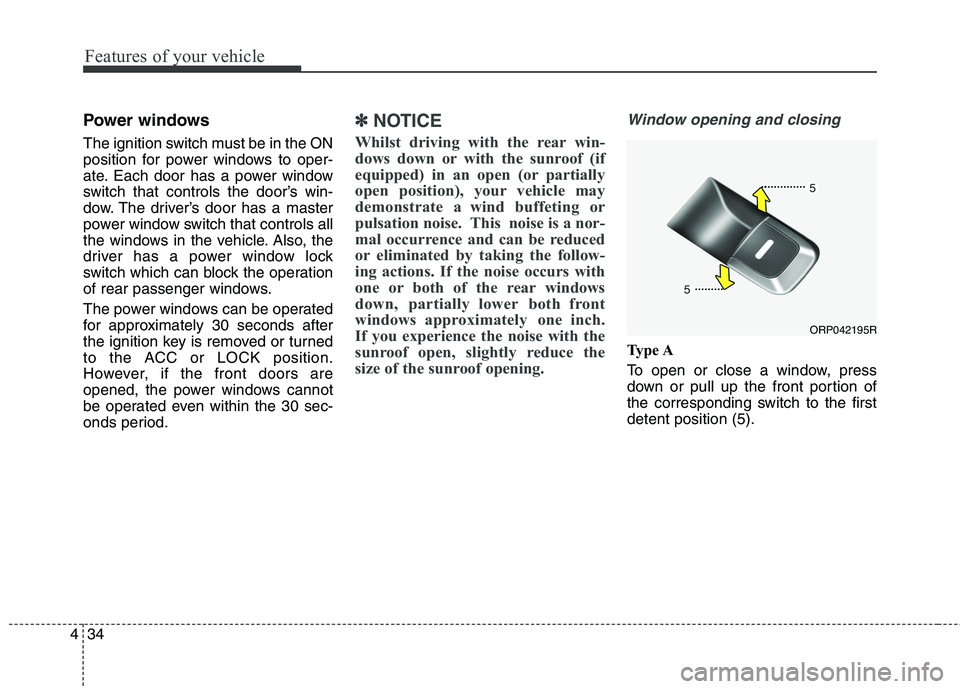
Type A
To open or close a window, press
down or pull up the front portion of
the corresponding switch to the firstdetent position (5).
ORP042195R
Page 134 of 723
Features of your vehicle
38
4
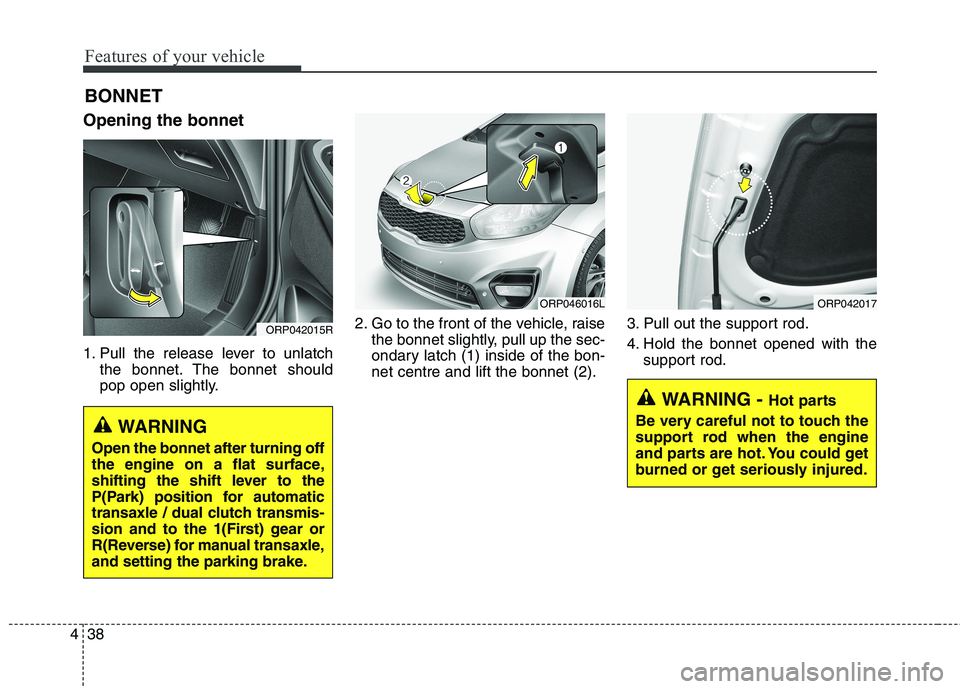
Opening the bonnet
1. Pull the release lever to unlatch
the bonnet. The bonnet should
pop open slightly. 2. Go to the front of the vehicle, raise
the bonnet slightly, pull up the sec-
ondary latch (1) inside of the bon-net centre and lift the bonnet (2). 3. Pull out the support rod.
4. Hold the bonnet opened with the
support rod.
BONNET
ORP042015R
WARNING
Open the bonnet after turning off
the engine on a flat surface,
shifting the shift lever to the
P(Park) position for automatic
transaxle / dual clutch transmis-
sion and to the 1(First) gear or
R(Reverse) for manual transaxle,
and setting the parking brake.
WARNING - Hot parts
Be very careful not to touch the
support rod when the engine
and parts are hot. You could get
burned or get seriously injured.
ORP046016LORP042017
Page 137 of 723
441
Features of your vehicle
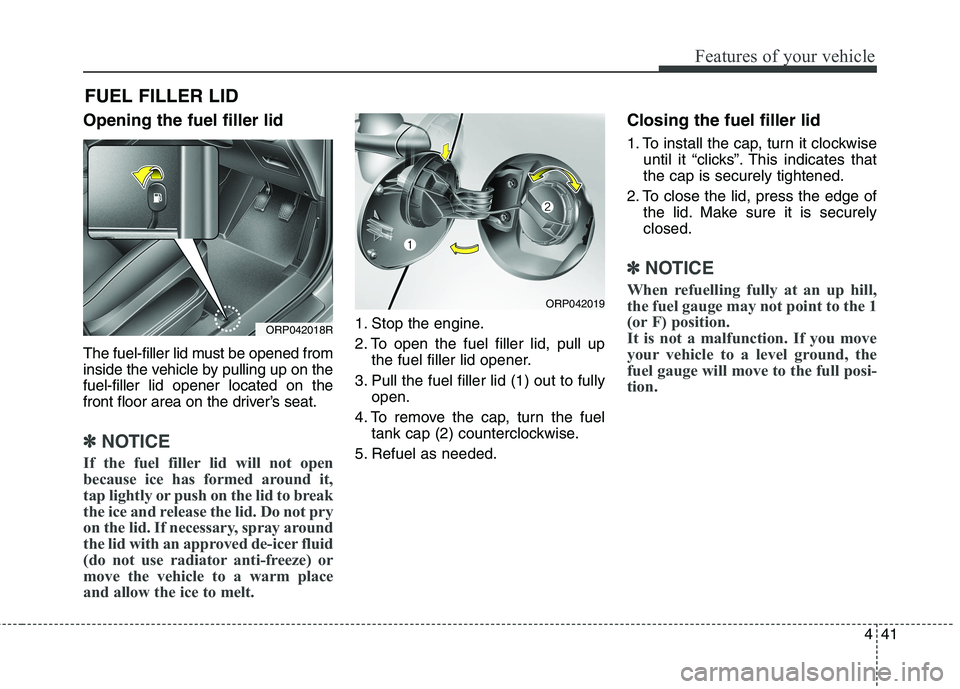
Opening the fuel filler lid
The fuel-filler lid must be opened from
inside the vehicle by pulling up on thefuel-filler lid opener located on the
front floor area on the driver’s seat.
✽✽NOTICE
If the fuel filler lid will not open
because ice has formed around it,
tap lightly or push on the lid to break
the ice and release the lid. Do not pry
on the lid. If necessary, spray around
the lid with an approved de-icer fluid
(do not use radiator anti-freeze) or
move the vehicle to a warm place
and allow the ice to melt.
1. Stop the engine.
2. To open the fuel filler lid, pull up the fuel filler lid opener.
3. Pull the fuel filler lid (1) out to fully open.
4. To remove the cap, turn the fuel tank cap (2) counterclockwise.
5. Refuel as needed. Closing the fuel filler lid
1. To install the cap, turn it clockwise
until it “clicks”. This indicates that the cap is securely tightened.
2. To close the lid, press the edge of the lid. Make sure it is securelyclosed.
✽✽ NOTICE
When refuelling fully at an up hill,
the fuel gauge may not point to the 1
(or F) position.
It is not a malfunction. If you move
your vehicle to a level ground, the
fuel gauge will move to the full posi-
tion.
FUEL FILLER LID
ORP042018R
ORP042019
Page 139 of 723

443
Features of your vehicle
(Continued)
When using an approvedportable fuel container, be sure to place the container on
the ground prior to refuelling.
Static electricity discharge
from the container can ignite
fuel vapours causing a fire.Once refuelling has begun,
contact with the vehicleshould be maintained until the
filling is complete.
Use only portable plastic fuel
containers designed to carry
and store petrol.
Do not use mobile phones whilst refuelling. Electric cur-
rent and/or electronic interfer-
ence from mobile phones can
potentially ignite fuel vapours
causing a fire.
(Continued)(Continued)
When refuelling, always shutthe engine off. Sparks produced
by electrical components relat-ed to the engine can ignite fuel
vapours causing a fire. Once
refuelling is complete, check tomake sure the filler cap and
filler door are securely closed,
before starting the engine.
DO NOT use matches or a lighter and DO NOT SMOKE or
leave a lit cigarette in your
vehicle whilst at a gas station
especially during refuelling.
Automotive fuel is highly
flammable and can, when
ignited, result in fire.
If a fire breaks out during refu- elling, leave the vicinity of the
vehicle, and immediately con-
tact the manager of the gasstation and then contact the
local fire department. Follow
any safety instructions they
provide.CAUTION
Make sure to refuel your vehi-
cle according to the "Fuelrequirements" suggested in chapter 1.
If the fuel filler cap requires replacement, please make surethat you use parts designed forreplacement in your vehicle. An incorrect fuel filler cap canresult in a serious malfunctionof the fuel system or emission control system. For moredetailed information, we rec-ommend that you contact an authorised Kia dealer.
Do not spill fuel on the exterior surfaces of the vehicle. Anytype of fuel spilled on paintedsurfaces may damage the paint.
After refuelling, make sure the fuel cap is installed securelyto prevent fuel spillage in theevent of an accident.
Page 144 of 723

Features of your vehicle
48
4
STEERING WHEEL
Electronic power steering (EPS)
Power steering uses the motor to
assist you in steering the vehicle. If
the engine is off or if the power steer-
ing system becomes inoperative, the
vehicle may still be steered, but it will
require increased steering effort.
The motor driven power steering is
controlled by the power steering con-
trol unit which senses the steering
wheel torque and vehicle speed to
command the motor.
The steering wheel becomes heavier
as the vehicle’s speed increases and
becomes lighter as the vehicle’s
speed decreases for better control of
the steering wheel.
Should you notice any change in the
effort required to steer during normal
vehicle operation, we recommend
that the system be checked by an
authorised Kia dealer.
✽✽ NOTICE
The following symptoms may occur
during normal vehicle operation:
The EPS warning light does not illuminate.
The steering effort is high immedi- ately after turning the ignition
switch on. This happens as the sys-
tem performs the EPS system diag-
nostics. When the diagnostics is
completed, the steering wheel will
return to its normal condition.
A click noise may be heard from the EPS relay after the ignition switch
is turned to the ON or LOCK/OFF
position.
Motor noise may be heard when the vehicle is at a stop or at a low driv-
ing speed.
The steering effort increases if the steering wheel is rotated continu-
ously when the vehicle is not in
motion. However, after a few min-
utes, it will return to its normal con-
ditions. (Continued)(Continued)
If an error is detected in the electric
power steering system, EPS will
stop assisting driver in steering the
vehicle to prevent accidents and the
warning light on the cluster will
illuminate or blink. We recom-
mend that the system be checked
by an authorised Kia dealer.
When you operate the steering wheel in low temperature, abnor-
mal noise could occur. If tempera-
ture rises, the noise will disappear.
This is a normal condition.
When the vehicle is stationary, if you turn the steering wheel all the
way to the left or right continuously,
the steering wheel becomes heavier
from the end. This is not a system
malfunction but for your safety. As
time passes, the steering wheel
returns to its normal condition.
When the charging system warn- ing light comes on or the voltage is
low (When the alternator (or bat-
tery) does not operate normally or
it malfunctions), the steering wheel
may get heavy and become diffi-
cult to control operate abnormally.
Page 145 of 723
449
Features of your vehicle
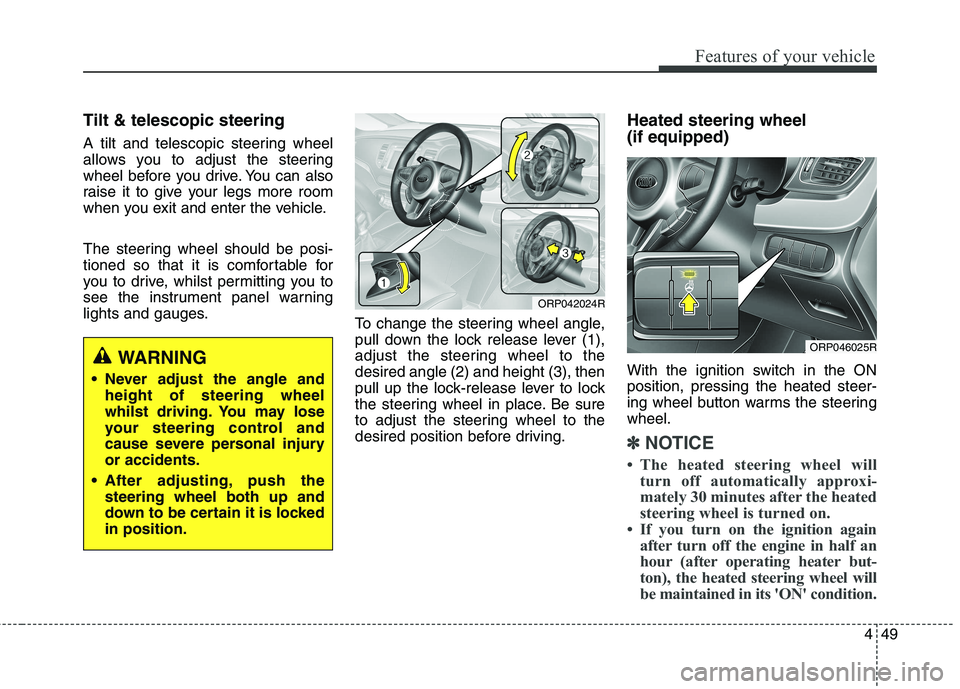
Tilt & telescopic steering
A tilt and telescopic steering wheel
allows you to adjust the steering
wheel before you drive. You can also
raise it to give your legs more room
when you exit and enter the vehicle.
The steering wheel should be posi-
tioned so that it is comfortable for
you to drive, whilst permitting you to
see the instrument panel warning
lights and gauges.To change the steering wheel angle,
pull down the lock release lever (1),
adjust the steering wheel to thedesired angle (2) and height (3), then
pull up the lock-release lever to lock
the steering wheel in place. Be sure
to adjust the steering wheel to the
desired position before driving.Heated steering wheel (if equipped)
With the ignition switch in the ON position, pressing the heated steer-
ing wheel button warms the steeringwheel.
✽✽
NOTICE
The heated steering wheel will turn off automatically approxi-
mately 30 minutes after the heated
steering wheel is turned on.
If you turn on the ignition again after turn off the engine in half an
hour (after operating heater but-
ton), the heated steering wheel will
be maintained in its 'ON' condition.
WARNING
Never adjust the angle and height of steering wheel
whilst driving. You may lose
your steering control and
cause severe personal injuryor accidents.
After adjusting, push the steering wheel both up and
down to be certain it is lockedin position.
ORP042024R
ORP046025R
Page 147 of 723

451
Features of your vehicle
FLEX STEER (if equipped)
The FLEX STEER controls steering
effort as driver's preference or roadcondition.
You can select the desired steering
mode by pressing the steering mode
button.
When the steering mode button is
pressed, the selected steering mode
will appear on the LCD display.
If the steering mode button is
pressed within 4 seconds, the steer-
ing mode will change.If the steering wheel mode button is
not pressed for about 4 seconds, the
LCD display will change to the previ-ous screen.
Normal mode
The normal mode offers medium
steering effort.
Comfort mode
The steering wheel becomes lighter.
The comfort mode is usually used
when driving in downtown or parking
the vehicle.
Also, the comfort mode helps weak
people to drive easily.
Sport mode
The steering wheel becomes heav-
ier. The sport mode is usually used
when driving in highway.
ORP042027
CAUTION
For your safety, if you press the
steering mode button whilstoperating the steering wheel, the LCD display will change. Atthe same time, the steeringeffort will change automatical- ly to the selected mode.
Be careful when changing the steering mode whilst driving.
When the electronic power steering is not working prop-erly, the flex steering wheelwill not work.
Page 148 of 723
Features of your vehicle
52
4
Inside rearview mirror
Adjust the rearview mirror so that the
centre view through the rear window
is seen. Make this adjustment before
you start driving.Day/night rearview mirror
(if equipped)
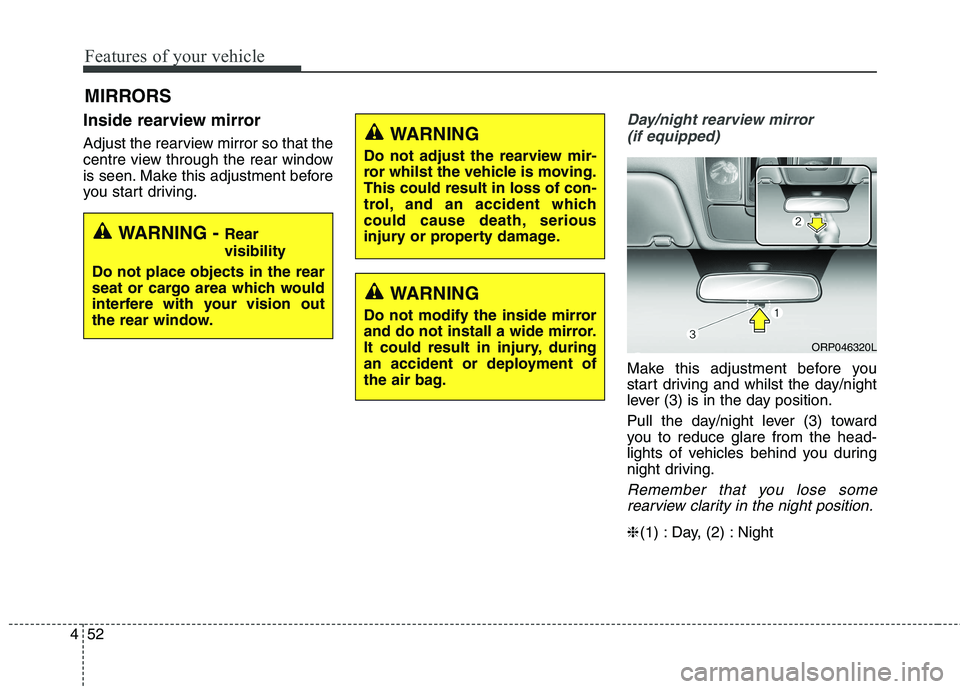
Make this adjustment before you
start driving and whilst the day/night
lever (3) is in the day position.
Pull the day/night lever (3) toward
you to reduce glare from the head-
lights of vehicles behind you during
night driving.
Remember that you lose somerearview clarity in the night position.
❈ (1) : Day, (2) : Night
MIRRORS
WARNING -
Rear visibility
Do not place objects in the rear
seat or cargo area which would
interfere with your vision out
the rear window.
WARNING
Do not adjust the rearview mir-
ror whilst the vehicle is moving.This could result in loss of con-
trol, and an accident which
could cause death, serious
injury or property damage.
WARNING
Do not modify the inside mirror
and do not install a wide mirror.
It could result in injury, during
an accident or deployment of
the air bag.
ORP046320L