2017 KIA CARENS RHD light
[x] Cancel search: lightPage 6 of 723

13
Introduction
Petrol engine
Unleaded
For Europe
For the optimal vehicle performance,
we recommend you use unleaded
petrol has an octane rating of RON(Research Octane Number) 95 / AKI
(Anti Knock Index) 91 or higher. (Do
not use methanol blended fuels.) You
may use unleaded petrol with an
octane rating of RON 91-94 / AKI 87-
90 but it may result in slight perform-
ance reduction of the vehicle.
Except Europe
Your new vehicle is designed to use
only unleaded fuel having an Octane
Rating of RON (Research Octane
Number) 91 / AKI (Anti-Knock Index)
87 or higher. (Do not use methanol
blended fuels.)
Your new vehicle is designed to
obtain maximum performance with
UNLEADED FUEL, as well as min-
imise exhaust emissions and spark
plug fouling.
Leaded (if equipped)
For some countries, your vehicle is
designed to use leaded petrol. When
you are going to use leaded petrol,
we recommend that you ask an
authorised Kia dealer whether lead-
ed petrol in your vehicle is availableor not. Octane Rating of leaded petrol is
same with unleaded one.
FUEL REQUIREMENTSCAUTION
NEVER USE LEADED FUEL. The
use of leaded fuel is detrimentalto the catalytic converter and will damage the engine controlsystem’s oxygen sensor andaffect emission control.
Never add any fuel systemcleaning agents to the fuel tank other than what has been speci-fied. (We recommend that youconsult an authorised Kia dealer for details.)
WARNING
Do not "top off" after the noz- zle automatically shuts off when refuelling.
Always check that the fuel cap is installed securely to pre-
vent fuel spillage in the eventof an accident.
Page 14 of 723
Your vehicle at a glance
4
2
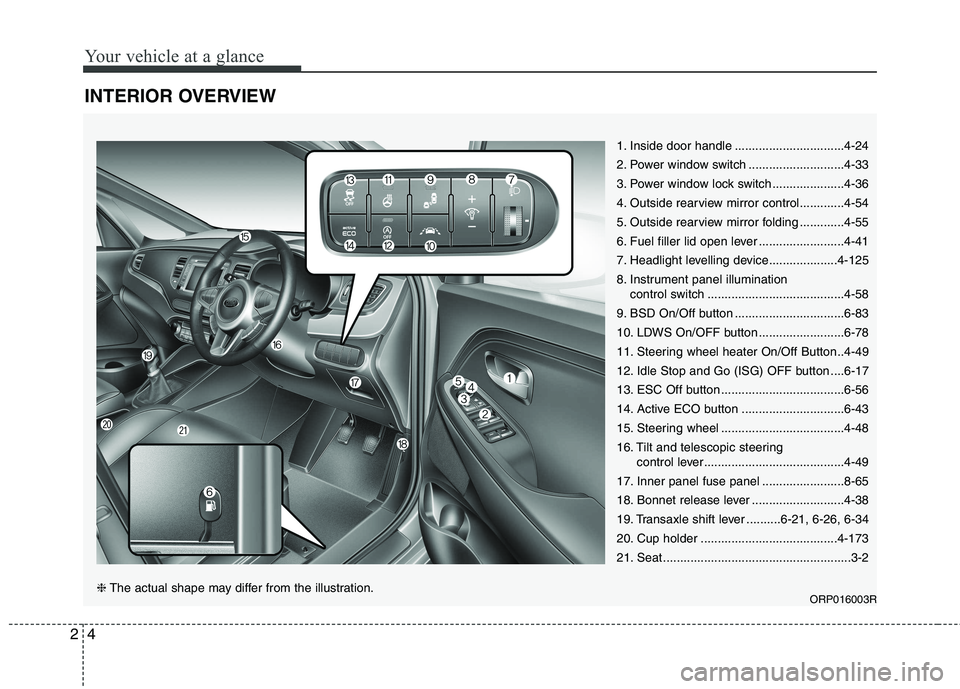
INTERIOR OVERVIEW
1. Inside door handle ................................4-24
2. Power window switch ............................4-33
3. Power window lock switch .....................4-36
4. Outside rearview mirror control.............4-54
5. Outside rearview mirror folding .............4-55
6. Fuel filler lid open lever .........................4-41
7. Headlight levelling device....................4-125
8. Instrument panel illumination
control switch ........................................4-58
9. BSD On/Off button ................................6-83
10. LDWS On/OFF button .........................6-78
11. Steering wheel heater On/Off Button..4-49
12. Idle Stop and Go (ISG) OFF button ....6-17
13. ESC Off button ....................................6-56
14. Active ECO button ..............................6-43
15. Steering wheel ....................................4-48
16. Tilt and telescopic steering control lever.........................................4-49
17. Inner panel fuse panel ........................8-65
18. Bonnet release lever ...........................4-38
19. Transaxle shift lever ..........6-21, 6-26, 6-34
20. Cup holder ........................................4-173
21. Seat .......................................................3-2
ORP016003R
❈The actual shape may differ from the illustration.
Page 15 of 723
25
Your vehicle at a glance
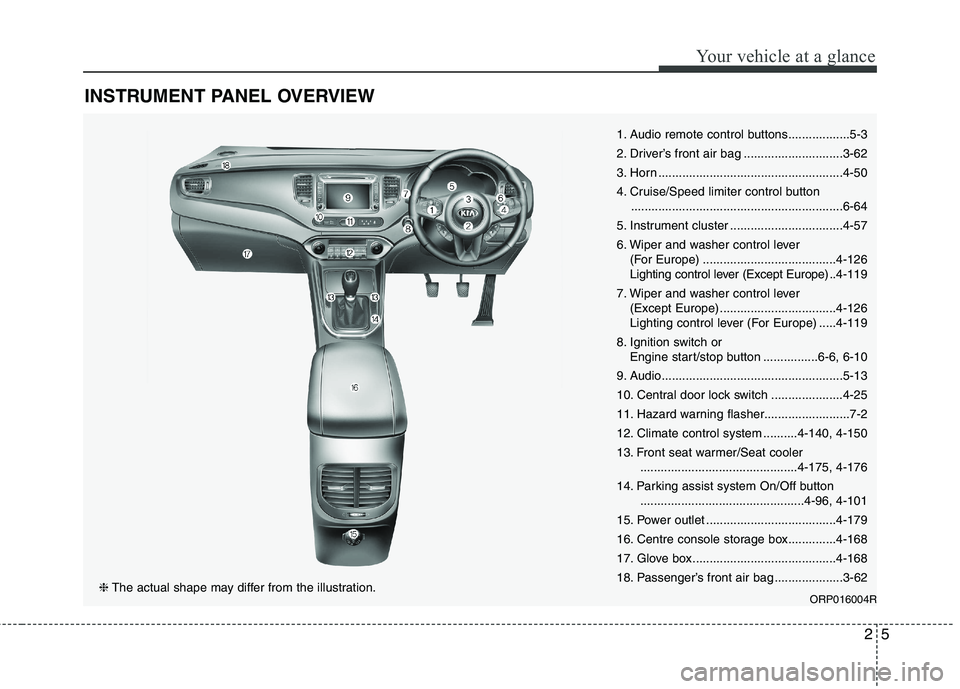
INSTRUMENT PANEL OVERVIEW
1. Audio remote control buttons..................5-3
2. Driver’s front air bag .............................3-62
3. Horn ......................................................4-50
4. Cruise/Speed limiter control button..............................................................6-64
5. Instrument cluster .................................4-57
6. Wiper and washer control lever (For Europe) .......................................4-126
Lighting control lever (Except Europe) ..4-119
7. Wiper and washer control lever (Except Europe) ..................................4-126
Lighting control lever (For Europe) .....4-119
8. Ignition switch or Engine start/stop button ................6-6, 6-10
9. Audio.....................................................5-13
10. Central door lock switch .....................4-25
11. Hazard warning flasher.........................7-2
12. Climate control system ..........4-140, 4-150
13. Front seat warmer/Seat cooler ..............................................4-175, 4-176
14. Parking assist system On/Off button ................................................4-96, 4-101
15. Power outlet ......................................4-179
16. Centre console storage box..............4-168
17. Glove box ..........................................4-168
18. Passenger’s front air bag ....................3-62
ORP016004R
❈The actual shape may differ from the illustration.
Page 23 of 723

35
Safety features of your vehicle
(Continued)
No passenger should ride inthe cargo area or sit or lie on
folded seatbacks whilst the
vehicle is moving. All passen-
gers must be properly seated
in seats and restrained prop-
erly whilst riding.
When resetting the seatback to the upright position, make sure
it is securely latched by push-
ing it forward and backwards.WARNING
After adjusting the seat, always
check that it is securely locked
into place by attempting to
move the seat forward or back-
ward without using the lock
release lever. Sudden or unex-
pected movement of the dri-
ver's seat could cause you to
lose control of the vehicleresulting in an accident.WARNING
Use extreme caution so that hands or other objects are not
caught in the seat mechanisms
whilst the seat is moving.
Do not put a cigarette lighter on the floor or seat. When you
operate the seat, gas may gush
out of the lighter and cause fire.
If there are occupants in the rear seats, be careful whilst
adjusting the front seat posi-tion.
Use extreme caution when picking small objects trappedunder the seats or between the
seat and the centre console.
Your hands might be cut or
injured by the sharp edges of
the seats mechanism.
Page 24 of 723

Safety features of your vehicle
6
3
Front seat adjustment - manual
Forward and backward
To move the seat forward or backward:
1. Pull the seat slide adjustment
lever up and hold it.
2. Slide the seat to the position you desire.
3. Release the lever and make sure the seat is locked in place.
Adjust the seat before driving, and
make sure the seat is locked securely
by trying to move forward and back-
ward without using the lever. If the seat
moves, it is not locked properly.
Seatback angle
To recline the seatback:
1. Lean forward slightly and lift up the seatback recline lever.
2. Carefully lean back on the seat and adjust the seatback of the
seat to the position you desire.
3. Release the lever and make sure the seatback is locked in place.
(The lever MUST return to its orig-
inal position for the seatback to
lock.)
Seatback folding (for front pas-
senger’s seat, if equipped)
The front passenger’s seatbacks can
be folded to facilitate carrying longitems or to increase the luggage
capacity of the vehicle.
To fold the seatback :
1. Lower the front passenger’s seat headrests to the lowest position.
And slide the seat rearward.
2. Pull on the seatback folding lever (recline lever), then fold the seat
toward the front of the vehicle.
When you return the seatback to
its upright position, always be sure
it has locked into position by push-
ing on the top of the seatback.
ORP036002R
ORP036003R
ORP036071R
Page 42 of 723
Safety features of your vehicle
24
3
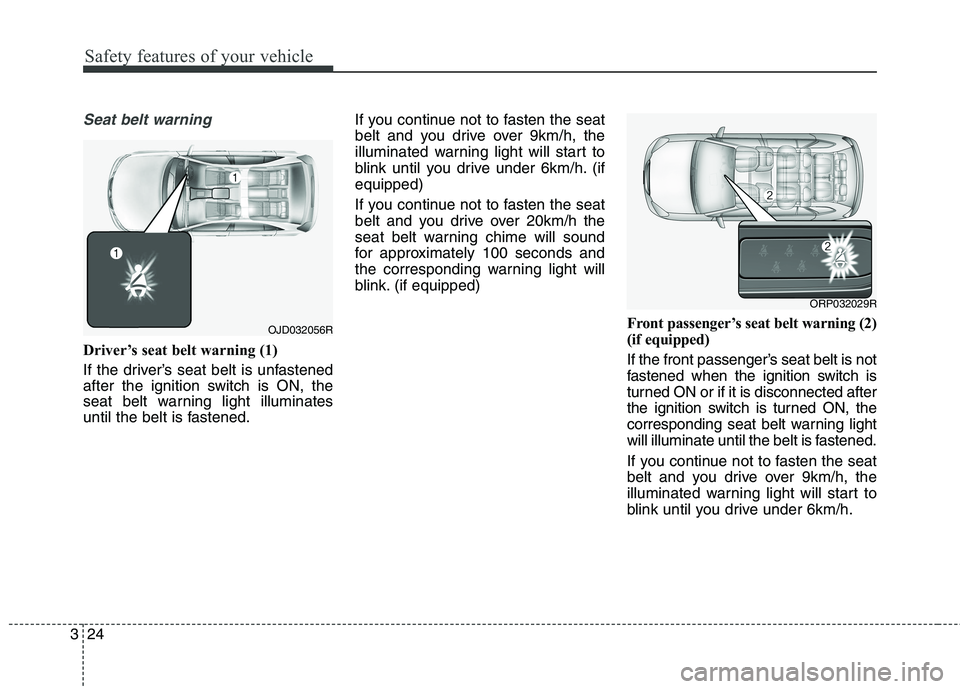
Seat belt warning
Driver’s seat belt warning (1)
If the driver’s seat belt is unfastened
after the ignition switch is ON, the
seat belt warning light illuminates
until the belt is fastened. If you continue not to fasten the seat
belt and you drive over 9km/h, the
illuminated warning light will start to
blink until you drive under 6km/h. (ifequipped)
If you continue not to fasten the seat
belt and you drive over 20km/h the
seat belt warning chime will sound
for approximately 100 seconds and
the corresponding warning light will
blink. (if equipped)
Front passenger’s seat belt warning (2)
(if equipped)
If the front passenger’s seat belt is not
fastened when the ignition switch is
turned ON or if it is disconnected after
the ignition switch is turned ON, the
corresponding seat belt warning light
will illuminate until the belt is fastened.
If you continue not to fasten the seat
belt and you drive over 9km/h, the
illuminated warning light will start to
blink until you drive under 6km/h.
ORP032029R
OJD032056R
Page 43 of 723
325
Safety features of your vehicle
If you continue not to fasten the seat
belt and you drive over 20km/h the
seat belt warning chime will sound for
approximately 100 seconds and the
corresponding warning light will blink.✽✽NOTICE
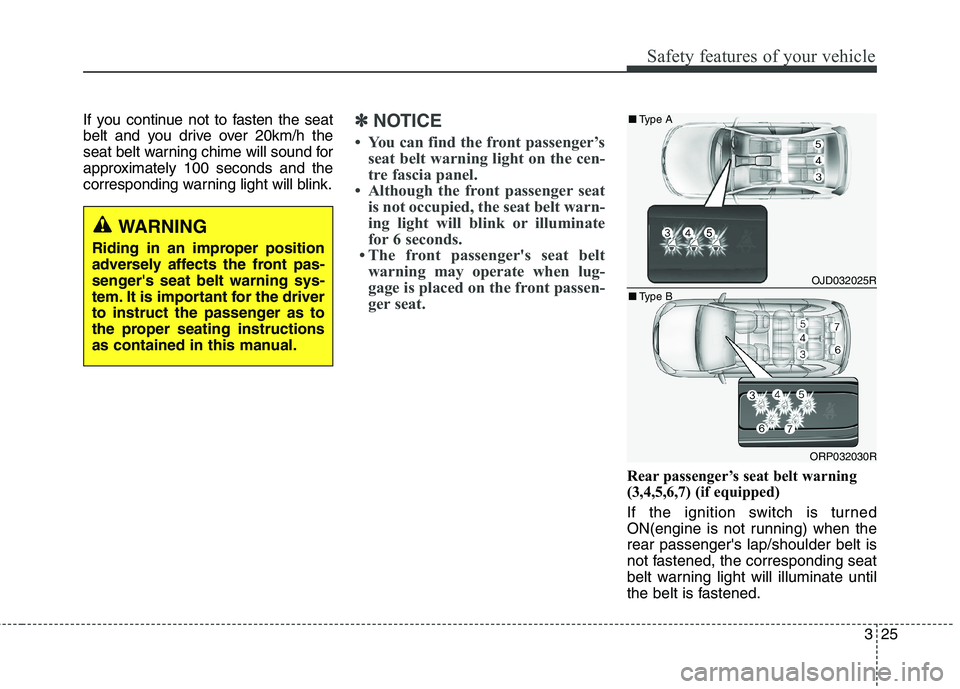
You can find the front passenger’s seat belt warning light on the cen-
tre fascia panel.
Although the front passenger seat is not occupied, the seat belt warn-
ing light will blink or illuminate
for 6 seconds.
The front passenger's seat belt warning may operate when lug-
gage is placed on the front passen-
ger seat.
Rear passenger’s seat belt warning
(3,4,5,6,7) (if equipped)
If the ignition switch is turned
ON(engine is not running) when therear passenger's lap/shoulder belt is
not fastened, the corresponding seat
belt warning light will illuminate until
the belt is fastened.
WARNING
Riding in an improper position
adversely affects the front pas-
senger's seat belt warning sys-
tem. It is important for the driver
to instruct the passenger as to
the proper seating instructions
as contained in this manual.
OJD032025R
ORP032030R
■
Type A
■ Type B
Page 44 of 723
Safety features of your vehicle
26
3
And then, the rear corresponding
seat belt warning light will illuminate
for approximately 35 seconds, if any
of following occurs;
- You start the engine when the rear
belt is not fastened.
- You drive over 9km/h when the rear belt is not fastened.
- The rear belt is disconnected when driving under 20km/h.
If the rear seat belt is fastened, the
warning light will turn off immediately. If the rear seat belt is disconnected
when you drive over the 20km/h, the
corresponding seat belt warning light
will blink and warning chime will
sound for 35 seconds. But, if the rear passenger's lap/shoul- der belt is/are connected and discon-nected twice within 9 seconds after
the belt is fastened, the correspon-
ding seat belt warning light will not
operate.Lap/shoulder belt
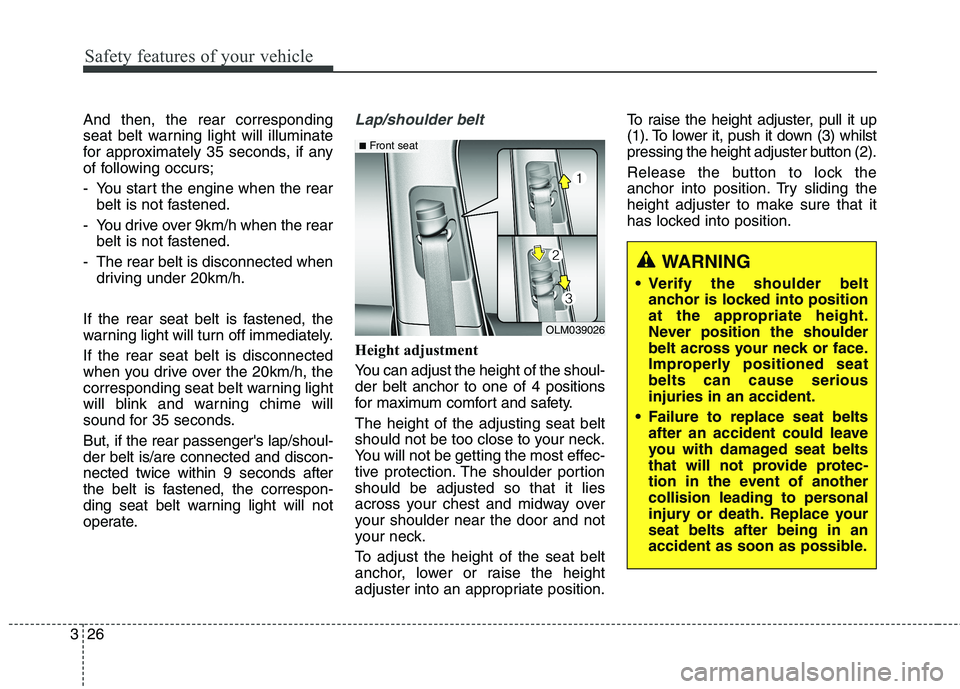
Height adjustment
You can adjust the height of the shoul- der belt anchor to one of 4 positions
for maximum comfort and safety. The height of the adjusting seat belt
should not be too close to your neck.
You will not be getting the most effec-
tive protection. The shoulder portionshould be adjusted so that it lies
across your chest and midway over
your shoulder near the door and not
your neck.
To adjust the height of the seat belt
anchor, lower or raise the height
adjuster into an appropriate position. To raise the height adjuster, pull it up
(1). To lower it, push it down (3) whilst
pressing the height adjuster button (2).
Release the button to lock the
anchor into position. Try sliding the
height adjuster to make sure that it
has locked into position.
OLM039026
■
Front seat
WARNING
Verify the shoulder belt anchor is locked into position
at the appropriate height.
Never position the shoulder
belt across your neck or face.
Improperly positioned seatbelts can cause seriousinjuries in an accident.
Failure to replace seat belts after an accident could leave
you with damaged seat belts
that will not provide protec-
tion in the event of another
collision leading to personal
injury or death. Replace yourseat belts after being in an
accident as soon as possible.