Page 274 of 723
Features of your vehicle
178
4
✽✽
NOTICE
Close the vanity mirror cover
securely and return the sunvisor to
its original position after use.
❈ To learn how to use the vanity mir-
ror lamp, refer to "Interior light" in
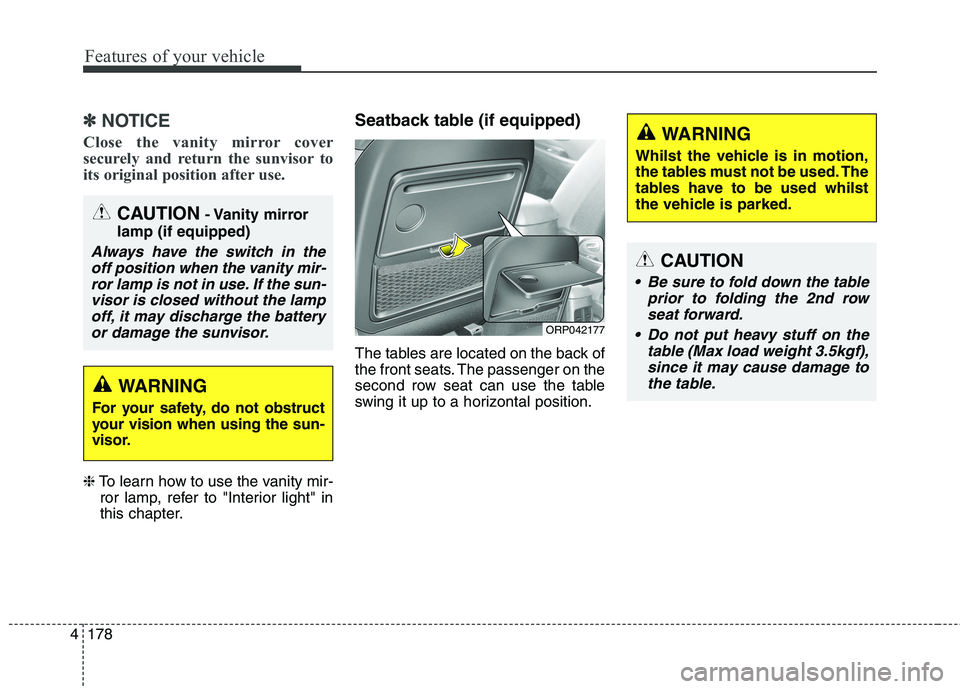
this chapter. Seatback table (if equipped)
The tables are located on the back of
the front seats. The passenger on the
second row seat can use the table
swing it up to a horizontal position.
CAUTION
Be sure to fold down the table
prior to folding the 2nd rowseat forward.
Do not put heavy stuff on the table (Max load weight 3.5kgf),since it may cause damage tothe table.
WARNING
Whilst the vehicle is in motion,
the tables must not be used. The
tables have to be used whilst
the vehicle is parked.
ORP042177
CAUTION - Vanity mirror
lamp (if equipped)
Always have the switch in the off position when the vanity mir-ror lamp is not in use. If the sun- visor is closed without the lampoff, it may discharge the batteryor damage the sunvisor.
WARNING
For your safety, do not obstruct
your vision when using the sun-
visor.
Page 277 of 723
4181
Features of your vehicle
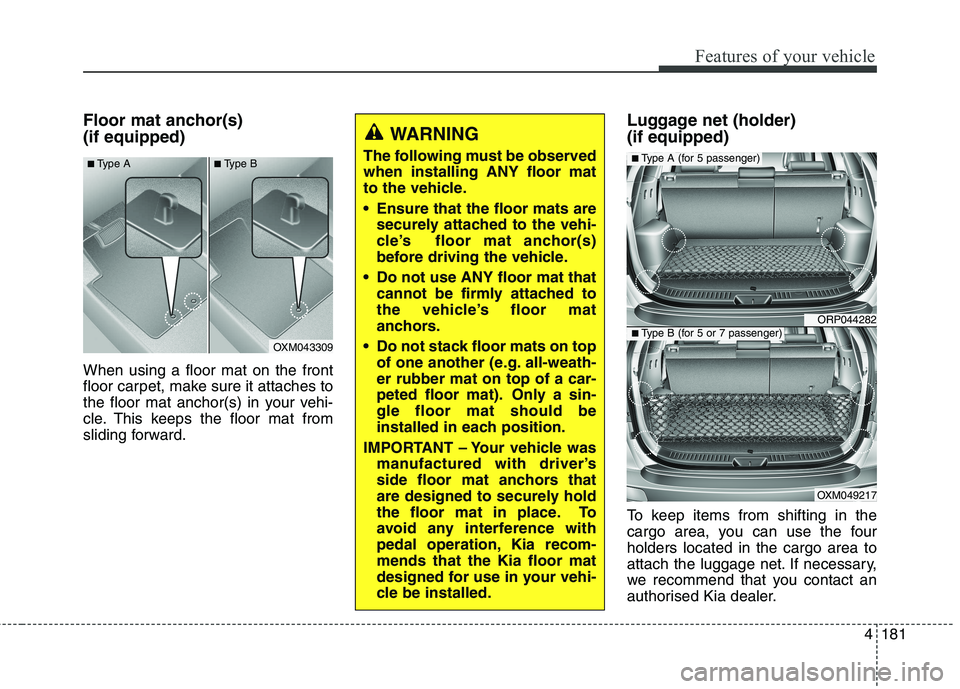
Floor mat anchor(s) (if equipped) When using a floor mat on the front
floor carpet, make sure it attaches to
the floor mat anchor(s) in your vehi-
cle. This keeps the floor mat from
sliding forward.Luggage net (holder) (if equipped)
To keep items from shifting in the
cargo area, you can use the fourholders located in the cargo area to
attach the luggage net. If necessary,
we recommend that you contact an
authorised Kia dealer.
ORP044282
OXM049217
■
Type A (for 5 passenger)
■Type B (for 5 or 7 passenger)
WARNING
The following must be observed when installing ANY floor mat
to the vehicle.
Ensure that the floor mats are securely attached to the vehi-
cle’s floor mat anchor(s)
before driving the vehicle.
Do not use ANY floor mat that cannot be firmly attached to
the vehicle’s floor mat
anchors.
Do not stack floor mats on top of one another (e.g. all-weath-er rubber mat on top of a car-
peted floor mat). Only a sin-gle floor mat should be
installed in each position.
IMPORTANT – Your vehicle was manufactured with driver’s
side floor mat anchors that
are designed to securely hold
the floor mat in place. To
avoid any interference with
pedal operation, Kia recom-mends that the Kia floor mat
designed for use in your vehi-
cle be installed.
OXM043309
■
Type A ■Type B
Page 278 of 723
Features of your vehicle
182
4
Cargo security screen (if equipped)
Use the cargo security screen to hide items stored in the cargo area.To use the cargo security screen
1. Pull the cargo security screen
towards the rear of the vehicle by the handle (1).
2. Insert the guide pin into the guide (2).
✽✽ NOTICE
Pull out the cargo security screen
with the handle in the centre to pre-
vent the guide pin from falling out of
the guide.
ORP042192
ORP042191
CAUTION
To prevent damage to the goods or the vehicle, care should betaken when carrying fragile or bulky objects in the luggagecompartment.
WARNING
To avoid eye injury, DO NOT
overstretch the luggage net.
ALWAYS keep your face and
body out of the luggage net’s
recoil path. DO NOT use the lug-
gage net when the strap has vis-
ible signs of wear or damage.
Page 279 of 723
4183
Features of your vehicle
When the cargo security screen is not
in use:
1. Pull the cargo security screen rearand down to release it from the
guides.
2. The cargo security screen will automatically slide back in.
✽✽ NOTICE
The cargo security screen may not
automatically slide back in if the
cargo security screen is not fully
pulled out. Fully pull it out and then
let go.
To remove the cargo security screen
1. Push the guide pin inward.
2. Whilst pushing the guide pin, pull out the cargo security screen.
3. Open the luggage tray and keep the cargo security screen in the tray.
To remove the cargo security
screen from the luggage tray
1. Pull up the screen board.
2. Push in the guide pin.
3. Whilst pushing the guide pin, pull out the cargo security screen.
ODMECO2039ORP042196
Page 280 of 723

Features of your vehicle
184
4
Portable lamp usage (if equipped)
1. In-vehicle lamp, if necessary, after
separation can be used as a
portable.
2. Press the button (1).
3. Pull out the lamp holder.
4. Press the power switch (2).❈ If the portable lamp does not turn
on, it means the portable lamp
needs to be charged. Insert thelamp holder and then charge it
again. The charge mode will be
activated if the ignition switch (or
engine start/stop button) is on
position or engine is running.CAUTION
1. Remove the batteries when
not in use for a long time.
2. Use the specified battery. 3. You can use the regular batter- ies (Disposable batteries) butdo not use the Non-recharge-able battery in charge mode. It may damage the vehicle.
4. Do not place the lamp with water or moist places and liq-uid compounds. These cancause internal leakage of a battery.
5. When replacing the batteries, check the direction and insert.
It will not be charged if installed reversely.
(Continued)
ORP042137
WARNING
Do not place objects on the cargo security screen. Such
objects may be thrown about
inside the vehicle and possi-
bly injure vehicle occupantsduring an accident or whenbraking.
Never allow anyone to ride in the luggage compartment. It
is designed for luggage only.
Maintain the balance of the vehicle and locate the weight
as forward as possible.
CAUTION
Since the cargo security screen
may be damaged or malformed,do not put luggage on it when it is used.
Page 283 of 723
4187
Features of your vehicle
WARNING
The following specification is the maximum weight that can
be loaded onto the roof rack.
Distribute the load as evenly as
possible across the crossbars
(if equipped) and roof rack and
secure the load firmly.
Loading cargo or luggage in
excess of the specified weight
limit on the roof rack may
damage your vehicle.
The vehicle centre of gravity will be higher when items are
loaded onto the roof rack.
Avoid sudden starts, braking,
sharp turns, abrupt manoeu-
vres or high speeds that may
result in loss of vehicle con-
trol or rollover resulting in anaccident.
(Continued)
ROOF 100 kg (220 lbs.)
RACK EVENLY DISTRIBUTED
(Continued)
Always drive slowly and turn
corners carefully when carry-
ing items on the roof rack.
Severe wind updrafts, caused
by passing vehicles or natural
causes, can cause sudden
upward pressure on items
loaded on the roof rack. This
is especially true when carry-
ing large, flat items such as
wood panels or mattresses.This could cause the items to
fall off the roof rack and cause
damage to your vehicle or
others around you.
To prevent damage or loss of cargo whilst driving, check
frequently before or whilstdriving to make sure the items
on the roof rack are securelyfastened.
Page 465 of 723
Driving your vehicle
30
6
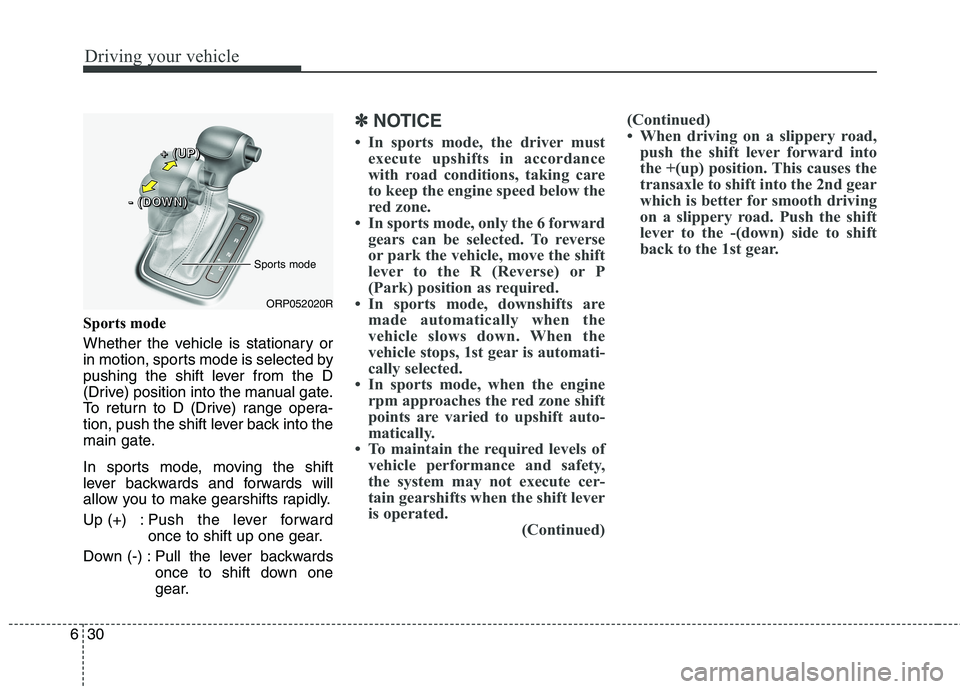
Sports mode
Whether the vehicle is stationary or
in motion, sports mode is selected by
pushing the shift lever from the D
(Drive) position into the manual gate.
To return to D (Drive) range opera-
tion, push the shift lever back into the
main gate.
In sports mode, moving the shift
lever backwards and forwards will
allow you to make gearshifts rapidly.
Up (+) : Push the lever forward
once to shift up one gear.
Down (-) : Pull the lever backwards once to shift down one
gear.
✽✽NOTICE
In sports mode, the driver must execute upshifts in accordance
with road conditions, taking care
to keep the engine speed below the
red zone.
In sports mode, only the 6 forward gears can be selected. To reverse
or park the vehicle, move the shift
lever to the R (Reverse) or P
(Park) position as required.
In sports mode, downshifts are made automatically when the
vehicle slows down. When the
vehicle stops, 1st gear is automati-
cally selected.
In sports mode, when the engine rpm approaches the red zone shift
points are varied to upshift auto-
matically.
To maintain the required levels of vehicle performance and safety,
the system may not execute cer-
tain gearshifts when the shift lever
is operated. (Continued)(Continued)
When driving on a slippery road,
push the shift lever forward into
the +(up) position. This causes the
transaxle to shift into the 2nd gear
which is better for smooth driving
on a slippery road. Push the shift
lever to the -(down) side to shift
back to the 1st gear.
ORP052020R
Sports mode
+
+++ ((((UUUUPPPP))))
---- ((((DDDDOOOOWWWWNNNN))))
Page 475 of 723
Driving your vehicle
40
6
✽✽
NOTICE
Only the seven forward gears can be selected. To reverse or park the
vehicle, move the shift lever to the
R (Reverse) or P (Park) position as
required.
Downshifts are made automatical- ly when the vehicle slows down.
When the vehicle stops, 1st gear is
automatically selected.
When the engine rpm approaches the red zone the transmission will
upshift automatically.
If the driver presses the lever to + (Up) or - (Down) position, the
transmission may not make the
requested gear change if the next
gear is outside of the allowable
engine rpm range. The driver
must execute upshifts in accor-
dance with road conditions, taking
care to keep the engine rpms
below the red zone.Shift lock system (if equipped)
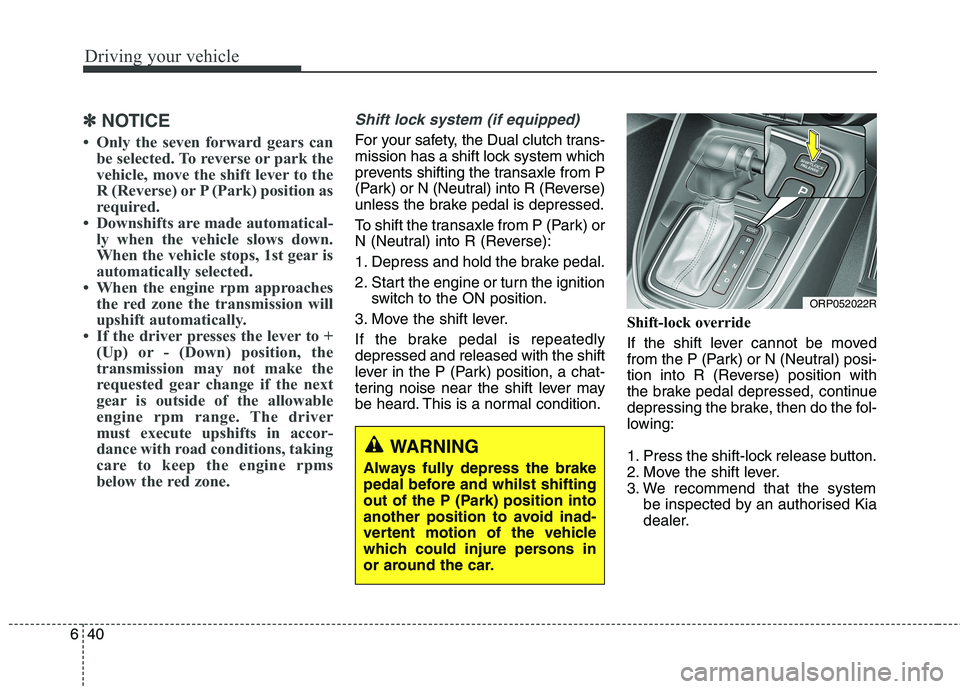
For your safety, the Dual clutch trans-
mission has a shift lock system which
prevents shifting the transaxle from P
(Park) or N (Neutral) into R (Reverse)
unless the brake pedal is depressed.
To shift the transaxle from P (Park) or
N (Neutral) into R (Reverse):
1. Depress and hold the brake pedal.
2. Start the engine or turn the ignition switch to the ON position.
3. Move the shift lever.
If the brake pedal is repeatedly depressed and released with the shift
lever in the P (Park) position, a chat-
tering noise near the shift lever may
be heard. This is a normal condition. Shift-lock override
If the shift lever cannot be moved
from the P (Park) or N (Neutral) posi-
tion into R (Reverse) position with
the brake pedal depressed, continue
depressing the brake, then do the fol-
lowing:
1. Press the shift-lock release button.
2. Move the shift lever.
3. We recommend that the system
be inspected by an authorised Kia
dealer.
ORP052022R
WARNING
Always fully depress the brake
pedal before and whilst shifting
out of the P (Park) position into
another position to avoid inad-
vertent motion of the vehicle
which could injure persons in
or around the car.