2017 KIA CARENS RHD torque
[x] Cancel search: torquePage 144 of 723

Features of your vehicle
48
4
STEERING WHEEL
Electronic power steering (EPS)
Power steering uses the motor to
assist you in steering the vehicle. If
the engine is off or if the power steer-
ing system becomes inoperative, the
vehicle may still be steered, but it will
require increased steering effort.
The motor driven power steering is
controlled by the power steering con-
trol unit which senses the steering
wheel torque and vehicle speed to
command the motor.
The steering wheel becomes heavier
as the vehicle’s speed increases and
becomes lighter as the vehicle’s
speed decreases for better control of
the steering wheel.
Should you notice any change in the
effort required to steer during normal
vehicle operation, we recommend
that the system be checked by an
authorised Kia dealer.
✽✽ NOTICE
The following symptoms may occur
during normal vehicle operation:
The EPS warning light does not illuminate.
The steering effort is high immedi- ately after turning the ignition
switch on. This happens as the sys-
tem performs the EPS system diag-
nostics. When the diagnostics is
completed, the steering wheel will
return to its normal condition.
A click noise may be heard from the EPS relay after the ignition switch
is turned to the ON or LOCK/OFF
position.
Motor noise may be heard when the vehicle is at a stop or at a low driv-
ing speed.
The steering effort increases if the steering wheel is rotated continu-
ously when the vehicle is not in
motion. However, after a few min-
utes, it will return to its normal con-
ditions. (Continued)(Continued)
If an error is detected in the electric
power steering system, EPS will
stop assisting driver in steering the
vehicle to prevent accidents and the
warning light on the cluster will
illuminate or blink. We recom-
mend that the system be checked
by an authorised Kia dealer.
When you operate the steering wheel in low temperature, abnor-
mal noise could occur. If tempera-
ture rises, the noise will disappear.
This is a normal condition.
When the vehicle is stationary, if you turn the steering wheel all the
way to the left or right continuously,
the steering wheel becomes heavier
from the end. This is not a system
malfunction but for your safety. As
time passes, the steering wheel
returns to its normal condition.
When the charging system warn- ing light comes on or the voltage is
low (When the alternator (or bat-
tery) does not operate normally or
it malfunctions), the steering wheel
may get heavy and become diffi-
cult to control operate abnormally.
Page 470 of 723

635
Driving your vehicle
The Dual Clutch Transmissiongives the driving feel of a manual
transmission, yet provides the
ease of a fully automatic transmis-
sion. Unlike a traditional automatic
transmission, the gear shifting can
be felt (and heard) on the dual
clutch transmission
- Think of it as an automaticallyshifting manual transmission.
- Shift into Drive range and get fully automatic shifting, similar to a
conventional automatic transmis-sion.
Dual clutch transmission adopts dry-type dual clutch, which is dif-
ferent from torque converter of
automatic transmission, and
shows better acceleration perform-
ance during driving. But, initial
launch might be little bit slower
than Automatic Transmission.
The dry-type clutch transfers torque and provides a direct driving feeling
which may feel different from a con-
ventional automatic transmission
with a torque converter. This may be
more noticeable when starting from
a stop or low vehicle speed. When rapidly accelerating at low
vehicle speed, engine could rev at
high rpm depending on vehicle
drive condition.
For smooth launch uphill, press down the accelerator pedalsmoothly depending on the current
conditions.
If you release your foot from the accelerator pedal at low vehicle
speed, you may feel strong engine
brake, which is similar to manual
transmission.
When driving downhill, you may use Sports Mode and press the
paddle shifters to downshift to a
lower gear in order to control your
speed without using the brake
pedal excessively.
When you turn the engine on and off, you may hear clicking soundsas the system goes through a self
test. This is a normal sound for the
Dual Clutch Transmission.
WARNING
To reduce the risk of serious
injury or death:
ALWAYS check the surround- ing areas near your vehicle for
people, especially children,
before shifting a vehicle into
D (Drive) or R (Reverse).
Before leaving the driver’s seat, always make sure the
shift lever is in the P (Park)
position, then set the parking
brake, and place the ignition
switch in the LOCK/OFF posi-
tion. Unexpected and sudden
vehicle movement can occurif these precautions are not
followed.
Do not use engine braking (shifting from a high gear to
lower gear) rapidly on slip-
pery roads. The vehicle mayslip causing an accident.
Page 478 of 723

643
Driving your vehicle
Active ECO operation
Active ECO helps improve fuel effi-
ciency by controlling the engine and
transaxle. But fuel-efficiency can be
changed by the driver's driving habits
and road conditions.
When the Active ECO button ispressed the ECO indicator (green)
will illuminate to show that the
Active ECO is operating.
If Active ECO is turned off, it will return to the normal mode. When Active ECO is activated:
The acceleration may slightly be
reduced eventhough you depress
the accelerator fully.
The air conditioner performance may be limited.
The shift pattern of the automatic transaxle/dual clutch transmission
may change.
The above situations are normal
conditions when the active eco sys-
tem is activated to improve fuel effi-
ciency. Limitation of Active ECO oper- ation:
If the following conditions occur
whilst Active ECO is operating, the
system operation is limited eventhough there is no change in the
ECO indicator.
When the coolant temperature is
low: The system will be limited until
engine performance becomes nor-mal.
When driving up a hill: The system will be limited to gain power when
driving uphill because the engine
torque is restricted.
When using sports mode: The sys- tem will be limited according to theshift location.
When the accelerator pedal is deeply pressed for a few seconds:The system will be limited, judging
that the driver wants to speed up.
ACTIVE ECO SYSTEM (IF EQUIPPED)
ORP056023R
Page 570 of 723

What to do in an emergency
20
7
If this is difficult, tip the wheel slight- ly and get the top hole in the wheel
lined up with the top stud. Then jig-
gle the wheel back and forth until
the wheel can be slid over the other
studs. 10. To reinstall the wheel, hold it on
the studs, put the wheel nuts onthe studs and tighten them finger
tight. Jiggle the tyre to be sure itis completely seated, then tight-
en the nuts as much as possible
with your fingers again.
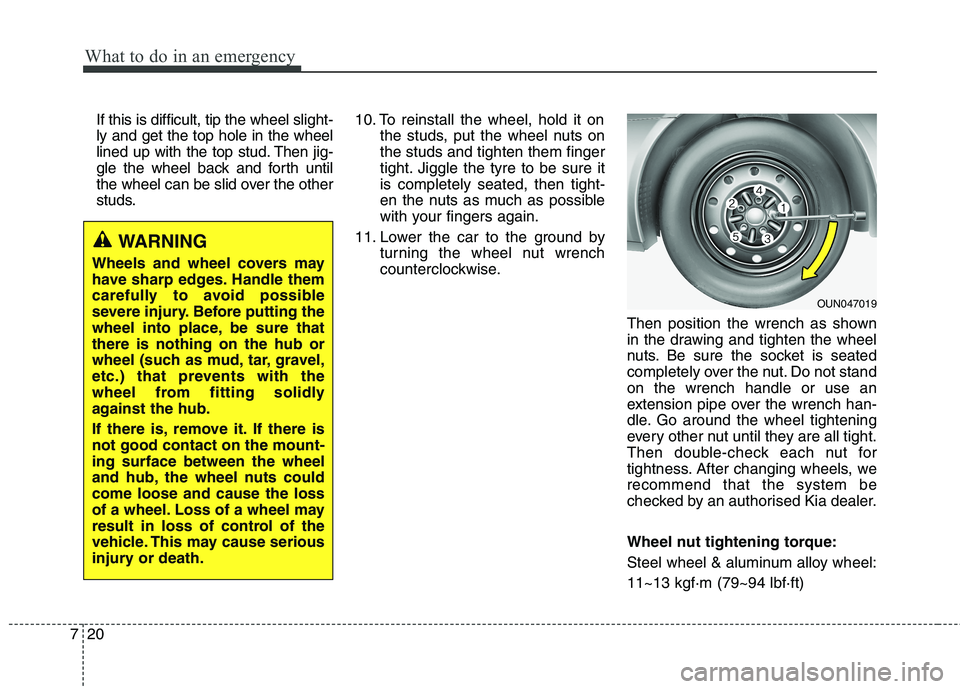
11. Lower the car to the ground by turning the wheel nut wrench
counterclockwise.
Then position the wrench as shown
in the drawing and tighten the wheel
nuts. Be sure the socket is seated
completely over the nut. Do not standon the wrench handle or use an
extension pipe over the wrench han-
dle. Go around the wheel tightening
every other nut until they are all tight.
Then double-check each nut for
tightness. After changing wheels, werecommend that the system be
checked by an authorised Kia dealer.
Wheel nut tightening torque:
Steel wheel & aluminum alloy wheel:11~13 kgf·m (79~94 lbf·ft)
WARNING
Wheels and wheel covers may
have sharp edges. Handle them
carefully to avoid possible
severe injury. Before putting the
wheel into place, be sure thatthere is nothing on the hub or
wheel (such as mud, tar, gravel,
etc.) that prevents with the
wheel from fitting solidly
against the hub.
If there is, remove it. If there is not good contact on the mount-ing surface between the wheel
and hub, the wheel nuts couldcome loose and cause the loss
of a wheel. Loss of a wheel may
result in loss of control of the
vehicle. This may cause serious
injury or death.
OUN047019
Page 618 of 723

831
Maintenance
Brake hoses and lines
Visually check for proper installation,
chafing, cracks, deterioration and
any leakage. Replace any deteriorat-
ed or damaged parts immediately. Brake fluid
Check brake fluid level in the brake
fluid reservoir. The level should be
between “MIN” and “MAX” marks on
the side of the reservoir. Use only
hydraulic brake fluid conforming to
DOT 3 or DOT 4 specification.
Brake pads, calipers and rotors
Check the pads for excessive wear,
discs for run out and wear, and
calipers for fluid leakage.
For more information on checking
the pads or lining wear limit, refer to
the Kia web site. (https://www
.kia-hotline.com)
Suspension mounting bolts
Check the suspension connections
for looseness or damage. Retighten
to the specified torque.
Parking brake
Inspect the parking brake system
including the EPB actuator, wiring
and connectors.
Steering gear box, linkage &
boots/lower arm ball joint
With the vehicle stopped and engine
off, check for excessive free-play in
the steering wheel.
Check the linkage for bends or dam-
age. Check the dust boots and ball
joints for deterioration, cracks, or
damage. Replace any damaged
parts.Drive shafts and boots
Check the drive shafts, boots and
clamps for cracks, deterioration, or
damage. Replace any damaged
parts and, if necessary, repack the
grease.
Air conditioning refrigerant/ compressor (if equipped)
Check the air conditioning lines and
connections for leakage and dam-
age.
Page 705 of 723

Specifications & Consumer information
6
9
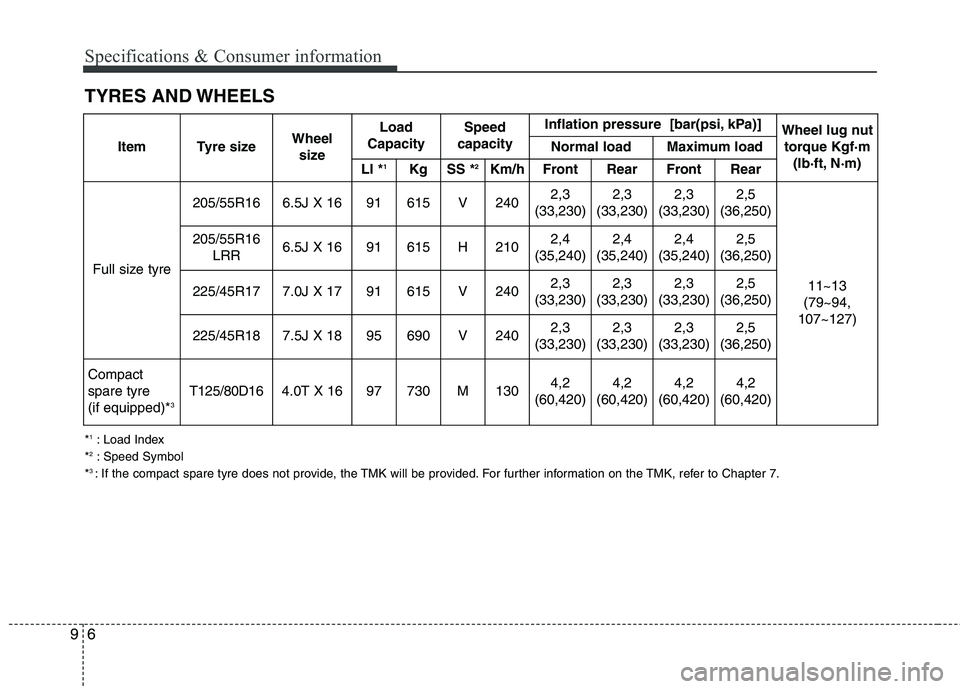
TYRES AND WHEELS * 1
: Load Index
* 2
: Speed Symbol
* 3
: If the compact spare tyre does not provide, the TMK will be provided. For further information on the TMK, refer to Chapter 7.
ItemTyre sizeWheel
sizeLoad
CapacitySpeed
capacityInflation pressure [bar(psi, kPa)] Wheel lug nut torque Kgf·m (lb·ft, N·m)
Normal loadMaximum load
LI * 1KgSS * 2Km/hFront RearFront Rear
Full size tyre
205/55R166.5J X 1691615V2402,3
(33,230)2,3
(33,230)2,3
(33,230)2,5
(36,250)
11~13
(79~94,
107~127)
205/55R16 LRR6.5J X 1691615H2102,4
(35,240)2,4
(35,240)2,4
(35,240)2,5
(36,250)
225/45R177.0J X 1791615V2402,3
(33,230)2,3
(33,230)2,3
(33,230)2,5
(36,250)
225/45R187.5J X 1895690V2402,3
(33,230)2,3
(33,230)2,3
(33,230)2,5
(36,250)
Compact spare tyre (if equipped)* 3
T125/80D164.0T X 1697730M1304,2
(60,420)4,2
(60,420)4,2
(60,420)4,2
(60,420)