Page 671 of 723

Maintenance
84
8
LIGHT BULBS
Use only the bulbs of the specified
wattage.
✽✽ NOTICE
After driving in heavy rain or wash-
ing the vehicle, headlight and tail-
light lenses could appear foggy. This
condition is caused by the tempera-
ture difference between the lamp
inside and outside. This is similar to
the condensation on your windows
inside your vehicle during rain and
does not indicate a problem with
your vehicle. If the water leaks into
the lamp bulb circuitry, we recom-
mend that the system be checked by
an authorised Kia dealer.WARNING - Working on
the lights
Prior to working on the light,
firmly apply the parking brake,
ensure that the ignition switch
is turned to the “LOCK” position
(smart key: turn off the engine)
and turn off the lights to avoid
sudden movement of the vehi-
cle and burning your fingers or
getting an electric shock.
CAUTION
Be sure to replace the burned- out bulb with one of the samewattage rating. Otherwise, it may cause damage to the fuseor electric wiring system.
CAUTION
If you do not have necessarytools, the correct bulbs and theexpertise, we recommend that you consult an authorised Kiadealer. In many cases, it is diffi-cult to replace vehicle lightbulbs because other parts of the vehicle must be removed beforeyou can get to the bulb. This isespecially true if you have to remove the headlight assemblyto get to the bulb(s).
Removing/installing the head-light assembly can result indamage to the vehicle.
Page 672 of 723
885
Maintenance
Front light replacement (1) Headlight (High) (2) Static bending light
(3) Headlight (Low)
(4) Position light/Daytime runninglight (DRL, LED Type) (if equipped)
(5) Front turn signal light
(6) Front fog light (if equipped) 1. Turn off the engine and open the
bonnet.
2. Disconnect the power connector front the back of the headlight
assembly.Static bending light
Follow the steps 1 to 2 from the pre-
vious chapter.
3. Remove the headlight bulb coverby turning it counterclockwise.
4. Disconnect the headlight bulb socket-connector.
5. Unsnap the headlight bulb retain- ing wire by depressing the end
and pushing it upward.
6. Remove the bulb from the head- light assembly.
ORP072057ORP076026L
Page 676 of 723
889
Maintenance
5. Insert a new bulb by inserting itinto the socket and rotating it until
it locks into place.
6. Install the socket in the assembly by aligning the tabs on the socket
with the slots in the assembly.
Push the socket into the assembly
and turn the socket clockwise.Front fog light (if equipped)
1. Pull the wheel guard down byrotating the screws.
2. Reach your hand into the back of the front bumper.
3. Disconnect the power connector from the socket. 4. Remove the bulb-socket from the
housing by turning the socket
counter clockwise until the tabs on
the socket align with the slots onthe housing.
5. Install the new bulb-socket into the housing by aligning the tabs on
the socket with the slots in the
housing. Push the socket into the
housing and turn the socket clock-
wise.
6. Connect the power connector to the socket.
ORP072063
OJD072050
Page 677 of 723

Headlight aiming
1. Inflate the tyres to the specified
pressure and remove any loads
from the vehicle except the driver,
spare ty")
Maintenance
90
8
Headlight and front fog light aim-
ing (for Europe)
Headlight aiming
1. Inflate the tyres to the specified
pressure and remove any loads
from the vehicle except the driver,
spare tyre, and tools.
2. The vehicle should be placed on a flat floor.
3. Draw vertical lines (Vertical lines passing through respective head
lamp centres) and a horizontal line
(Horizontal line passing throughcentre of head lamps) on thescreen. 4. With the head lamp and battery in
normal condition, aim the head
lamps so the brightest portion falls
on the horizontal and vertical
lines.
5. To aim the low beam left or right, turn the driver (1) clockwise or
counterclockwise. To aim the low
beam up or down, turn the driver
(2) clockwise or counterclockwise.
Front fog light aiming
The front fog lamp can be aimed as the same manner of the head lampsaiming.
With the front fog lamps and battery
normal condition, aim the front fog
lamps. To aim the front fog lamp up
or down, turn the driver clockwise or
counterclockwise.ORP072051
ORP076033L
Page 681 of 723
Maintenance
94
8
+10
-10
�b�i�a�ž�ž
ORP076082L
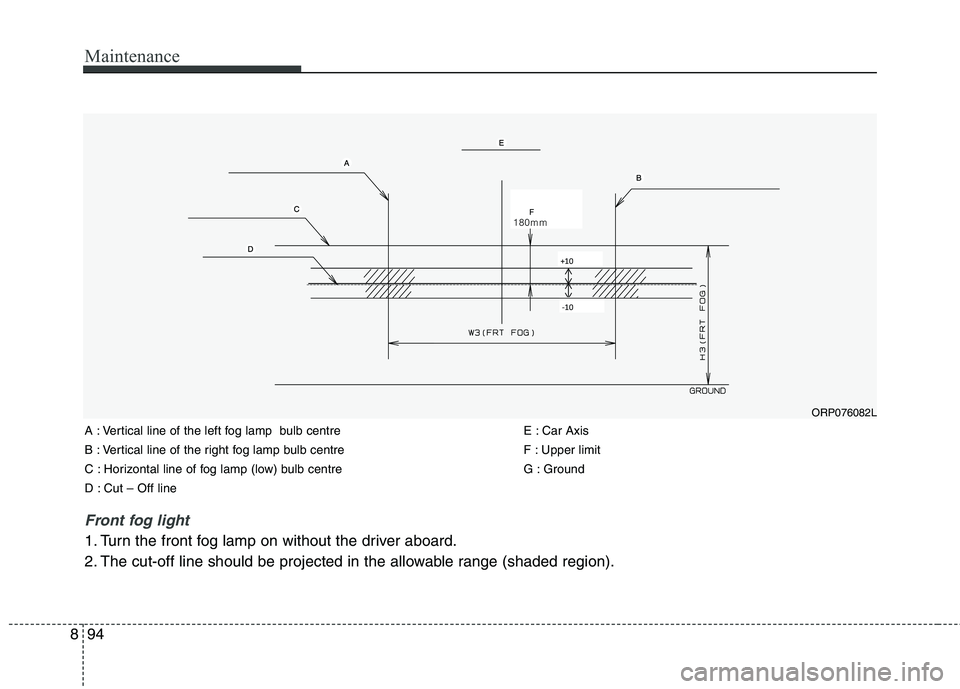
Front fog light
1. Turn the front fog lamp on without the driver aboard.
2. The cut-off line should be projected in the allowable range (shaded region).
A : Vertical line of the left fog lamp bulb centre
B : Vertical line of the right fog lamp bulb centre
C : Horizontal line of fog lamp (low) bulb centre
D : Cut – Off line
E : Car Axis
F : Upper limit
G : Ground
Page 682 of 723
895
Maintenance
Side repeater light bulb replacement
If the light bulb does not operate, we recommend that the system be
checked by an authorised Kia dealer.Rear combination light bulb replacement
(1) Rear turn signal light (2) Stop/tail light
(3) Back-up light (4) Tail light or stop/tail light
(for LED type)
(5) Rear fog & Reflex reflector light
ORP076035R
ORP072036
ORP072037
■ Type A
■Type B
Page 685 of 723
Maintenance
98
8
Rear fog light (if equipped)
1. Remove the socket from the
assembly by turning the socket
counterclockwise until the tabs on
the socket align with the slots on
the assembly.
2. Pull the bulb out of the socket.
3. Insert a new bulb into the socket.
4. Install the socket into the assem- bly by aligning the tabs on the
socket with the slots on the
assembly and turning the socket
clockwise.
5. Reinstall the light assembly to the body of the vehicle. Tail light or stop and tail light
(LED type)
If the light does not operate, we rec-
ommend that the system be checked
by an authorised Kia dealer.
High mounted stop light bulb replacement
If the light does not operate, we rec-
ommend that the system be checked
by an authorised Kia dealer.
ODMEMC2012
ORP072043
Page 695 of 723

Maintenance
108
8
Cleaning the upholstery and inte-
rior trim
Vinyl
Remove dust and loose dirt from
vinyl with a whisk broom or vacuum
cleaner. Clean vinyl surfaces with a
vinyl cleaner.
Fabric
Remove dust and loose dirt from fab-
ric with a whisk broom or vacuum
cleaner. Clean with a mild soap solu-
tion recommended for upholstery or
carpets. Remove fresh spots imme-
diately with a fabric spot cleaner. If
fresh spots do not receive immediate
attention, the fabric can be stained
and its colour can be affected. Also,
its fire-resistant properties can be
reduced if the material is not proper-ly maintained.
Cleaning the lap/shoulder beltwebbing
Clean the belt webbing with any mild
soap solution recommended for
cleaning upholstery or carpet. Follow
the instructions provided with the
soap. Do not bleach or re-dye the
webbing because this may weaken it.
Cleaning the interior window glass
If the interior glass surfaces of the
vehicle become fogged (that is, cov-
ered with an oily, greasy or waxy
film), they should be cleaned with
glass cleaner. Follow the directions
on the glass cleaner container.
CAUTION
Do not scrape or scratch theinside of the rear window. Thismay result in damage to the rear window defroster grid.
CAUTION
Using anything but recommend-ed cleaners and procedures mayaffect the fabric’s appearance and fire-resistant properties.
CAUTION
- Natural leather seat cover
(If equipped)
Natural leather has visiblepores, scars or blood vessels,etc. Pressure marks or wrinkles may be made when used.Prolonged exposure to sunlightor heat may cause discol- oration. These things occur dueto the natural characteristics ofcowhides. If the leather is exposed to rain or gets wet,remove water with a dry clothand dry the leather in the shadeto minimise damage. Make sure to keep sharp objects away fromthe leather as these can createscratches on the surface. For light-coloured leather, be care-ful of spots or colour transfer,such as from jeans.
 Headlight (High) (2) Static bending light
(3) Headlight (Low)
(4) Position light/Daytime runninglight (DRL, LED Type) (if equipped)
(5) Front turn signal")


1. Remove the socket from the
assembly by turning the socket
counterclockwise until the tabs on
the socket align with the slots on
the assembly.
2. Pul")