2017 JEEP GRAND CHEROKEE audio
[x] Cancel search: audioPage 316 of 372
time. If “No” is selected, simply select
“Uconnect” from the mobile phone/audio
device Bluetooth screen, and the
Uconnect system will reconnect to the
Bluetooth device.
Making A Phone Call
1. Push the PHONE button on the steeringwheel.
2. After the BEEP, say “dial” (or “call” a full name or phone number).
SMS Message Reader
After pairing your Uconnect system with a
Bluetooth enabled mobile device with the
Message Access Profile (MAP), the Uconnect
system can announce a new incoming text
message and read it to you over the vehicle’s
audio system.
NOTE:
Only incoming text messages received during
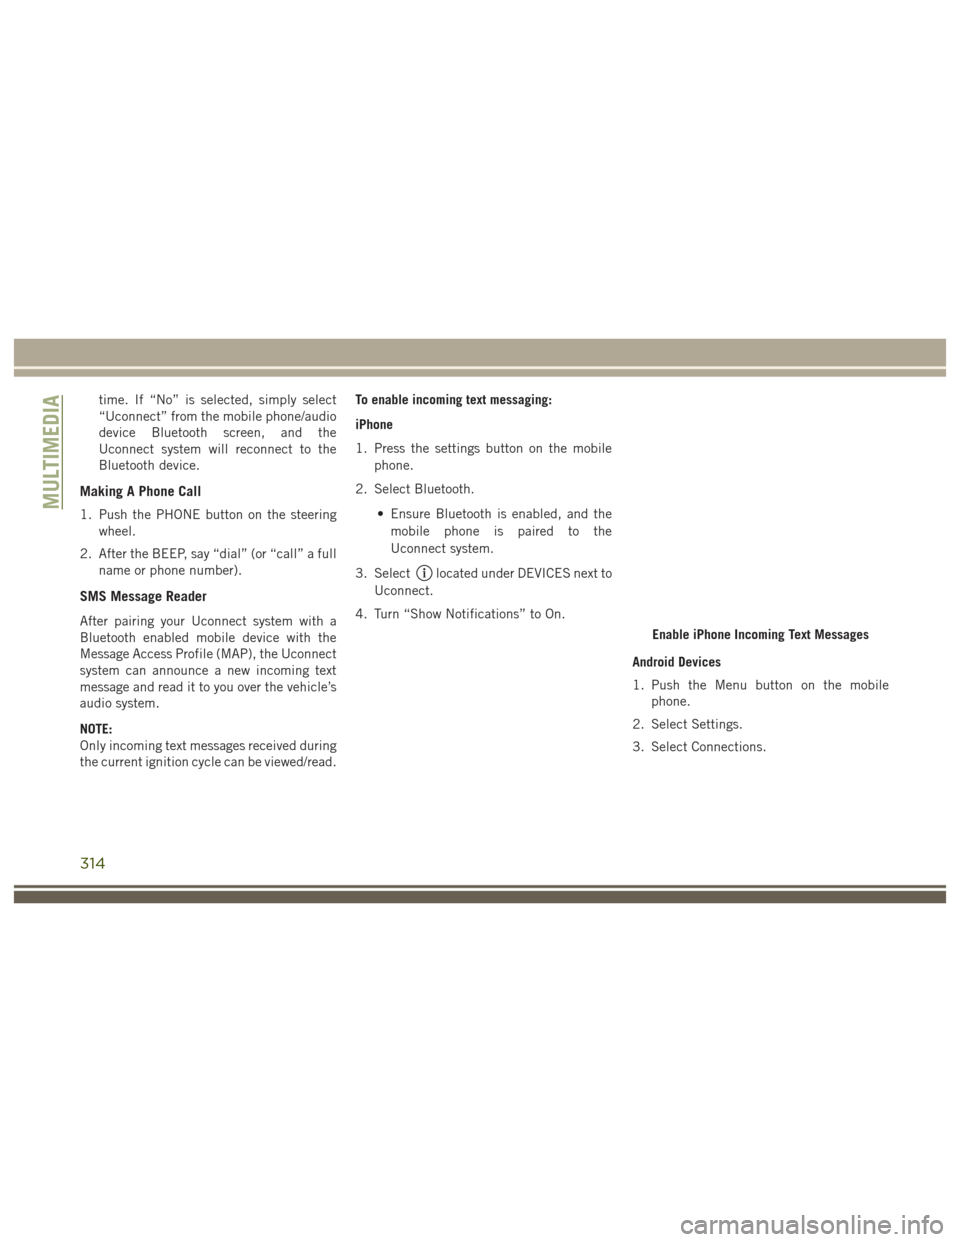
the current ignition cycle can be viewed/read. To enable incoming text messaging:
iPhone
1. Press the settings button on the mobile
phone.
2. Select Bluetooth.
• Ensure Bluetooth is enabled, and themobile phone is paired to the
Uconnect system.
3. Select
located under DEVICES next to
Uconnect.
4. Turn “Show Notifications” to On.
Android Devices
1. Push the Menu button on the mobilephone.
2. Select Settings.
3. Select Connections.
Enable iPhone Incoming Text Messages
MULTIMEDIA
314
Page 319 of 372
WARNING!
ALWAYS drive safely with your hands on
the wheel. You have full responsibility and
assume all risks related to the use of the
Uconnect features and applications in this
vehicle. Only use Uconnect when it is safe
to do so. Failure to do so may result in an
accident involving serious injury or death.
CAUTION!
Do NOT attach any object to the touch-
screen, doing so can result in damage to
the screen.
Setting The Time
• Model 8.4 NAV synchronizes time auto-matically via GPS, so it should not require
any time adjustment. If you do need to set
the time manually, follow the instructions
below for Model 8.4.
• For Model 8.4, turn the unit on, then press the time display at the top of the screen.
Press “Yes.”
• If the time is not displayed at the top of the screen, press the “Settings” button on the touchscreen. In the Settings screen, press
the “Clock” button on the touchscreen,
then check or uncheck this option.
• Press “+” or “–” next to Set Time Hours and Set Time Minutes to adjust the time.
• If these features are not available, un- check the Sync Time box.
• Press “X” to save your settings and exit out of the Clock Setting screen.
Background Themes
• Screen background themes are selectablefrom a pre-loaded list of themes. If you’d
like to set a theme, follow the instructions
below.
• Press the “Settings” button on the touch- screen.
• Press the “Display” button on the touch- screen.
• Then press “Set Theme” button on the touchscreen and select a theme.
Audio Settings
• Press of the “Audio” button on the touch-screen to activate the Audio settings
screen to adjust Balance\Fade, Equalizer,
and Speed Adjusted Volume.
• You can return to the Radio screen by pressing the “X” located at the top right.
Balance/Fade
• Press the “Balance/Fade” button on thetouchscreen to Balance audio between the
front speakers or fade the audio between
the rear and front speakers.
• Pressing the “Front,” “Rear,” “Left,” or “Right” buttons on the touchscreen or
press and drag the Speaker Icon to adjust
the Balance/Fade.
Equalizer
• Press the “Equalizer” button on the touch-screen to activate the Equalizer screen.
• Press the “+” or “–” buttons on the touch- screen, or press and drag over the level bar
for each of the equalizer bands. The level
value, which spans between plus or minus
9, is displayed at the bottom of each of the
Bands.
317
Page 320 of 372
Speed Adjusted Volume
• Press the “Speed Adjusted Volume” but-ton on the touchscreen to activate the
Speed Adjusted Volume screen. The
Speed Adjusted Volume is adjusted by
pressing the volume level indicator. This
alters the automatic adjustment of the
audio volume with variation to vehicle
speed.
Personalized Menu Bar
The Uconnect features and services in the
main menu bar are easily changed for your
convenience. Simply follow these steps: 1. Press the “Apps
” button to open the
App screen.
2. Press and hold, then drag the selected App to replace an existing shortcut in the
main menu bar.
The replaced shortcut will now be an
active App/shortcut on the main menu
bar.Radio Mode
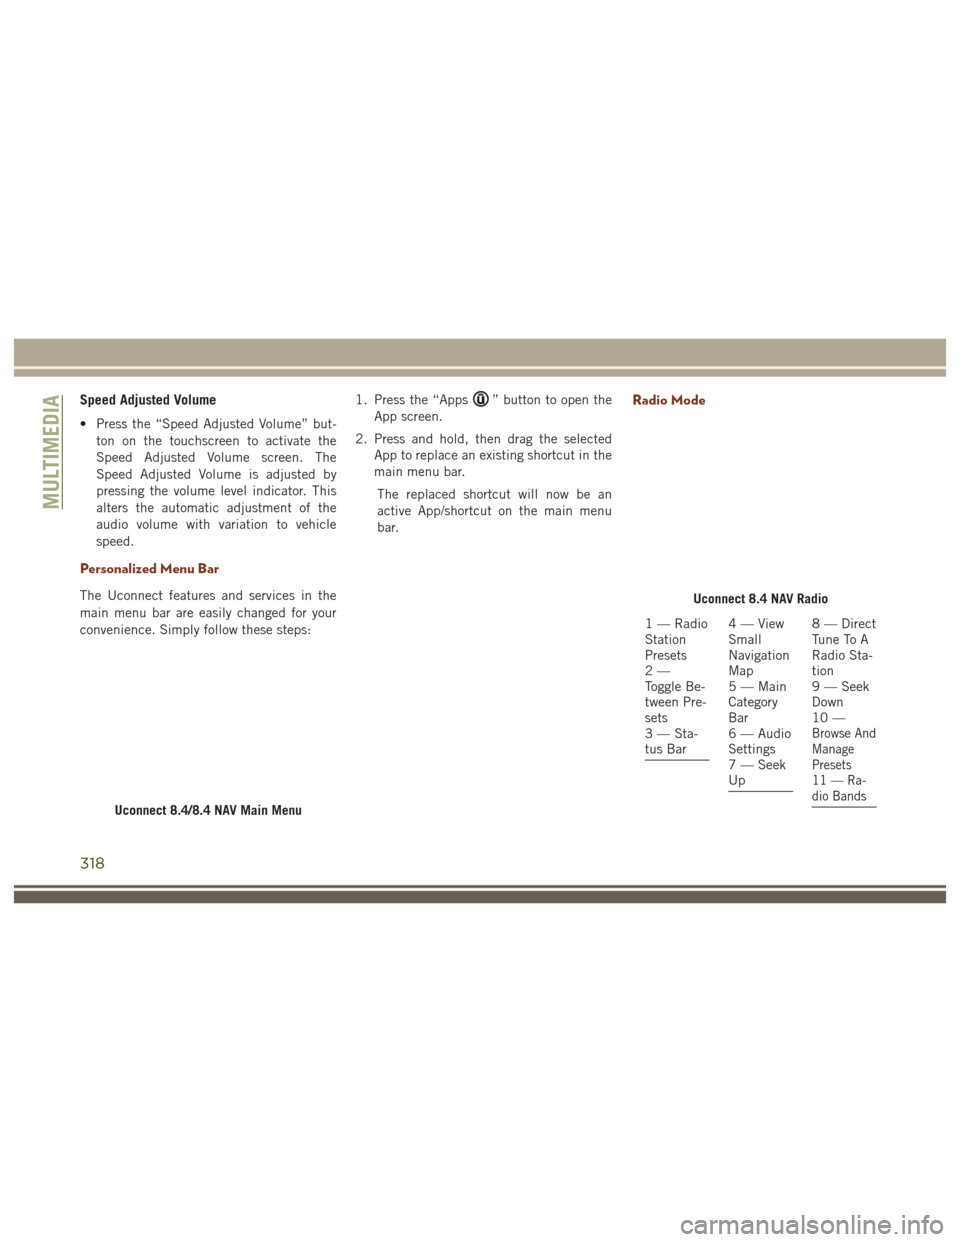
Uconnect 8.4/8.4 NAV Main Menu
Uconnect 8.4 NAV Radio
1 — Radio
Station
Presets
2—
Toggle Be-
tween Pre-
sets
3 — Sta-
tus Bar4—View
Small
Navigation
Map
5 — Main
Category
Bar
6 — Audio
Settings
7 — Seek
Up8 — Direct
Tune To A
Radio Sta-
tion
9 — Seek
Down
10 —
Browse And
Manage
Presets
11 — Ra-
dio Bands
MULTIMEDIA
318
Page 324 of 372
our satellite service area and in AK and HI.
©2016 Sirius XM Radio Inc. Sirius, XM
and all related marks and logos are trade-
marks of Sirius XM Radio Inc.
UCONNECT TOUCH
SETTINGS
The Uconnect system allows you to access
Customer Programmable feature settings
such as Display, Voice, Clock, Safety & Driv-
ing Assistance, Lights, Doors & Locks,
Auto-On Comfort & Remote Start, Engine Off
Options, Compass Settings, Audio, Phone/
Bluetooth, Suspension, SiriusXM Setup, Re-
store Settings, Clear Personal Data, and Sys-
tem Information through buttons on the
touchscreen.
Push the SETTINGS button (Uconnect 5.0),
or press the “Apps” button (Uconnect 8.4)
located near the bottom of the touchscreen,
then press the “Settings” button on the
touchscreen to access the Settings screen.
When making a selection, scroll up or down
until the preferred setting is highlighted,
then press the preferred setting until a check-mark appears next to the setting, showing
that setting has been selected. The following
feature settings are available:
• Display
• Engine Off Op-
tions
• Voice • Suspension
• Clock • Audio
• Safety & Driving Assistance • Phone/Bluetooth
• Lights • SiriusXM Setup
• Doors & Locks • Restore Settings
• Auto-On Comfort & Remote Start • Clear Personal
Data
• Compass (Uconnect 5.0) • System Informa-
tion
NOTE:
Depending on the vehicles options, feature
settings may vary.
Refer to “Uconnect Settings/Customer Pro-
grammable Features” in the “Multimedia”
Chapter on
www.jeep.com/en/owners/manuals/ for fur-
ther information.
IPOD/USB/SD CARD/MEDIA
PLAYER CONTROL
There are many ways to play music from
MP3 players, USB devices, or SD Cards
through your vehicle's sound system. Press
your Media button on the touchscreen to
begin.
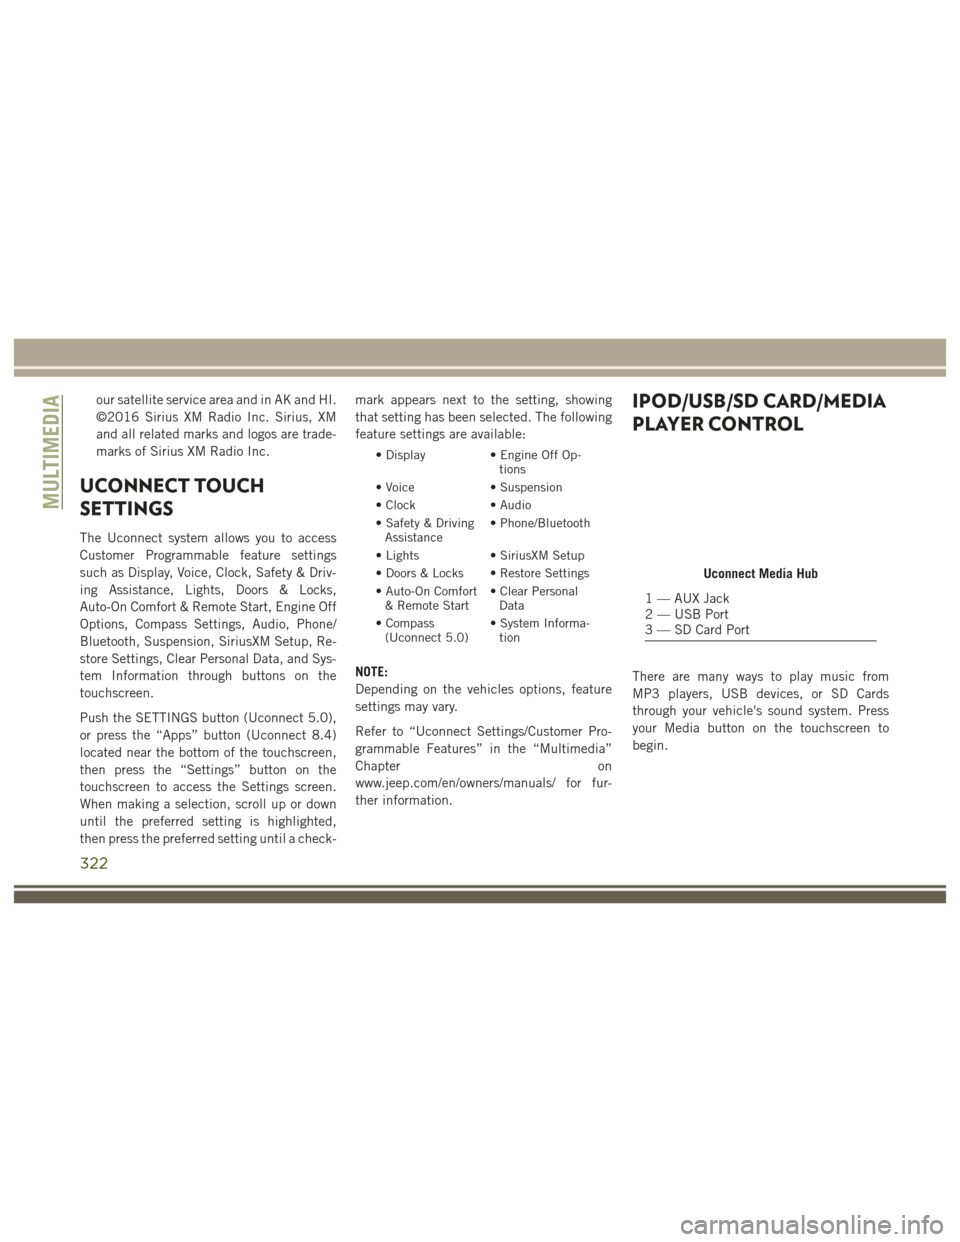
Uconnect Media Hub
1 — AUX Jack
2 — USB Port
3 — SD Card Port
MULTIMEDIA
322
Page 325 of 372

Audio Jack (AUX)
• The AUX allows a device to be plugged intothe radio and utilize the vehicle’s sound
system, using a 3.5 mm audio cable, to
amplify the source and play through the
vehicle speakers.
• Pressing the “AUX” button on the touch- screen will change the mode to auxiliary
device if the audio jack is connected,
allowing the music from your device to be
heard through the vehicle's speakers. To
activate the AUX, plug in the audio jack.
• The functions of the device are controlled using the device buttons. The volume may
be controlled using the radio or device.
• To route the audio cable out of the center console, use the access cut out in the front
of the console.
USB Port
• Connect your compatible device using aUSB cable into the USB Port. USB
Memory sticks with audio files can also be
used. Audio from the device can be played
on the vehicles sound system while provid-
ing metadata (artist, track title, album,
etc.) information on the radio display. • When connected, the compatible USB de-
vice can be controlled using the radio or
Steering Wheel Audio Controls to play,
skip to the next or previous track, browse,
and list the contents.
• The battery charges when plugged into the USB port (if supported by the specific
device).
• To route the USB cable out of the center console, use the access cut out.
NOTE:
When connecting your device for the first
time, the system may take several minutes to
read your music, depending on the number of
files. For example, the system will take ap-
proximately five minutes for every
1,000 songs loaded on the device. Also dur-
ing the reading process, the Shuffle and
Browse functions will be disabled. This pro-
cess is needed to ensure the full use of your
features and only happens the first time it is
connected. After the first time, the reading
process of your device will take considerably
less time unless changes are made or new
songs are added to the playlist.
SD Card
• Play songs stored on an SD card inserted into the SD card slot.
• Song playback can be controlled using the radio or Steering Wheel Audio Controls to
play, skip to the next or previous track,
browse, and list the contents.
Bluetooth Streaming Audio
If using a Bluetooth equipped device you may
also be able to stream music to your vehicle's
sound system. Your connected device must
be Bluetooth compatible and paired with your
system (see Uconnect Phone for pairing in-
structions). You can access the music from
your connected Bluetooth device by pressing
the Bluetooth button on the touchscreen
while in Media mode.
323
Page 326 of 372

Media ControlsThe controls are accessed by pressing the
desired button on the touchscreen and
choosing between Disc, AUX, USB,
Bluetooth or SD Card.
NOTE:
Uconnect will automatically switch to the
appropriate mode when something is first
connected or inserted into the system.
UCONNECT REAR SEAT
ENTERTAINMENT (RSE)
SYSTEM — IF EQUIPPED
Your Rear Seat Entertainment System is de-
signed to give your family years of enjoyment.
You can play your favorite CDs, DVDs or
Blu-ray Discs, listen to audio over the wire-
less headphones, or plug and play a variety of
standard video games or audio devices.
Please review this Owner's Manual to become
familiar with its features and operation.
Getting Started
•Screen(s) located in the rear of front seats:
Open the LCD screen cover by lifting up on
cover. • Place the ignition in the ON or ACC posi-
tion.
• Your vehicle may be equipped with a Blu- ray Disc Player. If equipped with a Blu-ray
disc player, the icon will be present on the
Player.
• Turn on the Rear Seat Entertainment sys- tem by pushing the power button on the
remote control.
Media Controls
1 — Repeat
Music Track
2 — Music
Track And Time
3 — Shuffle
Music Tracks
4 — Music
Track Informa-
tion5 — Show
Songs Currently
In Cue To Be
Played
6 — Browse
Music By
7 — Music
SourceRSE System Screen
MULTIMEDIA
324
Page 329 of 372
Using The Touchscreen Radio
1.RSE Channel 1 Mode
Indicates the current source for Screen
1/Channel 1. This button will be high-
lighted when it is the active Screen/
Channel being controlled by the front
user. If this button is not highlighted,
select button to access controls for
Screen 1/Channel 1 source.
2. RSE Power
Press to turn RSE On/Off. 3.
RSE Mute
Mute rear headphones for the current
ignition cycle. Pressing mute again will
unmute rear headphones.
4. RSE Remote Control Lock Out
Press to enable/disable remote control
functions.
5. RSE Channel 2 Mode
Indicates the current source for Screen
2/Channel 2. This button will be high-
lighted when it is the active Screen/
Channel being controlled by the front
user. If this button is not highlighted,
select button to access controls for
Screen 2/Channel 2 source.
6. Radio Full Screen Mode
Select this button to change to Full
Screen Mode.
7. Cabin Audio Mode
Select this button to change the cabin
audio to the rear entertainment source
currently shown on the rear media control
screen. 8.
RSE Mode
Select this button to change source for
the active (highlighted) rear Screen/
Channel on the rear media control screen.
• Press the Media button on the touch- screen, and then press the rear media
button on the touchscreen.
• Press the OK button on the touchscreen to begin playing the Blu-ray disc on the
touchscreen radio.
Using The Remote Control
• Select an audio channel (Rear 1 for driv- er’s side rear screen and Rear 2 for pas-
senger’s side rear screen), and then press
the source key, and using the up and down
arrows, highlight disc from the menu and
press the OK button.
• Press the popup/menu key to navigate the disc menu and options.
Rear Media Control Screen
327
Page 330 of 372
Play Video Games
Connect the video game console to the Audio/
Video RCA/HDMI input jacks located on the
side of each seat.
Audio/Video RCA/HDMI Jacks (AUX/HDMI
Jacks) on the side of each seat enable the
monitor to display video directly from a video
camera, connect video games for display on
the screen, or play music directly from an
MP3 player.When connecting an external source to the
AUX/HDMI input, ensure to follow the stan-
dard color coding for the audio/video jacks:
1. HDMI Input.
2. Right audio in (red).
3. Left audio in (white).
4. Video in (yellow).
NOTE:
Certain high-end video games consoles may
exceed the power limit of the vehicle's Power
Inverter.
NAVIGATION
• The information in the section below is
only applicable if you have the 8.4 NAV
system or the Navigation has been acti-
vated on your 8.4 system.
• If you have a Uconnect 8.4 system your radio is “Navigation-Ready,” and can be
equipped with Navigation at an extra cost.
Please see your dealer for details.
Press the “Nav” button on the touchscreen in
the menu bar to access the Navigation sys-
tem.
Changing The Navigation Voice Prompt
Volume
1. Press the “View Map” button on the touchscreen from the Nav Main Menu.
2. With the map displayed, press the “Set- tings” button on the touchscreen in the
lower right area of the screen.
3. In the Settings menu, press the “Guid- ance” button on the touchscreen.
4. In the Guidance menu, adjust the Nav Volume by pressing the “+” or “–” buttons
on the touchscreen.
Audio/Video RCA/HDMI Input Jacks
MULTIMEDIA
328