Page 9 of 20
6
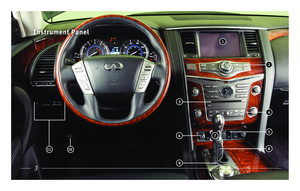
Meters and Gauges
1 Engine coolant temperature gauge
2 Tachometer
3 Vehicle information display
4 Shift lever indicator
5 Speedometer
6 Fuel gauge
Page 10 of 20

To activate the cruise control, push the ON/OFF switch 1 on the
steering wheel.
To set a cruising speed, accelerate the vehicle to the desired speed,
pu")
7
Cruise Control (if so equipped)
To activate the cruise control, push the ON/OFF switch 1 on the
steering wheel.
To set a cruising speed, accelerate the vehicle to the desired speed,
push the switch 2 on the steering wheel down toward COAST/SET
and release.
To reset at a faster cruising speed, push and hold the switch 3 up
toward ACCEL/RES. When the vehicle attains the desired speed, release
the switch.
To cancel the preset speed, tap the brake pedal or push the
CANCEL switch 4. To turn off cruise control, push the ON/OFF switch 1.
VEHICLE-TO-VEHICLE DISTANCE CONTROL MODE(if so equipped)
• Press the vehicle-to-vehicle distance button 5 on the steering wheel
repeatedly to change the set distance.
• When a vehicle is not detected ahead, the set distance and set vehicle
speed indicator lights will illuminate 6 in set mode. • When a vehicle is detected ahead, the vehicle ahead detection, set
distance and set vehicle speed indicator lights will illuminate 7 in
set mode.
TO USE CONVENTIONAL (FIXED SPEED) CRUISE CONTROL MODE
(if so equipped)
• While cruise control is off, push and hold the ON/OFF switch 1 on the
steering wheel for more than 1.5 seconds. The CRUISE indicator light
will illuminate.
• Accelerate to the desired speed. • Push the switch 2 down toward COAST/SET and release it. The SET
indicator light will illuminate.
Please see your Owner’s Manual for important safety information, syst\
em limitations, and additional
operating and feature information.
5
4
3
2
1
67
Page 11 of 20
 — Rear wiper
operates intermittently.
Low (ON
) — Rear wiper operates at a
continuous low-speed.
Push the lever forward 3 t")
8
Wiper and Washer Switch
REAR WIPER AND WASHER
Intermittent (INT) — Rear wiper
operates intermittently.
Low (ON
) — Rear wiper operates at a
continuous low-speed.
Push the lever forward 3 to activate
the rear washer.
3
RAIN-SENSING AUTOMATIC WIPER SYSTEM
To set the Rain-Sensing Automatic
Wiper System:
Push the lever down to the AUTO
position
4.
The rain sensor sensitivity level can be
adjusted by:
Turning the knob toward the front (High) for
High Sensitive Operation 5.
Turning the knob toward the rear (Low) for
Low Sensitive Operation
6.
To turn the Rain-Sensing Automatic Wiper
System off, push the lever to the OFF position.
Please see your Owner’s Manual for important safety
information, system limitations, and additional operating and
feature information.
4
56
Move the lever 1 up or down to one of
the following positions to operate the windshield wipers:
MIST
One sweep operation
OFF
Wipers are OFF
AUTO
Rain-sensing automatic wipe
LO
Continuous wipe, slow
HI
Continuous wipe, fast
To adjust the wiper sensitivity for the AUTO setting, twist
the control ring
2.
Pull the lever
1 toward you operate the
windshield washer.
1 2
Page 12 of 20
 headlight mode ON posit")
9
6
7
Exterior Light Operation
3
4 5
1
2
1 Side lights, license plate lights and combination meter lighting
ON position
2 Headlight ON position
3 Automatic (AUTO) headlight mode ON position (headlights
switch on/off automatically depending on ambient light
conditions/daytime light system)
4 OFF position
5 Front fog light switch
6 Push the headlight switch forward for the high beams. For High Beam Auto-Dimming (Auto position):
• When the vehicle speed is less than 17 mph
(27 km/h), the headlight returns to low beam.
• To disable high beam auto-dimming, turn headlight
switch to Headlight ON position 2.
7 Pull the headlight switch rearward to flash the high beams.
For normal headlight operation, leave the exterior light switch in the
AUTO position.
Please see your Owner’s Manual for important safety information, system limitations, and
additional operating and feature information.
To apply the parking brake, fully depress the parking brake pedal 1.
To release the parking brake:
Firmly apply the foot brake 2.
Depress the parking brake pedal 1 and the parking brake will be released.Please see your Owner’s Manual for important safety information, syst\
em limitations, and additional operating
and feature information.
Parking Brake
USB Connection Port
The USB port 1 is located in the center
console in front of the armrest. Compatible
audio and video files stored on a USB
device can be played through the vehicle’s
audio system and front display.
Please see your Owner’s Manual for important safety
information, system limitations, and additional operating and
feature information.
2
1
1
Page 13 of 20

With this entertainment system, you can play video files on both
the front and rear display screens.
Watching a DVD:
• Insert a DVD into the DV")
10
Dual Head Restraint DVD System (if so equipped)
With this entertainment system, you can play video files on both
the front and rear display screens.
Watching a DVD:
• Insert a DVD into the DVD slot 1 and the DVD will play
automatically. The front display will only work when the
vehicle is in park and the parking brake is engaged.
• Press the DISC•AUX button 2 on the control panel to bring
up the DVD menu and display settings. Use the touch-screen
and the Infiniti controller to select the menu items.
Watching videos from a USB device:
• Connect your compatible device to the USB connection port or
AUX jacks located inside the tray in the center console box.
• The source can be changed on the rear displays using the
remote by pressing the SOURCE button.
5 POWER – Turn display screen on and off
6 DISPLAY SELECT – Change display controls
between right and left screen
7 SOURCE – Change video source
8 MENU – Change menu display
9 ENTER/Selection Buttons – Control and
select buttons
10 BACK – Previous menu button
11 SETUP – Bring up display menu
12 Video Controls – Play, stop, fast forward
and rewind buttons
13 Volume – Control audio level
5
12
7
10
13
REAR DISPLAYS
To turn the rear displays on and off from the
front seats:
1. Press the SETTING button 3 on the
control panel.
2. Select the “Rear Display” key on
the display.
3. Toggle the “L” (Left) or “R” (Right) Display
4 ON or OFF.
2
3
1
8
6
11
Please see your Owner’s Manual for important safety information, syst\
em limitations, and additional operating and
feature information.
9
4
Page 14 of 20

11
Navigation System
2 1 5
4 7 312
6 8
9
10
11
Use the Infiniti controller 1 and ENTER button 2 to navigate through the center
display screen.
• Press the BACK button 3 to return to the previous screen. • Press the MAP button 4 to display the map.
SETTING A ROUTE
• To set a route, first ensure that the correct region is selected on the \
touch-screen. 1. Press the DEST button 5 on the control panel.
2. Select the “Change Region” key 6.
3. Select the preferred region.
• Once this is complete, select your destination. 1. Press the DEST button 5 on the control panel.
2. Select the preferred destination setting method.
3. Enter the address number, street name, and city as prompted by the scree\
n.
CANCELING A ROUTE
1. Press the ROUTE button 7 on the control panel.
2. Select the “Cancel Route” key
8.
VOICE GUIDANCE
• To activate voice guidance: 1. Press the ROUTE button 7 on the control panel.
2. Select the “Guidance Settings” key 9.
3. To ensure that voice guidance is activated, select the “Guidance Voic\
e”
key 10. The indicator illuminates if voice guidance is activated.
• To adjust the guidance volume, select the “Guidance Volume” key 11.
• To hear the current guidance during a programed route, press the VOICE button 12.Please see your Owner’s Manual for important safety information, syst\
em limitations, and additional operating and
feature information.
Page 15 of 20

12
Clock Set/Adjustment
DIGITAL CLOCK WITH NAVIGATION
To adjust the time and the appearance of the
clock on the display:
1. Press the SETTING button on the
control panel.
2. Select the “Others” key.
3. Select the “Clock” key.
ANALOG CLOCK
To set the clock forward, press the button
1.
To set the clock backward, press the
button
2.
Please see your Owner’s Manual for important safety
information, system limitations, and additional operating and
feature information.
1 2
SYSTEM OPERATING TIPS
• The interior of the vehicle should be as quiet
as possible.
• Speak naturally. Speaking too fast, too slow,
too soft, or too loud makes voice recognition
more difficult.
• Confirm that the correct voice commands are being
used. Glance at the screen to see the currently
available commands.
USING THE VOICE RECOGNITION SYSTEM
• Press the button 1 on the steering wheel, and a
list of commands will appear on the screen.
• After the tone sounds, speak the command.
• To skip the voice prompt and give the command
immediately, press the button 1 on the steering
wheel to interrupt the system. Speak the next
command after the tone sounds.
• To cancel the command, press and hold the button 1 on the steering wheel.
Please see your Owner’s Manual for important safety information, syst\
em
limitations, and additional operating and feature information.
Voice Recognition
1
Page 16 of 20

13
Bluetooth® Streaming Audio*
1. Press the SETTING button on the control panel and touch the “Bluetooth” key on the \
display.
2.
Select “Connected Devices”.
3.
Select “Audio Player”.
4.
Select the name of the device that you are attempting to connect as an a\
udio player.
5.
Select “Select”.
6.
Verify that the system confirms that the device has been selected as an \
audio player.
For any Bluetooth® connectivity issues, reboot your cellular phone or device.
*Some jurisdictions prohibit the use of cellular telephones while drivin\
g.
Please see your Owner’s Manual for important safety information, syst\
em limitations, and additional operating and
feature information.
Connecting your Cellular Phone or Device via Bluetooth®*
CONNECTING PROCEDURE
The vehicle must be stationary when connecting the cellular phone.
1.
Press the SETTING button on the control panel and touch the “Bluetooth” key on the \
display.
2. Touch the “Connect Bluetooth” key.
3.
A pop-up box will appear on the screen, prompting you to confirm that th\
e connection is for the
hands-free phone system. Touch the “Yes” key.
4. Initiate connecting from the cellular phone.
For any Bluetooth
® connectivity issues, reboot your cellular phone or device.
*Some jurisdictions prohibit the use of cellular telephones while drivin\
g.
Please see your Owner’s Manual for important safety information, syst\
em limitations, and additional operating and feature information.