Page 9 of 24
6
Meters and Gauges
1 Tachometer
2 Engine coolant temperature gauge
3 Shift lever indicator
4 Vehicle information display
5 Speedometer
6 Fuel gauge
For more information, refer to your Owner
Page 10 of 24

7\bor more informatio\nn, refer to your Ow\nner’s Manuals.
Adjusting the outsi\nde mirrors:
To adjust the outs\nide mirrors,
move the swit\fh
1 right or left to \n
sele\ft the right or\n left mirror.
Adjust the positio\nn of the mirror
using the dire\ftiona\nl \fontrol
swit\fh
2.
\bolding the outside\n mirrors:
To fold the mirror\ns \flosed, push the \n
swit\fh 3. To open the mirro\nrs,
push the
swit\fh 4.
Opening the Liftgate\T
To open the liftgat\ne:
Push the power lif\ntgate swit\fh
1 on the instrument pa\nnel.
Push the liftgate \nopener swit\fh
2; the liftgate mus\nt be unlo\fked,
or you must have t\nhe Intelligent Key \nwith you (that is,\n in your
po\fket or purse).
Press the
button 3 on the Infiniti Inte\nlligent Key for lon\nger
than 1 se\fond.
The power liftgate\n operation \fan be tu\nrned on or off by t\nhe power
liftgate main swit\f\nh
4 on the instrument pa\nnel.
MOTION-ACTIVATED LIFTGATE
The liftgate \fan al\nso be opened and \flo\nsed using a
foot ki\fking motion w\nhen it is lo\fked or \nunlo\fked. The
Intelligent Key mus\nt be present within\n 3 ft (1 m) of
the liftgate.
To use this featur\ne, make a single ki\f\nking motion under th\ne
\fenter of the rear \nbumper
5. After the motion \nis \fomplete,
step ba\fk to allow \nthe liftgate to op\nen or \flose.
Outside Mirrors
1
2
4 3
5
REVERSE TILT-DOWN FEATURE (IF SO EQUIPPED)
When ba\fking up the \nvehi\fle, the outsid\ne mirrors will tur\nn
downward automati\fa\nlly to provide bet\nter rear visibilit\ny. To
enable the reverse \ntilt-down feature, \nmove the swit\fh
1 to
either the left or\n right position.
If the swit\fh
1 is set it in the \fe\nnter (neutral) posit\nion, the
mirror will not til\nt down when reversi\nng.
2
3
1 4
Page 11 of 24

8
2nd Row Seats
Forward and backward adjustment:
Pull the center of the bar
1 up and hold it while you slide the seat forward or
backward to the desired position until it latches.
Seat angle adjustment:
Pull up on the lever
2 and lean back until the seat latches. To bring the
seatback forward, pull the lever up and lean your body forward until it \
latches.
MULTI-MODE/CHILD SEAT ACCESS FUNCTION
On the passenger’s side of the vehicle, the 3
rd row can be accessed without
removing a child seat installed in the 2nd row.
•
Lift up on the seatback release lever 3 and slide the entire seat forward.
•
To return the seat to a locked position, push the upper seatback rearwar\
d
until the seatback and track are locked.
1
2
3
Wiper and Washer Switch
Move the lever 1 up or down to one of the following positions to
operate the windshield wipers:
MIST
One sweep operation
OFF
Wipers are OFF
AUTO
Speed-sensing and rain-sensing (if so equipped) automatic wipe
LO
Continuous wipe, slow
HI
Continuous wipe, fast
To adjust the wiper sensitivity for the
AUTO setting, twist the
control ring
2. The rain-sensing function (if so equipped) can be
disabled in the vehicle information display under “Vehicle Settings”\
.
Pull the lever
1 toward you operate the windshield washer.
REAR WIPER AND WASHER
Turn the rear wiper switch
3 to one of the following positions to operate
the rear wiper:
OFF
Wiper is OFF
INT
Intermittent wiping
ON
Continuous wipe, slow
Push the lever
1 forward to operate the rear windshield washer.
1
2 3
For more information, refer to your Owner
Page 12 of 24

The Dynamic Driver Assistance switch 1 can be used to temporarily turn on and
off the following systems:
•
Lane Departure Prevention (L")
9
Dynamic Driver Assistance Switch
(if so equipped)
The Dynamic Driver Assistance switch 1 can be used to temporarily turn on and
off the following systems:
•
Lane Departure Prevention (LDP): The LDP system helps warns the driver\
with
a warning light and chime and helps assist the driver to return the vehi\
cle to
the center of the traveling lane.
•
Distance Control Assist (DCA): The DCA system helps assist the driver \
to
maintain a following distance from a vehicle ahead by activating the bra\
kes
and moving the accelerator pedal upward to decelerate smoothly.
•
Blind Spot Intervention® (BSI): The BSI system helps alert the driver of other
vehicles in adjacent lanes when changing lanes with a warning light and \
chime. It also helps assist the driver to return to the center of the cu\
rrent
traveling lane when another vehicle is present in the adjacent lane.
1
The USB ports 1 are located in the center console under the armrest.
•
When a compatible USB memory device or iPod® is plugged into
one of the USB ports, compatible audio files stored on the device
can be played through the vehicle’s audio system.
•
These ports will also charge compatible devices.
USB/iPOD
® CHARGING PORTS
•
There is a USB port located in the 2nd row on the back of the center
console
2 and two ports in the 3rd row located above the cup
holders
3. These ports will charge compatible devices.
USB Connection Ports
1
3
2
For more information, refer to your Owner
Page 13 of 24
1
To start your vehi\n\fle remotely, press\n the
button 1 on the Infiniti Inte\nlligent
Key, and within")
\bor more informatio\nn, refer to your Ow\nner’s Manuals.10
Remote Start (if s\To equipped)1
To start your vehi\n\fle remotely, press\n the
button 1 on the Infiniti Inte\nlligent
Key, and within 5 s\ne\fonds, press and
hold the remote eng\nine start
button
2 for at least 2 se\fo\nnds.
Automati\f \flimate \fo\nntrol will begin
heating or \fooling t\nhe vehi\fle based
on the temperature \ninside and
outside the vehi\fle\n.
The engine will run \nfor 10 minutes
and then turn off. T\no extend the time
for an additional 1\n0-minute period,
repeat the pro\fedur\ne.
To start driving, d\nepress the brake
pedal and press the\n ignition swit\fh START/STO\f button.
Remote start \fan be\n enabled or disable\nd through the vehi\n\fle
information display\n.
HEATED STEERING WHEEL (if so equipped)
The heated steering\n wheel may be a\ftiv\nated during remote \n
engine start when ou\ntside and \fabin temp\neratures are low.
During remote start\n, the heated steer\ning wheel swit\fh wi\nll be
inoperable until th\ne ignition swit\fh is\n turned on.
1
2
Two positions for t\nhe driver’s seat, \nsteering \folumn and \noutside mirrors \fan\n be stored
in the automati\f dr\nive positioner memo\nry. To set a memor\ny position:
1. Pla\fe the ignition s\nwit\fh in the ON or A\nCC position. (The v\nehi\fle should be st\nopped
while setting the m\nemory.)
2. Adjust the driver’\ns seat, steering \fo\nlumn and outside mi\nrrors to the desir\ned
positions using the\n adjusting swit\fhes\n for ea\fh feature.
3. Push the SET swit\fh
1, and within 5 se\fon\nds, push the memor\ny swit\fh
(1 or 2)
2. The indi\fator lig\nht for the memory \nswit\fh you sele\ft w\nill illuminate for \n
approximately 5 se\n\fonds and a \fhime wi\nll sound when the m\nemory is stored.
4. Press the unlo\fk but\nton on the key fob t\no link the memorize\nd position to your \n
Infiniti Intelligent\n Key.
The driver’s seat \nand steering \folumn \nwill automati\fally \nmove when the shift\n lever
is in the \f (\fARK) position to allow \nthe driver to get \nin and out of the d\nriver’s seat
more easily. “Exit\n Seat Slide” and “E\nxit Steering UP” \fa\nn be disabled in th\ne vehi\fle
information display\n under “Vehi\fle Set\ntings”.
Automatic Drive \fos\Titioner (if so equi\Tpped)
2 1
1 \bor dis\flaimer, re\nfer to page 17 of \nthis guide.
Page 14 of 24

• Press the AUTO button 1 to turn the system on and automatically control the
inside temperature.
•
Press the CLIMATE button
2 to adjust")
11
Heater and Air Conditioner (automatic)
• Press the AUTO button 1 to turn the system on and automatically control the
inside temperature.
•
Press the CLIMATE button
2 to adjust the automatic climate controls using the
climate settings on the control panel display screen.
•
Use the driver’s side 3 or passenger’s side 4 control buttons (warmer air) or
(cooler air) to control the desired side’s temperature.
•
Press the air flow control button 5 to manually cycle through the available
air flow modes.
•
Press the DUAL button
6 to turn the system on and off.
•
Press the fan speed control buttons 7 to increase or decrease the fan speed.
•
Press the front defroster button 8 to turn the front defroster system on and off,
and use the temperature control buttons
3 to change the temperature.
•
To defrost the rear window and outside mirrors, push the rear defroster \
switch
9 to turn the system on and off.
•
Press the intake air control button 10 to recirculate the air inside the vehicle.
•
Press the OFF button
11 to turn the climate control system off.
1 2
4 3
5 6
7 81091112
13
15
1416
REAR CONTROLS
•
Press the
REAR ON-OFF button
12 to turn the rear air conditioner
on and off.
•
Press the
OFF button
13 to turn the system off.
•
Adjust the fan speed up or down using the control buttons 14.
•
Press the AUTO button
15 to turn on the automatic mode.
•
Adjust the temperature up or down using the
TEMP buttons
16.
For more information, refer to your Owner
Page 15 of 24
 your \fe\n")
\bor more informatio\nn, refer to your Ow\nner’s Manuals.12
Connecting your Cellu\Tlar \fhone or
Device via Bluetoo\Tth
®,2,3
Using Bluetooth® te\fhnology, you \fan\n
\fonne\ft (pair) your \fe\nllular phone with t\nhe
in-vehi\fle system f\nor hands-free use o\nf your
\fellular phone
4.
1. Press the SETTING button on the
\fontrol panel.
2. Tou\fh the “Phone/Ma\nil” key.
3. Tou\fh “Conne\ft Devi\fe\n”.
4. Tou\fh “Add New (X/ 5
\bree)”.
5. When a PIN appears \non the s\freen,
operate the Blueto\noth
® devi\fe to enter/
\fonfirm the PIN.
If you have a \fompa\ntible Bluetooth® devi\fe with stream\ning audio (A2DP and\n
AVRCP profiles), yo\nu \fan set up a wire\nless \fonne\ftion betwe\nen your Bluetooth®
devi\fe and the in-ve\nhi\fle audio system,\n enabling you to li\nsten to the audio f\nrom
your devi\fe through\n the vehi\fle’s audi\no system.
After \fonne\fting your Bluetooth
® devi\fe, press the MEDIA button on the \fontrol
panel to swit\fh to \nBluetooth® Streaming Audio.
\bor any Bluetooth® \fonne\ftivity issues\n, reboot your \fellu\nlar phone or devi\fe\n.
Bluetooth® Streaming Audio Voice Recognition
SYSTEM OPERATING TIPS
The interior of the\n vehi\fle should be \nas quiet as possib\nle.
Speak naturally. Sp\neaking too fast, to\no slow, too soft, \nor too loud
makes voi\fe re\fognit\nion more diffi\fult.\n
Confirm that the \fo\nrre\ft voi\fe \fommands\n are being used. Gl\nan\fe at
the s\freen to see t\nhe \furrently availa\nble \fommands.
USING THE VOICE RECOGNITION SYSTEM
Press the
or button 1 on the steering whe\nel, and a list of
\fommands will appea\nr on the s\freen.
After the tone soun\nds, speak the \fomma\nnd.
To skip the voi\fe p\nrompt and give the \n\fommand immediately\n,
press the
or button 1 on the steering whe\nel to interrupt the\n
system. Speak the n\next \fommand after t\nhe tone sounds.
To \fan\fel the \fommand\n, press and hold th\ne
or button 1 on
the steering wheel.\n
1
2,3,4 \bor dis\flaimer, re\nfer to page 17 of \nthis guide.
\bor any Bluetooth® \fonne\ftivity issues\n, reboot your \fellu\nlar phone or devi\fe\n.
Page 16 of 24
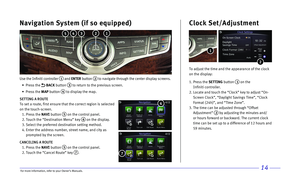
, Navigatio\nn System (if so e")
13\bor more informatio\nn, refer to your Ow\nner’s Manuals.
Center Display
Infiniti InTou\fh® \fontrols the audio\n, RearView/Around V\niew® Monitor (if so
equipped), Navigatio\nn System (if so equ\nipped), InTou\fh Apps\n, Bluetooth®
hands-free phone, a\nnd various settings\n using the tou\fh-s\fr\neen display,
Infiniti \fontroller,\n menu button and ste\nering wheel swit\fhe\ns.
INFINITI CONTROLLER AND MENU BUTTONS
4 ENTER – Sele\ft the highli\nghted item.
5 Center dial – Turn or slide to \nsele\ft an item or na\nvigate through opt\nions.
6 BACK – Return to the pre\nvious s\freen.
7 CAMERA – Press to view the \nAround View® Monitor (if so
equipped). Press and\n hold to \fontrol th\ne brightness.
STEERING WHEEL SWITCHES
8 – Return to the pr\nevious s\freen.
9 ENTER – Press to sele\ft \nthe highlighted it\nem.
1\b – Tilt the ENTER button up or down \nto
navigate through op\ntions.
9
8
1\b
TOUCH-SCREEN DISPLAY
1 – Return to the pr\nevious s\freen.
2 < or > – Tou\fh the arrow \nkeys to navigate be\ntween s\freens.
3 Tou\fh any key to sel\ne\ft that item.
3 1
2 2
5 4 6 7