Page 270 of 642

4-7
Multimedia System
4
Features of Your Vehicle
Satellite radio reception
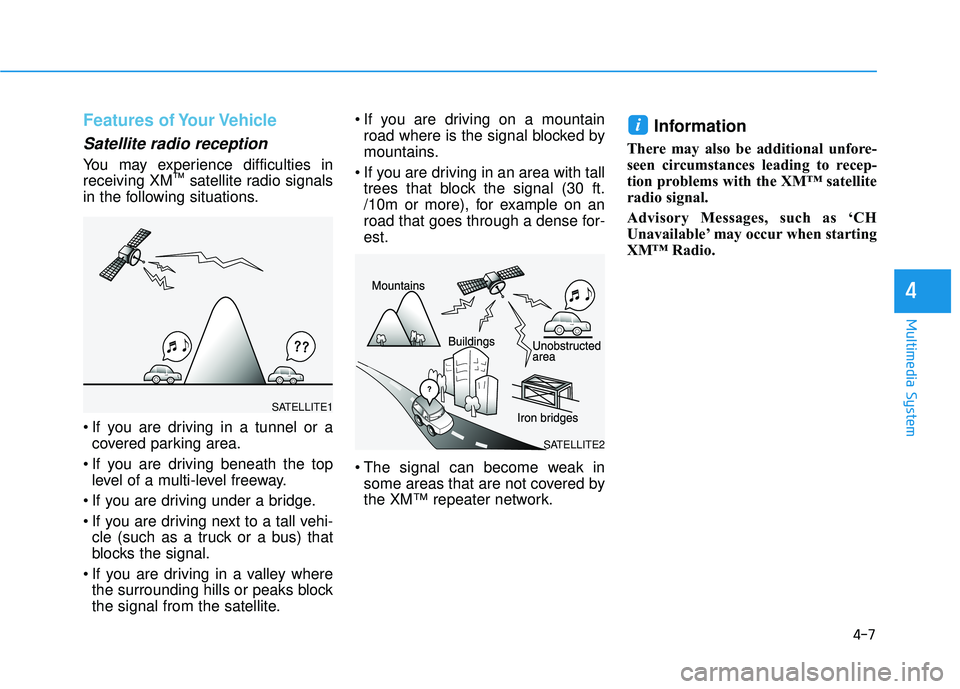
You may experience difficulties in receiving XM™
satellite radio signals
in the following situations.
If you are driving in a tunnel or a covered parking area.
If you are driving beneath the top level of a multi-level freeway.
If you are driving under a bridge.
If you are driving next to a tall vehi- cle (such as a truck or a bus) that
blocks the signal.
If you are driving in a valley where the surrounding hills or peaks block
the signal from the satellite. If you are driving on a mountain
road where is the signal blocked by
mountains.
If you are driving in an area with tall trees that block the signal (30 ft.
/10m or more), for example on an
road that goes through a dense for-est.
The signal can become weak in some areas that are not covered by
the XM™ repeater network.
Information
There may also be additional unfore-
seen circumstances leading to recep-
tion problems with the XM™ satellite
radio signal.
Advisory Messages, such as ‘CH
Unavailable’ may occur when starting
XM™ Radio.
i
SATELLITE2
SATELLITE1
Page 275 of 642

4-12
Multimedia System
(Continued)
Some USB devices may not be sup- ported due to compatibility issues.
Avoid contact between the USB con- nector with bodily parts or foreign
objects.
Repeated connecting/disconnecting of USB devices within short periods
of time may result in product mal-
function.
A strange noise may occur when dis- connecting the USB.
Make sure to connect/disconnect external USB devices with the audio
power turned off.
The amount of time required to rec- ognize the USB device may differ
depending on the type, size or file
formats stored in the USB. Such dif-
ferences in time are not indications
of malfunctions.
The device only supports USB devices used to play music files.
USB images and videos are not sup- ported.
(Continued)(Continued)
Do not use the USB I/F to charge batteries or USB accessories that
generate heat. Such acts may lead to
worsened performance or damage
to the device.
The device may not recognize the USB device if separately purchased
USB hubs and extension cables are
being used. Connect the USB direct-
ly with the multimedia terminal of
the vehicle.
When using mass storage USB devices with separate logical drives,
only files saved to the root drive can
be played.
Files may not properly operate if application programs are installed
to the USBs.
The device may not operate normal- ly if MP3 Players, cellular phones,
digital cameras, or other electronic
devices (USB devices not recognized
as portable disk drives) are connect-
ed with the device.
(Continued)(Continued)
Charging through the USB may not
work for some mobile devices.
The device may not support normal operation when using a USB memo-
ry type besides (Metal Cover Type)
USB Memory.
The device may not support normal operation when using formats such
as HDD Type, CF, or SD Memory.
The device will not support files locked by DRM (Digital Rights
Management.)
USB memory sticks used by con- necting an Adaptor (SD Type or CF
Type) may not be properly recog-
nized.
The device may not operate proper- ly when using USB HDDs or USBs
subject to connection failures
caused by vehicle vibrations. (e.g. i-
stick type)
(Continued)
Page 281 of 642
4-18
Multimedia System
SSyyssttee mm CC oonnttrr oo llllee rrss aa nn dd FF uunn ccttiioo nnss
Audio Head Unit
Name Description
Ejects the disc.
changed in order of FM1, FM2, AM, XM1,
XM2, XM3.
changed in order of CD, USB(iPod ®
), AUX,
My Music, BT Audio.
MEDIA
RADIO
Name Description
display time screen
move to the time
setting mode.
Converts to Phone mode ❈ When a phone is not connected, the
connection screen is displayed.
Power : Press to turn power on/off.
Volume : Turn left/right to control volume.
- Radio mode : plays previous/next frequency.
- Media (CD/USB/iPod ®
/My Music) modes :
changes the track, Song(file)
- Radio mode : continuously changes the frequency. Upon release, plays the current
frequency.
- Media(CD/USB/iPod ®
/My Music) modes :
rewinds or fast forwards the track or file
- During a Handsfree call, controls the call
volume.
PHONE
CLOCK
POWER/ VOL knob
TRACKSEEK
Page 327 of 642
4-64
Multimedia System
SSeettuu pp
Starting Mode
Press the key to display the Setup screen.
You can select and control options
related to [Display], [Sound], [Clock/Calendar], [Phone] and [System].
Display Settings
Adjusting the Brightness
Press the key Select
[Display] Select [Brightness]
Use the , buttons to adjust the
screen brightness or set the
Brightness on Automatic, Day, or
Night mode.
Press the button to reset.
1) Automatic : Adjusts the brightness
automatically
2) Day : Always maintains the bright- ness on high
3) Night : Always maintains the brightness on low
Mode Pop up
Press the key Select
[Display] Select [Mode Pop up]
This feature is used to display the
Mode Pop up screen when entering
radio and media modes.
When this feature is turned on, pressing the or key
will display the Mode Pop up screen.
Information
The media Mode Pop up screen can be
displayed only when two or more
media modes have been connected.
i
MEDIA RADIO
SETUP
Default
SETUPSETUP
Page 330 of 642
4-67
Multimedia System
4
Clock/Calendar Setting
Clock Settings
Press the key Select [Clock
/Calendar] Select [Clock Settings]
Use the , buttons to set the
Hour, Minutes and AM/PM setting.
Press and hold the key
(over 0.8 seconds) to display the
Clock /Calendar screen.
Calendar Settings
Press the key Select
[Clock/Calendar] Select [CalendarSettings]
Use the , buttons to set the
Day, Month and Year setting.
Time Format
Press the key Select
[Clock/Calendar] Select [Time Format]
This feature is used to change the
clock format between 12hr or 24hr.SETUPSETUP
CLOCK
NOTICE
SETUP
Page 331 of 642
4-68
Multimedia System
Clock Display
Press the key Select [Clock
/Calendar] Select [Clock Display
(Power off)]
This feature is used to display a clock on the screen when the audio sys-
tem is turned off.
System Setting
Memory Information
Press the key Select
[System] Select [Memory Information]
This feature displays information
related to system memory.
1) Using : Displays capacity currentlyin use
2) Capacity : Displays total capacity
Prompt Feedback
Press the key Select
[System] Select [Prompt Feedback]
This feature is used to select the
desired prompt feedback option from
ON and OFF.
1) ON : When using voice recogni- tion, provides detailed guidance prompts
2) OFF : When using voice recogni- tion, omits some guidancepromptsSETUP
SETUP
SETUP
Page 334 of 642
4-71
Multimedia System
4
SSyyssttee mm CC oonnttrr oo llllee rrss aa nn dd FF uunn ccttiioo nnss
Audio Head Unit
Name Description
Ejects the disc.
• Convert to Radio mode.
changed in order of FM1, FM2, AM, XM1,
XM2, XM3.
changed in order of CD, USB(iPod ®
), AUX,
My Music, BT Audio.
MEDIA
RADIO
Name Description
display time screen
move to the time
setting mode.
Converts to Phone mode ❈ When a phone is not connected, the
connection screen is displayed.
Power : Press to turn power on/off.
Volume : Turn left/right to control volume.
- Radio mode : plays previous/next frequency.
- Media (CD/USB/iPod ®
/My Music) modes :
changes the track, Song(file)
- Radio mode : continuously changes the frequency. Upon release, plays the current
frequency.
- Media(CD/USB/iPod ®
/My Music) modes :
rewinds or fast forwards the track or file
- During a Handsfree call, controls the call
volume.
PHONE
CLOCK
POWER/ VOL knob
TRACKSEEK
Page 379 of 642
4-116
Multimedia System
SSeettuu pp
Starting Mode
Press the key to display the Setup screen.
You can select and control options
related to [Display], [Sound], [Clock/Calendar], [Phone] and [System].
Display Settings
Adjusting the Brightness
Press the key Select
[Display] Select [Brightness]
Use the , buttons to adjust the
screen brightness or set the
Brightness on Automatic, Day, or
Night mode.
Press the button to reset.
1) Automatic : Adjusts the brightness
automatically
2) Day : Always maintains the bright- ness on high
3) Night : Always maintains the brightness on low
Mode Pop up
Press the key Select
[Display] Select [Mode Pop up]
This feature is used to display the
Mode Pop up screen when entering
radio and media modes.
When this feature is turned on, pressing the or key
will display the Mode Pop up screen.
Information
The media Mode Pop up screen can be
displayed only when two or more
media modes have been connected.
i
MEDIA RADIO
SETUP
Default
SETUPSETUP