2017 HYUNDAI TUCSON LIMITED rear view mirror
[x] Cancel search: rear view mirrorPage 13 of 642
F13F13
Accessing your vehicle .........................................3-4
Remote Key.........................................................................3-4
Smart Key ............................................................................3-8
Immobilizer System .........................................................3-12
Door locks .............................................................3-14
Operating Door Locks from Outside the Vehicle ....3-14
Operating Door Locks from Inside the Vehicle .......3-15
Auto Door Lock/Unlock Features ...............................3-17
Child-Protector Rear Door locks ................................3-18
Theft-alarm system.............................................3-19
Steering wheel......................................................3-20
Electric Power Steering (EPS) .....................................3-20
Tilt Steering / Telescope Steering ..............................3-21
Heated Steering Wheel ..................................................3-21
Horn ....................................................................................3-22
Mirrors ...................................................................3-23
Inside Rearview Mirror ..................................................3-23
Outside Rearview Mirror ...............................................3-35
Windows ................................................................3-38
Power Windows ...............................................................3-39
Panoramic sunroof ..............................................3-42
Sunshade ...........................................................................3-42
Sliding the Sunroof .........................................................3-43
Tilting the Sunroof .........................................................3-43
Closing the Sunroof........................................................3-44
To Reset the Sunroof.....................................................3-45
Exterior features .................................................3-46
Hood ...................................................................................3-46
Fuel Filler Door ................................................................3-48
Liftgate ..................................................................3-51
Non-Powered liftgate ....................................................3-51
Power liftgate ..................................................................3-52
Smart Liftgate ..................................................................3-59
Instrument cluster................................................3-63
Instrument Cluster Control............................................3-64
LCD Display Control ........................................................3-64
Gauges ...............................................................................3-65
3Convenient features of your vehicle
Page 99 of 642
Convenient features of your vehicle
Accessing your vehicle .........................................3-4
Remote Key.........................................................................3-4
Smart Key ............................................................................3-8
Immobilizer System .........................................................3-12
Door locks .............................................................3-14
Operating Door Locks from Outside the Vehicle ....3-14
Operating Door Locks from Inside the Vehicle .......3-15
Auto Door Lock/Unlock Features ...............................3-17
Child-Protector Rear Door locks ................................3-18
Theft-alarm system.............................................3-19
Steering wheel......................................................3-20
Electric Power Steering (EPS) .....................................3-20
Tilt Steering / Telescope Steering ..............................3-21
Heated Steering Wheel ..................................................3-21
Horn ....................................................................................3-22
Mirrors ...................................................................3-23
Inside Rearview Mirror ..................................................3-23
Outside Rearview Mirror ...............................................3-35
Windows ................................................................3-38
Power Windows ...............................................................3-39
Panoramic sunroof ..............................................3-42
Sunshade ...........................................................................3-42
Sliding the Sunroof .........................................................3-43
Tilting the Sunroof .........................................................3-43
Closing the Sunroof........................................................3-44
To Reset the Sunroof.....................................................3-45
Exterior features .................................................3-46
Hood ...................................................................................3-46
Fuel Filler Door ................................................................3-48
Liftgate ..................................................................3-51
Non-Powered liftgate ....................................................3-51
Power liftgate ..................................................................3-52
Smart Liftgate ..................................................................3-59
Instrument cluster................................................3-63
Instrument Cluster Control............................................3-64
LCD Display Control ........................................................3-64
Gauges ...............................................................................3-65
3
Page 121 of 642
3-23
Convenient features of your vehicle
3
MMIIRR RROO RRSS
Inside Rearview Mirror
Before you start driving, adjust the
rearview mirror to center on the view
through the rear window.
When cleaning the mirror, use a
paper towel or similar material
dampened with glass cleaner. Do
not spray glass cleaner directly on
the mirror as this may cause the
liquid cleaner to enter the mirrorhousing.
Day/night rearview mirror (if equipped)
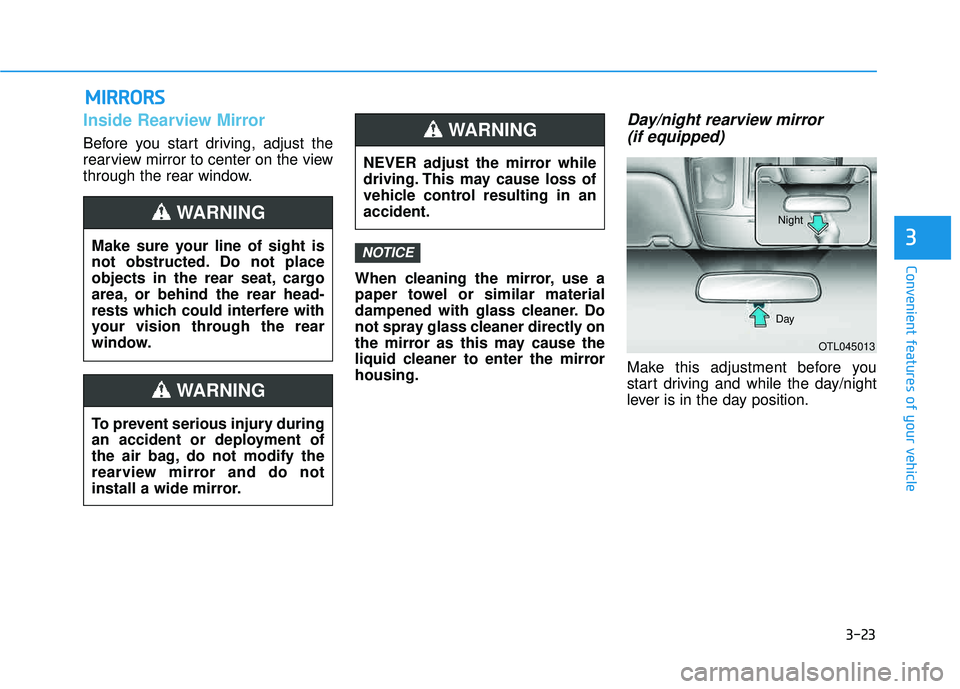
Make this adjustment before you
start driving and while the day/night
lever is in the day position.
NOTICEMake sure your line of sight is
not obstructed. Do not place
objects in the rear seat, cargo
area, or behind the rear head-
rests which could interfere with
your vision through the rear
window.
WARNING
NEVER adjust the mirror while
driving. This may cause loss of
vehicle control resulting in anaccident.
WARNING
To prevent serious injury during
an accident or deployment of
the air bag, do not modify the
rearview mirror and do not
install a wide mirror.
WARNING
OTL045013
Day Night
Page 122 of 642
3-24
Pull the day/night lever toward you to reduce glare from the headlights of
the vehicles behind you during night
driving.
Remember that you lose some
rearview clarity in the night position.Electric chromic mirror withhomelink system (if equipped)
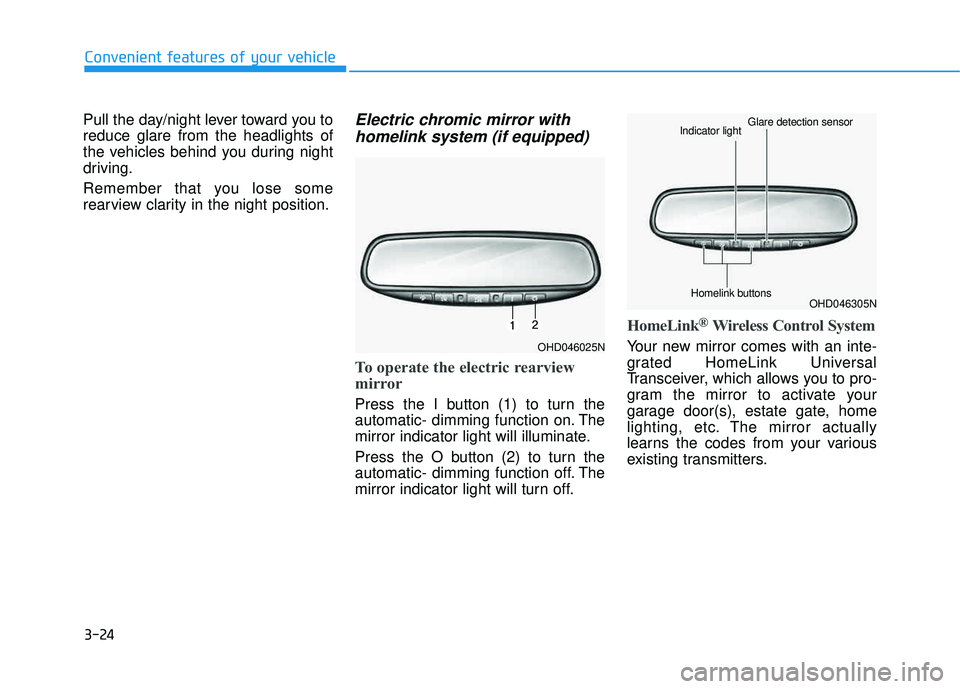
To operate the electric rearview
mirror
Press the I button (1) to turn the
automatic- dimming function on. The
mirror indicator light will illuminate.
Press the O button (2) to turn the
automatic- dimming function off. The
mirror indicator light will turn off.
HomeLink®Wireless Control System
Your new mirror comes with an inte-
grated HomeLink Universal
Transceiver, which allows you to pro-
gram the mirror to activate your
garage door(s), estate gate, home
lighting, etc. The mirror actually
learns the codes from your various
existing transmitters.
Convenient features of your vehicle
OHD046025N
OHD046305N
Glare detection sensor
Indicator light
Homelink buttons
Page 126 of 642
3-28
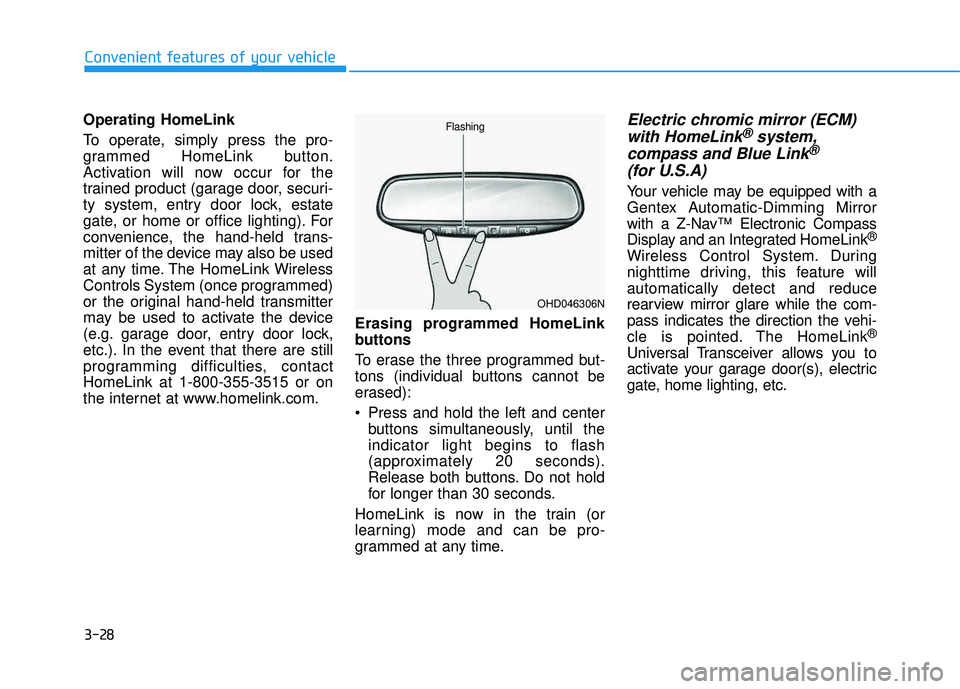
Operating HomeLink
To operate, simply press the pro-
grammed HomeLink button.
Activation will now occur for the
trained product (garage door, securi-
ty system, entry door lock, estate
gate, or home or office lighting). For
convenience, the hand-held trans-
mitter of the device may also be used
at any time. The HomeLink Wireless
Controls System (once programmed)
or the original hand-held transmitter
may be used to activate the device
(e.g. garage door, entry door lock,
etc.). In the event that there are still
programming difficulties, contactHomeLink at 1-800-355-3515 or on
the internet at www.homelink.com.Erasing programmed HomeLink
buttons
To erase the three programmed but-
tons (individual buttons cannot be
erased):
Press and hold the left and center
buttons simultaneously, until the indicator light begins to flash
(approximately 20 seconds).
Release both buttons. Do not hold
for longer than 30 seconds.
HomeLink is now in the train (or
learning) mode and can be pro-
grammed at any time.Electric chromic mirror (ECM) with HomeLink®system,
compass and Blue Link®
(for U.S.A)
Your vehicle may be equipped with a
Gentex Automatic-Dimming Mirror
with a Z-Nav™ Electronic Compass
Display and an Integrated HomeLink ®
Wireless Control System. During
nighttime driving, this feature willautomatically detect and reduce
rearview mirror glare while the com-
pass indicates the direction the vehi-
cle is pointed. The HomeLink ®
Universal Transceiver allows you to
activate your garage door(s), electric
gate, home lighting, etc.
Convenient features of your vehicle
OHD046306N
Flashing
Page 134 of 642
3-36
Convenient features of your vehicle
Use the rear view mirror inside the
vehicle or direct observation to deter-
mine the actual distance of following
vehicles when changing lanes.Blind Spot Mirror (if equipped)
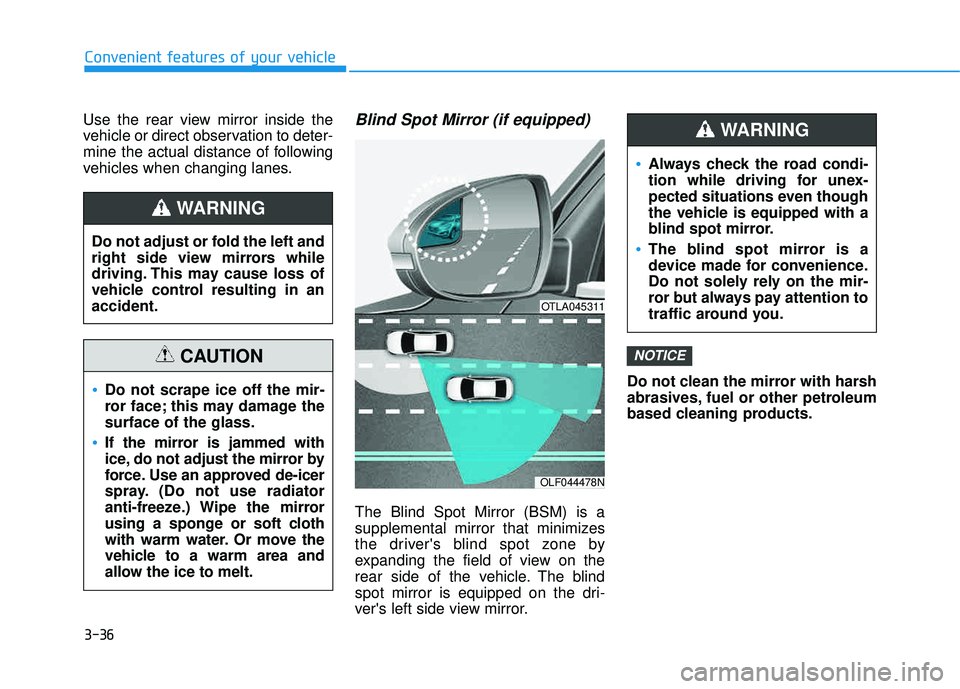
The Blind Spot Mirror (BSM) is a
supplemental mirror that minimizes
the driver's blind spot zone by
expanding the field of view on the
rear side of the vehicle. The blind
spot mirror is equipped on the dri-
ver's left side view mirror.Do not clean the mirror with harsh
abrasives, fuel or other petroleum
based cleaning products.
NOTICE
Do not adjust or fold the left and
right side view mirrors while
driving. This may cause loss of
vehicle control resulting in anaccident.
WARNING
Do not scrape ice off the mir-
ror face; this may damage thesurface of the glass.
If the mirror is jammed with
ice, do not adjust the mirror by
force. Use an approved de-icer
spray. (Do not use radiator
anti-freeze.) Wipe the mirror
using a sponge or soft cloth
with warm water. Or move the
vehicle to a warm area and
allow the ice to melt.
CAUTION
OTLA045311
OLF044478N
Always check the road condi-
tion while driving for unex-
pected situations even though
the vehicle is equipped with a
blind spot mirror.
The blind spot mirror is a
device made for convenience.
Do not solely rely on the mir-
ror but always pay attention to
traffic around you.
WARNING
Page 135 of 642
3-37
Convenient features of your vehicle
3
Side View Mirror Adjustment
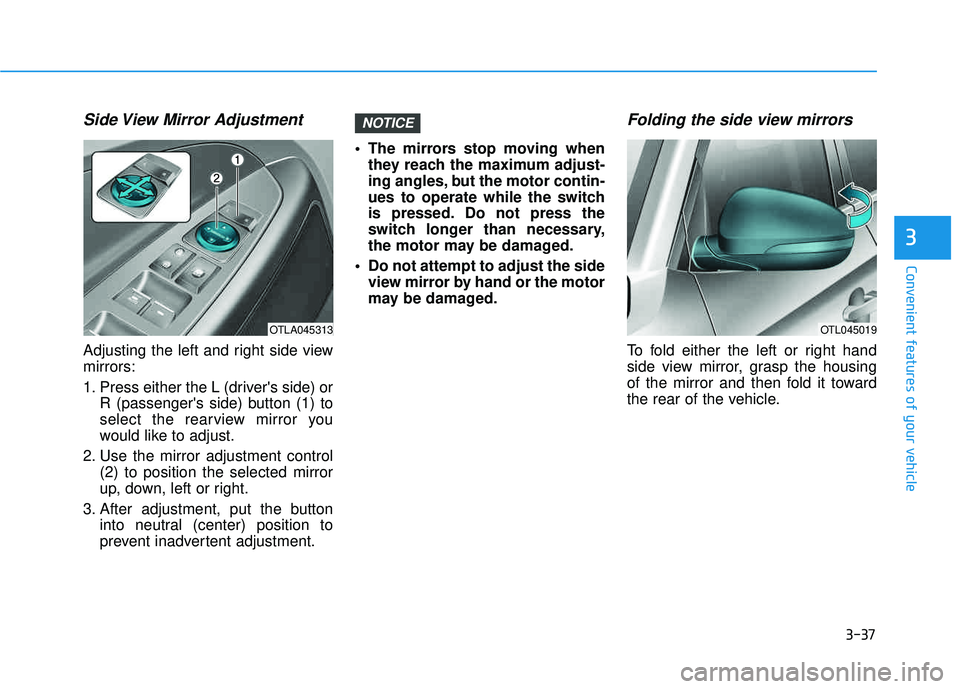
Adjusting the left and right side view mirrors:
1. Press either the L (driver's side) orR (passenger's side) button (1) to
select the rearview mirror you
would like to adjust.
2. Use the mirror adjustment control (2) to position the selected mirror
up, down, left or right.
3. After adjustment, put the button into neutral (center) position to
prevent inadvertent adjustment. The mirrors stop moving when
they reach the maximum adjust-
ing angles, but the motor contin-
ues to operate while the switch
is pressed. Do not press the
switch longer than necessary,
the motor may be damaged.
Do not attempt to adjust the side view mirror by hand or the motor
may be damaged.
Folding the side view mirrors
To fold either the left or right hand
side view mirror, grasp the housing
of the mirror and then fold it toward
the rear of the vehicle.
NOTICE
OTLA045313OTL045019
Page 224 of 642
3-126
Convenient features of your vehicle
DDEEFFRR OO SSTT EERR
The rear window defroster is com-
prised of conductors bonded tothe inside surface of the rear win-
dow. Never use sharp instruments
or window cleaners that contain
abrasives to clean the window.
Damage to the rear window
defroster may result.
If you want to defrost and defog
the front windshield, refer to the
"Windshield Defrosting and
Defogging" section in this chapter.
Rear Window Defroster
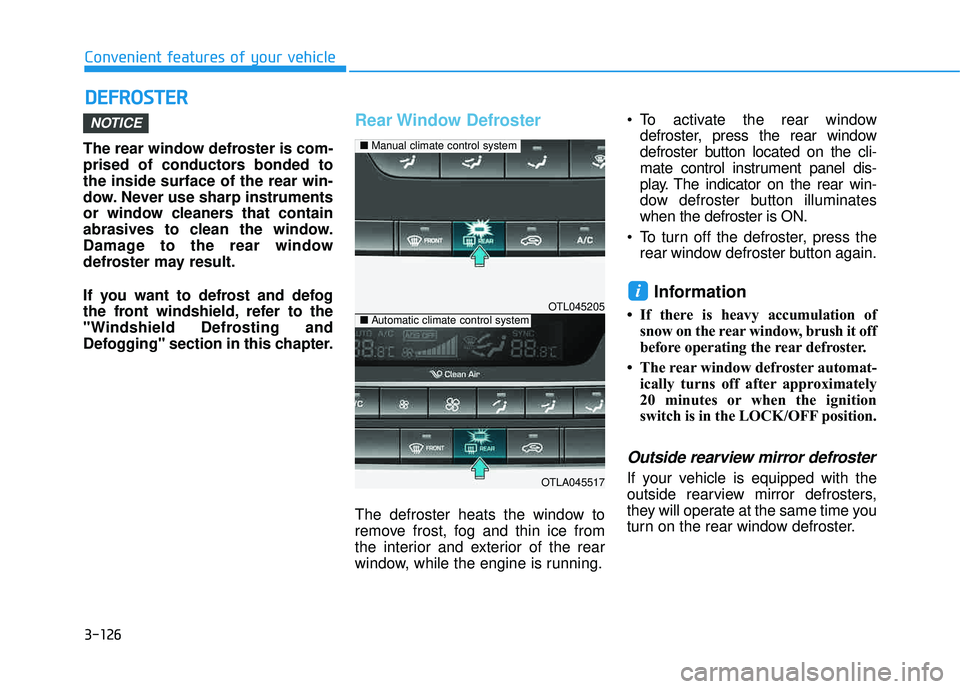
The defroster heats the window to
remove frost, fog and thin ice from
the interior and exterior of the rear
window, while the engine is running. To activate the rear window
defroster, press the rear window
defroster button located on the cli-
mate control instrument panel dis-
play. The indicator on the rear win-
dow defroster button illuminateswhen the defroster is ON.
To turn off the defroster, press the rear window defroster button again.
Information
If there is heavy accumulation ofsnow on the rear window, brush it off
before operating the rear defroster.
The rear window defroster automat- ically turns off after approximately
20 minutes or when the ignition
switch is in the LOCK/OFF position.
Outside rearview mirror defroster
If your vehicle is equipped with the
outside rearview mirror defrosters,
they will operate at the same time you
turn on the rear window defroster.
i
NOTICE
OTL045205
OTLA045517
■Manual climate control system
■Automatic climate control system