2017 Hyundai Santa Fe steering
[x] Cancel search: steeringPage 468 of 569
Maintenance
20
7
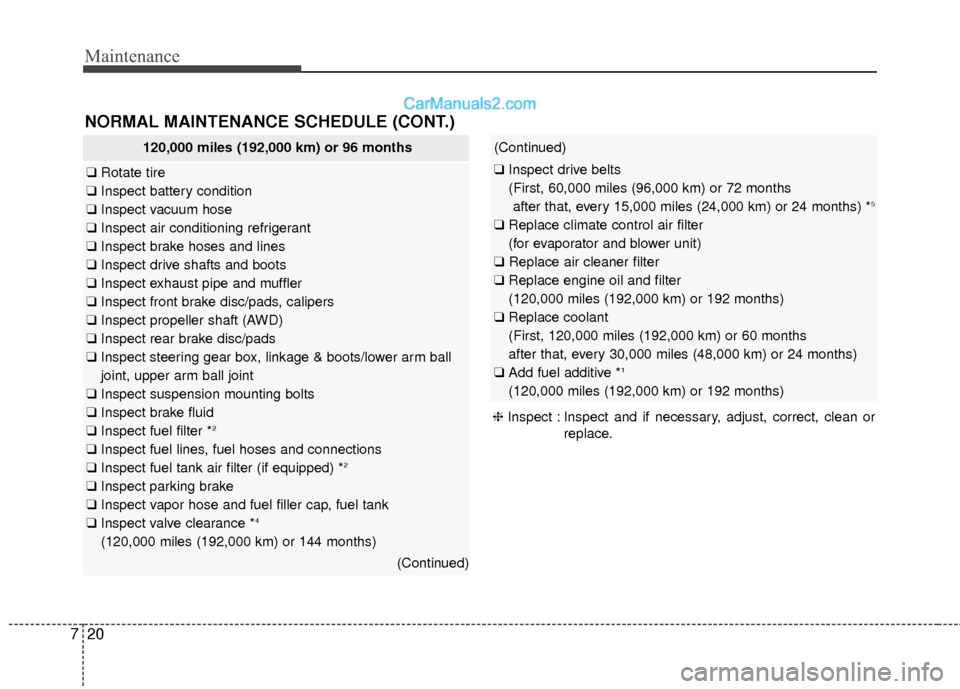
NORMAL MAINTENANCE SCHEDULE (CONT.)
120,000 miles (192,000 km) or 96 months
❑ Rotate tire
❑ Inspect battery condition
❑ Inspect vacuum hose
❑ Inspect air conditioning refrigerant
❑ Inspect brake hoses and lines
❑ Inspect drive shafts and boots
❑ Inspect exhaust pipe and muffler
❑ Inspect front brake disc/pads, calipers
❑ Inspect propeller shaft (AWD)
❑ Inspect rear brake disc/pads
❑ Inspect steering gear box, linkage & boots/lower arm ball
joint, upper arm ball joint
❑ Inspect suspension mounting bolts
❑ Inspect brake fluid
❑ Inspect fuel filter *
2
❑Inspect fuel lines, fuel hoses and connections
❑ Inspect fuel tank air filter (if equipped) *2
❑Inspect parking brake
❑ Inspect vapor hose and fuel filler cap, fuel tank
❑ Inspect valve clearance *
4
(120,000 miles (192,000 km) or 144 months)
(Continued)
(Continued)
❑Inspect drive belts
(First, 60,000 miles (96,000 km) or 72 months
after that, every 15,000 miles (24,000 km) or 24 months) *
5
❑ Replace climate control air filter
(for evaporator and blower unit)
❑ Replace air cleaner filter
❑ Replace engine oil and filter
(120,000 miles (192,000 km) or 192 months)
❑ Replace coolant
(First, 120,000 miles (192,000 km) or 60 months
after that, every 30,000 miles (48,000 km) or 24 months)
❑ Add fuel additive *
1
(120,000 miles (192,000 km) or 192 months)
❈ Inspect : Inspect and if necessary, adjust, correct, clean or
replace.
Page 469 of 569
721
Maintenance
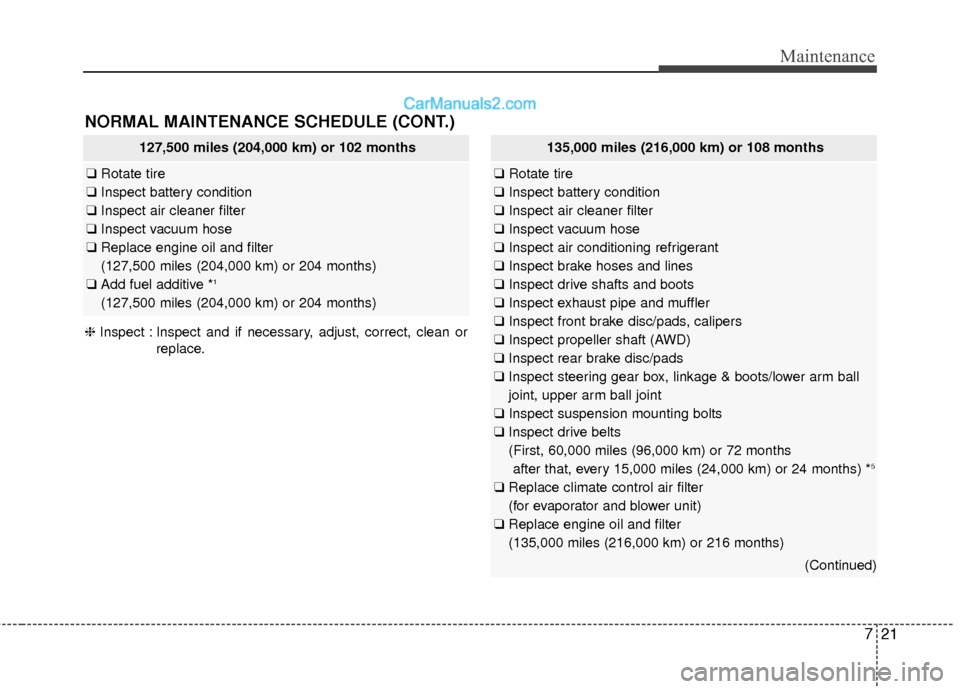
NORMAL MAINTENANCE SCHEDULE (CONT.)
127,500 miles (204,000 km) or 102 months
❑Rotate tire
❑ Inspect battery condition
❑ Inspect air cleaner filter
❑ Inspect vacuum hose
❑ Replace engine oil and filter
(127,500 miles (204,000 km) or 204 months)
❑ Add fuel additive *
1
(127,500 miles (204,000 km) or 204 months)
135,000 miles (216,000 km) or 108 months
❑ Rotate tire
❑ Inspect battery condition
❑ Inspect air cleaner filter
❑ Inspect vacuum hose
❑ Inspect air conditioning refrigerant
❑ Inspect brake hoses and lines
❑ Inspect drive shafts and boots
❑ Inspect exhaust pipe and muffler
❑ Inspect front brake disc/pads, calipers
❑ Inspect propeller shaft (AWD)
❑ Inspect rear brake disc/pads
❑ Inspect steering gear box, linkage & boots/lower arm ball
joint, upper arm ball joint
❑ Inspect suspension mounting bolts
❑ Inspect drive belts
(First, 60,000 miles (96,000 km) or 72 months
after that, every 15,000 miles (24,000 km) or 24 months) *
5
❑ Replace climate control air filter
(for evaporator and blower unit)
❑ Replace engine oil and filter
(135,000 miles (216,000 km) or 216 months)
(Continued)
❈ Inspect : Inspect and if necessary, adjust, correct, clean or
replace.
Page 471 of 569
723
Maintenance
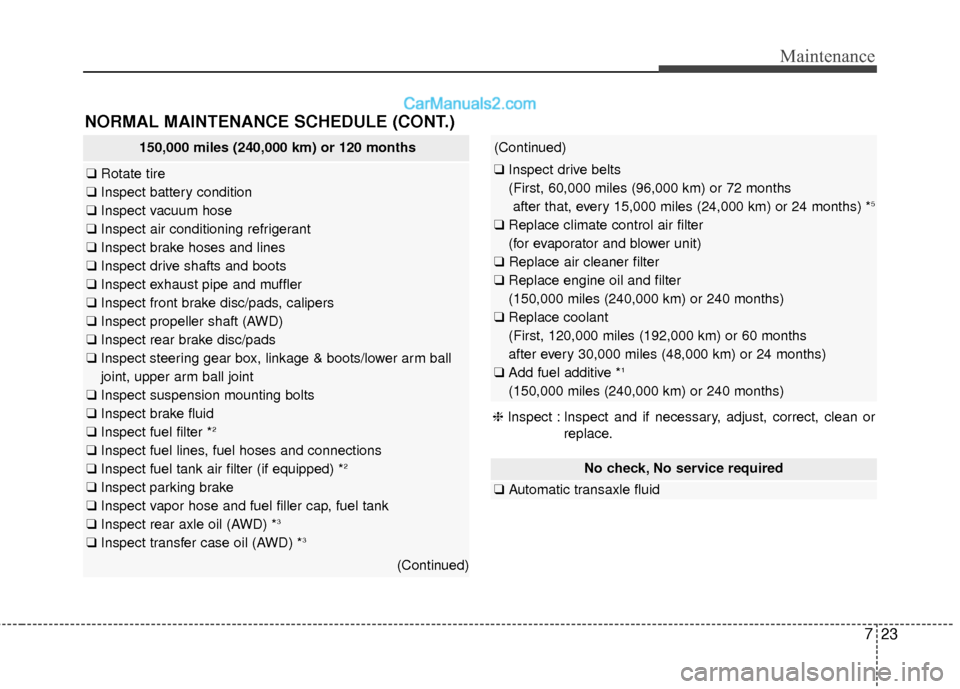
NORMAL MAINTENANCE SCHEDULE (CONT.)
No check, No service required
❑Automatic transaxle fluid
150,000 miles (240,000 km) or 120 months
❑Rotate tire
❑ Inspect battery condition
❑ Inspect vacuum hose
❑ Inspect air conditioning refrigerant
❑ Inspect brake hoses and lines
❑ Inspect drive shafts and boots
❑ Inspect exhaust pipe and muffler
❑ Inspect front brake disc/pads, calipers
❑ Inspect propeller shaft (AWD)
❑ Inspect rear brake disc/pads
❑ Inspect steering gear box, linkage & boots/lower arm ball
joint, upper arm ball joint
❑ Inspect suspension mounting bolts
❑ Inspect brake fluid
❑ Inspect fuel filter *
2
❑Inspect fuel lines, fuel hoses and connections
❑ Inspect fuel tank air filter (if equipped) *2
❑Inspect parking brake
❑ Inspect vapor hose and fuel filler cap, fuel tank
❑ Inspect rear axle oil (AWD) *
3
❑Inspect transfer case oil (AWD) *3
(Continued)
(Continued)
❑Inspect drive belts
(First, 60,000 miles (96,000 km) or 72 months
after that, every 15,000 miles (24,000 km) or 24 months) *
5
❑ Replace climate control air filter
(for evaporator and blower unit)
❑ Replace air cleaner filter
❑ Replace engine oil and filter
(150,000 miles (240,000 km) or 240 months)
❑ Replace coolant
(First, 120,000 miles (192,000 km) or 60 months
after every 30,000 miles (48,000 km) or 24 months)
❑ Add fuel additive *
1
(150,000 miles (240,000 km) or 240 months)
❈ Inspect : Inspect and if necessary, adjust, correct, clean or
replace.
Page 472 of 569
Maintenance
24
7
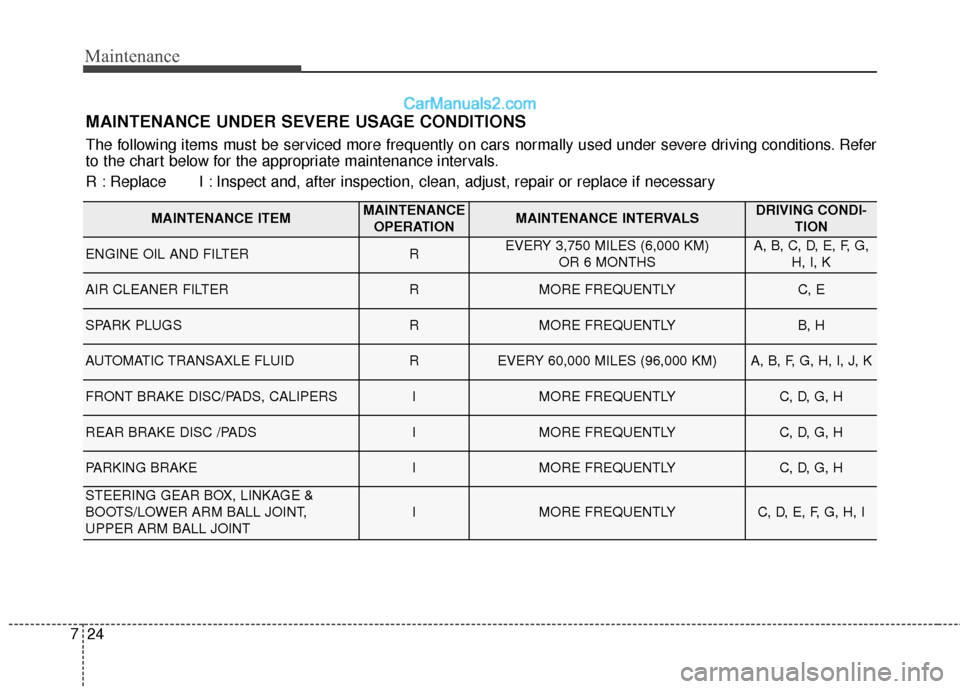
MAINTENANCE UNDER SEVERE USAGE CONDITIONS
The following items must be serviced more frequently on cars normally used under severe driving conditions. Refer
to the chart below for the appropriate maintenance intervals.
R : Replace I : Inspect and, after inspection, clean, adjust, repair or replace if neces\
sary
MAINTENANCE ITEMMAINTENANCE
OPERATIONMAINTENANCE INTERVALSDRIVING CONDI- TION
ENGINE OIL AND FILTER REVERY 3,750 MILES (6,000 KM) OR 6 MONTHSA, B, C, D, E, F, G,H, I, K
AIR CLEANER FILTERRMORE FREQUENTLYC, E
SPARK PLUGSRMORE FREQUENTLYB, H
AUTOMATIC TRANSAXLE FLUIDREVERY 60,000 MILES (96,000 KM) A, B, F, G, H, I, J, K
FRONT BRAKE DISC/PADS, CALIPERSIMORE FREQUENTLYC, D, G, H
REAR BRAKE DISC /PADSIMORE FREQUENTLYC, D, G, H
PARKING BRAKEIMORE FREQUENTLYC, D, G, H
STEERING GEAR BOX, LINKAGE &
BOOTS/LOWER ARM BALL JOINT,
UPPER ARM BALL JOINT
IMORE FREQUENTLYC, D, E, F, G, H, I
Page 477 of 569
729
Maintenance
Parking brake
Inspect the parking brake system
including the parking brake lever (or
pedal) and cables.
Brake pads, calipers and
rotors
Check the pads for excessive wear,
discs for run out and wear, and
calipers for fluid leakage.
Suspension mounting bolts
Check the suspension connections
for looseness or damage. Retighten
to the specified torque.
Steering gear box, linkage &
boots/lower arm ball joint
With the vehicle stopped and engine
off, check for excessive free-play in
the steering wheel.
Check the linkage for bends or dam-
age. Check the dust boots and ball
joints for deterioration, cracks, or dam-
age. Replace any damaged parts.
Drive shafts and boots
Check the drive shafts, boots and
clamps for cracks, deterioration, or
damage. Replace any damaged
parts and, if necessary, repack the
grease.
Air conditioning refrigerant/
compressor (if equipped)
Check the air conditioning lines and
connections for leakage and damage.
Page 500 of 569
Maintenance
52
7
Tire replacement
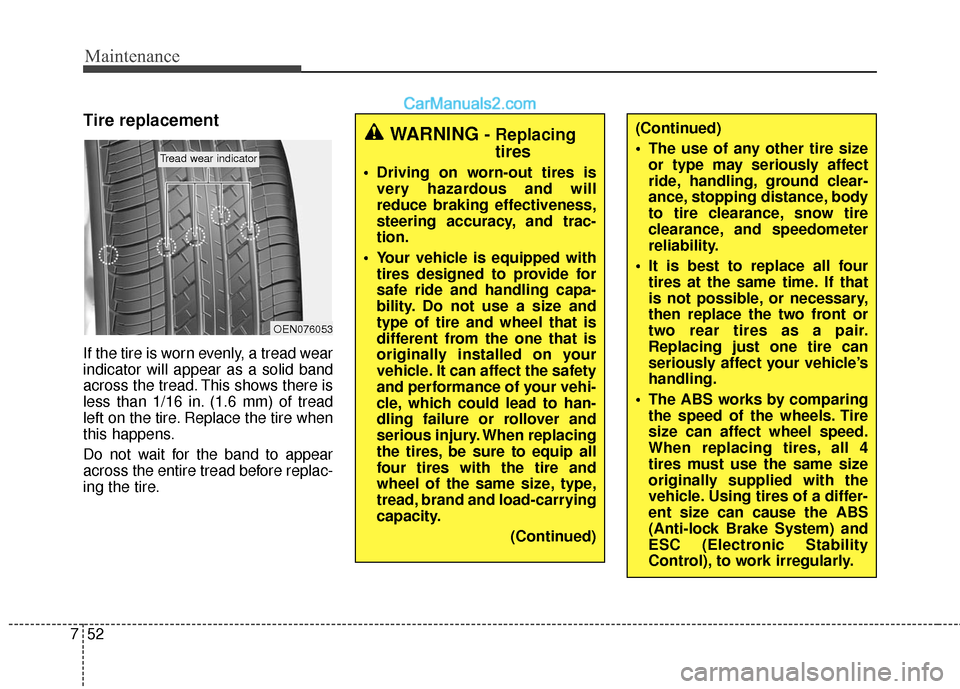
If the tire is worn evenly, a tread wear
indicator will appear as a solid band
across the tread. This shows there is
less than 1/16 in. (1.6 mm) of tread
left on the tire. Replace the tire when
this happens.
Do not wait for the band to appear
across the entire tread before replac-
ing the tire.
(Continued)
The use of any other tire size
or type may seriously affect
ride, handling, ground clear-
ance, stopping distance, body
to tire clearance, snow tire
clearance, and speedometer
reliability.
It is best to replace all four tires at the same time. If that
is not possible, or necessary,
then replace the two front or
two rear tires as a pair.
Replacing just one tire can
seriously affect your vehicle’s
handling.
The ABS works by comparing the speed of the wheels. Tire
size can affect wheel speed.
When replacing tires, all 4
tires must use the same size
originally supplied with the
vehicle. Using tires of a differ-
ent size can cause the ABS
(Anti-lock Brake System) and
ESC (Electronic Stability
Control), to work irregularly.WARNING - Replacingtires
Driving on worn-out tires is
very hazardous and will
reduce braking effectiveness,
steering accuracy, and trac-
tion.
Your vehicle is equipped with tires designed to provide for
safe ride and handling capa-
bility. Do not use a size and
type of tire and wheel that is
different from the one that is
originally installed on your
vehicle. It can affect the safety
and performance of your vehi-
cle, which could lead to han-
dling failure or rollover and
serious injury. When replacing
the tires, be sure to equip all
four tires with the tire and
wheel of the same size, type,
tread, brand and load-carrying
capacity.
(Continued)
OEN076053
Tread wear indicator
Page 517 of 569

769
Maintenance
DescriptionFuse ratingProtected Component
A/BAG IND10AInstrument Cluster, A/C Control Module
A/BAG15AACU, Passenger Occupant Detection Sensor
5 MODULE7.5ARR_BLOWER, AVM, AC_INVERTER_UNIT,Smart Key Control Module, BCM, Rear Seat Warmer
LH/RH,Driver/Passenger Seat Warmer Module,
1 MODULE7.5ASport Mode Switch, Key Solenoid, Console Switch LH/RH,Rear Power Window Switch LH/RH,
Data Link Connector
FOG LAMP REAR10A-
2 MEMORY10ABCM, Tire Pressure Monitoring Module, Electro Chromic Mirror, Driver/Passenger Door Module, Auto
Light & Photo Sensor, A/C Control Module, Instrument Cluster, FRT_DRV_SEAT
2 SMART KEY7.5ASmart Key Control Module, Immobilizer Module
3 MODULE10A
BCM, Instrument Cluster, Tire Pressure Monitoring Module, A/C Control Module,
Driver/Passenger Door Module, ATM Shift Lever Indicator, Rear Seat Warmer LH/RH, 4WD ECU,
Driver/Passenger Seat Warmer Module, MTS Module, Rear(SMART) Parking Assist Sensor LH/RH,
A/V & Navigation Head Unit, Rear Parking Assist Sensor (Center)LH/RH, AMP, SAS_ESP,EPB_EXT,
Electro Chromic Mirror, BSD
4 SMART KEY10AStart/Stop Button Switch, Immobilizer Module
INTERIOR LAMP15ACargo Lamp, Vanity Lamp LH/RH, Overhead Console Lamp, Center Room Lamp, Personal Lamp
LH/RH
MULTI MEDIA15AAudio, A/V & Navigation Head Unit, MTS Module,D_CLOCK
MDPS7.5AMDPS Unit
HTD STRG15ASteering Wheel Switch
FOG LAMP FRONT15AFRT FOG LAMP LH/RH
1 MEMORY10ARF Receiver, Ignition Key Ill. & Door Warning Switch
Page 541 of 569
793
Maintenance
Interior care
Interior general precautions
Prevent caustic solutions such as
perfume and cosmetic oil from con-
tacting the dashboard because they
may cause damage or discoloration.
If they do contact the dashboard,
clean immediately. See the instruc-
tions that follow for the proper way to
clean vinyl.
Cleaning the upholstery and inte-rior trim
Vinyl
Remove dust and loose dirt from
vinyl with a whisk broom or vacuum
cleaner. Clean vinyl surfaces with a
vinyl cleaner.
Fabric
Remove dust and loose dirt from fab-
ric with a whisk broom or vacuum
cleaner. Clean with a mild soap solu-
tion recommended for upholstery or
carpets. Remove fresh spots imme-
diately with a fabric spot cleaner. If
fresh spots do not receive immediate
attention, the fabric can be stained
and its color can be affected. Also, its
fire-resistant properties can be
reduced if the material is not proper-
ly maintained.
Cleaning the lap/shoulder beltwebbing
Clean the belt webbing with any mild
soap solution recommended for
cleaning upholstery or carpet. Follow
the instructions provided with the
soap. Do not bleach or re-dye the
webbing because this may weaken
it.
Cleaning the interior windowglass
If the interior glass surfaces of the
vehicle become fogged (that is, cov-
ered with an oily, greasy or waxy
film), they should be cleaned with
glass cleaner. Follow the directions
on the glass cleaner container.
CAUTION
Do not scrape or scratch theinside of the rear window. Thismay result in damage to the rearwindow defroster grid.
CAUTION
Using anything but recommend-ed cleaners and proceduresmay affect the fabric’s appear-ance and fire-resistant proper-ties.
CAUTION
Never allow water or other liq-uids to come in contact withelectrical/electronic componentsinside the vehicle as this maydamage them.
CAUTION
When cleaning leather products(steering wheel, seats etc.), useneutral detergents or low alco-hol content solutions. If you usehigh alcohol content solutionsor acid/alkaline detergents, thecolor of the leather may fade orthe surface may get stripped off.