Page 16 of 569
Your vehicle at a glance
22
EXTERIOR OVERVIEW
1. Panoramic sunroof ..............................4-50
2. Front windshield wiper blades .............7-43
3. Side view mirrors .................................4-68
4. Door locks ...........................................4-21
5. Headlight .............................................7-77
6. Front fog light.....................................4-125
7. Hood ....................................................4-44
8. Tires and wheels ..........................7-48, 8-5
ONC016001❈The actual shape may differ from the illustration.
■ Front view
Page 147 of 569
Features of your vehicle
44
4
Opening the hood
1. Pull the release lever to unlatch
the hood. The hood should pop
open slightly. 2. Go to the front of the vehicle, raise
the hood slightly, pull the second-
ary latch (1) inside of the hood up
and lift the hood (2).
3. Raise the hood. It will raise com- pletely by itself after it has been
raised about halfway.
HOOD
WARNING
Open the hood after turning off
the engine on a flat surface,
shifting the shift lever to the P
(Park) position, and setting the
parking brake.
ODM042023
ONC046082
WARNING
When you check the engine
compartment, please make sure
your head is not injured by the
hood safety hook which is
located inside of the hood.
ODMNMC2034
Page 163 of 569

Features of your vehicle
60
4
MIRRORS
Inside rearview mirror
Adjust the rearview mirror so that the
center view through the rear window
is seen. Make this adjustment before
you start driving.
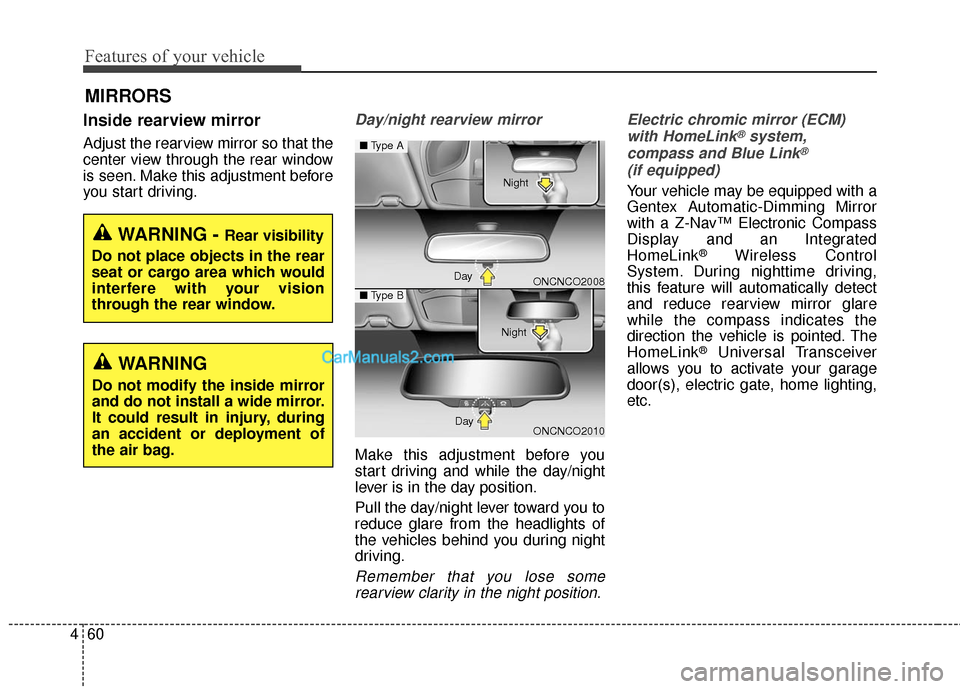
Day/night rearview mirror
Make this adjustment before you
start driving and while the day/night
lever is in the day position.
Pull the day/night lever toward you to
reduce glare from the headlights of
the vehicles behind you during night
driving.
Remember that you lose some
rearview clarity in the night position. Electric chromic mirror (ECM)
with HomeLink
®system,
compass and Blue Link®
(if equipped)
Your vehicle may be equipped with a
Gentex Automatic-Dimming Mirror
with a Z-Nav™ Electronic Compass
Display and an Integrated
HomeLink
®Wireless Control
System. During nighttime driving,
this feature will automatically detect
and reduce rearview mirror glare
while the compass indicates the
direction the vehicle is pointed. The
HomeLink
®Universal Transceiver
allows you to activate your garage
door(s), electric gate, home lighting,
etc.
WARNING - Rear visibility
Do not place objects in the rear
seat or cargo area which would
interfere with your vision
through the rear window.
WARNING
Do not modify the inside mirror
and do not install a wide mirror.
It could result in injury, during
an accident or deployment of
the air bag.
ONCNCO2008
ONCNCO2010
■ Type A
■Type B
Day Night
Day Night
Page 164 of 569

461
Features of your vehicle
(1) Telematics button
(2) Telematics button
(3) Telematics button
(4) Compass control button &Dimming ON/OFF button
(5) Status indicator LED
(6) Channel 1 button
(7) Channel 2 button
(8) Channel 3 button
(9) Compass display
(10) Rear light sensor Automatic-Dimming Night Vision
Safety™ (NVS
®) Mirror
The NVS
®Mirror in your vehicle is
the most advanced way to reduce
annoying glare in the rearview mirror
during any driving situation. For more
information regarding NVS
®mirrors
and other applications, please refer
to the Gentex website:
www.gentex.com
✽ ✽ NOTICE
The NVS®Mirror automatically
reduces glare during driving condi-
tions based upon light levels moni-
tored in front of the vehicle and
from the rear of the vehicle. These
light sensors are visible through
openings in the front and rear of the
mirror case. Any object that
obstructs either light sensor will
degrade the automatic dimming
control feature.
Automatic-dimming function
Your mirror will automatically dim
upon detecting glare from the vehi-
cles traveling behind you. The auto-
dimming function can be controlled
by the Dimming ON/OFF Button:
1. Pressing and hold the button for
3 seconds turns the autodimming
function OFF which is indicated by
the green Status Indicator LED
turning off.
2. Pressing and hold the button for 3 seconds again turns the auto-
dimming function ON which is indi-
cated by the green Status
Indicator LED turning on.
The mirror defaults to the ON posi-
tion each time the vehicle is started.
Z-Nav™ Compass Display
The NVS™ Mirror in your vehicle is
also equipped with a Z-Nav™
Compass that shows the vehicle
Compass heading in the Display
Window using the 8 basic cardinal
headings (N, NE, E, SE, etc.).
OYF042250N
Page 166 of 569

463
Features of your vehicle
To adjust the Zone setting:
1. Determine the desired ZoneNumber based upon your current
location on the Zone Map.
2. Press and hold the button for 6 seconds, the current Zone
Number will appear on the display.
3. Pressing and holding the button again will cause the numbers to
increment (Note: they will repeat
…13, 14, 15, 1, 2, …). Releasing
the button when the desired Zone
Number appears on the display
will set the new Zone.
4. Within about 5 seconds the com- pass will start displaying a com-
pass heading again.
There are some conditions that can
cause changes to the vehicle mag-
nets, such as installing a ski rack or
a CB antenna. Body repair work on
the vehicle can also cause changes
to the vehicle's magnetic field. In
these situations, the compass will
need to be re-calibrated to quickly
correct for these changes. To re-cali-
brate the compass: 1. Press and hold the button for
more than 9 seconds. When the
compass memory is cleared a "C"
will appear in the display.
2. To calibrate the compass, drive the vehicle in 2 complete circles at
less than 5 mph (8 km/h). Integrated HomeLink®Wireless
Control System
The HomeLink
®Wireless Control
System provides a convenient way to
replace up to three hand-held radio-
frequency (RF) transmitters with a
single built-in device. This innovative
feature will learn the radio frequency
codes of most current transmitters to
operate devices such as gate opera-
tors, garage door openers, entry
door locks, security systems, even
home lighting. Both standard and
rolling code-equipped transmitters
can be programmed by following the
outlined procedures. Additional
HomeLink
®information can be found
at: www.homelink.com or by calling
1-800-355-3515.
Page 169 of 569

Features of your vehicle
66
4
4. Firmly press, hold for 5 seconds
and release the programmed
HomeLink
®button up to two sepa-
rate times to activate the door. If
the door does not activate, press
and hold the just-trained
HomeLink
®button and observe
the indicator light.
stantly, programming is complete
and your device should activate
when the HomeLink
®button is
pressed and released.
for 2 seconds and then turns to a
constant light, continue with
"Programming" steps 5-7 to
complete the programming of a
rolling code equipped device
(most commonly a garage door
opener).
5. At the garage door opener receiv- er (motor-head unit) in the garage,
locate the "leam" or "smart" but-
ton. This can usually be found
where the hanging antenna wire is
attached to the motor-head unit. 6. Firmly press and release the
"leam" or "smart" button. (The
name and color of the button vary
by manufacturer). There are 30
seconds to initiate step 7.
7. Return to the vehicle and firmly press, hold for 2 seconds and
release the programmed
HomeLink
®button. Repeat the
"press/hold/release" sequence a
second time, and, depending on
the brand of the garage door
opener (or other rolling code
equipped device), repeat this
sequence a third time to complete
the programming process.
HomeLink
®should now activate your
rolling code equipped device. Gate operator & Canadian pro-
gramming
During programming, your handheld
transmitter may automatically stop
transmitting. Continue to press the
Integrated HomeLink
®Wireless
Control System button (note steps 2
through 3 in the Programming por-
tion of this document) while you
press and re-press ("cycle") your
handheld transmitter every two sec-
onds until the frequency signal has
been learned. The indicator light will
flash slowly and then rapidly after
several seconds upon successful
training.
Operating HomeLink
®
To operate, simply press and release
the programmed HomeLink®button.
Activation will now occur for the
trained device (i.e. garage door
opener, gate operator, security sys-
tem, entry door lock, home/office
lighting, etc.). For convenience, the
hand-held transmitter of the device
may also be used at any time.
Page 186 of 569
483
Features of your vehicle
ItemsExplanation
One Touch Turn Signal
The one touch turn signal function will be deactivated.
The lane change signals will blink 3, 5, or 7 times when the turn signal lever ismoved slightly.
For more details, refer to "Light" in this chapter.
Head Lamp Delay
Welcome Light (If equipped)
Light
ItemsExplanation
Park Assist System Vol. (if equipped) (Level 1~3)
BSD (Blind Spot Detection)Sound (if equipped)
For more details, refer to "Blind Spot Detection System" in chapter 5.
Welcome Sound(if equipped)
Sound
Page 197 of 569
Features of your vehicle
94
4
Check headlight (if equipped)
This warning message illuminates if
there is a malfunction with the head-
lamp. In this case, have your vehicle
inspected by an authorized
HYUNDAI dealer.
✽ ✽ NOTICE
• When replacing the bulb, use the
same wattage bulb.
For more information, refer to
"BULB WATTAGE" in chapter 8.
• If the different wattage bulb is equipped with the vehicle, this
warning message is not displayed.
ODM046637/ODM046638
■
Type A
■Type B