2017 Hyundai Santa Fe oil
[x] Cancel search: oilPage 506 of 569

Maintenance
58
7
Tire terminology and defini-
tions
Air Pressure: The amount of air
inside the tire pressing outward on
the tire. Air pressure is expressed in
pounds per square inch (psi) or kilo-
pascal (kPa).
Accessory Weight: This means the
combined weight of optional acces-
sories. Some examples of optional
accessories are, automatic transaxle
power seats, and air conditioning.
Aspect Ratio: The relationship of a
tire's height to its width.
Belt: A rubber coated layer of cords
that is located between the plies and
the tread. Cords may be made from
steel or other reinforcing materials.
Bead: The tire bead contains steel
wires wrapped by steel cords that
hold the tire onto the rim.
Bias Ply Tire: A pneumatic tire in
which the plies are laid at alternate
angles less than 90 degrees to the
centerline of the tread.
Cold Tire Pressure: The amount of
air pressure in a tire, measured in
pounds per square inch (psi) or kilo-
pascals (kPa) before a tire has built
up heat from driving. Curb Weight:
This means the weight
of a motor vehicle with standard and
optional equipment including the
maximum capacity of fuel, oil and
coolant, but without passengers and
cargo.
DOT Markings: A code molded into
the sidewall of a tire signifying that
the tire is in compliance with the U.S.
Department of Transportation motor
vehicle safety standards. The DOT
code includes the Tire Identification
Number (TIN), an alphanumeric des-
ignator which can also identify the
tire manufacturer, production plant,
brand and date of production.
GVWR: Gross Vehicle Weight Rating
GAWR FRT: Gross Axle Weight
Rating for the Front Axle.
GAWR RR: Gross Axle Weight
Rating for the Rear axle.
Intended Outboard Sidewall: The
side of an asymmetrical tire, that
must always face outward when
mounted on a vehicle.
Kilopascal (kPa): The metric unit for
air pressure.
WARNING - Tire temperature
The temperature grade for this
tire is established for a tire that
is properly inflated and not
overloaded. Excessive speed,
underinflation, or excessive
loading, either separately or in
combination, can cause heat
build-up and possible sudden
tire failure. This can cause loss
of vehicle control and serious
injury or death.
Page 512 of 569
Maintenance
64
7
FUSES
A vehicle’s electrical system is pro-
tected from electrical overload dam-
age by fuses.
This vehicle has 2 fuse panels, one
located in the driver’s side panel bol-
ster, the other in the engine compart-
ment near the battery.
If any of your vehicle’s lights, acces-
sories, or controls do not work, check
the appropriate circuit fuse. If a fuse
has blown, the element inside the
fuse will be melted.
If the electrical system does not
work, first check the driver’s side
fuse panel.
Always replace a blown fuse with
one of the same rating.
Before replacing an open fuse, dis-
connect the negative battery cable.
If the replacement fuse blows, this
indicates an electrical problem. Avoid
using the system involved and imme-
diately consult an authorized
HYUNDAI dealer.
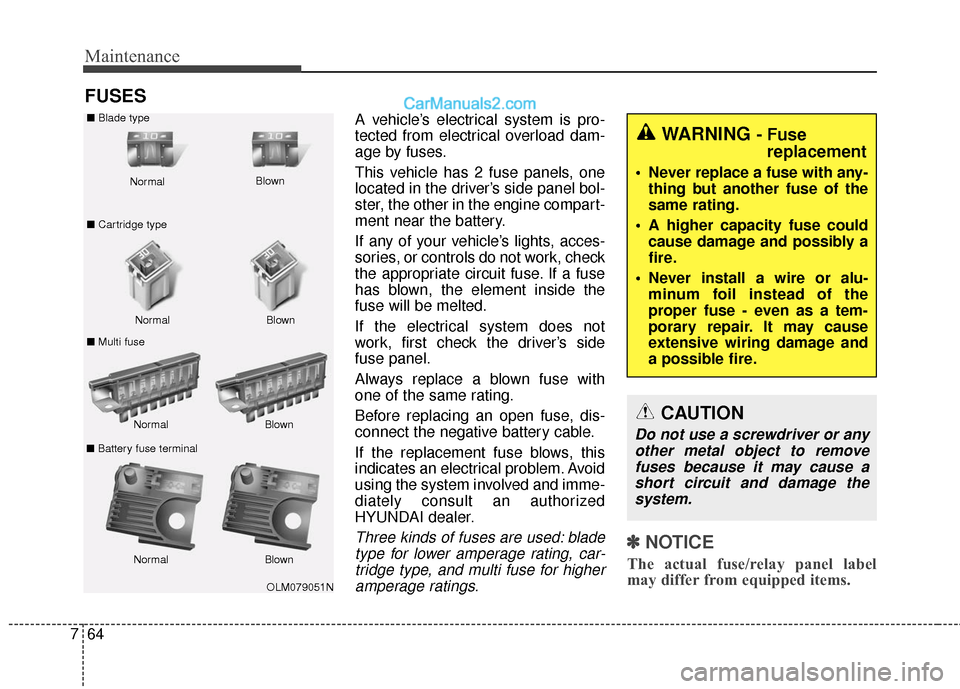
Three kinds of fuses are used: blade
type for lower amperage rating, car-tridge type, and multi fuse for higheramperage ratings.✽ ✽ NOTICE
The actual fuse/relay panel label
may differ from equipped items.
OLM079051N
Normal
Normal
■
Blade type
■ Cartridge type
■ Multi fuse Blown
Blown
Normal Blown
Normal Blown
WARNING - Fuse
replacement
Never replace a fuse with any-
thing but another fuse of the
same rating.
A higher capacity fuse could cause damage and possibly a
fire.
Never install a wire or alu- minum foil instead of the
proper fuse - even as a tem-
porary repair. It may cause
extensive wiring damage and
a possible fire.
CAUTION
Do not use a screwdriver or anyother metal object to removefuses because it may cause ashort circuit and damage thesystem.■ Battery fuse terminal
Page 523 of 569

775
Maintenance
DescriptionFuse ratingProtected Component
FUSE
POWER TAILGATE30APower Tail Gate Module
IDB15AIDB Module
4WD20A4WD ECM
AMS10ABattery Sensor
AMS (WIPER)10ABCM, PCM
WIPER FRT25AWiper LO Relay, Front Wiper Motor
B/UP LAMP10AA/T - Rear Combination Lamp (IN) LH/RH, Electro Chromic Mirror, Audio, A/V & Navigation
Head Unit
ABS37.5AESC Module
5 SENSOR7.5APCM
TCU15AA/T : Transaxle Range Switch
F/PUMP15AFuel Pump Relay
1 ECU 15APCM
2 ECU10AIDB Module
3 SENSOR10AFuel Pump Relay
IGN COIL20ACondenser, Ignition Coil #1/#2/#3/#4
2 SENSOR10APurge Control Solenoid Valve, Variable Intake Solenoid Valve(G4KJ), Oil Control Valve #1/#2
1 SENSOR15AOxygen sensor(#1/#2/#3/#4), PCM, Oxygen Sensor(Down), E/R Fuse & Relay Box (Cooling
Fan Relay)
B/A HORN10ABurgl Aralarm Horn Relay
Page 526 of 569
Maintenance
78
7
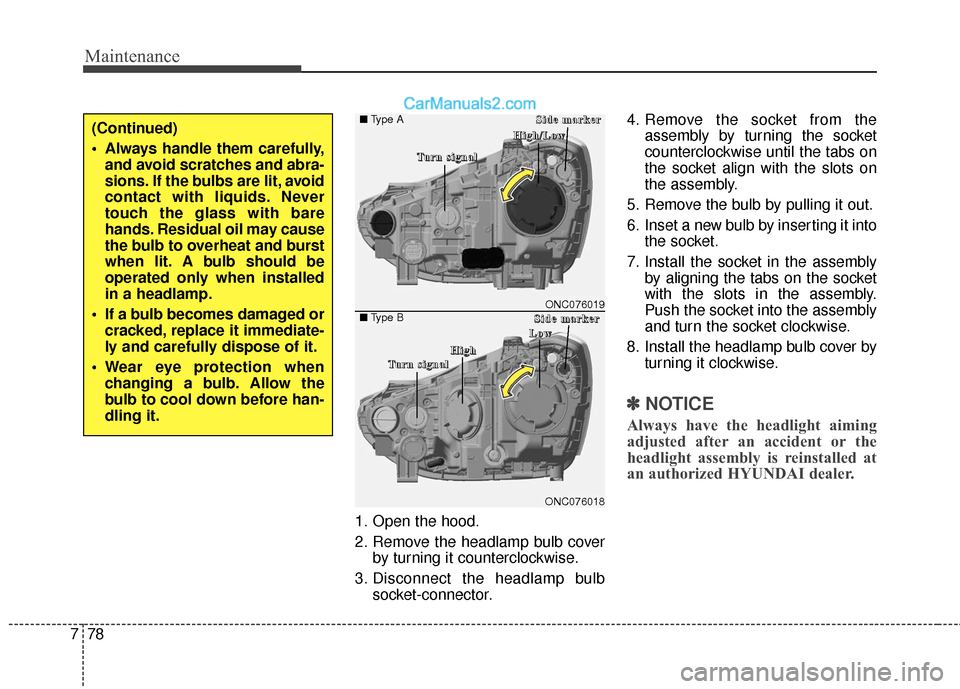
1. Open the hood.
2. Remove the headlamp bulb cover
by turning it counterclockwise.
3. Disconnect the headlamp bulb socket-connector. 4. Remove the socket from the
assembly by turning the socket
counterclockwise until the tabs on
the socket align with the slots on
the assembly.
5. Remove the bulb by pulling it out.
6. Inset a new bulb by inserting it into the socket.
7. Install the socket in the assembly by aligning the tabs on the socket
with the slots in the assembly.
Push the socket into the assembly
and turn the socket clockwise.
8. Install the headlamp bulb cover by turning it clockwise.
✽ ✽NOTICE
Always have the headlight aiming
adjusted after an accident or the
headlight assembly is reinstalled at
an authorized HYUNDAI dealer.
(Continued)
Always handle them carefully,
and avoid scratches and abra-
sions. If the bulbs are lit, avoid
contact with liquids. Never
touch the glass with bare
hands. Residual oil may cause
the bulb to overheat and burst
when lit. A bulb should be
operated only when installed
in a headlamp.
If a bulb becomes damaged or cracked, replace it immediate-
ly and carefully dispose of it.
Wear eye protection when changing a bulb. Allow the
bulb to cool down before han-
dling it.
ONC076018
■ Type A
■Type BONC076019
T
T
T
T
u
u
u
u
r
r
r
r
n
n
n
n
s
s
s
s
i
i
i
i
g
g
g
g
n
n
n
n
a
a
a
a
l
l
l
lS
S
S
S
i
i
i
i
d
d
d
d
e
e
e
e
m
m
m
m
a
a
a
a
r
r
r
r
k
k
k
k
e
e
e
e
r
r
r
r
T
T
T
T
u
u
u
u
r
r
r
r
n
n
n
n
s
s
s
s
i
i
i
i
g
g
g
g
n
n
n
n
a
a
a
a
l
l
l
l
H
H
H
H
i
i
i
i
g
g
g
g
h
h
h
h
/
/
/
/
L
L
L
L
o
o
o
o
w
w
w
w
S
S
S
S
i
i
i
i
d
d
d
d
e
e
e
e
m
m
m
m
a
a
a
a
r
r
r
r
k
k
k
k
e
e
e
e
r
r
r
r
H
H
H
H
i
i
i
i
g
g
g
g
h
h
h
h
L
L
L
L
o
o
o
o
w
w
w
w
Page 532 of 569
Maintenance
84
7
High mounted stop lamp
replacement
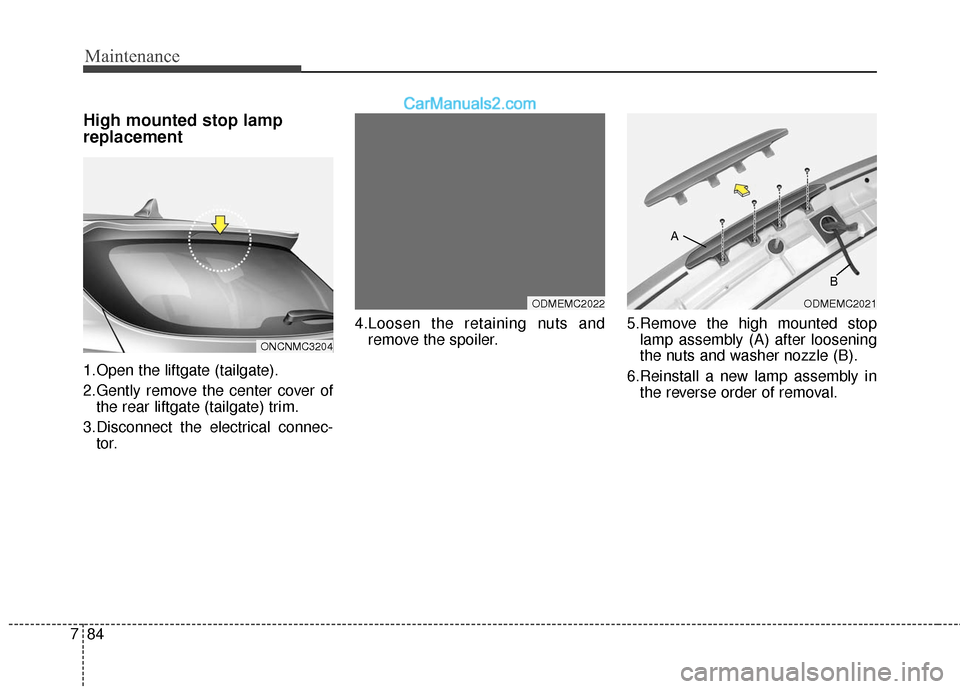
1.Open the liftgate (tailgate).
2.Gently remove the center cover of
the rear liftgate (tailgate) trim.
3.Disconnect the electrical connec- tor. 4.Loosen the retaining nuts and
remove the spoiler. 5.Remove the high mounted stop
lamp assembly (A) after loosening
the nuts and washer nozzle (B).
6.Reinstall a new lamp assembly in the reverse order of removal.
ONCNMC3204
ODMEMC2021
B
A
ODMEMC2022
Page 536 of 569
Maintenance
88
7
Waxing
Wax the vehicle when water will no
longer bead on the paint.
Always wash and dry the vehicle
before waxing. Use a good quality
liquid or paste wax, and follow the
manufacturer’s instructions. Wax all
metal trim to protect it and to main-
tain its luster.
Removing oil, tar, and similar materi-
als with a spot remover will usually
strip the wax from the finish. Be sure
to re-wax these areas even if the rest
of the vehicle does not yet need wax-
ing.CAUTION
Wiping dust or dirt off the
body with a dry cloth willscratch the finish.
Do not use steel wool, abra- sive cleaners, or strong deter-gents containing highly alka-line or caustic agents onchrome-plated or anodizedaluminum parts. This mayresult in damage to the pro-tective coating and cause dis-coloration or paint deteriora-tion.
CAUTION
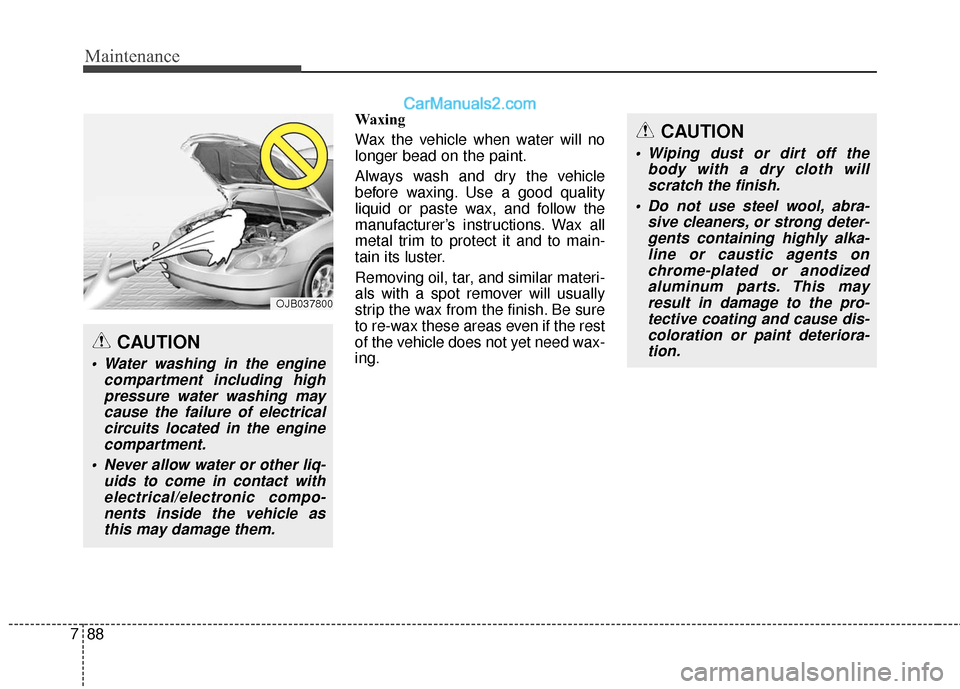
Water washing in the engine compartment including highpressure water washing maycause the failure of electricalcircuits located in the enginecompartment.
Never allow water or other liq- uids to come in contact withelectrical/electronic compo-nents inside the vehicle asthis may damage them.
OJB037800
Page 541 of 569
793
Maintenance
Interior care
Interior general precautions
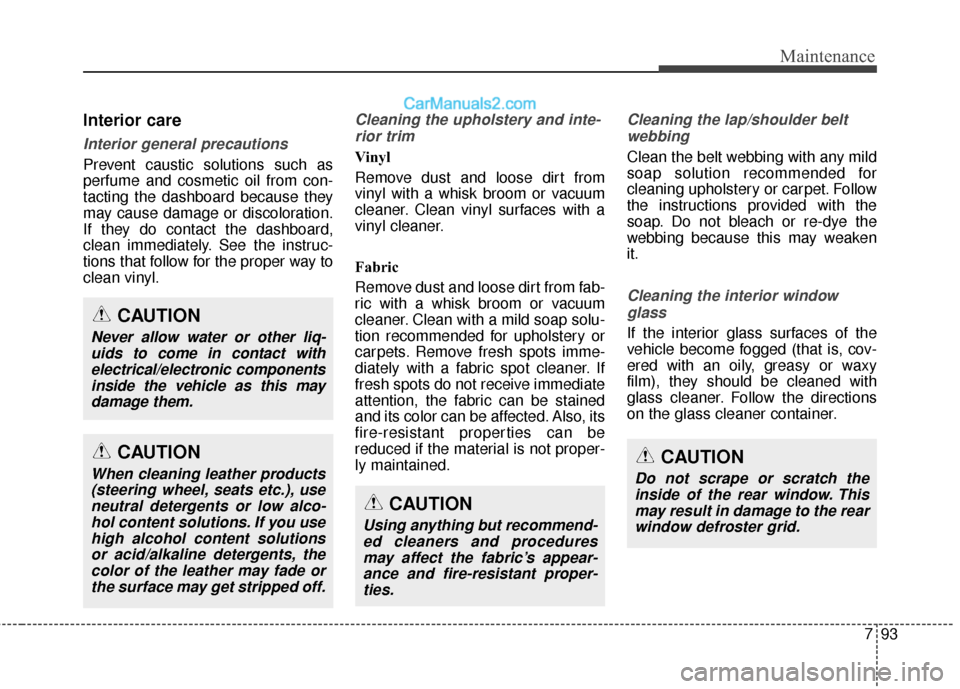
Prevent caustic solutions such as
perfume and cosmetic oil from con-
tacting the dashboard because they
may cause damage or discoloration.
If they do contact the dashboard,
clean immediately. See the instruc-
tions that follow for the proper way to
clean vinyl.
Cleaning the upholstery and inte-rior trim
Vinyl
Remove dust and loose dirt from
vinyl with a whisk broom or vacuum
cleaner. Clean vinyl surfaces with a
vinyl cleaner.
Fabric
Remove dust and loose dirt from fab-
ric with a whisk broom or vacuum
cleaner. Clean with a mild soap solu-
tion recommended for upholstery or
carpets. Remove fresh spots imme-
diately with a fabric spot cleaner. If
fresh spots do not receive immediate
attention, the fabric can be stained
and its color can be affected. Also, its
fire-resistant properties can be
reduced if the material is not proper-
ly maintained.
Cleaning the lap/shoulder beltwebbing
Clean the belt webbing with any mild
soap solution recommended for
cleaning upholstery or carpet. Follow
the instructions provided with the
soap. Do not bleach or re-dye the
webbing because this may weaken
it.
Cleaning the interior windowglass
If the interior glass surfaces of the
vehicle become fogged (that is, cov-
ered with an oily, greasy or waxy
film), they should be cleaned with
glass cleaner. Follow the directions
on the glass cleaner container.
CAUTION
Do not scrape or scratch theinside of the rear window. Thismay result in damage to the rearwindow defroster grid.
CAUTION
Using anything but recommend-ed cleaners and proceduresmay affect the fabric’s appear-ance and fire-resistant proper-ties.
CAUTION
Never allow water or other liq-uids to come in contact withelectrical/electronic componentsinside the vehicle as this maydamage them.
CAUTION
When cleaning leather products(steering wheel, seats etc.), useneutral detergents or low alco-hol content solutions. If you usehigh alcohol content solutionsor acid/alkaline detergents, thecolor of the leather may fade orthe surface may get stripped off.
Page 553 of 569
87
Specifications, Consumer information and Reporting safety defects
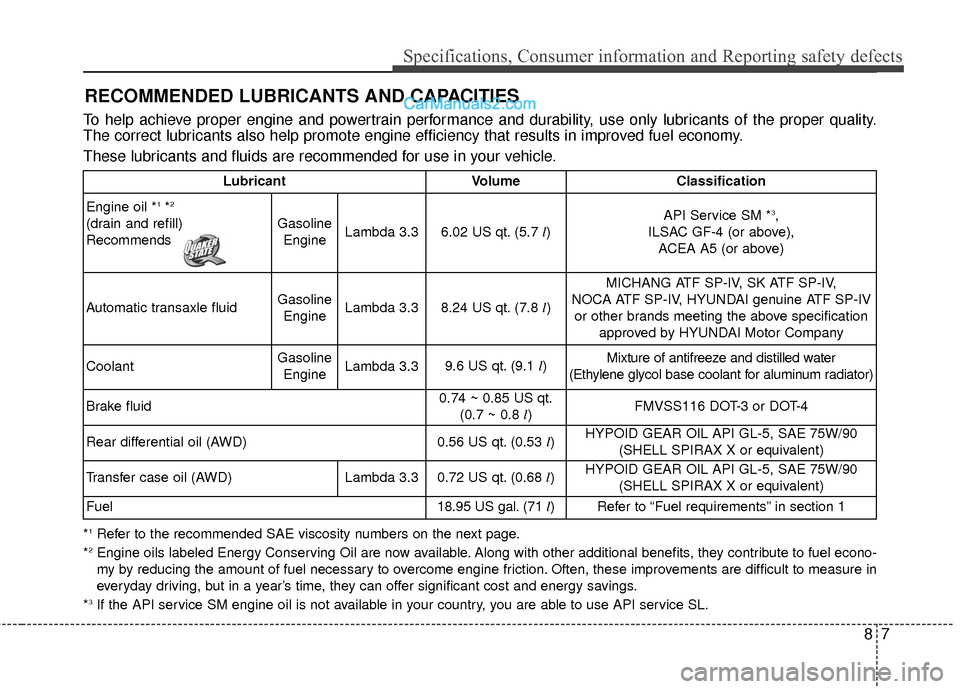
RECOMMENDED LUBRICANTS AND CAPACITIES
*1Refer to the recommended SAE viscosity numbers on the next page.
*2Engine oils labeled Energy Conserving Oil are now available. Along with other additional benefits, they contribute to fuel econo -
my by reducing the amount of fuel necessary to overcome engine friction. Often, these improvements are difficult to measure in
everyday driving, but in a year’s time, they can offer significant cost and energy savings.
*
3If the API service SM engine oil is not available in your country, you are able to use API service SL.
To help achieve proper engine and powertrain performance and durability, use only lubricants of the proper quality.
The correct lubricants also help promote engine efficiency that results in improved fuel economy.
These lubricants and fluids are recommended for use in your vehicle.
Lubricant VolumeClassification
Engine oil *
1*2
(drain and refill)
Recommends Gasoline
Engine Lambda 3.3
6.02 US qt. (5.7
l) API Service SM *3,
ILSAC GF-4 (or above), ACEA A5 (or above)
Automatic transaxle fluid Gasoline
Engine Lambda 3.3
8.24 US qt. (7.8
l)MICHANG ATF SP-IV, SK ATF SP-IV,
NOCA ATF SP-IV, HYUNDAI genuine ATF SP-IV or other brands meeting the above specification approved by HYUNDAI Motor Company
Coolant Gasoline
Engine Lambda 3.3
9.6 US qt. (9.1
l)Mixture of antifreeze and distilled water
(Ethylene glycol base coolant for aluminum radiator)
Brake fluid0.74 ~ 0.85 US qt. (0.7 ~ 0.8 l)FMVSS116 DOT-3 or DOT-4
Rear differential oil (AWD) 0.56 US qt. (0.53 l)HYPOID GEAR OIL API GL-5, SAE 75W/90
(SHELL SPIRAX X or equivalent)
Transfer case oil (AWD) Lambda 3.30.72 US qt. (0.68
l)HYPOID GEAR OIL API GL-5, SAE 75W/90
(SHELL SPIRAX X or equivalent)
Fuel18.95 US gal. (71 l)Refer to “Fuel requirements” in section 1