Page 54 of 569
333
Safety features of your vehicle
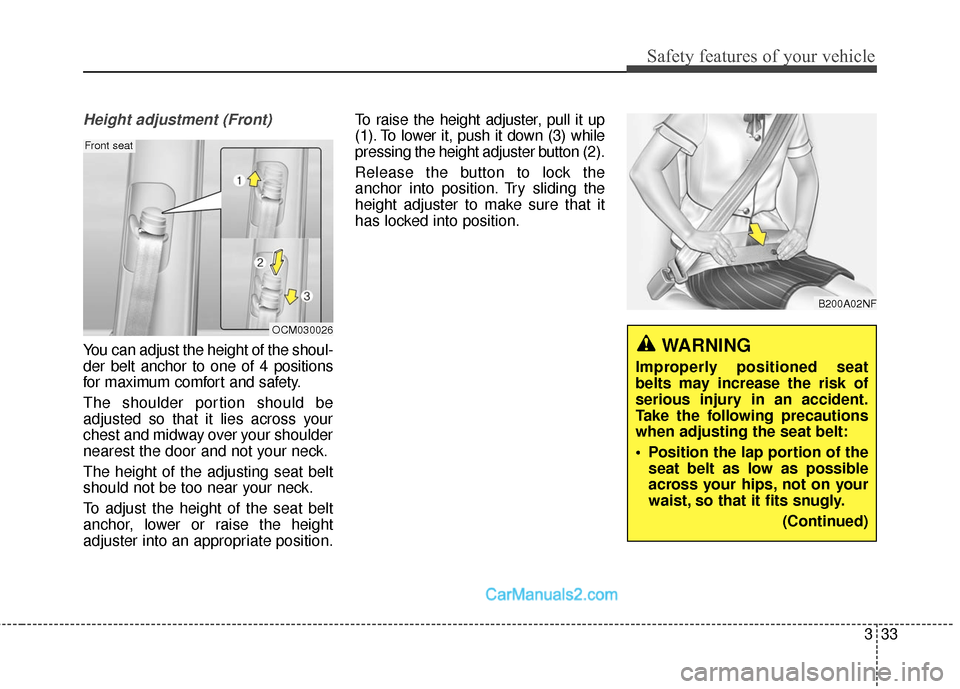
Height adjustment (Front)
You can adjust the height of the shoul-
der belt anchor to one of 4 positions
for maximum comfort and safety.
The shoulder portion should be
adjusted so that it lies across your
chest and midway over your shoulder
nearest the door and not your neck.
The height of the adjusting seat belt
should not be too near your neck.
To adjust the height of the seat belt
anchor, lower or raise the height
adjuster into an appropriate position.To raise the height adjuster, pull it up
(1). To lower it, push it down (3) while
pressing the height adjuster button (2).
Release the button to lock the
anchor into position. Try sliding the
height adjuster to make sure that it
has locked into position.
OCM030026
Front seat
B200A02NF
WARNING
Improperly positioned seat
belts may increase the risk of
serious injury in an accident.
Take the following precautions
when adjusting the seat belt:
Position the lap portion of the
seat belt as low as possible
across your hips, not on your
waist, so that it fits snugly.
(Continued)
Page 55 of 569
Safety features of your vehicle
34
3
Seat belts - Rear seat 3-point sys-
tem with combination lockingretractor
To fasten your seat belt:
Combination retractor type seat belts
are installed in the rear seat positions
to help accommodate the installation
of child restraint systems. Although a
combination retractor is also installed
in the front passenger seat position, it
is strongly recommended that children
always be seated in the rear seat.
NEVER place any infant restraint sys-
tem in the front seat of the vehicle.
This type of seat belt combines the
features of both an emergency lock-
ing retractor seat belt and an auto-
matic locking retractor seat belt. To
fasten your seat belt, pull it out of the
retractor and insert the metal tab into
the buckle. There will be an audible
"click" when the tab locks into the
buckle. When not securing a child
restraint, the seat belt operates in the
same way as the driver's seat belt
(Emergency Locking Retractor Type).
It automatically adjusts to the proper
length only after the lap belt portion of
the seat belt is adjusted manually so
that it fits snugly around your hips. When the seat belt is fully extended
from the retractor to allow the instal-
lation of a child restraint system, the
seat belt operation changes to allow
the belt to retract, but not to extend
(Automatic Locking Retractor Type).
Refer to “Using a child restraint sys-
tem” in this section.
To convert from the automatic lock-
ing feature to the emergency locking
operation mode, allow the unbuckled
seat belt to fully retract.
(Continued)
Position one arm under the
shoulder belt and the other
over the belt, as shown in the
illustration.
Always position the shoulder belt anchor into the locked
position at the appropriate
height.
Never position the shoulder belt across your neck or face.
Page 56 of 569
335
Safety features of your vehicle
When using the rear center seat belt,
the buckle with the "CENTER" mark
must be used.To release the seat belt:
The seat belt is released by pressing
the release button (1) in the locking
buckle. When it is released, the belt
should automatically draw back into
the retractor.
If this does not happen, check the
belt to be sure it is not twisted, then
try again.
Stowing the rear seat belt
The rear seat belt buckles can be
stowed in the pocket between the
rear seatback and cushion when
not in use.
B210A01NF-1/HODM032034
OXM039030
■ 2nd row seat
■3rd row seat (if equipped)
ODM032051
Page 58 of 569
337
Safety features of your vehicle
When the vehicle stops suddenly, or
if the occupant tries to lean forward
too quickly, the seat belt retractor will
lock into position. In certain frontal
collisions (or side collisions or
rollovers), the pre-tensioner will acti-
vate and pull the seat belt into tighter
contact against the occupant's body.
(1) Retractor PretensionerThe purpose of the retractor pre-tensioner is to make sure that the
shoulder belts fit in tightly against
the occupant's upper body in cer-
tain frontal collisions (or side colli-
sions or rollovers).
(2) EFD (Emergency Fastening Device)
The purpose of the EFD is to makesure that the pelvis belts fit in tight-
ly against the occupant's lower
body in certain frontal collisions (or
rollovers). (for passenger’s side)
If the system senses excessive ten-
sion on the driver or passenger's seat
belt when the pre-tensioner system
activates, the load limiter inside the
retractor pre-tensioner will release
some of the pressure on the affected
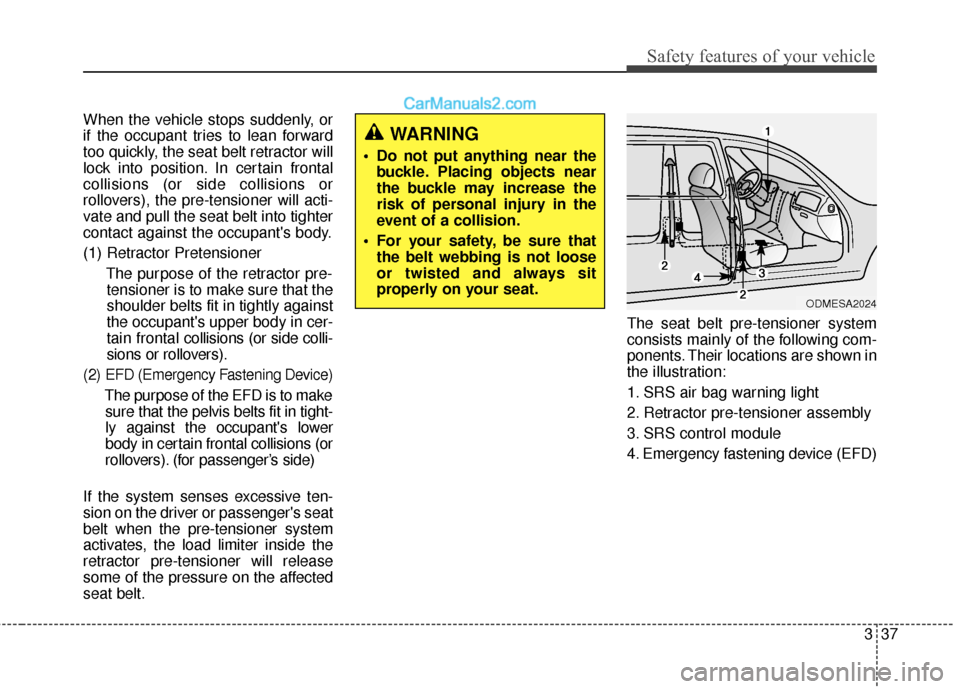
seat belt. The seat belt pre-tensioner system
consists mainly of the following com-
ponents. Their locations are shown in
the illustration:
1. SRS air bag warning light
2. Retractor pre-tensioner assembly
3. SRS control module
4. Emergency fastening device (EFD)
WARNING
Do not put anything near the
buckle. Placing objects near
the buckle may increase the
risk of personal injury in the
event of a collision.
For your safety, be sure that the belt webbing is not loose
or twisted and always sit
properly on your seat.
ODMESA2024
Page 65 of 569
Safety features of your vehicle
44
3
WARNING
To reduce the chance of serious
or fatal injuries:
Children of all ages are safer
when restrained in the rear
seat. A child riding in the front
passenger seat can be force-
fully struck by an inflating air
bag resulting in serious or
fatal injuries.
Always follow the child restraint system manufactur-
er’s instructions for installa-
tion and use of the child
restraint.
Always make sure the child seat is secured properly in the
car and your child is securely
restrained in the child seat.
Never hold a child in your arms or lap when riding in a
vehicle. The violent forces cre-
ated during a crash will tear
the child from your arms and
throw the child against the
car’s interior.
(Continued)
(Continued)
Never put a seat belt overyourself and a child. During a
crash, the belt could press
deep into the child causing
serious internal injuries.
Never leave children unat- tended in a vehicle – not even
for a short time. The car can
heat up very quickly, resulting
in serious injuries to children
inside. Even very young chil-
dren may inadvertently cause
the vehicle to move, entangle
themselves in the windows, or
lock themselves or others
inside the vehicle.
Never allow two children, or any two persons, to use the
same seat belt.
Children often squirm and reposition themselves improp-
erly. Never let a child ride with
the shoulder belt under their
arm or behind their back.
Always properly position and
secure children in the rear
seat.
(Continued)(Continued)
When the child restraint sys-tem is not in use, store it in
the luggage area or fasten it
with a seat belt so that it will
not be thrown forward in the
case of a sudden stop or an
accident.
Children may be seriously injured or killed by an inflating
air bag. All children, even
those too large for child
restraints, must ride in the
rear seat.
Page 66 of 569
345
Safety features of your vehicle
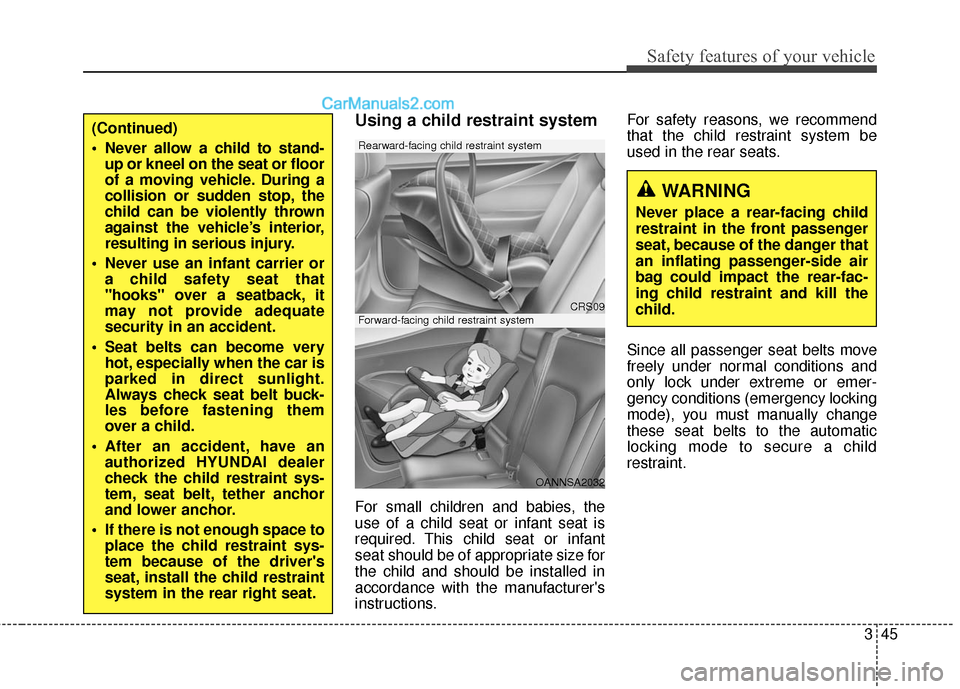
Using a child restraint system
For small children and babies, the
use of a child seat or infant seat is
required. This child seat or infant
seat should be of appropriate size for
the child and should be installed in
accordance with the manufacturer's
instructions.For safety reasons, we recommend
that the child restraint system be
used in the rear seats.
Since all passenger seat belts move
freely under normal conditions and
only lock under extreme or emer-
gency conditions (emergency locking
mode), you must manually change
these seat belts to the automatic
locking mode to secure a child
restraint.
WARNING
Never place a rear-facing child
restraint in the front passenger
seat, because of the danger that
an inflating passenger-side air
bag could impact the rear-fac-
ing child restraint and kill the
child.
CRS09
OANNSA2032
Forward-facing child restraint system
Rearward-facing child restraint system
(Continued)
Never allow a child to stand-
up or kneel on the seat or floor
of a moving vehicle. During a
collision or sudden stop, the
child can be violently thrown
against the vehicle’s interior,
resulting in serious injury.
Never use an infant carrier or a child safety seat that
"hooks" over a seatback, it
may not provide adequate
security in an accident.
Seat belts can become very hot, especially when the car is
parked in direct sunlight.
Always check seat belt buck-
les before fastening them
over a child.
After an accident, have an authorized HYUNDAI dealer
check the child restraint sys-
tem, seat belt, tether anchor
and lower anchor.
If there is not enough space to place the child restraint sys-
tem because of the driver's
seat, install the child restraint
system in the rear right seat.
Page 67 of 569
Safety features of your vehicle
46
3
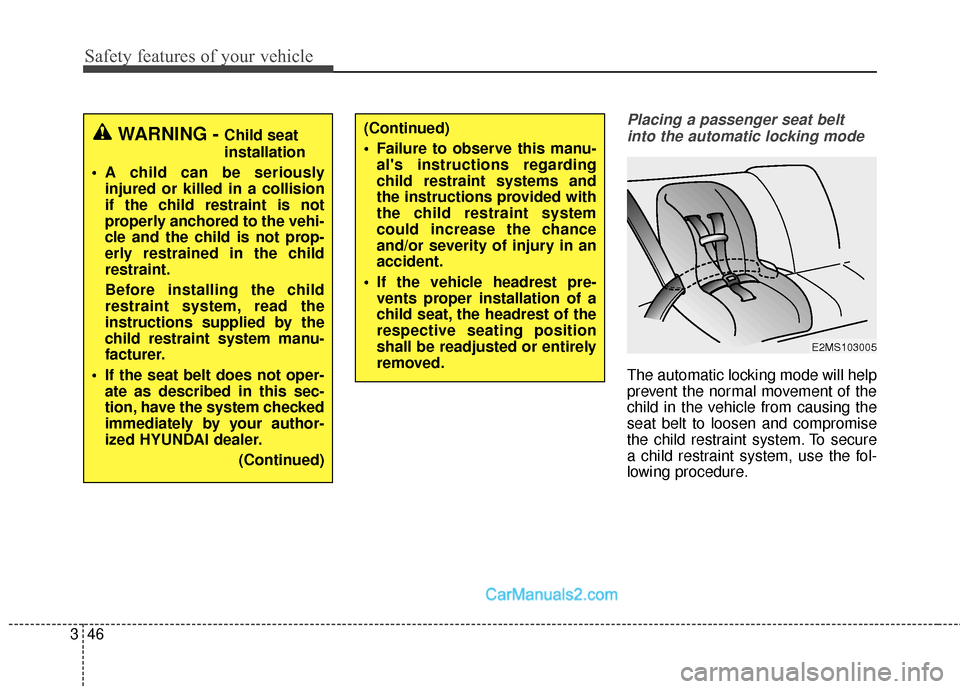
Placing a passenger seat belt
into the automatic locking mode
The automatic locking mode will help
prevent the normal movement of the
child in the vehicle from causing the
seat belt to loosen and compromise
the child restraint system. To secure
a child restraint system, use the fol-
lowing procedure.
E2MS103005
(Continued)
Failure to observe this manu- al's instructions regarding
child restraint systems and
the instructions provided with
the child restraint system
could increase the chance
and/or severity of injury in an
accident.
If the vehicle headrest pre- vents proper installation of a
child seat, the headrest of the
respective seating position
shall be readjusted or entirely
removed.WARNING - Child seat
installation
A child can be seriously injured or killed in a collision
if the child restraint is not
properly anchored to the vehi-
cle and the child is not prop-
erly restrained in the child
restraint.
Before installing the child
restraint system, read the
instructions supplied by the
child restraint system manu-
facturer.
If the seat belt does not oper- ate as described in this sec-
tion, have the system checked
immediately by your author-
ized HYUNDAI dealer.
(Continued)
Page 68 of 569
347
Safety features of your vehicle
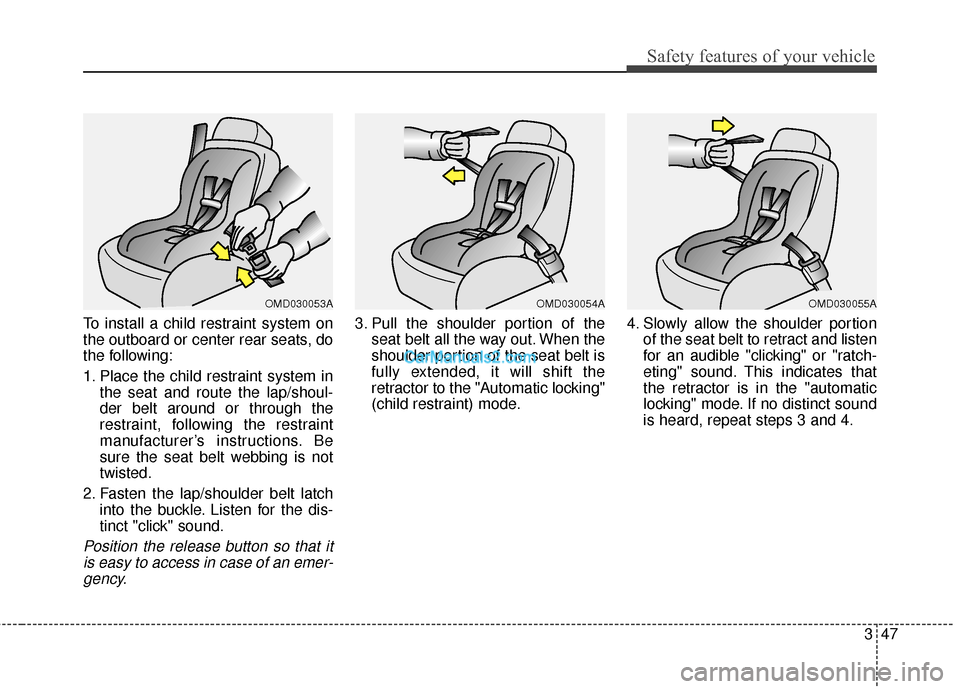
To install a child restraint system on
the outboard or center rear seats, do
the following:
1. Place the child restraint system inthe seat and route the lap/shoul-
der belt around or through the
restraint, following the restraint
manufacturer’s instructions. Be
sure the seat belt webbing is not
twisted.
2. Fasten the lap/shoulder belt latch into the buckle. Listen for the dis-
tinct "click" sound.
Position the release button so that itis easy to access in case of an emer-gency.
3. Pull the shoulder portion of the seat belt all the way out. When the
shoulder portion of the seat belt is
fully extended, it will shift the
retractor to the "Automatic locking"
(child restraint) mode. 4. Slowly allow the shoulder portion
of the seat belt to retract and listen
for an audible "clicking" or "ratch-
eting" sound. This indicates that
the retractor is in the "automatic
locking" mode. If no distinct sound
is heard, repeat steps 3 and 4.
OMD030055AOMD030054AOMD030053A