Page 56 of 553
2-26
Safety system of your vehicle
Seat belt warning light
Seat belt warning
Driver’s seat belt warning
As a reminder to the driver, the seat
belt warning light will illuminate and
chime for approximately 6 seconds
each time you turn the ignition switch
ON regardless of belt fastening.
If the driver’s seat belt is unfastened
after the ignition switch is ON, the
seat belt warning light illuminates
until the belt is fastened.
Damaged seat belts and seat
belt assemblies will not operate
properly. Always replace:
Frayed, contaminated, or dam-
aged webbing.
Damaged hardware.
The entire seat belt assembly
after it has been worn in an
accident, even if damage to
webbing or assembly is notapparent.
WARNING (Continued)
No modifications or additions
should be made by the user
which will either prevent the
seat belt adjusting devices
from operating to remove
slack, or prevent the seat belt
assembly from being adjusted
to remove slack.
OAM032161L
Page 67 of 553
2-37
Safety system of your vehicle
2
When to replace seat belts
The entire seat belt assembly or
assemblies should be replaced if the
vehicle has been involved in an acci-
dent. This should be done even if no
damage is visible. We recommend that
you consult an authorized HYUNDAI
dealer.
Page 454 of 553
7-33
7
Maintenance
3. Press and hold the lock (1) onboth sides of the cover.
4. Pull out (2) the cover. 4. Replace the climate control air filter.
5. Reassemble in the reverse order
of disassembly. Install a new climate control air fil- ter in the correct direction with the
arrow symbol (
�
�) facing down-
wards. Otherwise, the climate con-
trol effects may decrease, possi-
bly with a noise.
NOTICE
OHG070041OAE076015
Page 456 of 553
7-35
7
Maintenance
Type A
1. Raise the wiper arm and turn thewiper blade assembly to expose
the plastic locking clip.
2. Press the clip and slide the bladeassembly downward.
3. Lift it off the arm.
4. Install the blade assembly in the reverse order of removal.
Type B
1. Raise the wiper arm.
OLMB073020
OLMB073021
OLMB073022
OLF074017
Page 487 of 553

7-66
MaintenanceL
L IIGG HH TT BB UU LLBB SS
Consult an authorized HYUNDAI
dealer to replace most vehicle light
bulbs. It is difficult to replace vehicle
light bulbs because other parts of the
vehicle must be removed before you
can get to the bulb. This is especially
true for removing the headlamp
assembly to get to the bulb(s).
Removing/installing the headlamp
assembly can result in damage to
the vehicle.
Information
After heavy driving, rain or washing,
the lamps could appear frosty. This
condition is caused by the temperature
difference between the lamp inside and
the outside temperature. This is similar
to the condensation on your windows
inside your vehicle during the rain and
doesn’t indicate a problem with your
vehicle. If the water leaks into the light
bulb circuitry, have your vehicle
checked by an authorized HYUNDAI
dealer. Information
A normally functioning lamp may flicker momentarily to stabilize the
vehicle’s electrical control system.
However, if the lamp goes out after
flickering momentarily, or contin-
ues to flicker, we recommend the
system be checked by an authorized
HYUNDAI dealer.
The position lamp may not turn on when the position lamp switch is
turned on, but the position lamp and
headlamp switch may turn on when
the headlamp switch is turned on.
This may be caused by network fail-
ure or vehicle electrical control sys-
tem malfunction. If this occurs, we
recommend the system be checked
by an authorized HYUNDAI dealer.i
i
Prior to replacing a lamp,
depress the foot brake, move
the shift lever into P (Park),
apply the parking brake, place
the ignition switch in the
LOCK/OFF position, and take
the key with you when leaving
the vehicle to avoid sudden
movement of the vehicle and
to prevent possible electric
shock.
Be aware the bulbs may be hot
and may burn your fingers.
WARNING
Page 489 of 553

7-68
Maintenance
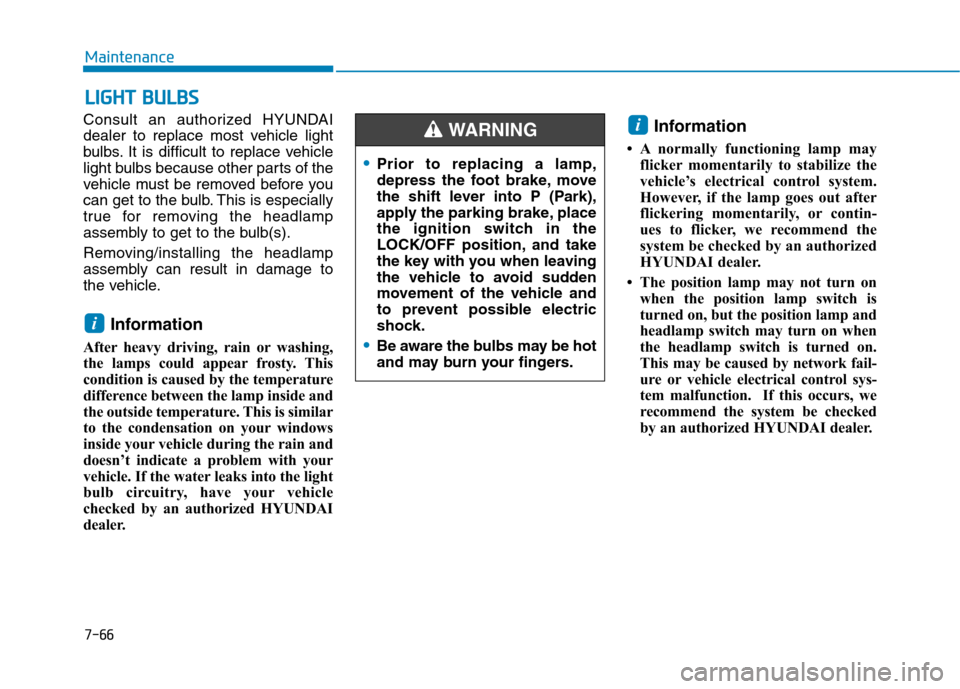
Headlamp and position lamp
1. Open the hood.
2. Disconnect the negative batterycable.
3. Remove the bulb cover (1) by turn- ing it counterclockwise.
4. Disconnect the bulb socket-con- nector. (for low beam and high beam)
5. Remove the bulb from the head- lamp assembly.
6. Install a new bulb.
7. Connect the bulb socket-connec- tor. (for low beam and high beam)
8. Install the bulb cover (1) by turning it clockwise. Information
The headlamp aiming should be
adjusted after an accident or after the
headlamp assembly is reinstalled at an
authorized HYUNDAI dealer.
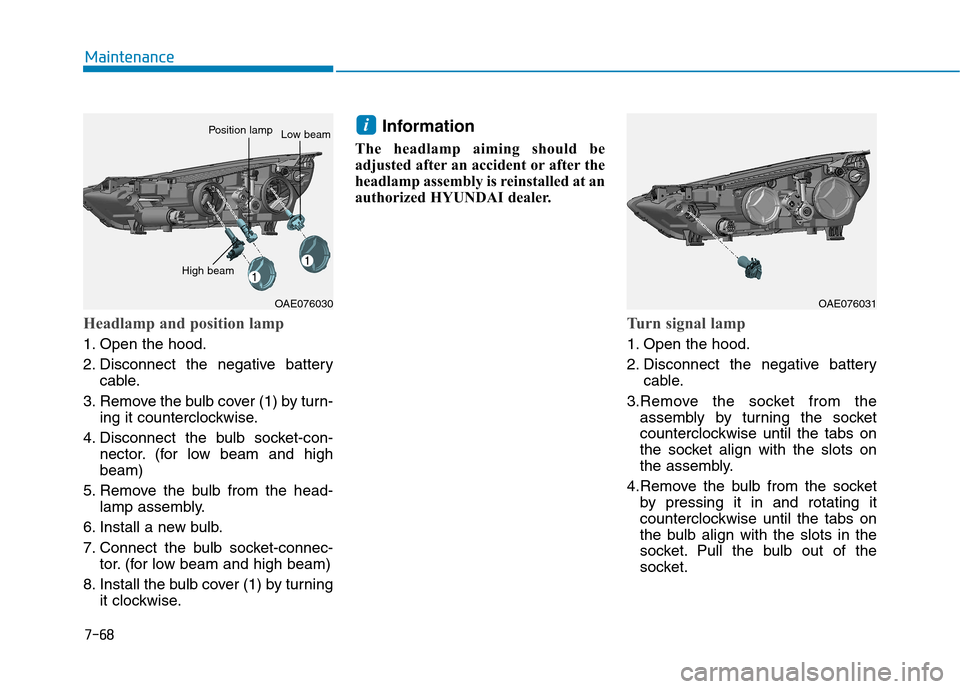
Turn signal lamp
1. Open the hood.
2. Disconnect the negative battery cable.
3.Remove the socket from the assembly by turning the socket
counterclockwise until the tabs on
the socket align with the slots on
the assembly.
4.Remove the bulb from the socket by pressing it in and rotating it
counterclockwise until the tabs on
the bulb align with the slots in the
socket. Pull the bulb out of the
socket.
i
OAE076030
High beam
Position lampLow beam
OAE076031
Page 490 of 553

7-69
7
Maintenance
5.Insert a new bulb by inserting it intothe socket and rotating it until it
locks into place.
6.Install the socket in the assembly by aligning the tabs on the socket
with the slots in the assembly.
7.Push the socket into the assembly and turn the socket clockwise.Type B
(1) Headlamp (Low/High)
(2) Turn signal lamp
(3) Position lamp
Headlamp and position lamp
If the light bulb does not operate,
have the vehicle checked by an
authorized HYUNDAI dealer. Information
If your vehicle is equipped with High
Intensity Discharge (HID) headlamps,
these headlamps contain mercury. So
if you need to have your vehicle dis-
posed, you should remove the HID
Headlamps before disposal. The
removed HID headlamps should be
recycled, re-used or disposed as haz-
ardous waste.
iOAE076029 HID headlamp Do not attempt to replace or
inspect the low beam (XENON
bulb) due to electric shock dan-
ger. If the low beam (XENON
bulb) is not working, have your
vehicle checked by an author-
ized HYUNDAI Dealer.
WARNING
Page 491 of 553

7-70
Maintenance
Information
HID lamps have superior perform-
ance vs. halogen bulbs.
HID lamps are estimated by the man-
ufacturer to last twice as long or
longer than halogen bulbs depending
on their frequency of use. They will
probably require replacement at some
point in the life of the vehicle. Cycling
the headlamps on and off more than
typical use will shorten HID lamps
life. HID lamps do not fail in the same
manner as halogen incandescent
lamps. If a headlamp goes out after a
period of operation but will immedi-
ately relight when the headlamp
switch is cycled it is likely the HID
lamp needs to be replaced. HID light-
ing components are more complex
than conventional halogen bulbs thus
have higher replacement cost.
Information
The headlamp aiming should be
adjusted after an accident or after the
headlamp assembly is reinstalled at an
authorized HYUNDAI dealer. Information
Traffic Change (For Europe)
The low beam light distribution is
asymmetric. If you go abroad to a
country with opposite traffic direc-
tion, this asymmetric part will dazzle
oncoming car driver. To prevent daz-
zle, ECE regulation demand several
technical solutions (ex. automatic
change system, adhesive sheet, down
aiming). This headlamps are designed
not to dazzle opposite drivers. So, you
need not change your headlamps in a
country with opposite traffic direc-
tion.
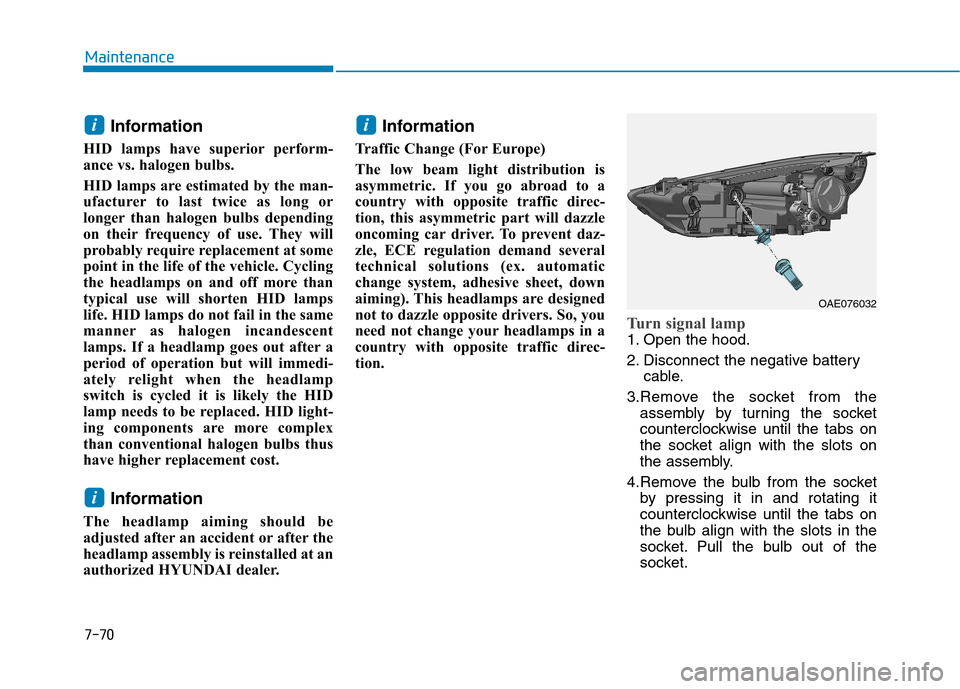
Turn signal lamp
1. Open the hood.
2. Disconnect the negative battery cable.
3.Remove the socket from the assembly by turning the socket
counterclockwise until the tabs on
the socket align with the slots on
the assembly.
4.Remove the bulb from the socket by pressing it in and rotating it
counterclockwise until the tabs on
the bulb align with the slots in the
socket. Pull the bulb out of the
socket.
i
i
i
OAE076032