Page 406 of 553
6-21
What to do in an emergency
6
When driving with the compact spare
tire mounted to your vehicle:
Check the tire pressure afterinstalling the compact spare tire. The compact spare tire should be
inflated to 420 kPa (60 psi).
Do not take this vehicle through an automatic car wash while the com-pact spare tire is installed.
Do not use the compact spare tire on any other vehicle because thistire has been designed especially
for your vehicle.
The compact spare tire's tread life is shorter than a regular tire.
Inspect your compact spare tire
regularly and replace worn com-
pact spare tires with the same sizeand design, mounted on the samewheel.
Do not use more than one compact spare tire at a time.
Do not tow a trailer while the com- pact spare tire is installed. When the original tire and wheelare repaired and reinstalled on the
vehicle, the lug nut torque must be
set correctly. The correct lug nut
tightening torque is 11~13 kgf.m
(79~94 lbf.ft).NOTICE
To prevent damaging the com-
pact spare tire and your vehicle:
Drive slowly enough for the
road conditions to avoid all
hazards, such as a potholesor debris.
Avoid driving over obstacles. The compact spare tire diame-ter is smaller than the diame-
ter of a conventional tire and
reduces the ground clearance
approximately 25 mm (1 inch).
Do not use tire chains on the
compact spare tire. Because
of the smaller size, a tire chain
will not fit properly.
Do not use the compact spare
tire on any other wheels, nor
should standard tires, snow
tires, wheel covers or trimrings be used with the com-pact spare wheel.
CAUTION
Page 415 of 553

6-30
What to do in an emergency
Distributing the sealant
11. Immediately drive approximately7~10 km (4~6 miles or about 10
minutes) to evenly distribute the
sealant in the tire.
Do not exceed a speed of 80 km/h
(50 mph). If possible, do not fall
below a speed of 20 km/h (12 mph).
While driving, if you experience any
unusual vibration, ride disturbance or
noise, reduce your speed and drive
with caution until you can safely pulloff of the side of the road.
Call for road side service or towing.
When you use the Tire Mobility Kit, the tire pressure sensors and wheel
may be damaged by sealant, have it
inspected at an authorized dealer. Checking the tire inflation pressure
1. After driving approximately 7~10 km
(4~6 miles or about 10 minutes),
stop at a safe location.
2. Connect hose (9) of the compres- sor directly to the tire valve.
3. Plug the compressor power cord into the vehicle power outlet. 4. Adjust the tire inflation pressure to
the recommended tire inflation.
With the ignition switched on, pro- ceed as follows.
- To increase the inflation pres- sure:
Switch on the compressor, posi-
tion to [I]. To check the current
inflation pressure setting, briefly
switch off the compressor.
- To reduce the inflation pres- sure:
Loosen the screw cap (8) on the
compressor hose.
Information
The pressure gauge may show higher
than actual reading when the com-
pressor is running. To get an accurate
tire pressure, the compressor needs to
be turned off.
i
OAD065014
OLMF064106
Page 417 of 553

6-32
What to do in an emergency
Towing service
If emergency towing is necessary,
we recommend having it done by an
authorized HYUNDAI dealer or a
commercial tow-truck service.
Proper lifting and towing procedures
are necessary to prevent damage to
the vehicle. The use of wheel dolliesor flatbed is recommended.It is acceptable to tow the vehicle
with the rear wheels on the ground(without dollies) and the front wheels
off the ground.
If any of the loaded wheels or sus- pension components are damaged
or the vehicle is being towed with the
front wheels on the ground, use a
towing dolly under the front wheels.
When being towed by a commercial
tow truck and wheel dollies are not
used, the front of the vehicle should
always be lifted, not the rear.
TT
OO WW IINN GG
OAE066018 Dolly
Dolly
Do not tow the vehicle with the
front wheels on the ground as
this may cause damage to the
vehicle.
Do not tow with sling-type
equipment. Use wheel lift orflatbed equipment.
CAUTION
OAE066020
OAE066019
Page 418 of 553
6-33
What to do in an emergency
6
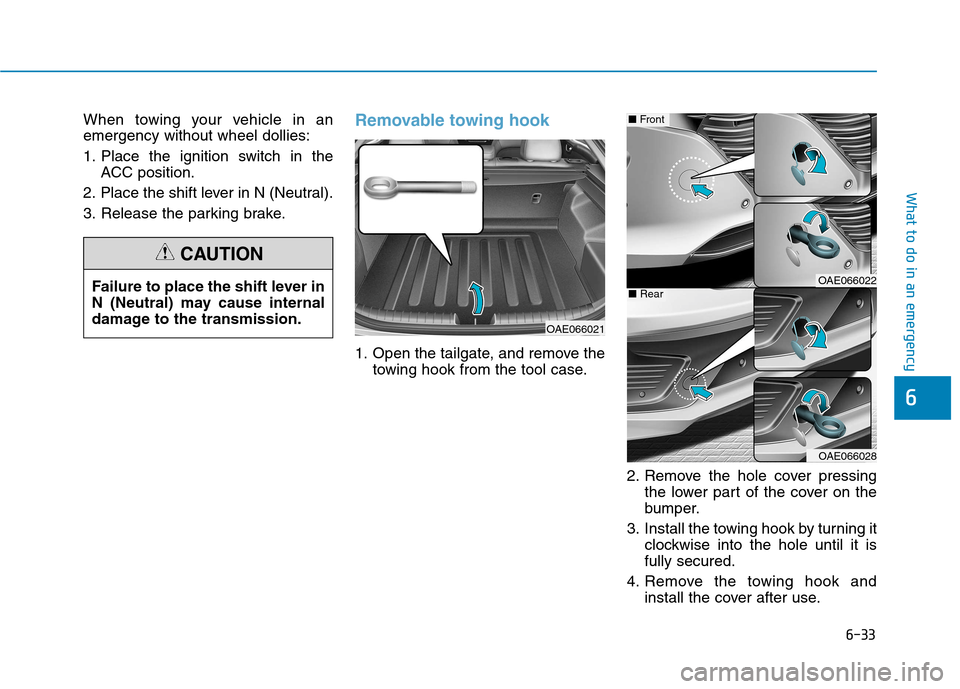
When towing your vehicle in an emergency without wheel dollies:
1. Place the ignition switch in theACC position.
2. Place the shift lever in N (Neutral).
3. Release the parking brake.Removable towing hook
1. Open the tailgate, and remove the towing hook from the tool case.
2. Remove the hole cover pressingthe lower part of the cover on the
bumper.
3. Install the towing hook by turning it clockwise into the hole until it isfully secured.
4. Remove the towing hook and install the cover after use.
Failure to place the shift lever in
N (Neutral) may cause internal
damage to the transmission.
CAUTION
OAE066021
OAE066022
OAE066028
■
Front
■Rear
Page 419 of 553
6-34
What to do in an emergency
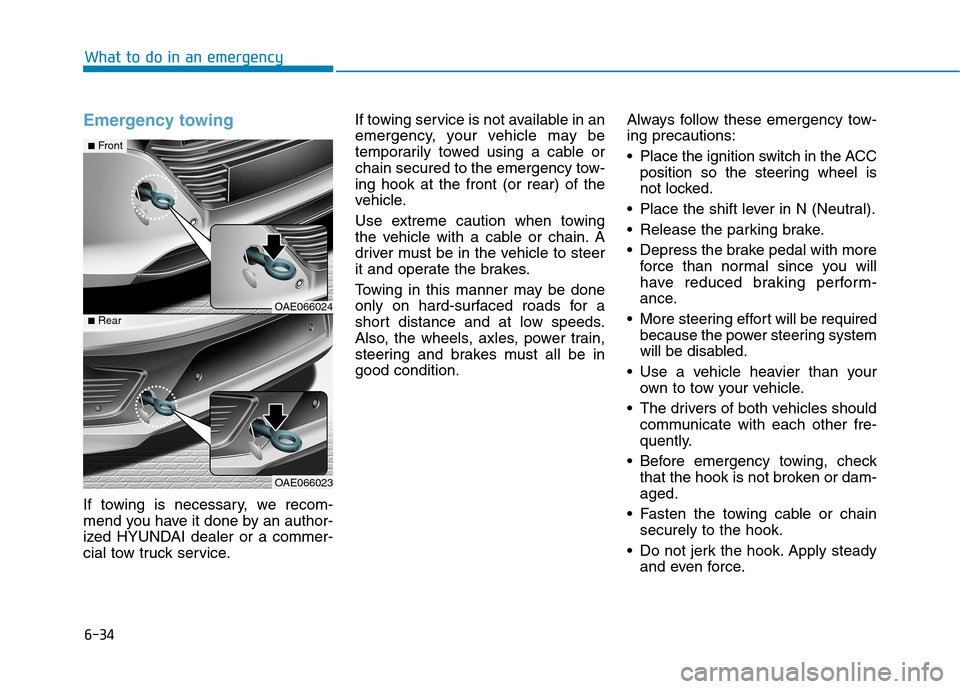
Emergency towing
If towing is necessary, we recom-
mend you have it done by an author-
ized HYUNDAI dealer or a commer-
cial tow truck service.If towing service is not available in an
emergency, your vehicle may be
temporarily towed using a cable or
chain secured to the emergency tow-ing hook at the front (or rear) of the
vehicle.
Use extreme caution when towing
the vehicle with a cable or chain. A
driver must be in the vehicle to steer
it and operate the brakes.
Towing in this manner may be done
only on hard-surfaced roads for a
short distance and at low speeds.
Also, the wheels, axles, power train,
steering and brakes must all be ingood condition.
Always follow these emergency tow-ing precautions:
Place the ignition switch in the ACC
position so the steering wheel is
not locked.
Place the shift lever in N (Neutral).
Release the parking brake.
Depress the brake pedal with more force than normal since you will
have reduced braking perform-
ance.
More steering effort will be required because the power steering system
will be disabled.
Use a vehicle heavier than your own to tow your vehicle.
The drivers of both vehicles should communicate with each other fre-
quently.
Before emergency towing, check that the hook is not broken or dam-aged.
Fasten the towing cable or chain securely to the hook.
Do not jerk the hook. Apply steady and even force.
OAE066024
OAE066023
■Front
■Rear
Page 420 of 553
6-35
What to do in an emergency
6
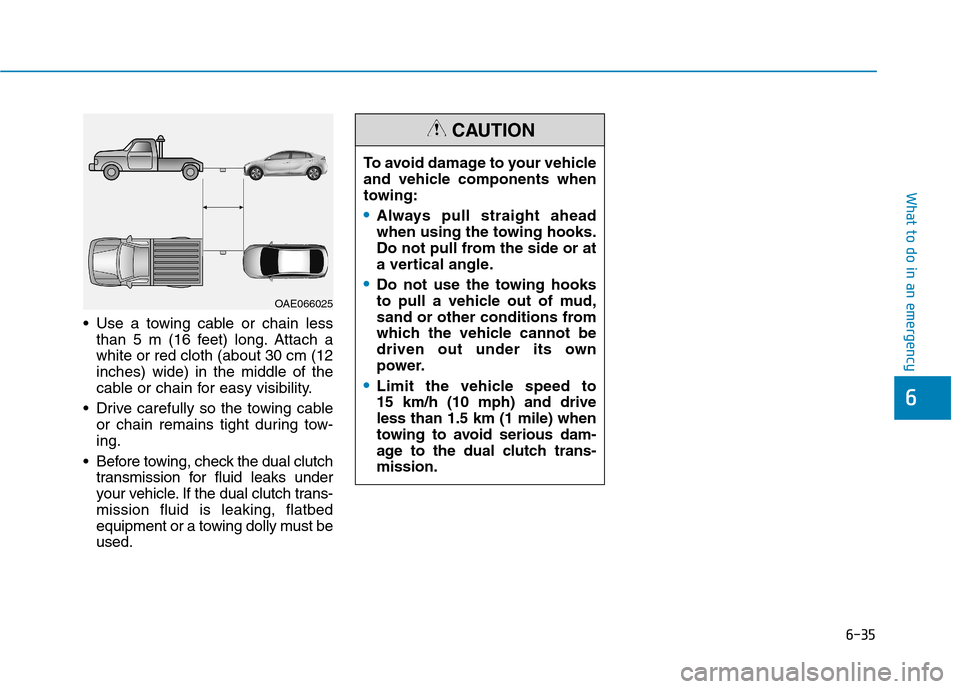
Use a towing cable or chain lessthan 5 m (16 feet) long. Attach a white or red cloth (about 30 cm (12inches) wide) in the middle of the
cable or chain for easy visibility.
Drive carefully so the towing cable or chain remains tight during tow-ing.
Before towing, check the dual clutch transmission for fluid leaks under
your vehicle. If the dual clutch trans-mission fluid is leaking, flatbed
equipment or a towing dolly must beused. To avoid damage to your vehicle
and vehicle components when
towing:
Always pull straight ahead
when using the towing hooks.
Do not pull from the side or at
a vertical angle.
Do not use the towing hooks
to pull a vehicle out of mud,
sand or other conditions from
which the vehicle cannot be
driven out under its own
power.
Limit the vehicle speed to 15 km/h (10 mph) and driveless than 1.5 km (1 mile) when
towing to avoid serious dam-
age to the dual clutch trans-mission.
CAUTION
OAE066025
Page 421 of 553
6-36
What to do in an emergency
Your vehicle is equipped with emer-
gency commodities to help yourespond to emergency situation.
Fire extinguisher
If there is small fire and you know
how to use the fire extinguisher, fol-
low these steps carefully.
1. Pull out the safety pin at the top ofthe extinguisher that keeps the handle from being accidentallypressed.
2. Aim the nozzle towards the base of the fire.
3. Stand approximately 2.5 m (8 ft) away from the fire and squeeze
the handle to discharge the extin-
guisher. If you release the handle,
the discharge will stop.
4. Sweep the nozzle back and forth at the base of the fire. After the fire
appears to be out, watch carefully
since it may re-ignite.
First aid kit
Supplies for use in giving first aid
such as scissors, bandage and
adhesive tape, etc. are provided.
Triangle reflector
Place the triangle reflector on the
road to warn oncoming vehicles dur-
ing emergencies, such as when the
vehicle is parked by the roadside due
to problems.
Tire pressure gauge (if equipped)
Tires normally lose some air in day-
to-day use, and you may have to add
a air periodically and usually it is not
a sign of a leaking tire, but of normal
wear. Always check tire pressurewhen the tires are cold because tire
pressure increases with temperature. To check the tire pressure, take the
following steps:
1. Unscrew the inflation valve cap
that is located on the rim of the
tire.
2. Press and hold the gauge against the tire valve. Some air will leak as
you begin and more will leak if you
don't press the gauge in firmly.
3. A firm non-leaking push will acti- vate the gauge.
4. Read the tire pressure on the gauge to see whether the tire pres-
sure is low or high.
5. Adjust the tire pressure to the specified pressure. Refer to "Tires
and Wheels" in chapter 8.
6. Reinstall the inflation valve cap.
EE MM EERR GG EENN CCYY CC OO MM MMOODDIITT YY (( IIFF EE QQ UUIIPP PP EEDD ))
Page 428 of 553
SSCC HH EEDD UU LLEE DD MM AAIINN TTEENN AANN CCEE SS EE RR VV IICC EE SS
7-7
7
Maintenance
Follow Normal Maintenance Schedule if the vehicle is usually operated where none of the following conditions apply. If any
of the following conditions apply, you must follow the Maintenance Under Severe Usage Conditions.
Repeated driving short distance of less than 8 km (5 miles) in normal temperature or less than 16 km (10miles) in
freezing temperature
Extensive engine idling or low speed driving for long distances
Driving on rough, dusty, muddy, unpaved, graveled or salt-spread roads
Driving in areas using salt or other corrosive materials or in very cold weather
Driving in heavy dust condition
Driving in heavy traffic area
Driving on uphill, downhill, or mountain road repeatedly
Towing a trailer or using a camper, or roof rack
Driving as a patrol car, taxi, other commercial use of vehicle towing
Driving over 170 km/h (106 miles/h)
Frequently driving in stop-and-go condition
If your vehicle is operated under the above conditions, you should inspect, replace or refill more frequently than the following Normal Maintenance Schedule. After the periods or distance shown in the chart, continue to follow the pre-scribed maintenance intervals.