Page 184 of 582
3-15
Convenient features of your vehicle
3
Electric power steering (EPS)
The system assists you with steering
the vehicle. If the vehicle is off or if
the power steering system becomes
inoperative, the vehicle may still be
steered, but it will require increased
steering effort.
Also, the steering effort becomes
heavier as the vehicle’s speedincreases and becomes lighter as
the vehicle’s speed decreases for
better control of the steering wheel.
Should you notice any change in the
effort required to steer during normal
vehicle operation, we recommend
that the system be checked by an
authorized HYUNDAI dealer.
If the Electric Power SteeringSystem does not operate nor-
mally, the warning light ( ) will
illuminate or blink on the instru-
ment cluster. The steering wheel
may become difficult to control
or operate. Take your vehicle to
an authorized HYUNDAI dealer
and have the system checked as
soon as possible.
(Continued)(Continued)
When abnormality is detected in
the electric power steering sys-
tem, to prevent a deadly acci-
dent, the steering assist function
will stop. At this time, the warn-
ing light turns on or blinks on
the cluster. The steering wheel
may become difficult to control
or operate. Have your vehicle
checked immediately, after mov-
ing the vehicle to a safe zone.
Information
The following symptoms may occur
during normal vehicle operation:
The steering effort may be high immediately after placing the
POWER button in the ON position.
This happens as the system per-
forms the EPS system diagnostics.
When the diagnostics is completed,
the steering wheel will return to its
normal condition.
(Continued)(Continued)
A click noise may be heard from the
EPS relay after the POWER button
is in the ON or OFF position.
Motor noise may be heard when the vehicle is at a stop or at a low driv-
ing speed.
When you operate the steering wheel in low temperature, abnormal
noise may occur. If temperature
rises, the noise will disappear. This
is a normal condition.
When the vehicle is stationary, if you turn the steering wheel all the
way to the left or right continuously,
the steering wheel effort increases.
This is not a system malfunction. As
time passes, the steering wheel
effort will return to its normal con-
dition.
i
NOTICE
SSTT EEEERR IINN GG WW HHEEEELL
Page 185 of 582
3-16
Convenient features of your vehicle
Tilt steering / Telescope steering
Information
After adjustment, sometimes the lock-
release lever may not lock the steering
wheel.
It is not a malfunction. This occurs
when two gears are not engaged cor-
rectly. In this case, adjust the steering
wheel again and then lock the steering
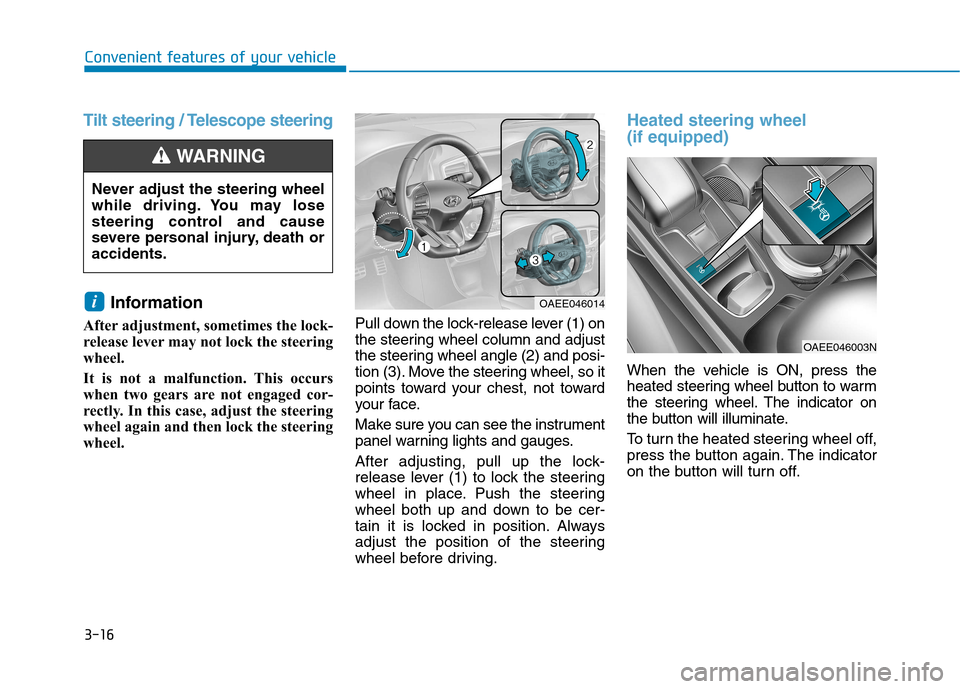
wheel. Pull down the lock-release lever (1) on
the steering wheel column and adjust
the steering wheel angle (2) and posi-
tion (3). Move the steering wheel, so it
points toward your chest, not toward
your face.
Make sure you can see the instrument
panel warning lights and gauges.
After adjusting, pull up the lock-
release lever (1) to lock the steering
wheel in place. Push the steering
wheel both up and down to be cer-
tain it is locked in position. Always
adjust the position of the steering
wheel before driving.
Heated steering wheel (if equipped)
When the vehicle is ON, press the
heated steering wheel button to warm
the steering wheel. The indicator on
the button will illuminate.
To turn the heated steering wheel off,
press the button again. The indicator
on the button will turn off.
i
Never adjust the steering wheel
while driving. You may lose
steering control and cause
severe personal injury, death oraccidents.
WARNING
OAEE046014
OAEE046003N
Page 187 of 582
3-18
Convenient features of your vehicle
When cleaning the mirror, use a
paper towel or similar material
dampened with glass cleaner. Do
not spray glass cleaner directly on
the mirror as that may cause the
liquid cleaner to enter the mirrorhousing.
Day/night rearview mirror (if equipped)
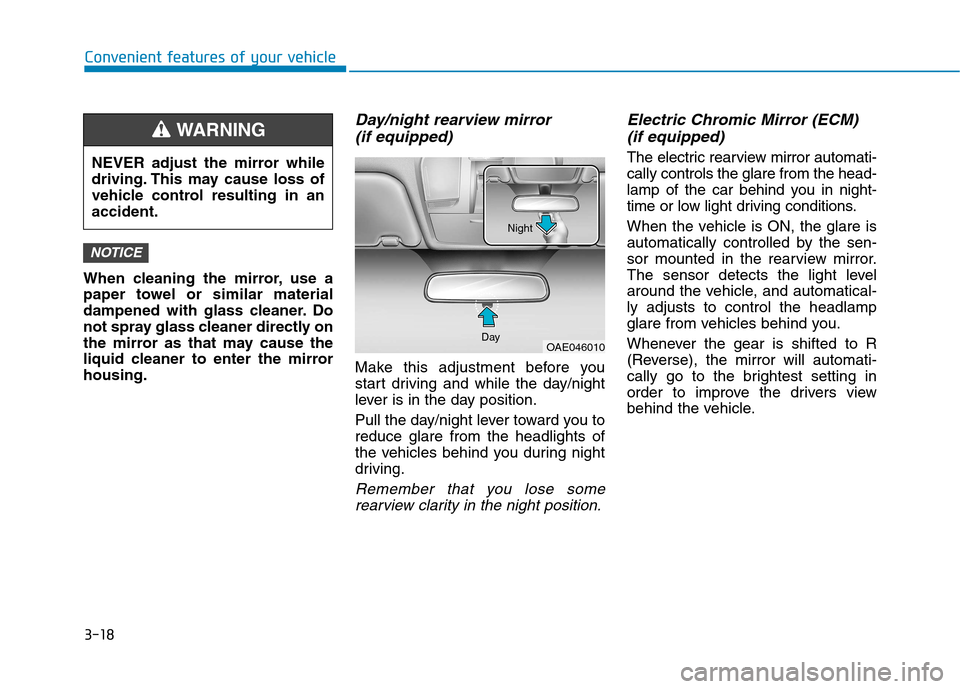
Make this adjustment before you
start driving and while the day/night
lever is in the day position.
Pull the day/night lever toward you to reduce glare from the headlights of
the vehicles behind you during night
driving.
Remember that you lose somerearview clarity in the night position.
Electric Chromic Mirror (ECM)
(if equipped)
The electric rearview mirror automati-cally controls the glare from the head-
lamp of the car behind you in night-
time or low light driving conditions.
When the vehicle is ON, the glare is
automatically controlled by the sen-
sor mounted in the rearview mirror.
The sensor detects the light level
around the vehicle, and automatical-ly adjusts to control the headlamp
glare from vehicles behind you.
Whenever the gear is shifted to R
(Reverse), the mirror will automati-
cally go to the brightest setting in
order to improve the drivers view
behind the vehicle.
NOTICE
NEVER adjust the mirror while
driving. This may cause loss of
vehicle control resulting in anaccident.
WARNING
OAE046010
Day Night
Page 188 of 582
3-19
Convenient features of your vehicle
3
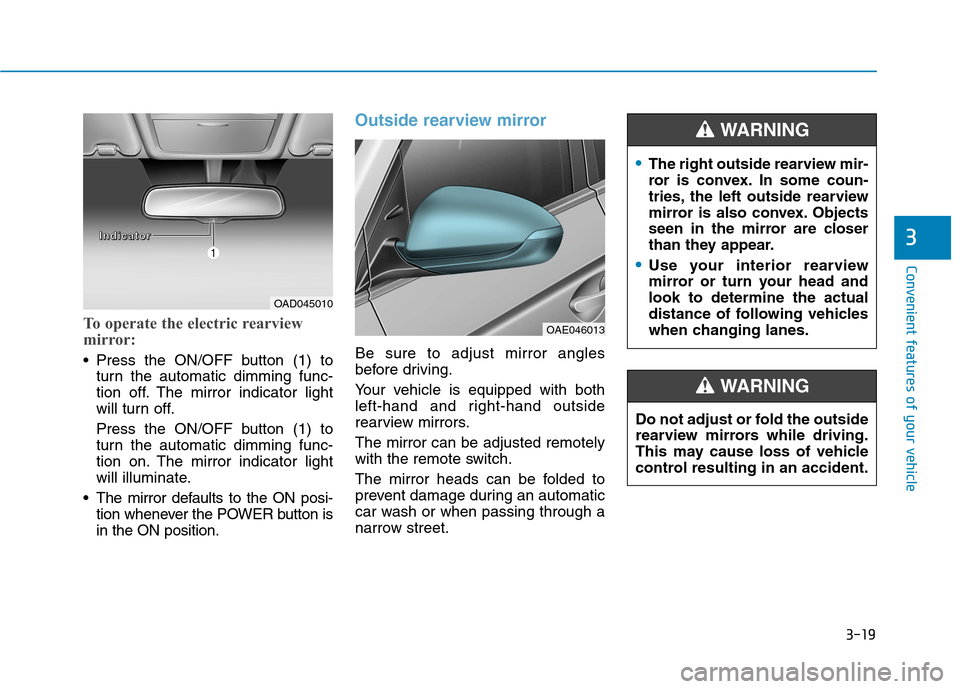
To operate the electric rearview
mirror:
Press the ON/OFF button (1) toturn the automatic dimming func-
tion off. The mirror indicator light
will turn off.
Press the ON/OFF button (1) to
turn the automatic dimming func-
tion on. The mirror indicator light
will illuminate.
The mirror defaults to the ON posi- tion whenever the POWER button isin the ON position.
Outside rearview mirror
Be sure to adjust mirror angles
before driving.
Your vehicle is equipped with both
left-hand and right-hand outside
rearview mirrors. The mirror can be adjusted remotely
with the remote switch.
The mirror heads can be folded to
prevent damage during an automatic
car wash or when passing through a
narrow street.
OAD045010
OAE046013
IIIInnnnddddiiiiccccaaaattttoooorrrr
The right outside rearview mir-
ror is convex. In some coun-
tries, the left outside rearview
mirror is also convex. Objects
seen in the mirror are closer
than they appear.
Use your interior rearview
mirror or turn your head andlook to determine the actual
distance of following vehicles
when changing lanes.
WARNING
Do not adjust or fold the outside
rearview mirrors while driving.
This may cause loss of vehicle
control resulting in an accident.
WARNING
Page 193 of 582
3-24
Convenient features of your vehicle
The POWER button must be in the
ON position to be able to raise or
lower the windows. Each door has a
Power Window switch to control that
door's window. The driver has a
Power Window Lock switch which
can block the operation of passenger
windows. The power windows will
operate for approximately 30 sec-
onds after the POWER button is
placed in the ACC or OFF position.
However, if the front doors are
opened, the Power Windows cannot
be operated even within the 30 sec-
ond period.Information
In cold and wet climates, power win- dows may not work properly due to
freezing conditions.
While driving with the rear win- dows down or with the sunroof (if
equipped) opened (or partially
opened), your vehicle may demon-
strate a wind buffeting or pulsation
noise. This noise is normal and can
be reduced or eliminated by taking
the following actions. If the noise
occurs with one or both of the rear
windows down, partially lower both
front windows approximately one
inch. If you experience the noise
with the sunroof open, slightly close
the sunroof.Window opening and closing
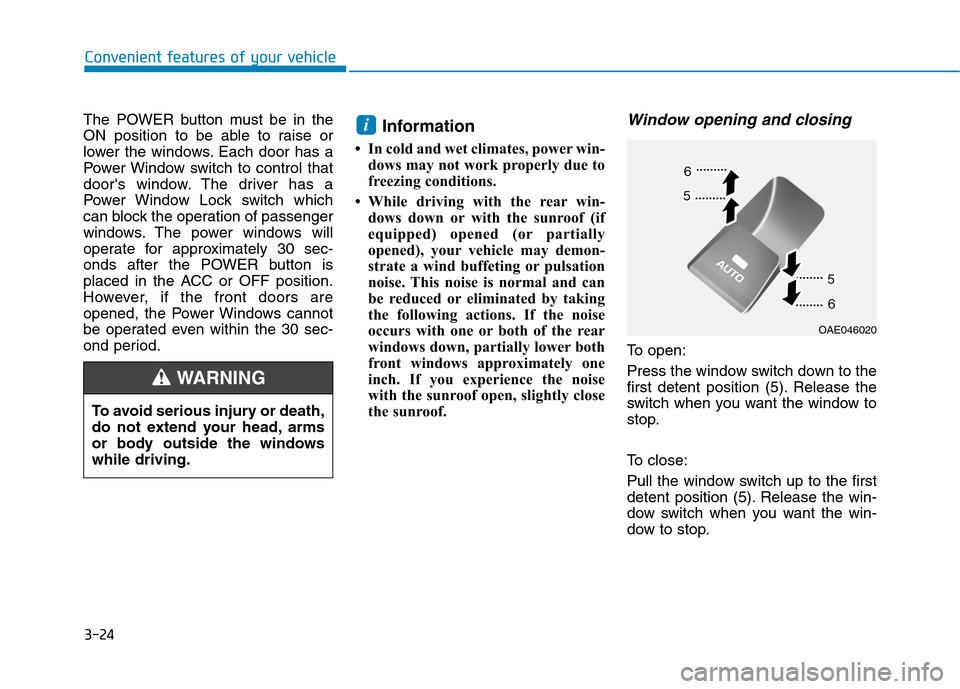
To open:
Press the window switch down to the
first detent position (5). Release the
switch when you want the window to
stop.
To close:
Pull the window switch up to the first
detent position (5). Release the win-
dow switch when you want the win-
dow to stop.
i
To avoid serious injury or death,
do not extend your head, arms
or body outside the windowswhile driving.
WARNING
OAE046020
Page 201 of 582
3-32
Convenient features of your vehicle
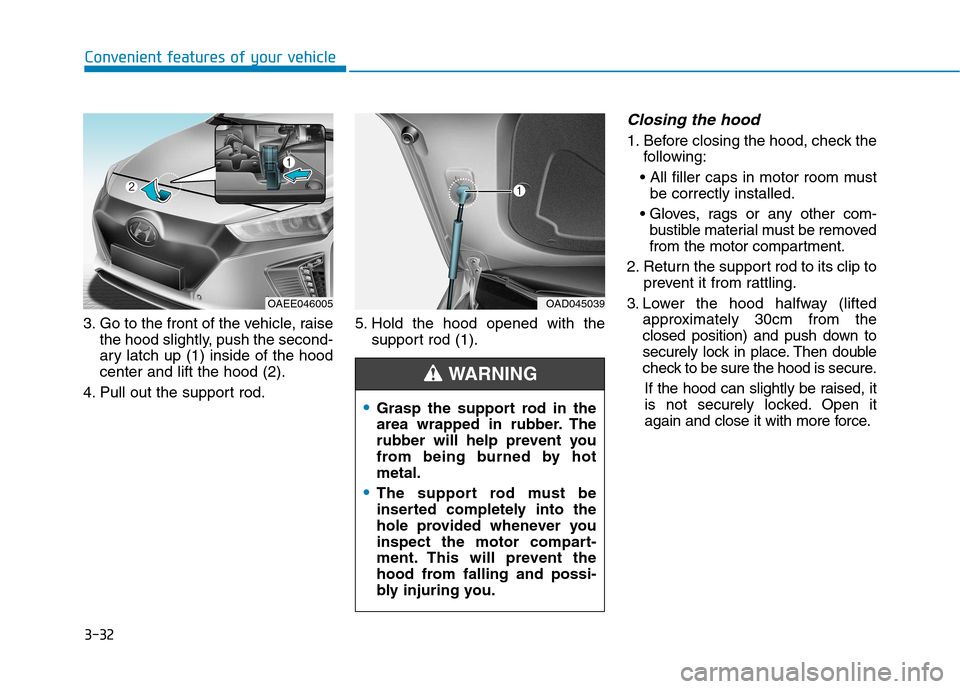
3. Go to the front of the vehicle, raisethe hood slightly, push the second-
ary latch up (1) inside of the hoodcenter and lift the hood (2).
4. Pull out the support rod. 5. Hold the hood opened with the
support rod (1).
Closing the hood
1. Before closing the hood, check thefollowing:
be correctly installed.
bustible material must be removed
from the motor compartment.
2. Return the support rod to its clip to prevent it from rattling.
3. Lower the hood halfway (lifted approximately 30cm from the
closed position) and push down to
securely lock in place. Then double
check to be sure the hood is secure.
If the hood can slightly be raised, it
is not securely locked. Open it
again and close it with more force.
OAEE046005
Grasp the support rod in the
area wrapped in rubber. The
rubber will help prevent you
from being burned by hotmetal.
The support rod must be
inserted completely into the
hole provided whenever you
inspect the motor compart-
ment. This will prevent the
hood from falling and possi-
bly injuring you.
WARNING
OAD045039
Page 202 of 582
3-33
Convenient features of your vehicle
3
Tailgate
Opening the tailgate
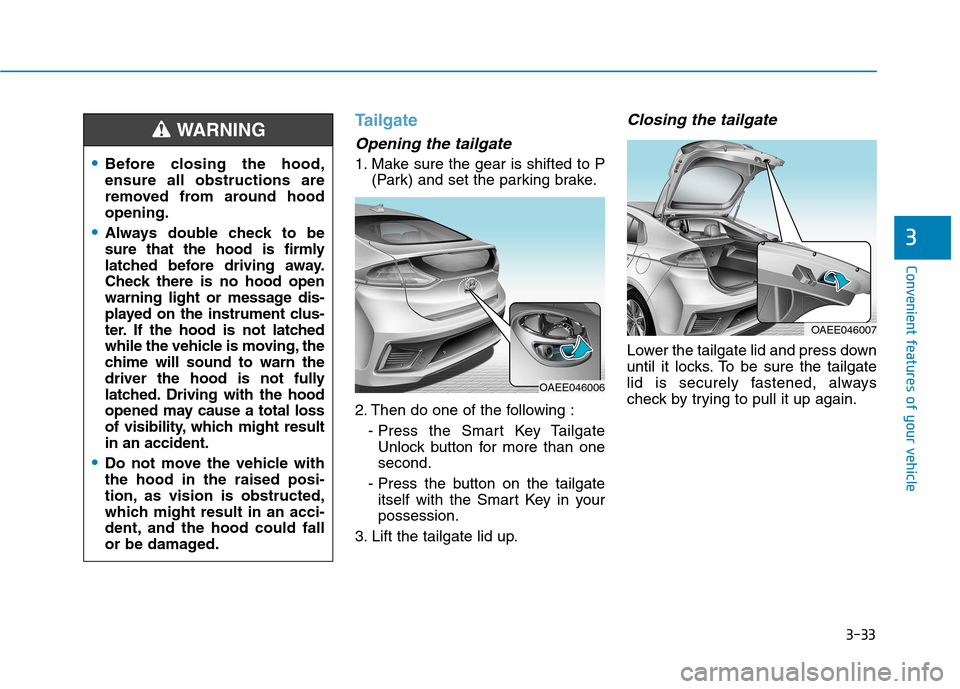
1. Make sure the gear is shifted to P(Park) and set the parking brake.
2. Then do one of the following : - Press the Smart Key TailgateUnlock button for more than one second.
- Press the button on the tailgate itself with the Smart Key in yourpossession.
3. Lift the tailgate lid up.
Closing the tailgate
Lower the tailgate lid and press down
until it locks. To be sure the tailgate
lid is securely fastened, always
check by trying to pull it up again.
Before closing the hood, ensure all obstructions are
removed from around hoodopening.
Always double check to be
sure that the hood is firmly
latched before driving away.
Check there is no hood open
warning light or message dis-
played on the instrument clus-
ter. If the hood is not latched
while the vehicle is moving, the
chime will sound to warn the
driver the hood is not fully
latched. Driving with the hood
opened may cause a total loss
of visibility, which might resultin an accident.
Do not move the vehicle with the hood in the raised posi-
tion, as vision is obstructed,
which might result in an acci-
dent, and the hood could fall
or be damaged.
WARNING
OAEE046006
OAEE046007
Page 204 of 582
3-35
Convenient features of your vehicle
3
OAEE046100L
IINN SSTT RR UU MM EENN TT CC LLUU SSTT EERR
The actual cluster in the vehicle
may differ from the illustration.
For more details, refer to the
"Gauges and meters" in this
chapter.
1. ECO guide
2. Speedometer
3. Warning and indicator lights
4. LCD display (including Trip computer)
5. Battery SOC (State of Charge) gauge