Page 249 of 582
3-80
Convenient features of your vehicle
The lever will return to the OFF posi-
tion when released or when the turnis completed.
If an indicator stays on and does not
flash or if it flashes abnormally, one of
the turn signal bulbs may be burnedout and will require replacement.
One-touch turn signal function
To activate an one-touch turn signal
function, move the turn signal lever
slightly and then release it. The lane
change signals will blink 3, 5 or 7
times.
You can activate/deactivate the One
Touch Turn Signal function or choose
the number of blinking (3, 5, or 7)from the User Settings Mode on the
LCD display.For more details, refer
to "LCD Display" in this chapter.
Rear fog lamp (if equipped)
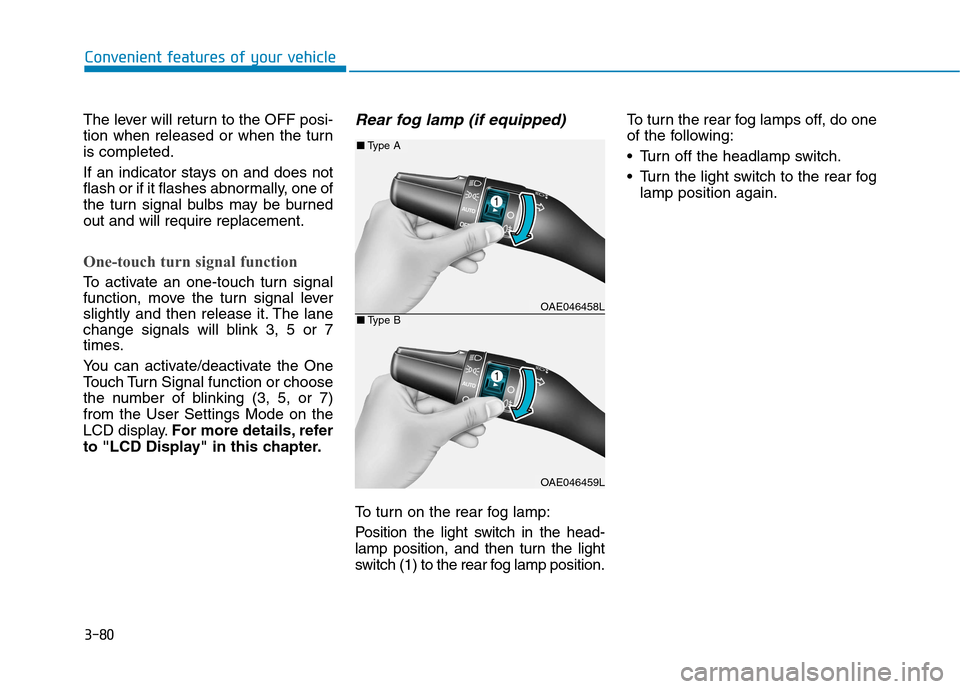
To turn on the rear fog lamp:
Position the light switch in the head-
lamp position, and then turn the light
switch (1) to the rear fog lamp position. To turn the rear fog lamps off, do one
of the following:
• Turn off the headlamp switch.
Turn the light switch to the rear fog
lamp position again.
OAE046458L
OAE046459L
■Type A
■Type B
Page 468 of 582
Light bulbs.............................................................7-57Headlamp, position lamp, turn signal lamp
bulb replacement .............................................................7-58Headlamp aiming (For Europe) ....................................7-62
Daytime running lamp ....................................................7-66
Side repeater lamp replacement .................................7-66
Rear combination lamp bulb replacement ................7-66
Rear fog lamp ..................................................................7-69
High mounted stop lamp ...............................................7-69
License plate light bulb replacement .........................7-69
Interior light bulb replacement ....................................7-69
Appearance care ..................................................7-71 Exterior care ....................................................................7-71
Interior care......................................................................7-76
Page 524 of 582
7-58
Maintenance
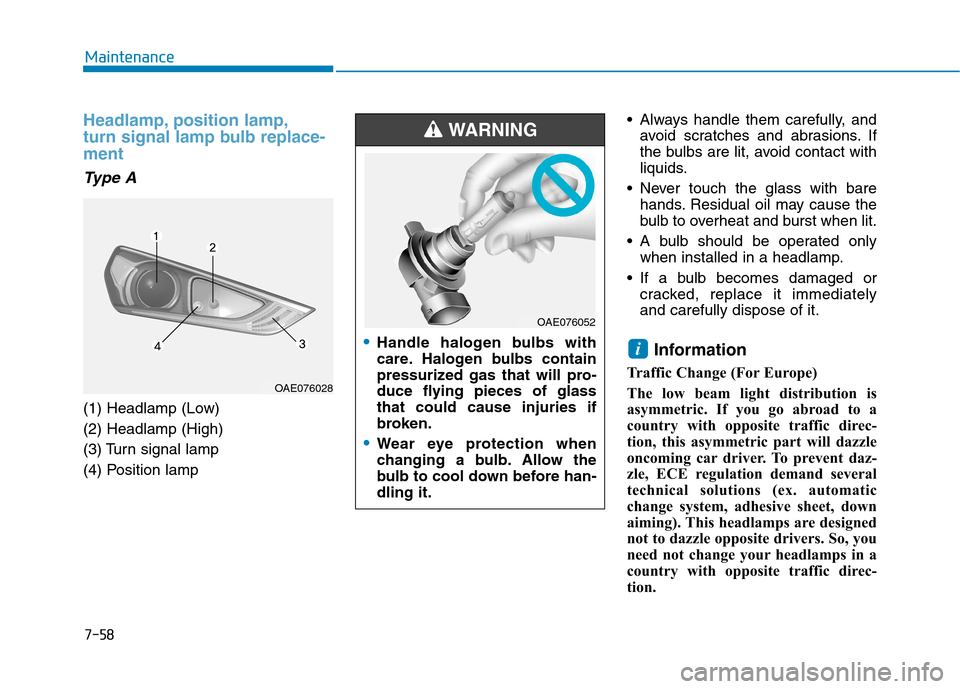
Headlamp, position lamp,
turn signal lamp bulb replace-ment
Type A
(1) Headlamp (Low) (2) Headlamp (High)
(3) Turn signal lamp
(4) Position lamp Always handle them carefully, and
avoid scratches and abrasions. If
the bulbs are lit, avoid contact with
liquids.
Never touch the glass with bare hands. Residual oil may cause the
bulb to overheat and burst when lit.
A bulb should be operated only when installed in a headlamp.
If a bulb becomes damaged or cracked, replace it immediatelyand carefully dispose of it.
Information
Traffic Change (For Europe)
The low beam light distribution is
asymmetric. If you go abroad to a
country with opposite traffic direc-
tion, this asymmetric part will dazzle
oncoming car driver. To prevent daz-
zle, ECE regulation demand several
technical solutions (ex. automatic
change system, adhesive sheet, down
aiming). This headlamps are designed
not to dazzle opposite drivers. So, you
need not change your headlamps in a
country with opposite traffic direc-
tion.
i
OAE076028
Handle halogen bulbs with
care. Halogen bulbs contain
pressurized gas that will pro-
duce flying pieces of glassthat could cause injuries if
broken.
Wear eye protection when
changing a bulb. Allow the
bulb to cool down before han-dling it.
WARNING
OAE076052
Page 525 of 582
7-59
7
Maintenance
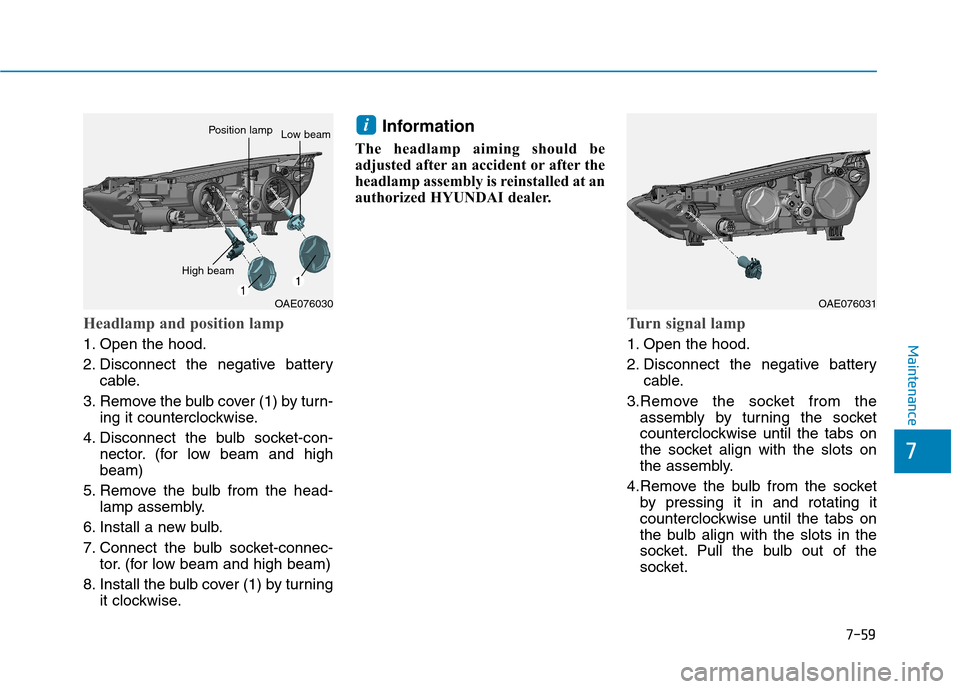
Headlamp and position lamp
1. Open the hood.
2. Disconnect the negative batterycable.
3. Remove the bulb cover (1) by turn- ing it counterclockwise.
4. Disconnect the bulb socket-con- nector. (for low beam and high beam)
5. Remove the bulb from the head- lamp assembly.
6. Install a new bulb.
7. Connect the bulb socket-connec- tor. (for low beam and high beam)
8. Install the bulb cover (1) by turning it clockwise. Information
The headlamp aiming should be
adjusted after an accident or after the
headlamp assembly is reinstalled at an
authorized HYUNDAI dealer.
Turn signal lamp
1. Open the hood.
2. Disconnect the negative battery cable.
3.Remove the socket from the assembly by turning the socket
counterclockwise until the tabs on
the socket align with the slots on
the assembly.
4.Remove the bulb from the socket by pressing it in and rotating it
counterclockwise until the tabs on
the bulb align with the slots in the
socket. Pull the bulb out of the
socket.
i
OAE076030
High beam
Position lampLow beam
OAE076031
Page 526 of 582
7-60
Maintenance
5.Insert a new bulb by inserting it intothe socket and rotating it until it
locks into place.
6.Install the socket in the assembly by aligning the tabs on the socket
with the slots in the assembly.
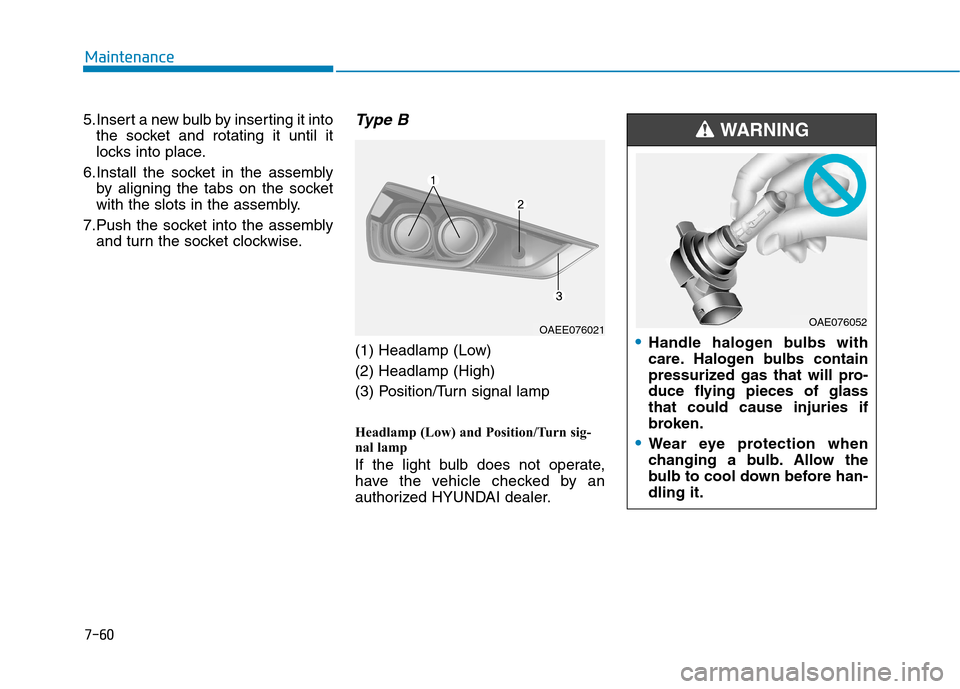
7.Push the socket into the assembly and turn the socket clockwise.Type B
(1) Headlamp (Low) (2) Headlamp (High)
(3) Position/Turn signal lamp
Headlamp (Low) and Position/Turn sig-
nal lamp
If the light bulb does not operate,
have the vehicle checked by an
authorized HYUNDAI dealer.
OAEE076021•Handle halogen bulbs with
care. Halogen bulbs contain
pressurized gas that will pro-
duce flying pieces of glassthat could cause injuries if
broken.
Wear eye protection when
changing a bulb. Allow the
bulb to cool down before han-dling it.
WARNING
OAE076052
Page 532 of 582
7-66
Maintenance
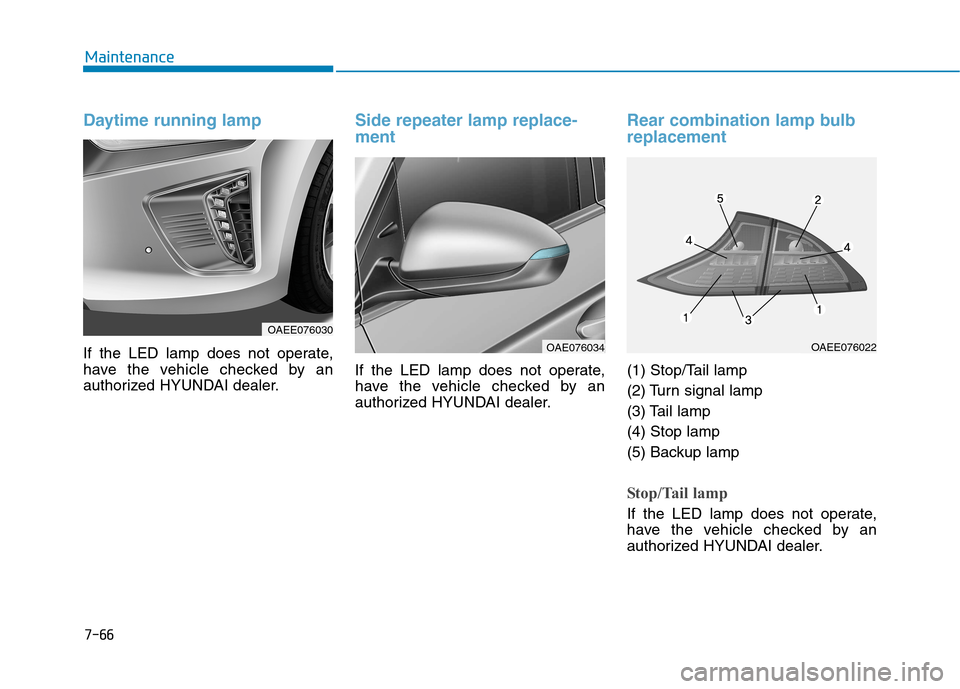
Daytime running lamp
If the LED lamp does not operate,
have the vehicle checked by an
authorized HYUNDAI dealer.
Side repeater lamp replace- ment
If the LED lamp does not operate,
have the vehicle checked by an
authorized HYUNDAI dealer.
Rear combination lamp bulb replacement
(1) Stop/Tail lamp
(2) Turn signal lamp
(3) Tail lamp(4) Stop lamp
(5) Backup lamp
Stop/Tail lamp
If the LED lamp does not operate,
have the vehicle checked by an
authorized HYUNDAI dealer.
OAEE076030
OAE076034OAEE076022
Page 533 of 582
7-67
7
Maintenance
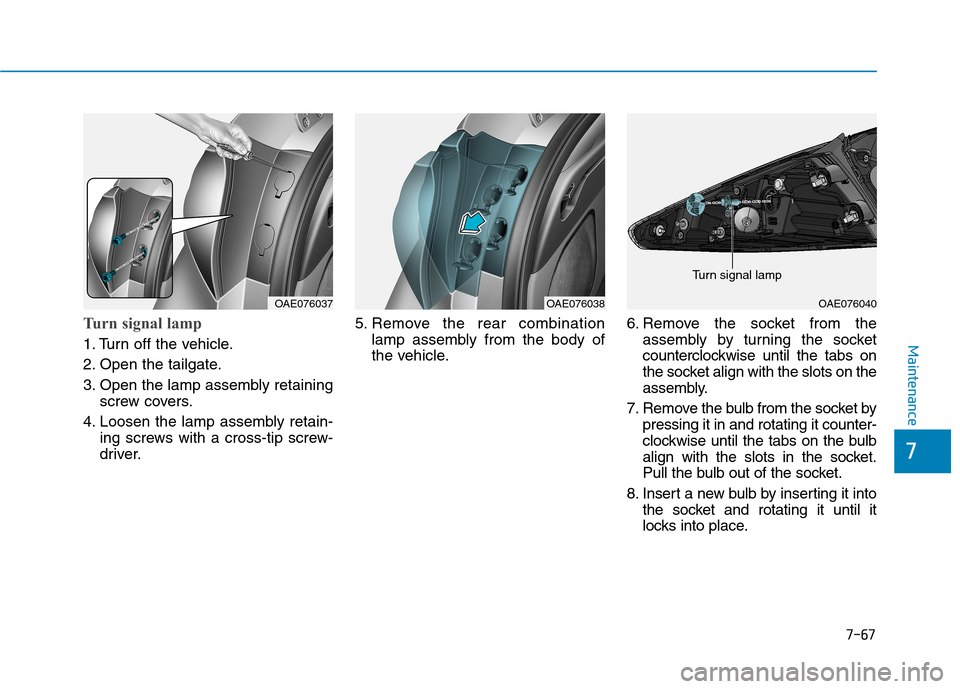
Turn signal lamp
1. Turn off the vehicle.
2. Open the tailgate.
3. Open the lamp assembly retainingscrew covers.
4. Loosen the lamp assembly retain- ing screws with a cross-tip screw-
driver. 5. Remove the rear combination
lamp assembly from the body of
the vehicle. 6. Remove the socket from the
assembly by turning the socket
counterclockwise until the tabs on
the socket align with the slots on the
assembly.
7. Remove the bulb from the socket by pressing it in and rotating it counter-
clockwise until the tabs on the bulb
align with the slots in the socket.
Pull the bulb out of the socket.
8. Insert a new bulb by inserting it into the socket and rotating it until it
locks into place.
OAE076038OAE076037OAE076040
Turn signal lamp
Page 546 of 582
8-3
8
Specifications & Consumer information
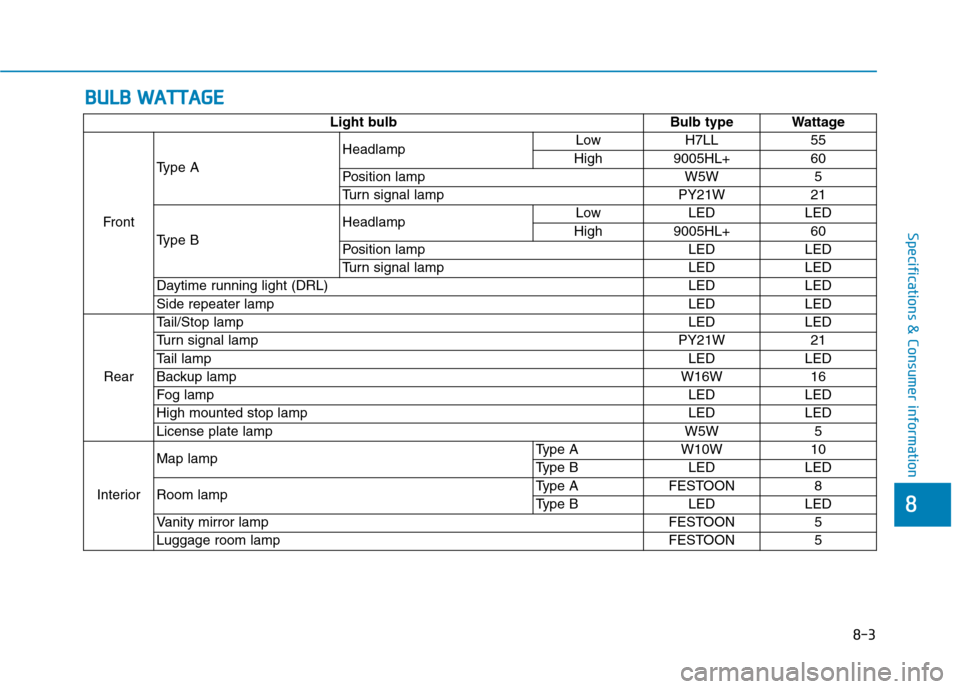
BBUU LLBB WW AATTTTAA GG EE
Light bulb Bulb type Wattage
Front Type A
Headlamp
Low H7LL 55
High 9005HL+ 60
Position lamp W5W 5
Turn signal lamp PY21W 21
Type B Headlamp
Low LED LED
High 9005HL+ 60
Position lamp LED LED
Turn signal lamp LED LED
Daytime running light (DRL) LED LED
Side repeater lamp LED LED
Rear Tail/Stop lamp
LED LED
Turn signal lamp PY21W 21
Tail lamp LED LED
Backup lamp W16W 16
Fog lamp LED LED
High mounted stop lamp LED LED
License plate lamp W5W 5
Interior Map lamp
Type A W10W 10
Type B LED LED
Room lamp Type A FESTOON 8
Type B LED LED
Vanity mirror lamp FESTOON 5
Luggage room lamp FESTOON 5