Page 246 of 582
3-77
Convenient features of your vehicle
3
Exterior lights
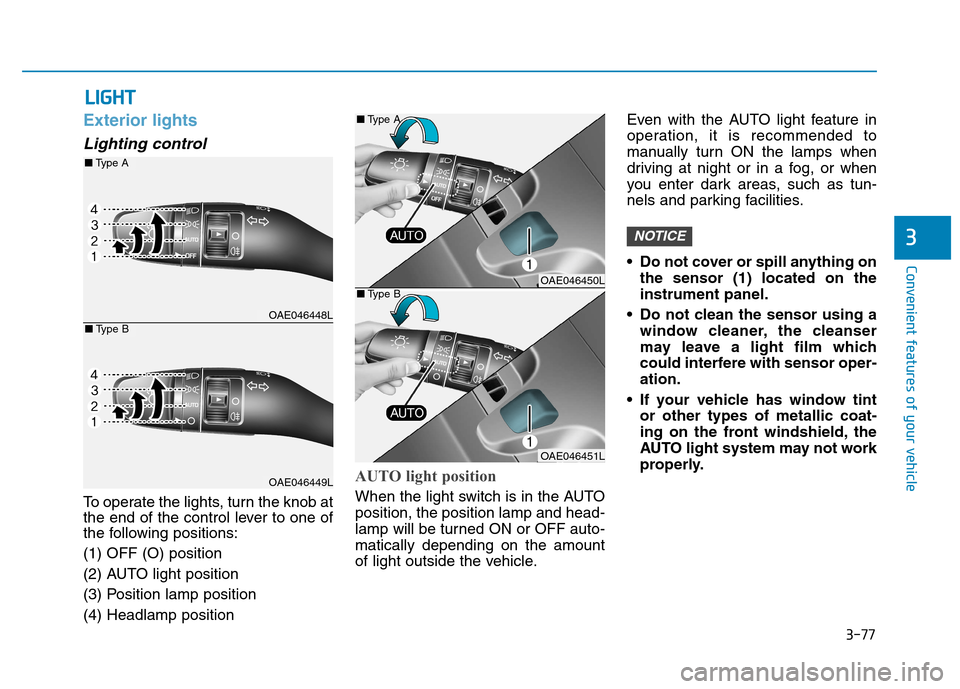
Lighting control
To operate the lights, turn the knob at
the end of the control lever to one of
the following positions: (1) OFF (O) position
(2) AUTO light position
(3) Position lamp position(4) Headlamp position
AUTO light position
When the light switch is in the AUTO position, the position lamp and head-
lamp will be turned ON or OFF auto-matically depending on the amount
of light outside the vehicle.Even with the AUTO light feature in
operation, it is recommended to
manually turn ON the lamps when
driving at night or in a fog, or when
you enter dark areas, such as tun-
nels and parking facilities.
• Do not cover or spill anything on
the sensor (1) located on the instrument panel.
Do not clean the sensor using a window cleaner, the cleanser
may leave a light film which
could interfere with sensor oper-ation.
If your vehicle has window tint or other types of metallic coat-
ing on the front windshield, the
AUTO light system may not work
properly.
NOTICE
LLIIGG HH TT
OAE046448L
OAE046449L
■Type A
■Type B
OAE046450L
OAE046451L
■
Type A
■ Type B
Page 247 of 582
3-78
Convenient features of your vehicle
Position lamp position ( )
The position lamp, license plate lamp
and instrument panel lamp are turnedON.
Headlamp position ( )
The headlamp, position lamp, license
plate lamp and instrument panel
lamp are turned ON.
Information
The POWER button must be in the
ON position to turn on the headlamp.
High beam operation
To turn on the high beam headlamp,
push the lever away from you. The
lever will return to its original position. The high beam indicator will light when the headlamp high beams are
switched on.
i
OAE046468L
OAE046469L
■ Type A
■Type BOAE046466L
OAE046467L
■Type A
■Type BOAE046452L
OAE046453L
■Type A
■Type B
Page 266 of 582
3-97
Convenient features of your vehicle
3
DDEEFFRR OO SSTT EERR
To prevent damage to the conduc-
tors bonded to the inside surface
of the rear window, never use sharp
instruments or window cleaners
containing abrasives to clean the
window.
Information
If you want to defrost and defog the
front windshield, refer to “Windshield
Defrosting and Defogging” in this
chapter.
Rear window defroster
The defroster heats the window to
remove frost, fog and thin ice from
the interior and exterior of the rear
window, while the vehicle is in the
ready ( ) mode.
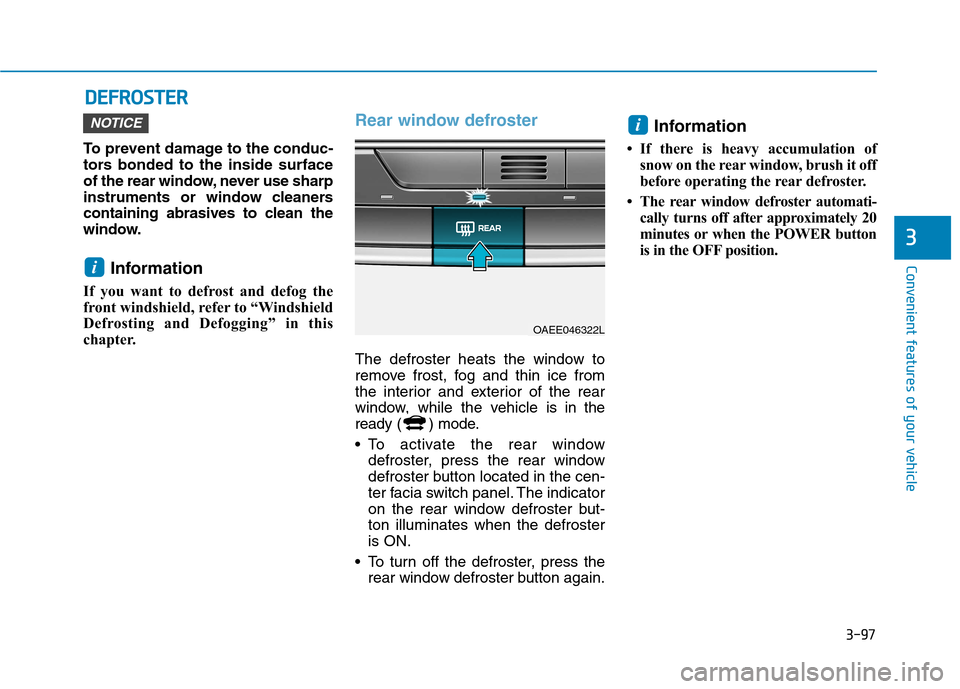
To activate the rear window defroster, press the rear window
defroster button located in the cen-
ter facia switch panel. The indicator
on the rear window defroster but-ton illuminates when the defrosteris ON.
To turn off the defroster, press the rear window defroster button again. Information
If there is heavy accumulation of snow on the rear window, brush it off
before operating the rear defroster.
The rear window defroster automati- cally turns off after approximately 20
minutes or when the POWER button
is in the OFF position.
i
i
NOTICE
OAEE046322L
Page 272 of 582
3-103
Convenient features of your vehicle
3
Instrument panel vents
The outlet vents can be opened or
closed ( ) using the vent control
lever.Also, you can adjust the direction of
air delivery from these vents using
the vent control lever as shown.
Temperature control
Turn the temperature control knob to
set the desired temperature.
OAEE046321
OAE046309
■
Front
■Rear (if equipped)
OAEE046305
Page 342 of 582
5-3
Driving your vehicle
5
Before entering the vehicle
• Be sure all windows, outside mir-ror(s), and outside lights are clean
and unobstructed.
Remove frost, snow, or ice.
Visually check the tires for uneven wear and damage.
Check under the vehicle for any sign of leaks.
Be sure there are no obstacles behind you if you intend to back up.
Before starting
Make sure the hood, the tailgate,and the doors are securely closed
and locked.
Adjust the position of the seat and steering wheel.
Adjust the inside and outside rearview mirrors.
Verify all the lights work.
Fasten your seatbelt. Check that all passengers have fastened their
seatbelts.
Check the gauges and indicators in the instrument panel and the mes-
sages on the instrument display
when the POWER button is in theON position.
Check that any items you are car- rying are stored properly or fas-
tened down securely.
BBEEFFOO RREE DD RRIIVV IINN GG
To reduce the risk of SERIOUS
INJURY or DEATH, take the fol-
lowing precautions:
•ALWAYS wear your seat belt.
All passengers must be prop-
erly belted whenever the vehi-
cle is moving. For more infor-
mation, refer to "Seat Belts" in
chapter 2.
Always drive defensively.
Assume other drivers or pedes-
trians may be careless andmake mistakes.
Stay focused on the task of
driving. Driver distraction cancause accidents.
Leave plenty of space between
you and the vehicle in front of
you.
WARNING
Page 400 of 582
5-61
Driving your vehicle
5
LKAS operation
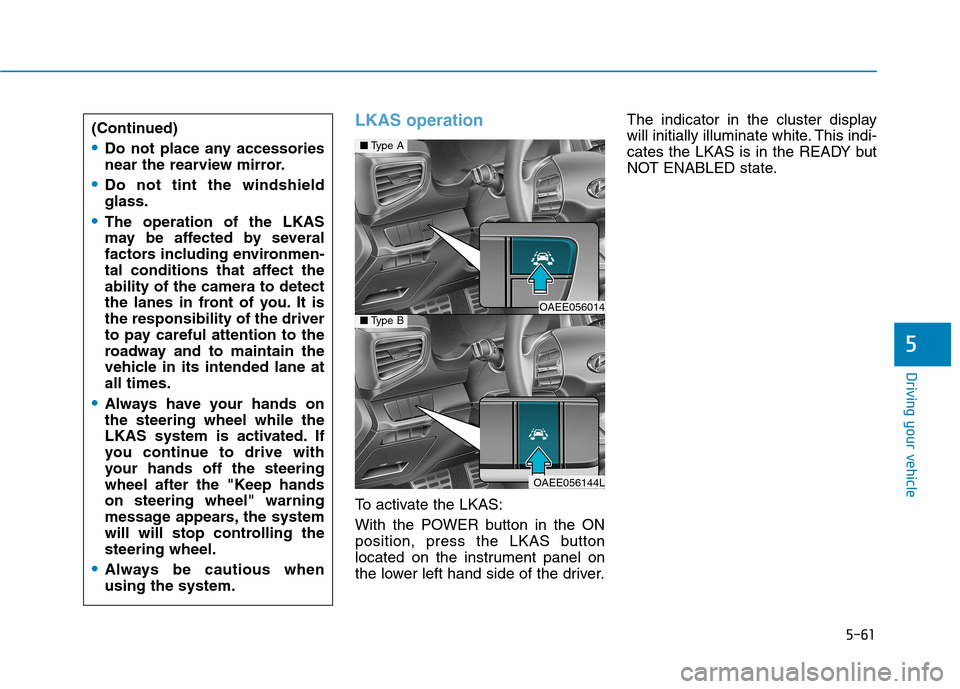
To activate the LKAS:
With the POWER button in the ON
position, press the LKAS button
located on the instrument panel on
the lower left hand side of the driver.The indicator in the cluster display
will initially illuminate white. This indi-
cates the LKAS is in the READY but
NOT ENABLED state.
(Continued)
Do not place any accessories
near the rearview mirror.
Do not tint the windshield glass.
The operation of the LKAS
may be affected by several
factors including environmen-
tal conditions that affect theability of the camera to detect
the lanes in front of you. It isthe responsibility of the driver
to pay careful attention to the
roadway and to maintain the
vehicle in its intended lane atall times.
Always have your hands on the steering wheel while the
LKAS system is activated. If
you continue to drive with
your hands off the steering
wheel after the "Keep handson steering wheel" warning
message appears, the system
will will stop controlling thesteering wheel.
Always be cautious when using the system.
■
Type A
OAEE056014 ■Type B
OAEE056144L
Page 467 of 582
7
Maintenance
7
Maintenance
Motor compartment...............................................7-3
Maintenance services ...........................................7-4Owner's responsibility ......................................................7-4
Owner maintenance precautions ..................................7-4
Owner maintenance ...............................................7-5 Owner maintenance schedule ........................................7-5
Scheduled maintenance services.........................7-7 Normal maintenance schedule - For Europe.............7-8
Maintenance under severe usage conditions -
For Europe ........................................................................7-10 Normal maintenance schedule - Except Europe ....7-12
Maintenance under severe usage conditions -
Except Europe..................................................................7-14
Explanation of scheduled maintenance items .7-16 Coolant...................................................................7-17 Checking the coolant level ...........................................7-17 Changing coolant.............................................................7-20
Brake fluid ............................................................7-21 Checking the brake fluid level .....................................7-21
Washer fluid .........................................................7-22 Checking the washer fluid level ..................................7-22
Climate control air filter .....................................7-23 Filter inspection ...............................................................7-23 Wiper blades .........................................................7-25
Blade inspection ..............................................................7-25
Blade replacement ..........................................................7-25
Battery (12 Volt) ..................................................7-27 For best battery service................................................7-28
Battery capacity label ....................................................7-28
Battery recharging .........................................................7-29
Reset features .................................................................7-30
Tires and wheels ..................................................7-31 Tire care ............................................................................7-31
Recommended cold tire inflation pressures.............7-32
Check tire inflation pressure........................................7-33
Tire rotation .....................................................................7-34
Wheel alignment and tire balance ..............................7-35
Tire replacement ............................................................7-35
Wheel replacement .........................................................7-36
Tire traction ....................................................................7-36
Tire maintenance ............................................................7-36
Tire sidewall labeling ......................................................7-36
Low aspect ratio tires ....................................................7-40
Fuses ......................................................................7-42 Instrument panel fuse replacement ...........................7-43
Motor compartment panel fuse replacement ..........7-44
Fuse/relay panel description .......................................7-45
7
Page 509 of 582
7-43
7
Maintenance
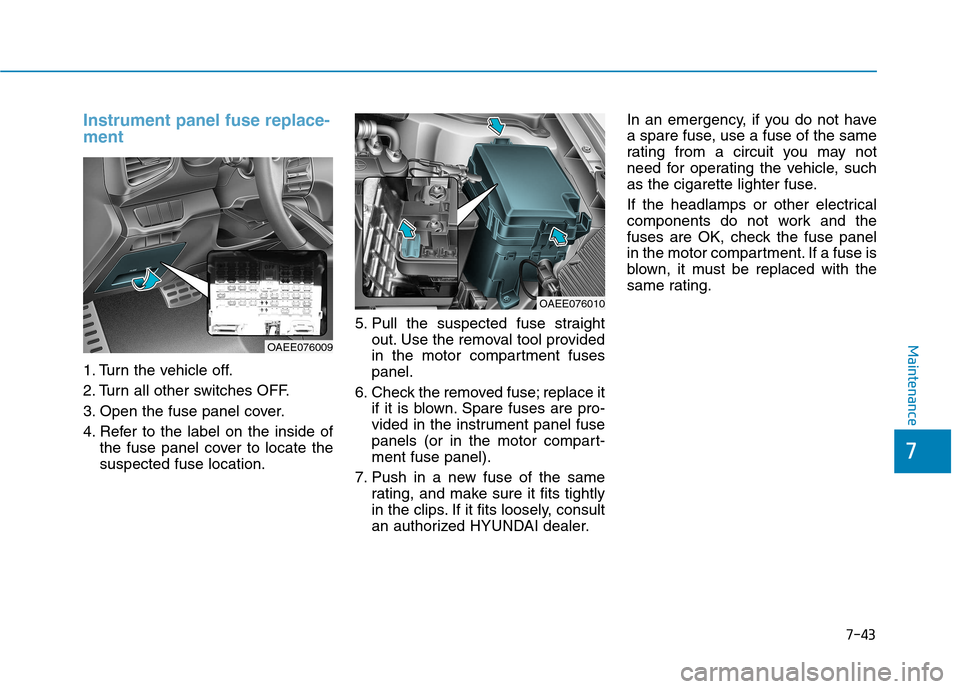
Instrument panel fuse replace- ment
1. Turn the vehicle off.
2. Turn all other switches OFF.
3. Open the fuse panel cover.
4. Refer to the label on the inside ofthe fuse panel cover to locate the suspected fuse location. 5. Pull the suspected fuse straight
out. Use the removal tool provided
in the motor compartment fusespanel.
6. Check the removed fuse; replace it if it is blown. Spare fuses are pro-
vided in the instrument panel fuse
panels (or in the motor compart-ment fuse panel).
7. Push in a new fuse of the same rating, and make sure it fits tightly
in the clips. If it fits loosely, consult
an authorized HYUNDAI dealer. In an emergency, if you do not have
a spare fuse, use a fuse of the same
rating from a circuit you may not
need for operating the vehicle, such
as the cigarette lighter fuse.
If the headlamps or other electrical
components do not work and the
fuses are OK, check the fuse panel
in the motor compartment. If a fuse is
blown, it must be replaced with the
same rating.
OAEE076009
OAEE076010