2017 Hyundai Ioniq Electric door lock
[x] Cancel search: door lockPage 60 of 582
H53
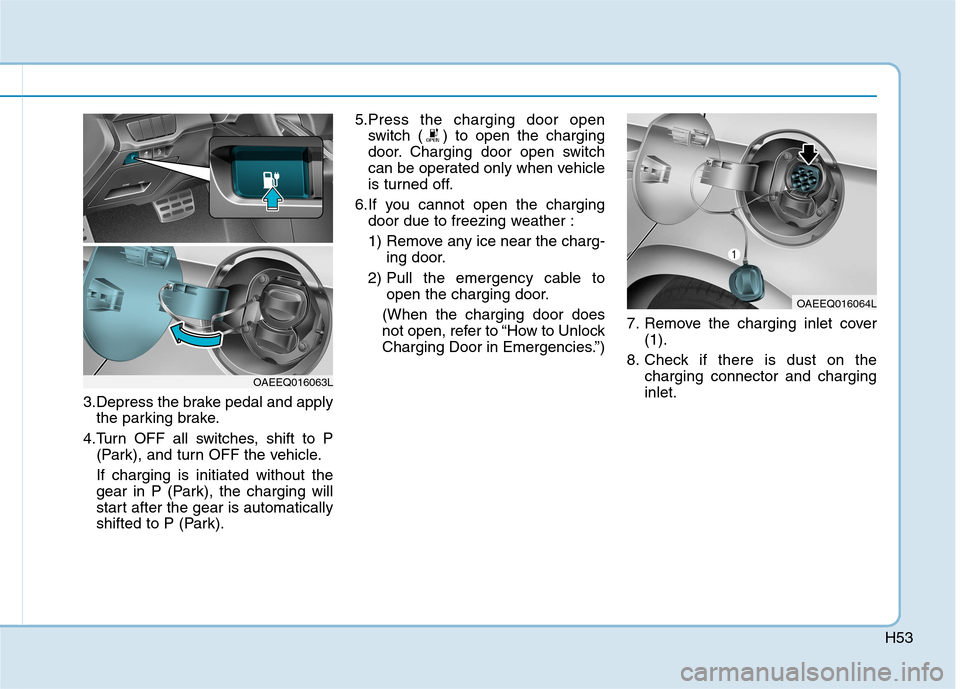
3.Depress the brake pedal and applythe parking brake.
4.Turn OFF all switches, shift to P (Park), and turn OFF the vehicle. If charging is initiated without the
gear in P (Park), the charging will
start after the gear is automatically
shifted to P (Park). 5.Press the charging door open
switch ( ) to open the charging
door. Charging door open switch
can be operated only when vehicle
is turned off.
6.If you cannot open the charging door due to freezing weather :
1) Remove any ice near the charg- ing door.
2) Pull the emergency cable to open the charging door.
(When the charging door does
not open, refer to “How to Unlock
Charging Door in Emergencies.”) 7. Remove the charging inlet cover
(1).
8. Check if there is dust on the charging connector and charginginlet.
OAEEQ016064L
OAEEQ016063L
Page 63 of 582
H56
CCHH AARRGG IINN GG EE LLEE CCTT RR IICC VV EEHH IICC LLEE (( TT RR IICC KK LLEE CC HH AARRGG EE)) (( CC OO NNTT..))
Information
Depending on the condition and dura-
bility of the high voltage battery,
charger specifications, and ambient
temperature, the time required for
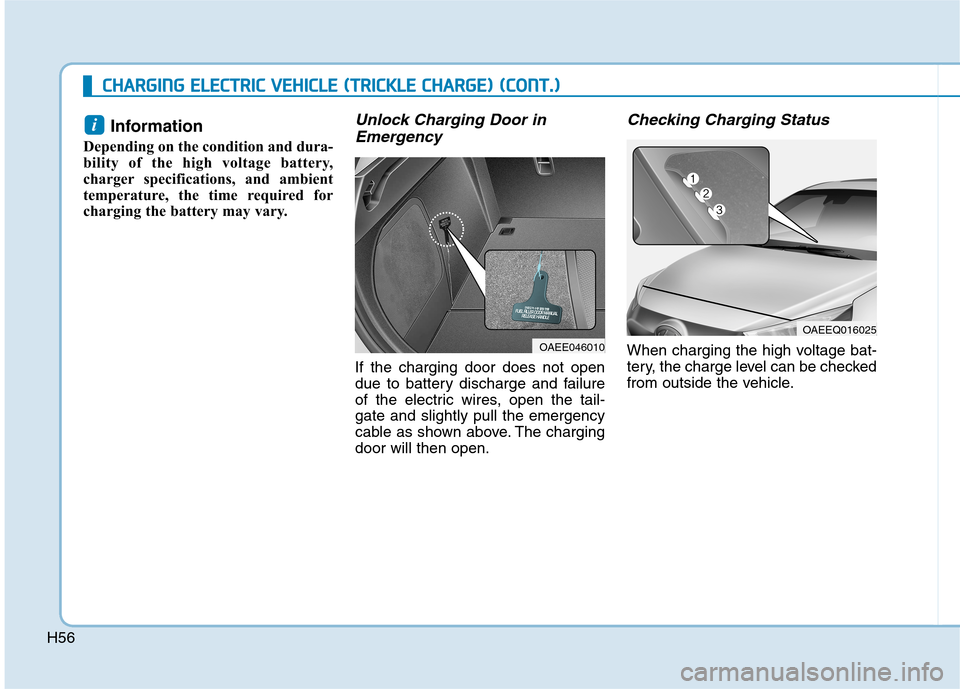
charging the battery may vary. Unlock Charging Door in Emergency
If the charging door does not open
due to battery discharge and failure
of the electric wires, open the tail-gate and slightly pull the emergency
cable as shown above. The chargingdoor will then open.
Checking Charging Status
When charging the high voltage bat-
tery, the charge level can be checked
from outside the vehicle.
i
OAEE046010
OAEEQ016025
Page 68 of 582
H61
How to Disconnect PortableCharger (ICCB: In-Cable Control
Box)
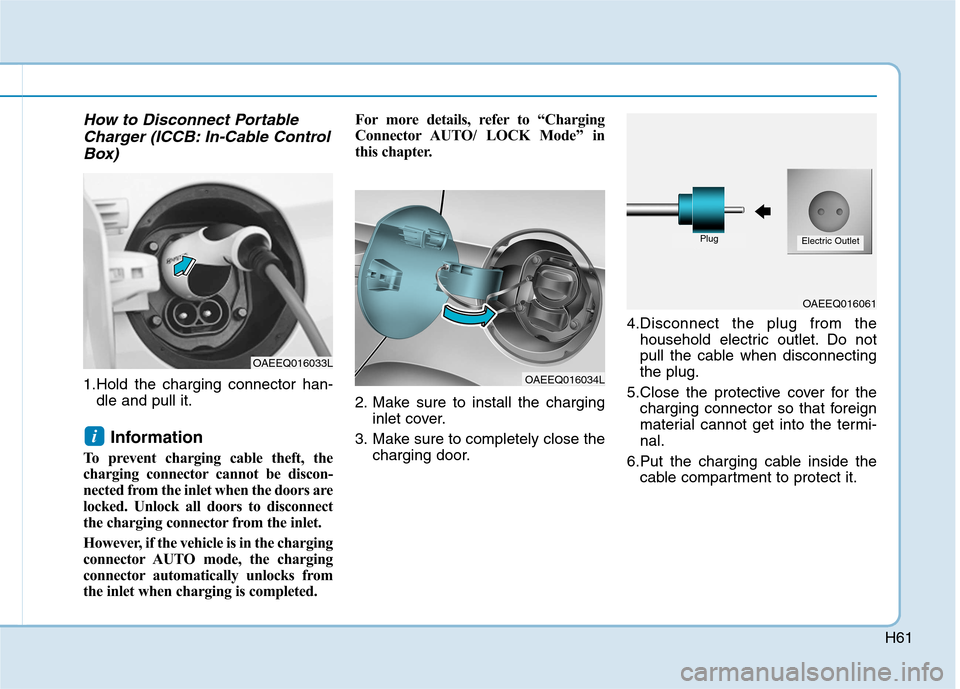
1.Hold the charging connector han- dle and pull it.
Information
To prevent charging cable theft, the
charging connector cannot be discon-
nected from the inlet when the doors are
locked. Unlock all doors to disconnect
the charging connector from the inlet.
However, if the vehicle is in the charging
connector AUTO mode, the charging
connector automatically unlocks from
the inlet when charging is completed. For more details, refer to “Charging
Connector AUTO/ LOCK Mode” in
this chapter.
2. Make sure to install the charging
inlet cover.
3. Make sure to completely close the charging door. 4.Disconnect the plug from the
household electric outlet. Do not
pull the cable when disconnectingthe plug.
5.Close the protective cover for the charging connector so that foreign
material cannot get into the termi-nal.
6.Put the charging cable inside the cable compartment to protect it.
i
OAEEQ016033L
OAEEQ016034L
OAEEQ016061
PlugElectric Outlet
Page 94 of 582
1-6
Your vehicle at a glance
INTERIOR OVERVIEW (I)
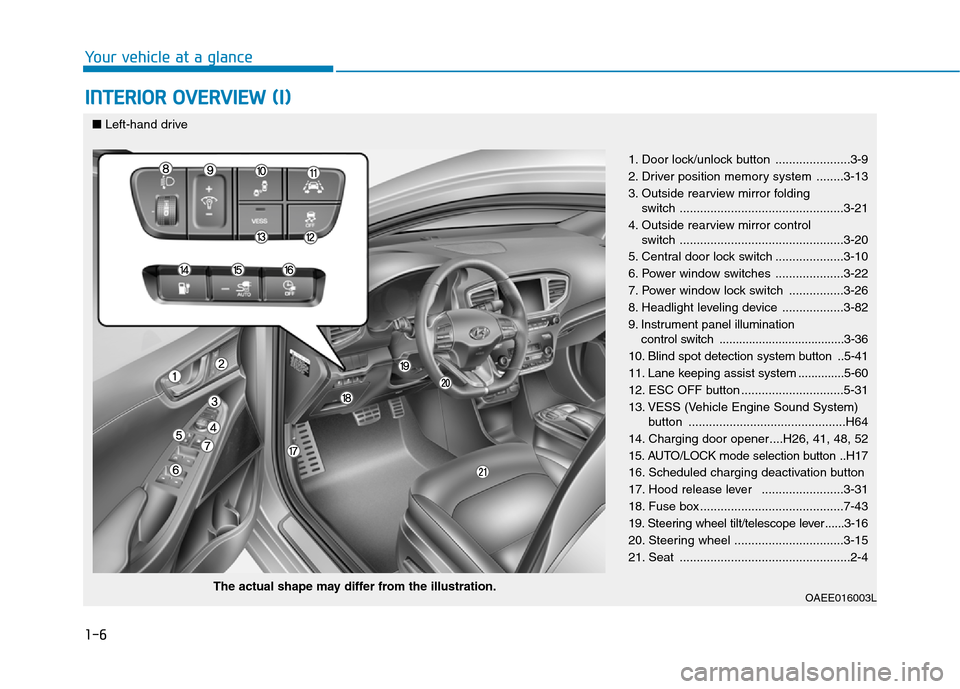
1. Door lock/unlock button ......................3-9
2. Driver position memory system ........3-13
3. Outside rearview mirror folding switch ................................................3-21
4. Outside rearview mirror control switch ................................................3-20
5. Central door lock switch ....................3-10
6. Power window switches ....................3-22
7. Power window lock switch ................3-26
8. Headlight leveling device ..................3-82
9. Instrument panel illumination control switch ......................................3-36
10. Blind spot detection system button ..5-41
11. Lane keeping assist system ..............5-60
12. ESC OFF button ..............................5-31
13. VESS (Vehicle Engine Sound System) button ..............................................H64
14. Charging door opener....H26, 41, 48, 52
15. AUTO/LOCK mode selection button ..H17
16. Scheduled charging deactivation button
17. Hood release lever ........................3-31
18. Fuse box ..........................................7-43
19. Steering wheel tilt/telescope lever ......3-16
20. Steering wheel ................................3-15
21. Seat ..................................................2-4
OAEE016003L
The actual shape may differ from the illustration.
■
Left-hand drive
Page 95 of 582
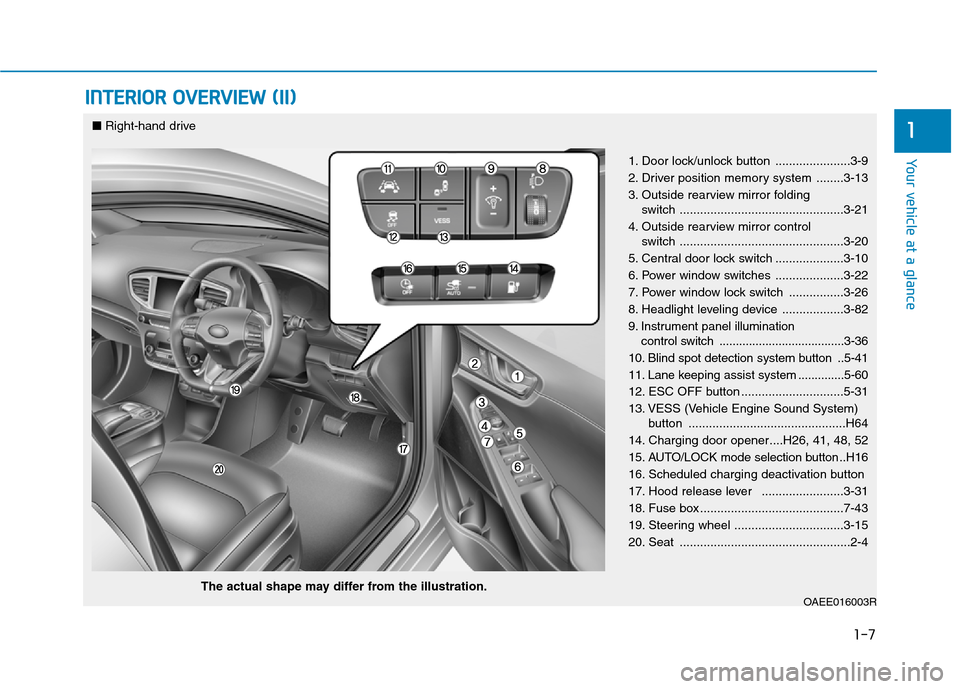
1-7
Your vehicle at a glance
INTERIOR OVERVIEW (II)
1
1. Door lock/unlock button ......................3-9
2. Driver position memory system ........3-13
3. Outside rearview mirror folding switch ................................................3-21
4. Outside rearview mirror control switch ................................................3-20
5. Central door lock switch ....................3-10
6. Power window switches ....................3-22
7. Power window lock switch ................3-26
8. Headlight leveling device ..................3-82
9. Instrument panel illumination control switch ......................................3-36
10. Blind spot detection system button ..5-41
11. Lane keeping assist system ..............5-60
12. ESC OFF button ..............................5-31
13. VESS (Vehicle Engine Sound System) button ..............................................H64
14. Charging door opener....H26, 41, 48, 52
15. AUTO/LOCK mode selection button ..H16
16. Scheduled charging deactivation button
17. Hood release lever ........................3-31
18. Fuse box ..........................................7-43
19. Steering wheel ................................3-15
20. Seat ..................................................2-4
OAEE016003R
■ Right-hand drive
The actual shape may differ from the illustration.
Page 128 of 582
2-30
Safety system of your vehicle
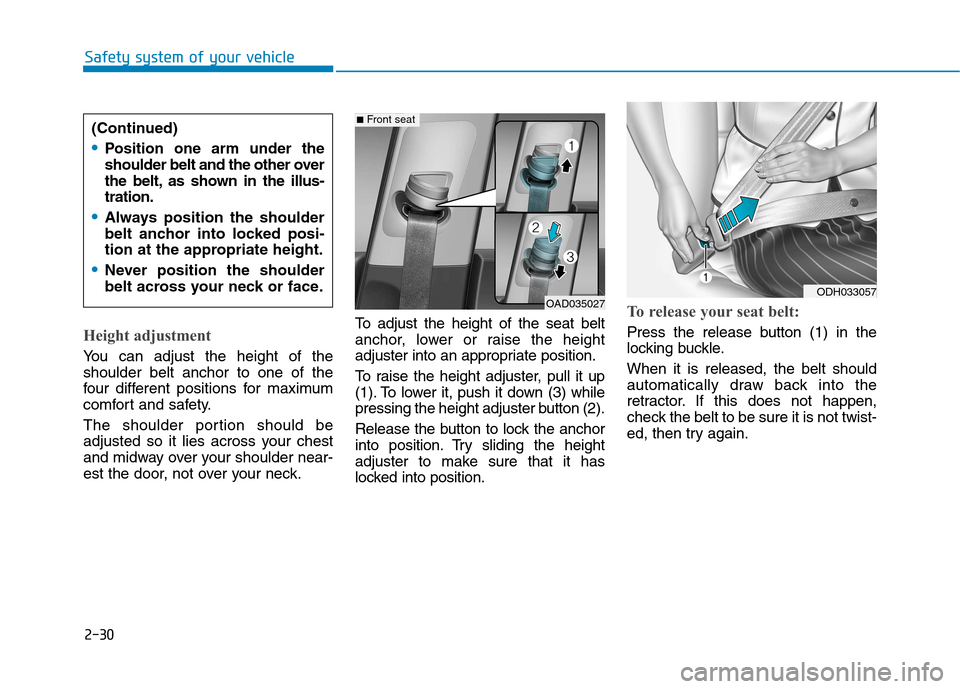
Height adjustment
You can adjust the height of the shoulder belt anchor to one of the
four different positions for maximum
comfort and safety.
The shoulder portion should be
adjusted so it lies across your chest
and midway over your shoulder near-
est the door, not over your neck.To adjust the height of the seat belt
anchor, lower or raise the height
adjuster into an appropriate position.
To raise the height adjuster, pull it up
(1). To lower it, push it down (3) while
pressing the height adjuster button (2).
Release the button to lock the anchor
into position. Try sliding the height
adjuster to make sure that it has
locked into position.
To release your seat belt:
Press the release button (1) in the
locking buckle. When it is released, the belt should
automatically draw back into the
retractor. If this does not happen,
check the belt to be sure it is not twist-
ed, then try again.
OAD035027
■
Front seat
(Continued)
Position one arm under the
shoulder belt and the other over
the belt, as shown in the illus-tration.
Always position the shoulder
belt anchor into locked posi-
tion at the appropriate height.
Never position the shoulder
belt across your neck or face.
ODH033057
Page 154 of 582
2-56
Safety system of your vehicle
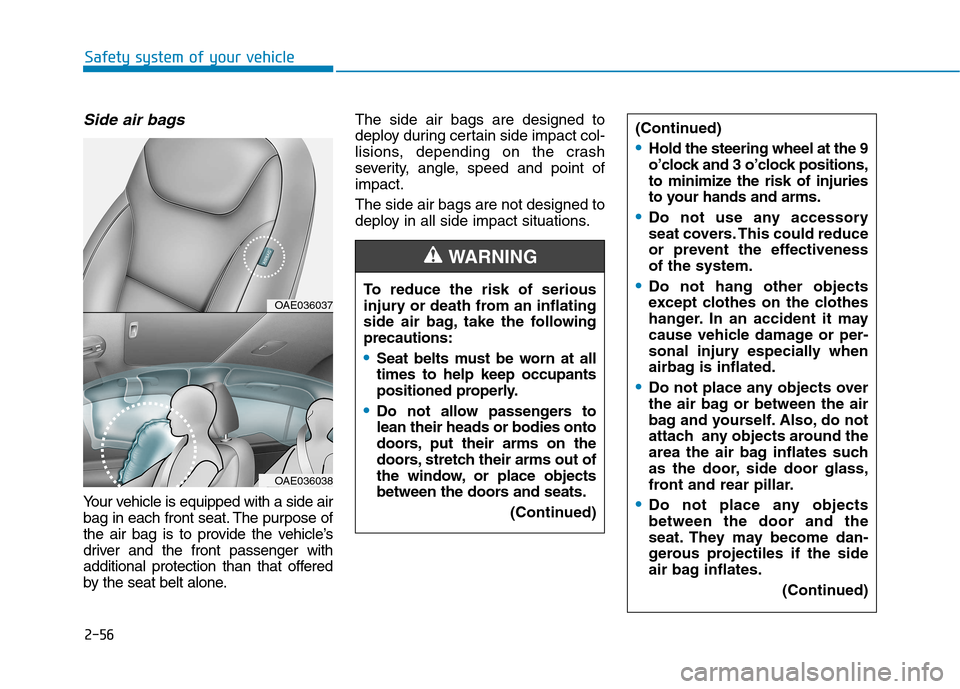
Side air bags
Your vehicle is equipped with a side air
bag in each front seat. The purpose of
the air bag is to provide the vehicle’s
driver and the front passenger with
additional protection than that offered
by the seat belt alone.The side air bags are designed to
deploy during certain side impact col-
lisions, depending on the crash
severity, angle, speed and point ofimpact. The side air bags are not designed to
deploy in all side impact situations.
To reduce the risk of serious
injury or death from an inflating
side air bag, take the follo wing
precautions:
Seat belts must be worn at all times to help keep occupants
positioned properly.
Do not allow passengers to lean their heads or bodies onto
doors, put their arms on the
doors, stretch their arms out of
the window, or place objects
between the doors and seats.
(Continued)
WARNING
OAE036037
OAE036038
(Continued)
Hold the steering wheel at the 9
o’clock and 3 o’clock positions,
to minimize the risk of injuries
to your hands and arms.
Do not use any accessory
seat covers. This could reduce
or prevent the effectivenessof the system.
Do not hang other objects
except clothes on the clothes
hanger. In an accident it may
cause vehicle damage or per-
sonal injury especially when
airbag is inflated.
Do not place any objects over
the air bag or between the air
bag and yourself. Also, do not
attach any objects around the
area the air bag inflates such
as the door, side door glass,
front and rear pillar.
Do not place any objects between the door and the
seat. They may become dan-
gerous projectiles if the side
air bag inflates.(Continued)
Page 170 of 582
Convenient features of your vehicle
Accessing your vehicle .........................................3-3Smart key ............................................................................3-3
Immobilizer system ..........................................................3-7
Door locks ...............................................................3-8 Operating door locks from outside the vehicle .......3-8
Operating door locks from inside the vehicle ..........3-9
Auto door lock/unlock features ................................3-11
Child-protector rear door locks ..................................3-11
Theft-alarm system.............................................3-12
Driver position memory system ........................3-13 Storing memory positions .............................................3-13
Easy access function ....................................................3-14
Steering wheel......................................................3-15 Electric power steering (EPS) ......................................3-15
Tilt steering / Telescope steering...............................3-16
Heated steering wheel .................................................3-16
Horn ....................................................................................3-17
Mirrors ...................................................................3-17 Inside rearview mirror....................................................3-17
Outside rearview mirror ................................................3-19
Windows ................................................................3-22 Power windows ..............................................................3-22 Sunroof..................................................................3-28
Sunroof opening and closing .......................................3-28
Sliding the sunroof .........................................................3-28
Tilting the sunroof ..........................................................3-29
Sunshade ...........................................................................3-30
Resetting the sunroof ....................................................3-30
Exterior features .................................................3-31 Hood ...................................................................................3-31
Tailgate...............................................................................3-33
Instrument cluster................................................3-35 Instrument cluster control ............................................3-36
Gauges and meters .........................................................3-37
Warning and indicator lights ........................................3-42
LCD display messages ..................................................3-52
LCD Display ..........................................................3-65 LCD display control.........................................................3-65
LCD modes .....................................................................3-66
Trip computer .......................................................3-73
3