Page 189 of 637
3-94
Convenient features of your vehicle
Supervision cluster
The trip computer is a microcomput-
er-controlled driver information sys-
tem that displays information related
to driving.
Information
Some driving information stored in the
trip computer (for example Average
Vehicle Speed) resets if the battery is
disconnected.
Trip modes
To change the trip mode, toggle the
“▲,▼” switch on the steering wheel.
i
• Tripmeter [A]
• Average Vehicle Speed [A]
• Elapsed Time [A]
TRIP A
• Tripmeter [B]
• Average Vehicle Speed [B]
• Elapsed Time [B]
TRIP B
• Distance To Empty
• Average Fuel Economy
• Instant Fuel Economy
FUEL ECONOMY
Digital Speedometer
Auto Stop Time
OAD045449
Page 190 of 637

3-95
Convenient features of your vehicle
3
Fuel economy
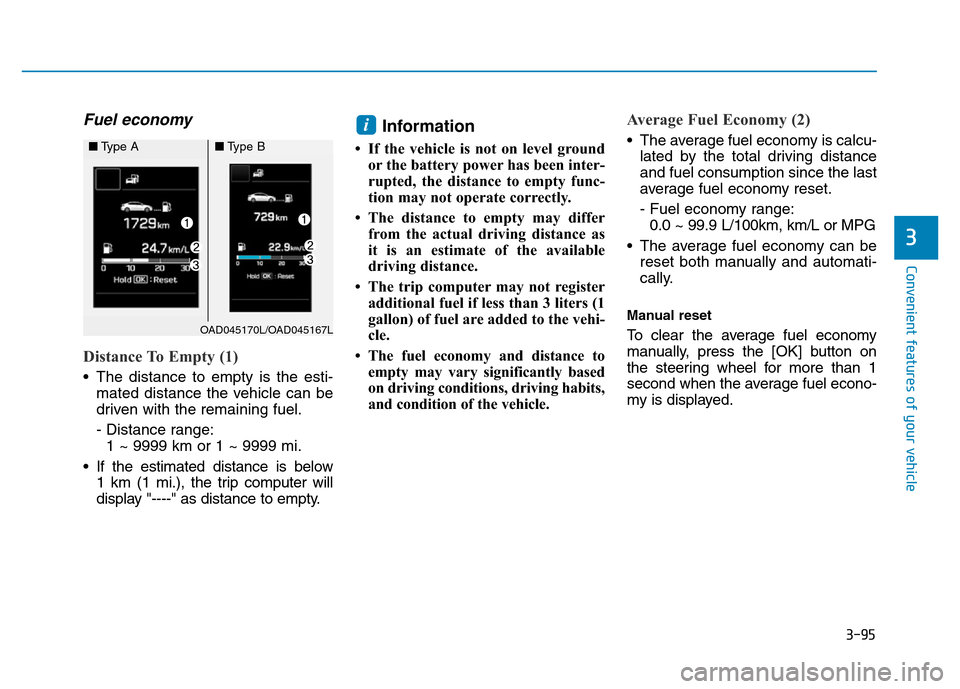
Distance To Empty (1)
• The distance to empty is the esti-
mated distance the vehicle can be
driven with the remaining fuel.
- Distance range:
1 ~ 9999 km or 1 ~ 9999 mi.
• If the estimated distance is below
1 km (1 mi.), the trip computer will
display "----" as distance to empty.
Information
• If the vehicle is not on level ground
or the battery power has been inter-
rupted, the distance to empty func-
tion may not operate correctly.
• The distance to empty may differ
from the actual driving distance as
it is an estimate of the available
driving distance.
• The trip computer may not register
additional fuel if less than 3 liters (1
gallon) of fuel are added to the vehi-
cle.
• The fuel economy and distance to
empty may vary significantly based
on driving conditions, driving habits,
and condition of the vehicle.
Average Fuel Economy (2)
• The average fuel economy is calcu-
lated by the total driving distance
and fuel consumption since the last
average fuel economy reset.
- Fuel economy range:
0.0 ~ 99.9 L/100km, km/L or MPG
• The average fuel economy can be
reset both manually and automati-
cally.
Manual reset
To clear the average fuel economy
manually, press the [OK] button on
the steering wheel for more than 1
second when the average fuel econo-
my is displayed.
i
OAD045170L/OAD045167L
■Type A■Type B
Page 191 of 637

3-96
Convenient features of your vehicle
Automatic reset
To automatically reset the average fuel
economy after refueling, select the
"Auto Reset" mode in User Settings
menu on the LCD display (Refer to
"LCD Display" in this chapter).
In "Auto Reset" mode, the average fuel
economy will be reset to zero (----),
when driving speed exceeds 1 km/h,
after adding 3~6 liters (1~2 gallon) of
fuels or more.
Information
The vehicle must be driven for a min-
imum of 300 meters (0.19 miles) since
the last ignition key cycle before the
average fuel economy will be recalcu-
lated.
Instant Fuel Economy (3)
• This mode displays the instanta-
neous fuel economy while driving
when the vehicle speed is greater
than 10 km/h (6.2 mph).
- Fuel economy range:
0~30 L/100km, km/L or 0~50 MPG
Trip A/B
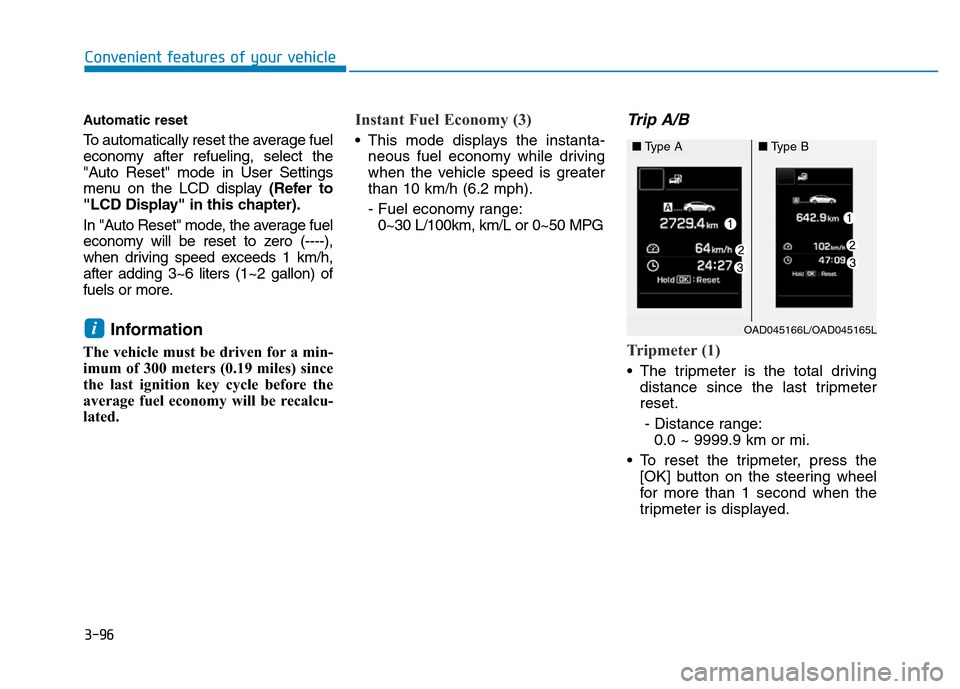
Tripmeter (1)
• The tripmeter is the total driving
distance since the last tripmeter
reset.
- Distance range:
0.0 ~ 9999.9 km or mi.
• To reset the tripmeter, press the
[OK] button on the steering wheel
for more than 1 second when the
tripmeter is displayed.
iOAD045166L/OAD045165L
■Type A■Type B
Page 192 of 637

3-97
Convenient features of your vehicle
3
Average Vehicle Speed (2)
• The average vehicle speed is cal-
culated by the total driving dis-
tance and driving time since the
last average vehicle speed reset.
- Speed range:
0~240 km/h or 0~160 MPH
• To reset the average vehicle speed,
press the [OK] button on the steer-
ing wheel for more than 1 second
when the average vehicle speed is
displayed.
Information
• The average vehicle speed is not dis-
played if the driving distance is less
than 300 meters (0.19 miles) or the
driving time is less than 10 seconds
since the ignition switch or the Engine
Start/Stop button is turned to ON.
• The average vehicle speed will con-
tinue to be calculated and will start
to decrease if the vehicle is stopped
while the engine is still running (for
example, when the vehicle is in traf-
fic or stopped at a stop light.)
Elapsed Time (3)
• The elapsed time is the total driv-
ing time since the last elapsed time
reset.
- Time range (hh:mm):
00:00 ~ 99:59
• To reset the elapsed time, press the
[OK] button on the steering wheel
for more than 1 second when the
elapsed time is displayed.
Information
The elapsed time will continue to be
counted while the engine is still run-
ning (for example, when the vehicle is
in traffic or stopped at a stop light.)
Auto stop time (if equipped)
This mode displays the elapsed time of
Auto stop for "Idle stop and go system".
For more details, refer to the "Idle
stop and go system" in chapter 5.
i
i
OTL045191L/OAD045175N
■Type A■Type B
Page 193 of 637
3-98
Convenient features of your vehicle
Digital speedometer
This message shows the speed of
the vehicle (km/h, MPH).
Driving Info display
At the end of each driving cycle, the
Driving Info message is displayed.
This display shows the trip distance
(1), the average fuel economy (2),
and the remaining distance to empty
(3).
This information is displayed for a few
seconds when you turn off the igni-
tion, and then goes off automatically.
The information is calculated for each
ignition cycle.If the estimated remaining vehicle
range is below 1 km (1 mi.), the dis-
tance to empty will display as "----"
and a "Low Fuel" warning message
(4) will be displayed.
Information
If sunroof open warning is displayed
in the cluster, the Driving Info mes-
sage will not be displayed.
i
OAD045164L/OAD045163L
■Type B■Type A
OTL045193/OTL045194
■Type A■Type B
Page 197 of 637

3-102
Convenient features of your vehicle
Turn signals and lane change
signals
To signal a turn, push down on the
lever for a left turn or up for a right
turn in position (A). To signal a lane
change, move the turn signal lever
slightly and hold it in position (B).The lever will return to the OFF posi-
tion when released or when the turn
is completed.
If an indicator stays on and does not
flash or if it flashes abnormally, one of
the turn signal bulbs may be burned
out and will require replacement.
One-touch turn signal function
To activate an one-touch turn signal
function, move the turn signal lever
slightly and then release it. The lane
change signals will blink 3, 5 or 7
times.
You can activate/deactivate the One
Touch Turn Signal function or choose
the number of blinking (3, 5, or 7)
from the User Settings Mode on the
LCD display.For more details, refer
to "LCD Display" in this chapter.
Front fog lamp (if equipped)
Fog lamps are used to provide
improved visibility when visibility is
poor due to fog, rain or snow, etc. Use
the switch next to the headlamp switch
to turn the fog lamps ON and OFF.
OTL045257L
OTL045257R
■Left-hand drive
■Right-hand drive
OTL045258L
OTL045258R
■Left-hand drive
■Right-hand drive
Page 199 of 637

3-104
Convenient features of your vehicle
To turn the rear fog lamps off, do one
of the following:
• Turn off the headlamp switch.
• Turn the light switch to the rear fog
lamp position again.
• When the light switch is in the
parking lamp position, if you turn
off the front fog lamp, the rear fog
lamp will also turn off.
Battery saver function
The purpose of this feature is to pre-
vent the battery from being dis-
charged. The system automatically
turns off the parking lamp when the
driver turns the engine off and opens
the driver-side door.
With this feature, the parking lamps
will turn off automatically if the driver
parks on the side of road at night.
If necessary, to keep the lamps on
when the engine is turned off, perform
the following:
1) Open the driver-side door.
2) Turn the parking lamps OFF and
ON again using the light switch on
the steering column.
Headlamp delay function
(if equipped)
If you place the ignition switch in to
the ACC or OFF position with the
headlamps ON, the headlamps
(and/or parking lamps) remain on for
about 5 minutes. However, with the
engine off if the driver’s door is
opened and closed, the headlamps
(and/or parking lamps) are turned off
after 15 seconds.
The headlamps (and/or parking
lamps) can be turned off by pressing
the lock button on the smart key
twice or turning the light switch to the
OFF or AUTO position. However, if
you turn the light switch to the AUTO
position when it is dark outside, the
headlamps will not be turned off.
You can activate or deactivate the
Headlamp Delay function from the
User Settings Mode on the LCD dis-
play.For more details, refer to
"LCD Display" in this chapter.
Page 201 of 637

3-106
Convenient features of your vehicle
The higher the number of the switch
position, the lower the headlight
beam level. Always keep the head-
light beam at the proper leveling
position, or headlights may dazzle
other road users.
Listed below are the examples of
proper switch settings. For loading
conditions other than those listed
below, adjust the switch position so
that the beam level may be the near-
est as the condition obtained accord-
ing to the list.
Welcome system (if equipped)
Welcome light (if equipped)
Door handle lamp (if equipped)
When all the doors (and trunk) are
closed and locked, the door handle
lamp will come on for about 15 sec-
onds if any of the below is performed.
• When the door unlock button is
pressed on the remote key or
smart key.
• When the button of the outside
door handle is pressed.
• When the vehicle is approached
with the smart key in possession.
Headlamp and Parking lamp
When the headlamp (lamp switch in
the headlamp or AUTO position) is on
and all doors (and trunk) are locked
and closed, the parking lamp and
headlamp will come on for 15 seconds
if/or any of the below is performed.
• When the door unlock button is
pressed on the remote key or
smart key.
At this time, if you press the door lock
or unlock button, the parking lamp and
headlamp will turn off immediately.
You can activate or deactivate the
Welcome Light from the User
Settings Mode on the LCD display.
For more details, refer to "LCD
Display" in this chapter.
Loading conditionSwitch
position
Driver only 0
Driver + Front passenger 0
Full passengers (including driver) 1
Full passengers (including driver)
+ Maximum permissible loading2
Driver + Maximum permissible
loading 3OAD045434L