Page 364 of 637
![Hyundai Elantra 2017 Owners Manual 4-107
Multimedia System
4
With the Phone Button
Press the [SETUP]button
�Select
[Phone]
You can select and control options
related to [Pair Phone], [Paired
Phone List], [Phone book
Download], [Auto D](/manual-img/35/14543/w960_14543-363.png "Hyundai Elantra 2017 Owners Manual 4-107
Multimedia System
4
With the Phone Button
Press the [SETUP]button
�Select
[Phone]
You can select and control options
related to [Pair Phone], [Paired
Phone List], [Phone book
Download], [Auto D")
4-107
Multimedia System
4
With the Phone Button
Press the [SETUP]button
�Select
[Phone]
You can select and control options
related to [Pair Phone], [Paired
Phone List], [Phone book
Download], [Auto Download],
[Outgoing Volume] and [Bluetooth
System Off].
Pairing a New Device
Bluetooth®Wireless Technology
devices can be paired with the audio
system.
For more information, refer to the
“Pairing through Phone Setup” sec-
tion within
Bluetooth®Wireless
Technology.
Viewing Paired Phone List
Press the [SETUP]button
�Select
[Phone]
�Select [Paired Phone List]
This feature is used to view mobile
phones that have been paired with
the audio system. Upon selecting a
paired phone, the setup menu is dis-
played.
For more information, refer to the
“Setting
Bluetooth®Wireless
TechnologyConnection” section within
Bluetooth®Wireless Technology.
(1) Moves to the previous screen.
(2) Connect/Disconnects currently select-
ed phone.
(3) Deletes the currently selected
phone.
(4) Sets currently selected phone to
highest connection priority.
Information
- Before Downloading Phone
Books
• Only phone books within connected
phones can be downloaded. Also
check to see that your mobile phone
supports the download feature.
• To learn more about whether your
mobile phone supports phone book
downloads, refer to your mobile
phone user’s manual.
• The Phone book for only the con-
nected phone can be downloaded.
Before downloading, check to see
whether your phone supports the
download feature.
i
Page 366 of 637
4-109
Multimedia System
4
Turning Bluetooth System Off
Once Bluetooth®Wireless Technology
is turned off,
Bluetooth®Wireless
Technology related features will not be
supported within the audio system.
To turn
Bluetooth®Wireless Technology
back on, go to [SETUP]
�[Phone]
and press “Yes”.
Bluetooth®Wireless Technology
audio streaming may not be sup-
ported in some
Bluetooth®Wireless
Technology phones.
With the System Button
Press the [SETUP]button
�Select
[System]
You can select and control options
related to [Memory Information] and
[Language].
Memory Information
This feature displays information relat-
ed to system memory.
• Using : Displays capacity currently
in use
• Capacity : Displays total capacity
❈May differ depending on the
selected audio.
Language
This feature is used to change the
system and voice recognition lan-
guage.
If the language is changed, the sys-
tem will restart and apply the select-
ed language.
• Language support by region
NOTICE
Page 370 of 637
4-113
Multimedia System
4
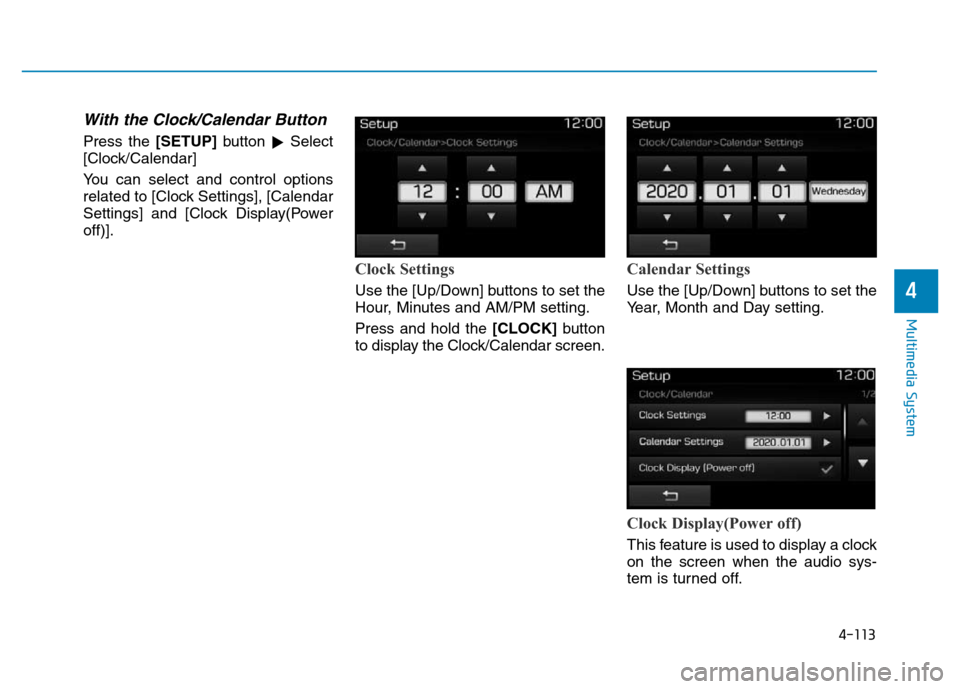
With the Clock/Calendar Button
Press the [SETUP]button
�Select
[Clock/Calendar]
You can select and control options
related to [Clock Settings], [Calendar
Settings] and [Clock Display(Power
off)].
Clock Settings
Use the [Up/Down] buttons to set the
Hour, Minutes and AM/PM setting.
Press and hold the [CLOCK]button
to display the Clock/Calendar screen.
Calendar Settings
Use the [Up/Down] buttons to set the
Year, Month and Day setting.
Clock Display(Power off)
This feature is used to display a clock
on the screen when the audio sys-
tem is turned off.
Page 371 of 637
4-114
Multimedia System
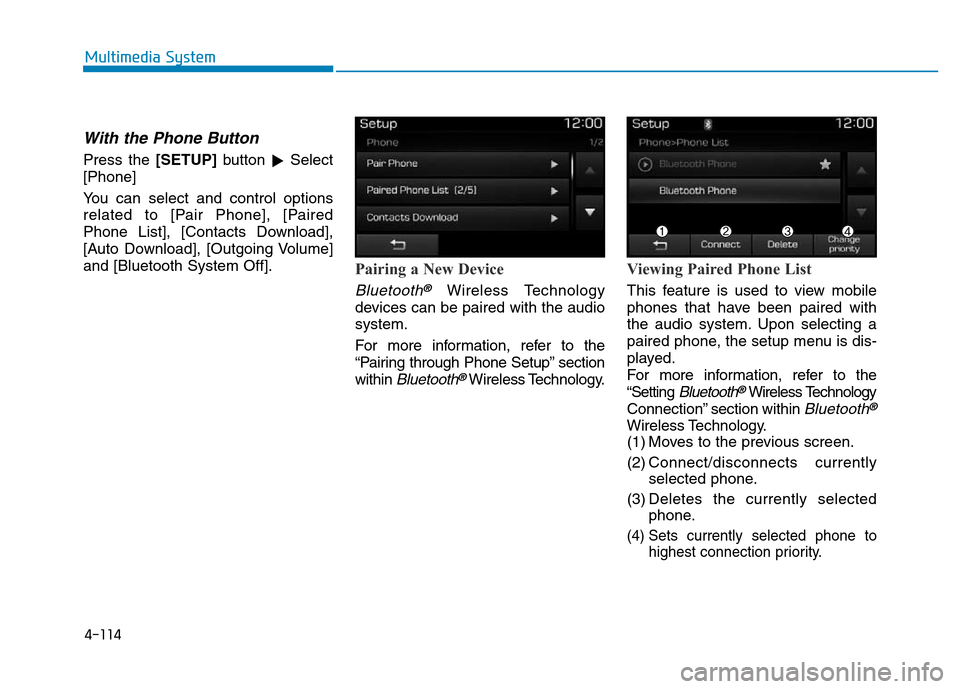
With the Phone Button
Press the [SETUP]button
�Select
[Phone]
You can select and control options
related to [Pair Phone], [Paired
Phone List], [Contacts Download],
[Auto Download], [Outgoing Volume]
and [Bluetooth System Off].
Pairing a New Device
Bluetooth®Wireless Technology
devices can be paired with the audio
system.
For more information, refer to the
“Pairing through Phone Setup” section
within
Bluetooth®Wireless Technology.
Viewing Paired Phone List
This feature is used to view mobile
phones that have been paired with
the audio system. Upon selecting a
paired phone, the setup menu is dis-
played.
For more information, refer to the
“Setting
Bluetooth®Wireless Technology
Connection” section within
Bluetooth®
Wireless Technology.
(1) Moves to the previous screen.
(2) Connect/disconnects currently
selected phone.
(3) Deletes the currently selected
phone.
(4) Sets currently selected phone to
highest connection priority.
Page 373 of 637
4-116
Multimedia System
Outgoing Volume
Use the [-], [+] buttons to adjust the
outgoing volume level.
Turning Bluetooth System Off
Once Bluetooth®Wireless Technology
is turned off,
Bluetooth®Wireless
Technology related features will not be
supported within the audio system.
To turn Bluetooth®Wireless
Technology back on, go to [SETUP]
�[Phone] and press “Yes”.
With the System Button
Press the [SETUP]button
�Select
[System]
You can select and control options
related to [Memory Information] and
[Language].
Memory Information
This feature displays information
related to system memory.
• Using : Displays capacity currently
in use
• Capacity : Displays total capacity
Language
This feature is used to change the
system language.
If the language is changed, the sys-
tem will restart and apply the select-
ed language.
• Language support by region.
English, Português, Español.
Page 578 of 637
7-67
7
Maintenance
Fuse switch
Always, place the fuse switch to the
ON position.
If you move the switch to the OFF
position, some items such as the
audio system and digital clock must
be reset and the smart key may not
work properly.
Information
If the fuse switch is OFF, the above
message will appear.• Always place the fuse switch in
the ON position while driving the
vehicle.
• Place the fuse switch in the OFF
position when the vehicle is
parked more than a month to
prevent battery discharge.
• Do not move the transportation
fuse switch repeatedly. The fuse
switch may be damaged.
NOTICEi
OAD075023OAD045144/OTL045155L
■Conventional cluster ■Supervision cluster
Page 580 of 637

7-69
7
Maintenance
Multi fuse
If the multi fuse is blown, it must be
removed as follows:
1. Disconnect the negative battery
cable.
2. Remove the nuts shown in the pic-
ture above.
3. Replace the fuse with a new one
of the same rating.
4. Reinstall in the reverse order of
removal.
Information
If the multi fuse is blown, we recom-
mend that you consult an authorized
HYUNDAI dealer.
Blade type fuse
Before inspecting a fuse, you should
turn OFF the engine as well as the
other electric system switches. If a
fuse is blown out, remove the blown-
out fuse and install a new fuse of the
same capacity by using the fuse
puller, which is prepared inside the
fuse box in the engine compartment.
A new fuse may be prepared along
with the fuse puller. However, if not,
you may temporarily select/use a
fuse of the other systems, which do
not affect the vehicle operation, such
as the audio system.
Cartridge type fuse
Before inspecting a fuse, you should
turn OFF the engine as well as the
other electric system switches. If a
fuse is blown out, remove the blown-
out fuse and install a new fuse of the
same capacity. Pay extreme caution
not to damage the blown-out fuse
while removing it.
i
OAD075026OAD075053OAD075054
Page 582 of 637
7-71
7
Maintenance
Fuse NameSymbolFuse ratingCircuit Protected
SPARE210ASpare
CLUSTER10AInstrument Cluster
A/BAG IND7.5AInstrument Cluster, A/C Control Module
MDPS17.5AMDPS Unit
MODULE77.5AFront Seat Warmer Control Module, Front Air Ventilation Seat Control Module,
Rear Seat Warmer Control Module, Sunroof Motor, Electro Chromic Mirror
A/CON17.5AE/R Junction Block (RLY.12, RLY.1B, RLY.13B), Ionizer, A/C Control Module
HTD STRG15ABCM
WIPER125AWiper Motor, PCM Block (Front Wiper (Low) Relay)
HTD MIRR10ADriver Power Outside Mirror, Passenger Power Outside Mirror, A/C Control Module,
ECM/PCM
DR LOCK20ADoor Lock Relay, Door Unlock Relay
MULTI MEDIA15ADC-DC Converter, Audio, A/V & Navigation Head Unit, MTH E-Call Module
MODULE17.5ADriver/Passenger Smart Key Outside Handle, Driver Door Module, Passenger Door Module
Driver’s side fuse panel

![Hyundai Elantra 2017 Owners Manual 4-116
Multimedia System
Outgoing Volume
Use the [-], [+] buttons to adjust the
outgoing volume level.
Turning Bluetooth System Off
Once Bluetooth®Wireless Technology
is turned off,
Bluetooth®Wirele](/manual-img/35/14543/w960_14543-372.png "Hyundai Elantra 2017 Owners Manual 4-116
Multimedia System
Outgoing Volume
Use the [-], [+] buttons to adjust the
outgoing volume level.
Turning Bluetooth System Off
Once Bluetooth®Wireless Technology
is turned off,
Bluetooth®Wirele")

