Page 34 of 571

2-7
Safety system of your vehicle
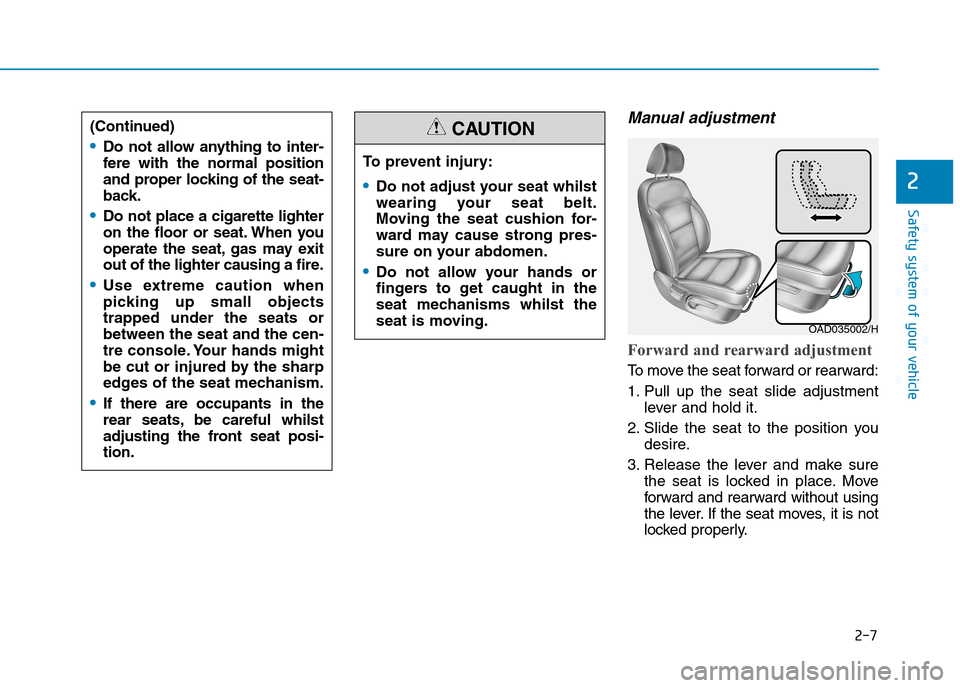
Manual adjustment
Forward and rearward adjustment
To m o v e t h e s e a t f o r w a r d o r r e a r w a r d :
1. Pull up the seat slide adjustment
lever and hold it.
2. Slide the seat to the position you
desire.
3. Release the lever and make sure
the seat is locked in place. Move
forward and rearward without using
the lever. If the seat moves, it is not
locked properly.
2
To p r e v e n t i n j u r y :
•Do not adjust your seat whilst
wearing your seat belt.
Moving the seat cushion for-
ward may cause strong pres-
sure on your abdomen.
•Do not allow your hands or
fingers to get caught in the
seat mechanisms whilst the
seat is moving.
CAUTION(Continued)
•Do not allow anything to inter-
fere with the normal position
and proper locking of the seat-
back.
•Do not place a cigarette lighter
on the floor or seat. When you
operate the seat, gas may exit
out of the lighter causing a fire.
•Use extreme caution when
picking up small objects
trapped under the seats or
between the seat and the cen-
tre console. Your hands might
be cut or injured by the sharp
edges of the seat mechanism.
•If there are occupants in the
rear seats, be careful whilst
adjusting the front seat posi-
tion.
OAD035002/H
Page 36 of 571

2-9
Safety system of your vehicle
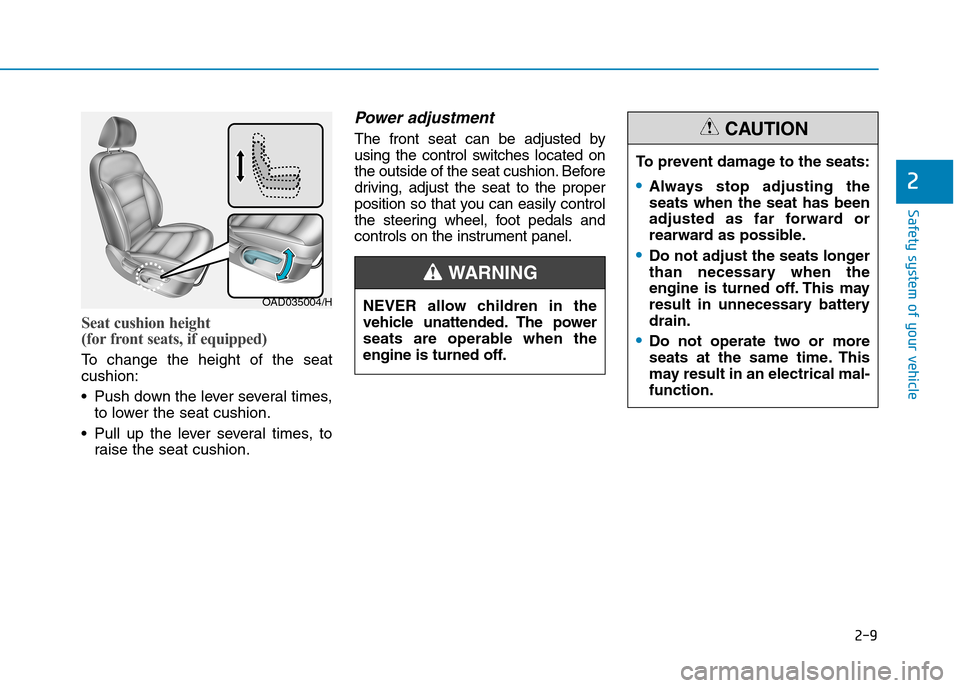
Seat cushion height
(for front seats, if equipped)
To c h a n g e t h e h e i g h t o f t h e s e a t
cushion:
•Push down the lever several times,
to lower the seat cushion.
•Pull up the lever several times, to
raise the seat cushion.
Power adjustment
The front seat can be adjusted by
using the control switches located on
the outside of the seat cushion. Before
driving, adjust the seat to the proper
position so that you can easily control
the steering wheel, foot pedals and
controls on the instrument panel.
2
OAD035004/H
To p r e v e n t d a m a g e t o t h e s e a t s :
•Always stop adjusting the
seats when the seat has been
adjusted as far forward or
rearward as possible.
•Do not adjust the seats longer
than necessary when the
engine is turned off. This may
result in unnecessary battery
drain.
•Do not operate two or more
seats at the same time. This
may result in an electrical mal-
function.
CAUTION
NEVER allow children in the
vehicle unattended. The power
seats are operable when the
engine is turned off.
WA R N I N G
Page 37 of 571

2-10
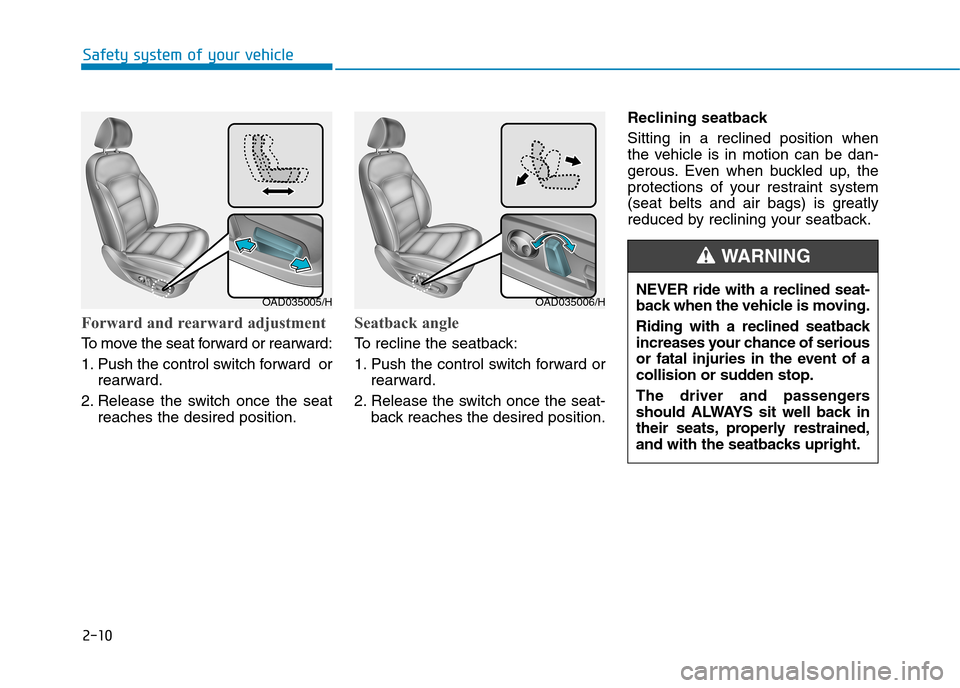
Forward and rearward adjustment
To m o v e t h e s e a t f o r w a r d o r r e a r w a r d :
1. Push the control switch forward or
rearward.
2. Release the switch once the seat
reaches the desired position.
Seatback angle
To r e c l i n e t h e s e a t b a c k :
1. Push the control switch forward or
rearward.
2. Release the switch once the seat-
back reaches the desired position.
Reclining seatback
Sitting in a reclined position when
the vehicle is in motion can be dan-
gerous. Even when buckled up, the
protections of your restraint system
(seat belts and air bags) is greatly
reduced by reclining your seatback.
Safety system of your vehicle
OAD035005/HOAD035006/HNEVER ride with a reclined seat-
back when the vehicle is moving.
Riding with a reclined seatback
increases your chance of serious
or fatal injuries in the event of a
collision or sudden stop.
The driver and passengers
should ALWAYS sit well back in
their seats, properly restrained,
and with the seatbacks upright.
WA R N I N G
Page 55 of 571

2-28
Safety system of your vehicle
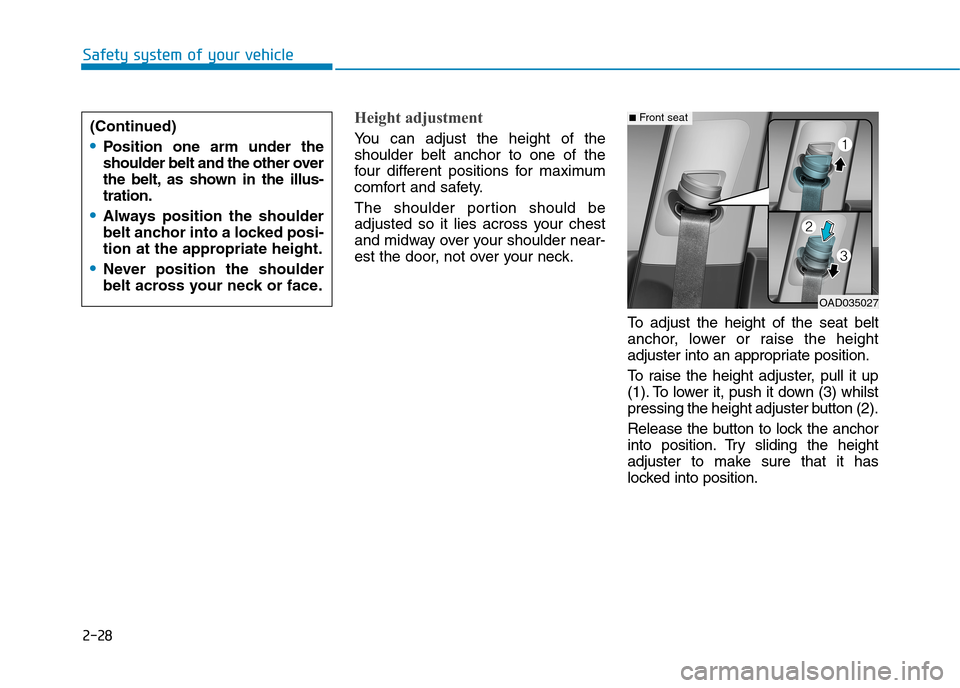
Height adjustment
Yo u c a n a d j u s t t h e h e i g h t o f t h e
shoulder belt anchor to one of the
four different positions for maximum
comfort and safety.
The shoulder portion should be
adjusted so it lies across your chest
and midway over your shoulder near-
est the door, not over your neck.
To a d j u s t t h e h e i g h t o f t h e s e a t b e l t
anchor, lower or raise the height
adjuster into an appropriate position.
To r a i s e t h e h e i g h t a d j u s t e r , p u l l i t u p
(1). To lower it, push it down (3) whilst
pressing the height adjuster button (2).
Release the button to lock the anchor
into position. Try sliding the height
adjuster to make sure that it has
locked into position.
OAD035027
■Front seat(Continued)
•Position one arm under the
shoulder belt and the other over
the belt, as shown in the illus-
tration.
•Always position the shoulder
belt anchor into a locked posi-
tion at the appropriate height.
•Never position the shoulder
belt across your neck or face.