2017 Hyundai Elantra ECU
[x] Cancel search: ECUPage 294 of 571
![Hyundai Elantra 2017 Owners Manual - RHD (UK. Australia) 4-45
Multimedia System
4
With the Phone Button
(if equipped)
Press the [SETUP/CLOCK] button to
select [Phone]
To p a i r a Bluetooth®Wireless
Te ch n o l o g y e n a bl e d m o b i l e
phone Hyundai Elantra 2017 Owners Manual - RHD (UK. Australia) 4-45
Multimedia System
4
With the Phone Button
(if equipped)
Press the [SETUP/CLOCK] button to
select [Phone]
To p a i r a Bluetooth®Wireless
Te ch n o l o g y e n a bl e d m o b i l e
phone](/manual-img/35/14544/w960_14544-293.png)
4-45
Multimedia System
4
With the Phone Button
(if equipped)
Press the [SETUP/CLOCK] button to
select [Phone]
To p a i r a Bluetooth®Wireless
Te ch n o l o g y e n a bl e d m o b i l e
phone, authentication and con-
nection processes are first
required. As a result, you cannot
pair your mobile phone whilst
driving the vehicle. First park your
vehicle before use.
Pair Phone
Select [Pair Phone]
➀Search for device names as dis-
played on your mobile phone and
connect.
❈SSP : Secure Simple Pairing
Non SSP supported device :
➁After a few moments, a screen isdisplayed where the passkey isentered.
Enter the passkey “0000” to pair your
Bluetooth®Wireless Technology
device with the audio system.
SSP supported device :
➁After a few moments, a screen
displays a 6 digit passkey.
Check the passkey on your
Bluetooth®Wireless Technology
device and confirm.
The device name and passkey will
be displayed on the screen for up to
3 minutes. If pairing is not completed
within the 3 minutes, the mobile
phone pairing process will automati-
cally be cancelled.
➂Pair ing completion is displayed.
In some mobile phones, pairing will
automatically be followed by connec-
tion.
It is possible to pair up to five
Bluetooth®Wireless Technology
enabled mobile phones.
NOTICE
Page 302 of 571
![Hyundai Elantra 2017 Owners Manual - RHD (UK. Australia) 4-53
Multimedia System
4
With the Phone Button
(if equipped)
Press the [SETUP/CLOCK] button to
select [Phone]
To p a i r a Bluetooth®Wireless
Te ch n o l o g y e n a bl e d m o b i l e
phone Hyundai Elantra 2017 Owners Manual - RHD (UK. Australia) 4-53
Multimedia System
4
With the Phone Button
(if equipped)
Press the [SETUP/CLOCK] button to
select [Phone]
To p a i r a Bluetooth®Wireless
Te ch n o l o g y e n a bl e d m o b i l e
phone](/manual-img/35/14544/w960_14544-301.png)
4-53
Multimedia System
4
With the Phone Button
(if equipped)
Press the [SETUP/CLOCK] button to
select [Phone]
To p a i r a Bluetooth®Wireless
Te ch n o l o g y e n a bl e d m o b i l e
phone, authentication and con-
nection processes are first
required. As a result, you cannot
pair your mobile phone whilst
driving the vehicle. First park your
vehicle before use.
Pair Phone
Select [Pair Phone]
➀Search for device names as dis-
played on your mobile phone and
connect.
❈SSP : Secure Simple Pairing
Non SSP supported device :
➁After a few moments, a screen isdisplayed where the passkey isentered.
Enter the passkey “0000” to pair your
Bluetooth®Wireless Technology
device with the audio system.
SSP supported device :
➁After a few moments, a screen
displays a 6 digit passkey.
Check the passkey on your
Bluetooth®Wireless Technology
device and confirm.
The device name and passkey will
be displayed on the screen for up to
3 minutes. If pairing is not completed
within the 3 minutes, the mobile
phone pairing process will automati-
cally be cancelled.
➂Pair ing completion is displayed.
In some mobile phones, pairing will
automatically be followed by connec-
tion.
It is possible to pair up to five
Bluetooth®Wireless Technology
enabled mobile phones.
NOTICE
Page 347 of 571
![Hyundai Elantra 2017 Owners Manual - RHD (UK. Australia) 4-98
Multimedia System
Bluetooth®Wireless Technology
(Type B-1, Type B-2,Type B-3,
Ty p e B - 4 )
When No Devices have been
Paired
➀Press the [PHONE]button or the
[CALL]button on the steerin Hyundai Elantra 2017 Owners Manual - RHD (UK. Australia) 4-98
Multimedia System
Bluetooth®Wireless Technology
(Type B-1, Type B-2,Type B-3,
Ty p e B - 4 )
When No Devices have been
Paired
➀Press the [PHONE]button or the
[CALL]button on the steerin](/manual-img/35/14544/w960_14544-346.png)
4-98
Multimedia System
Bluetooth®Wireless Technology
(Type B-1, Type B-2,Type B-3,
Ty p e B - 4 )
When No Devices have been
Paired
➀Press the [PHONE]button or the
[CALL]button on the steering
wheel controls. The following
screen is displayed.
➁Press the [OK]button to enter the
Pair Phone screen.
•Device :Name of device as shown
when searching from your
Bluetooth®Wireless Technology
device
•Passkey :Passkey used to pair the
device
➂From your Bluetooth®Wireless
Te c h n o l o g y d e v i c e ( i . e . M o b i l e
Phone), search and select your
audio system.
❈SSP : Secure Simple Pairing
Non SSP supported device :
➃After a few moments, a screen is
displayed where the passkey is
entered.
Enter the passkey “0000” to pair
your Bluetooth®Wireless Technology
device with the audio system.
SSP supported device :
➃After a few moments, a screen
displays a 6 digit passkey.
Check the passkey on your
Bluetooth®Wireless Technology
device and confirm.
➄Once pairing is complete, the fol-
lowing screen is displayed.
Some phones (i.e., iPhone®, Android
and Blackberry phones) may offer an
option to allow acceptance of all
future Bluetooth®connection requests
by default. Visit http://www.
Hyundai.com/#/bluetooth for addition-
al information on pairing your
Bluetooth®-enabled mobile phone,
and to view a phone compatibility list.
Page 354 of 571
![Hyundai Elantra 2017 Owners Manual - RHD (UK. Australia) 4-105
Multimedia System
4
Bluetooth®Wireless Technology
(Type B-5, Type B-6)
When No Devices have been
Paired
➀Press the [PHONE]button or the
[CALL]button on the steering
wheel controls. Hyundai Elantra 2017 Owners Manual - RHD (UK. Australia) 4-105
Multimedia System
4
Bluetooth®Wireless Technology
(Type B-5, Type B-6)
When No Devices have been
Paired
➀Press the [PHONE]button or the
[CALL]button on the steering
wheel controls.](/manual-img/35/14544/w960_14544-353.png)
4-105
Multimedia System
4
Bluetooth®Wireless Technology
(Type B-5, Type B-6)
When No Devices have been
Paired
➀Press the [PHONE]button or the
[CALL]button on the steering
wheel controls. The following
screen is displayed.
➁Press the [OK]button to enter the
Pair Phone screen.
•Car Name :Name of device as
shown when searching from your
Bluetooth®Wireless Technology
device
•Passkey :Passkey used to pair the
device
➂From your Bluetooth®Wireless
Te c h n o l o g y d e v i c e ( i . e . M o b i l e
Phone), search and select your
audio system.
❈SSP : Secure Simple Pairing
Non SSP supported device :
➃After a few moments, a screen is
displayed where the passkey is
entered.
Enter the passkey “0000” to pair
your Bluetooth®Wireless Technology
device with the audio system.
SSP supported device :
➃After a few moments, a screen
displays a 6 digit passkey.
Check the passkey on your
Bluetooth®Wireless Technology
device and confirm.
➄Once pairing is complete, the fol-
lowing screen is displayed.
Some phones (i.e., iPhone®, Android
and Blackberry phones) may offer an
option to allow acceptance of all
future Bluetooth®connection requests
by default. Visit http://www.
Hyundai.com/#/bluetooth for addi-
tional information on pairing your
Bluetooth®-enabled mobile phone,
and to view a phone compatibility list.
Page 379 of 571

5-3
Driving your vehicle
5
Before entering the vehicle
•Be sure all windows, outside mir-
ror(s), and outside lights are clean
and unobstructed.
•Remove frost, snow, or ice.
•Visually check the tyres for uneven
wear and damage.
•Check under the vehicle for any
sign of leaks.
•Be sure there are no obstacles
behind you if you intend to reverse.
Before starting
•Make sure the bonnet, the boot,
and the doors are securely closed
and locked.
•Adjust the position of the seat and
steering wheel.
•Adjust the inside and outside
rearview mirrors.
•Verify all the lights work.
•Fasten your seat belt.Check that
all passengers have fastened their
seat belts.
•Check the gauges and indicators in
the instrument panel and the mes-
sages on the instrument display
when the ignition switch is in the
ON position.
•Check that any items you are car-
rying are stored properly or fas-
tened down securely.
BBEEFFOORREE DDRRIIVVIINNGG
To r e d u c e t h e r i s k o f S E R I O U S
INJURY or DEATH, take the fol-
lowing precautions:
•ALWAYS wear your seat belt.
All passengers must be prop-
erly restrained whenever the
vehicle is moving. For more
information, refer to "Seat
Belts" in chapter 2.
•Always drive defensively.
Assume other drivers or pedes-
trians may be careless and
make mistakes.
•Stay focused on the task of
driving. Driver distraction can
cause accidents.
•Leave plenty of space between
you and the vehicle in front of
you.
WA R N I N G
Page 400 of 571

5-24
Driving your vehicle
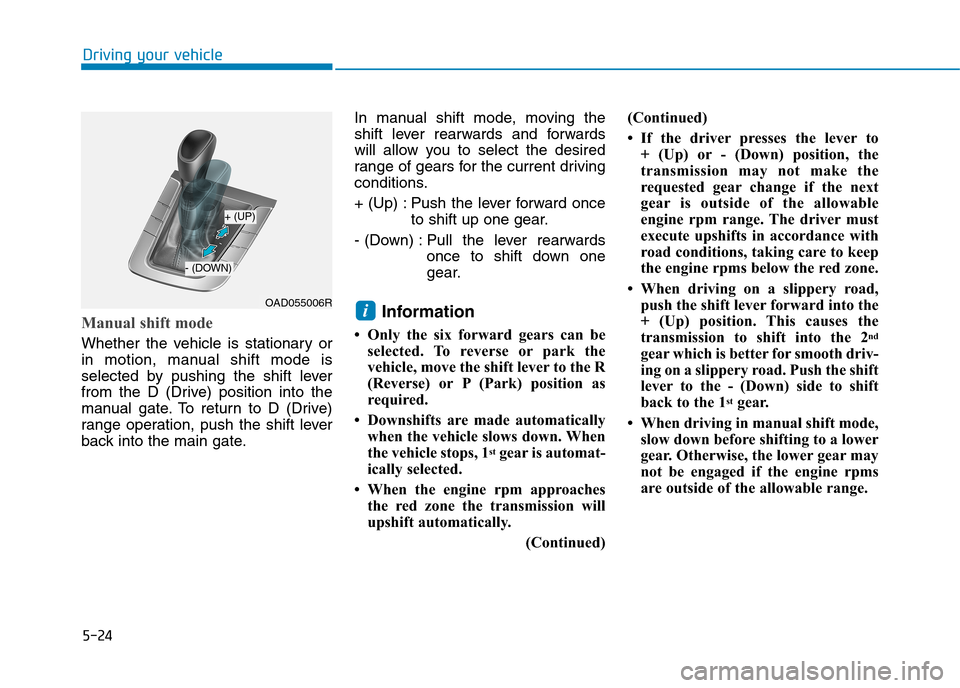
Manual shift mode
Whether the vehicle is stationary or
in motion, manual shift mode is
selected by pushing the shift lever
from the D (Drive) position into the
manual gate. To return to D (Drive)
range operation, push the shift lever
back into the main gate.
In manual shift mode, moving the
shift lever rearwards and forwards
will allow you to select the desired
range of gears for the current driving
conditions.
+ (Up) : Push the lever forward once
to shift up one gear.
- (Down) : Pull the lever rearwards
once to shift down one
gear.
Information
• Only the six forward gears can be
selected. To reverse or park the
vehicle, move the shift lever to the R
(Reverse) or P (Park) position as
required.
• Downshifts are made automatically
when the vehicle slows down. When
the vehicle stops, 1stgear is automat-
ically selected.
• When the engine rpm approaches
the red zone the transmission will
upshift automatically.
(Continued)
(Continued)
• If the driver presses the lever to
+ (Up) or - (Down) position, the
transmission may not make the
requested gear change if the next
gear is outside of the allowable
engine rpm range. The driver must
execute upshifts in accordance with
road conditions, taking care to keep
the engine rpms below the red zone.
• When driving on a slippery road,
push the shift lever forward into the
+ (Up) position. This causes the
transmission to shift into the 2nd
gear which is better for smooth driv-
ing on a slippery road. Push the shift
lever to the - (Down) side to shift
back to the 1stgear.
• When driving in manual shift mode,
slow down before shifting to a lower
gear. Otherwise, the lower gear may
not be engaged if the engine rpms
are outside of the allowable range.
iOAD055006R
+ (UP)
- (DOWN)
Page 461 of 571

6-17
What to do in an emergency
6
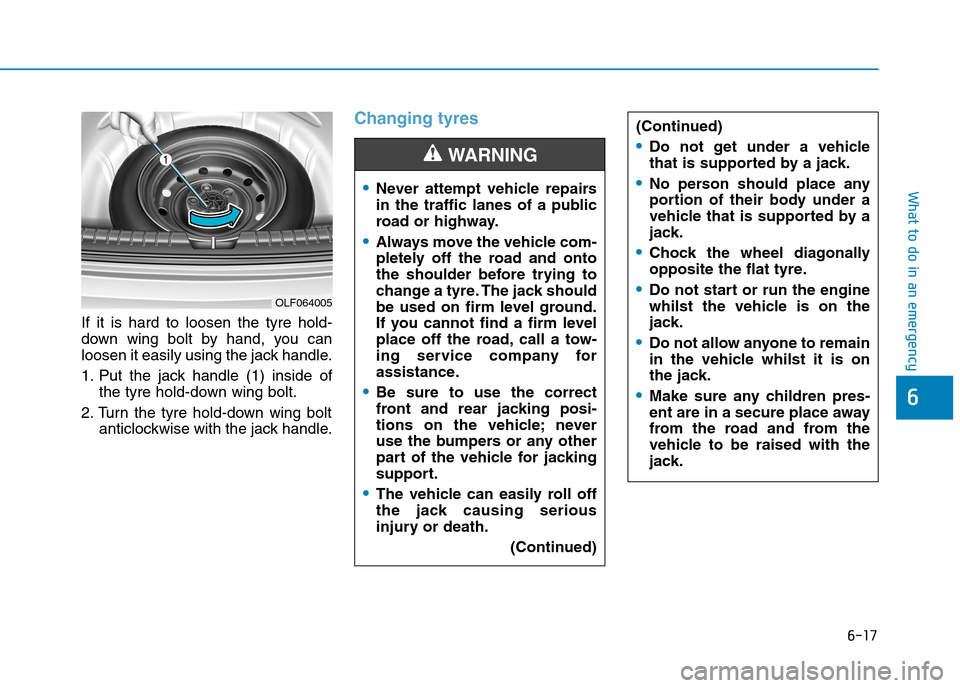
If it is hard to loosen the tyre hold-
down wing bolt by hand, you can
loosen it easily using the jack handle.
1. Put the jack handle (1) inside of
the tyre hold-down wing bolt.
2. Turn the tyre hold-down wing bolt
anticlockwise with the jack handle.
Changing tyres
OLF064005
•Never attempt vehicle repairs
in the traffic lanes of a public
road or highway.
•Always move the vehicle com-
pletely off the road and onto
the shoulder before trying to
change a tyre. The jack should
be used on firm level ground.
If you cannot find a firm level
place off the road, call a tow-
ing service company for
assistance.
•Be sure to use the correct
front and rear jacking posi-
tions on the vehicle; never
use the bumpers or any other
part of the vehicle for jacking
support.
•The vehicle can easily roll off
the jack causing serious
injury or death.
(Continued)
WA R N I N G
(Continued)
•Do not get under a vehicle
that is supported by a jack.
•No person should place any
portion of their body under a
vehicle that is supported by a
jack.
•Chock the wheel diagonally
opposite the flat tyre.
•Do not start or run the engine
whilst the vehicle is on the
jack.
•Do not allow anyone to remain
in the vehicle whilst it is on
the jack.
•Make sure any children pres-
ent are in a secure place away
from the road and from the
vehicle to be raised with the
jack.
Page 464 of 571

6-20
What to do in an emergency
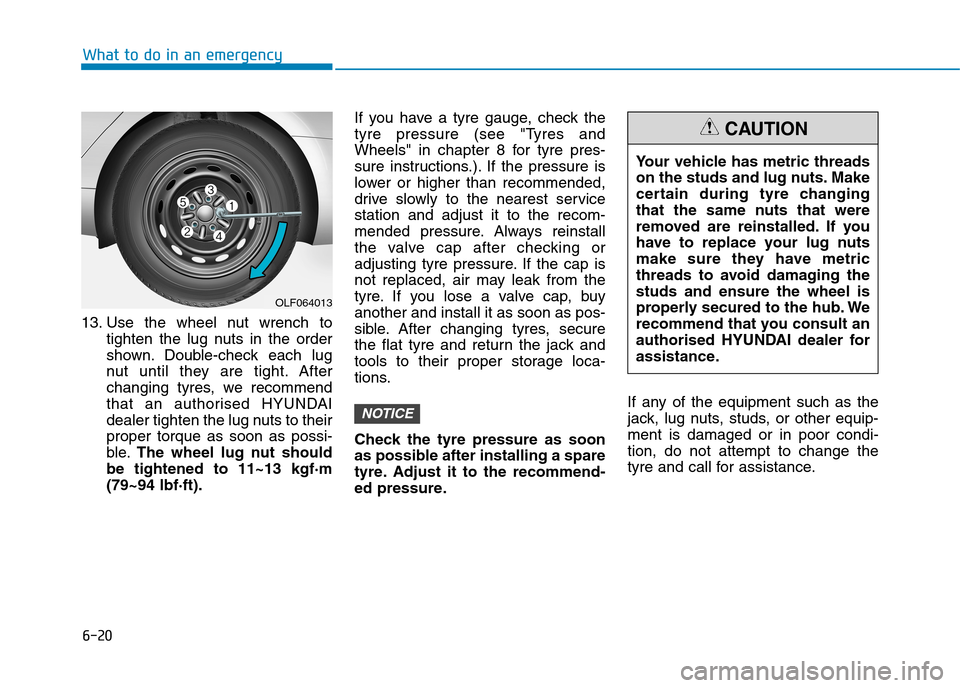
13. Use the wheel nut wrench to
tighten the lug nuts in the order
shown. Double-check each lug
nut until they are tight. After
changing tyres, we recommend
that an authorised HYUNDAI
dealer tighten the lug nuts to their
proper torque as soon as possi-
ble.The wheel lug nut should
be tightened to 11~13 kgf·m
(79~94 lbf·ft).
If you have a tyre gauge, check the
tyre pressure (see "Tyres and
Wheels" in chapter 8 for tyre pres-
sure instructions.). If the pressure is
lower or higher than recommended,
drive slowly to the nearest service
station and adjust it to the recom-
mended pressure. Always reinstall
the valve cap after checking or
adjusting tyre pressure. If the cap is
not replaced, air may leak from the
tyre. If you lose a valve cap, buy
another and install it as soon as pos-
sible. After changing tyres, secure
the flat tyre and return the jack and
tools to their proper storage loca-
tions.
Check the tyre pressure as soon
as possible after installing a spare
tyre. Adjust it to the recommend-
ed pressure.
If any of the equipment such as the
jack, lug nuts, studs, or other equip-
ment is damaged or in poor condi-
tion, do not attempt to change the
tyre and call for assistance.
NOTICE
OLF064013
Yo u r v e h i c l e h a s m e t r i c t h r e a d s
on the studs and lug nuts. Make
certain during tyre changing
that the same nuts that were
removed are reinstalled. If you
have to replace your lug nuts
make sure they have metric
threads to avoid damaging the
studs and ensure the wheel is
properly secured to the hub. We
recommend that you consult an
authorised HYUNDAI dealer for
assistance.
CAUTION