2017 HONDA RIDGELINE traction control
[x] Cancel search: traction controlPage 4 of 85

| 1
V
ISUAL INDEX
uDoor mirror controls p. 48
vECON button p. 110
wLights p. 38
Turn signals p. 39
LaneWatch button* p. 114
xInstrument panel p. 26
Multi-information display (MID) p. 30
yBrightness control p. 38
zWipers/washers p. 41
u v w x
y z
VISUAL INDEX
Quickly locate items in the vehicle’s interior.
Steering Wheel and Nearby Controls
DRIVING....................................................................... 97
Before Driving ......................................................... 97
Maximum Load Limit .............................................. 99
Towing a Trailer .................................................... 101
Remote Engine Start* ........................................... 105
Starting to Drive .................................................... 106
Shifting .................................................................... 107
Braking ................................................................... 108
Intelligent Traction Management System ........ 109
Eco Assist System ................................................. 110
Vehicle Stability Assist (VSA®) .......................... 110
Cruise Control* ...................................................... 111
Adaptive Cruise Control (ACC)* ......................... 112
LaneWatch™* ......................................................... 114
Lane Keeping Assist System (LKAS)* ............... 115
Road Departure Mitigation (RDM)* ................... 116Collision Mitigation Braking System™ (CMBS™)* 117
Parking Sensor System* ...................................... 118
Blind Spot Information (BSI)* ............................. 119
Cross Traffic Monitor* .......................................... 120
Multi-View Rear Camera..................................... 121
Refueling
................................................................ 122
HANDLING THE UNEXPECTED
.............................. 125
Smart Entry Remote Battery Strength ............... 125
Shift Lever Does Not Move ................................. 125
Jump Starting ........................................................ 126
Overheating ............................................................ 127
Emergency Engine Stop ....................................... 128
Emergency Towing ............................................... 128
Tire Pressure Monitoring System (TPMS)........ 129
Changing a Flat Tire
.............................................. 131
Fuse Locations
....................................................... 134MAINTENANCE
........................................................
137
Safety Precautions ............................................... 137
Maintenance Minder™ ........................................ 138
Under the Hood ...................................................... 140
Engine Oil ............................................................... 142
Engine Coolant ...................................................... 144
Checking the Battery ............................................ 145
Window Washer Fluid ......................................... 145
Brake Fluid ............................................................. 145
Changing Wiper Blades ....................................... 146
Tire Information ..................................................... 147
Tire Labeling .......................................................... 150
DOT Tire Quality Grading..................................... 151
T
esting of Readiness Codes
................................ 153
SPECIFICATIONS...................................................... 154 CUSTOMER INFORMA
TION
................................... 156
Frequently Asked Questions/Troubleshooting 156
Contact Us .............................................................. 157
Honda Roadside Assistance ............................... 158
Warranty Coverages ............................................. 158
EPA Contact Information...................................... 158
VOICE COMMAND INDEX
...................................... 159
INDEX
........................................................................\
. 161
*if equipped
Page 5 of 85

VISUAL INDEX
2 || 3
V
ISUAL INDEX
Dashboard and Nearby Controls
u v w x y z
uVehicle Stability Assist (VSA®) OFF
button p. 110
Parking sensor system button* p. 118
Collision Mitigation Braking System
(CMBS) OFF button* p. 117
Road Departure Mitigation (RDM)
button* p. 116
Heated windshield button* p. 52
AC power outlet button* p. 34
Bed light button p. 39
vAudio controls p. 56
wHeated steering wheel button* p. 52
xVoice recognition button p. 80, p. 90
Phone/Back buttons p. 80
yHorn
zINFO/RESET buttons p. 30
Lane Keeping Assist System (LKAS)*
button p. 115
Cruise control* p. 111
Adaptive Cruise Control (ACC)* p. 112
}ENGINE START/STOP button p. 106
uPower window switches p. 36
Door lock switches p. 35
vDriving Position Memory System* p. 47
wFuel fill door button p. 123
xColor audio system* p. 60
Touchscreen* p. 65
Navigation system* p. 90
ySeat heater/ventilation buttons* p. 53
zClimate control system p. 51
Hood release handle p. 140
Parking brake p. 108
}Shifter p. 107
Intelligent Traction Management
button p. 109
~USB port p. 56
Accessory power socket p. 57
AUX input (in console) p. 57
u v w x y z
} ~
*if equipped *if equipped
}
Page 36 of 85

AUDIO AND CONNECTIVITY
64 || 65
A
UDIO AND CONNECTIVITY
Bluetooth® Audio
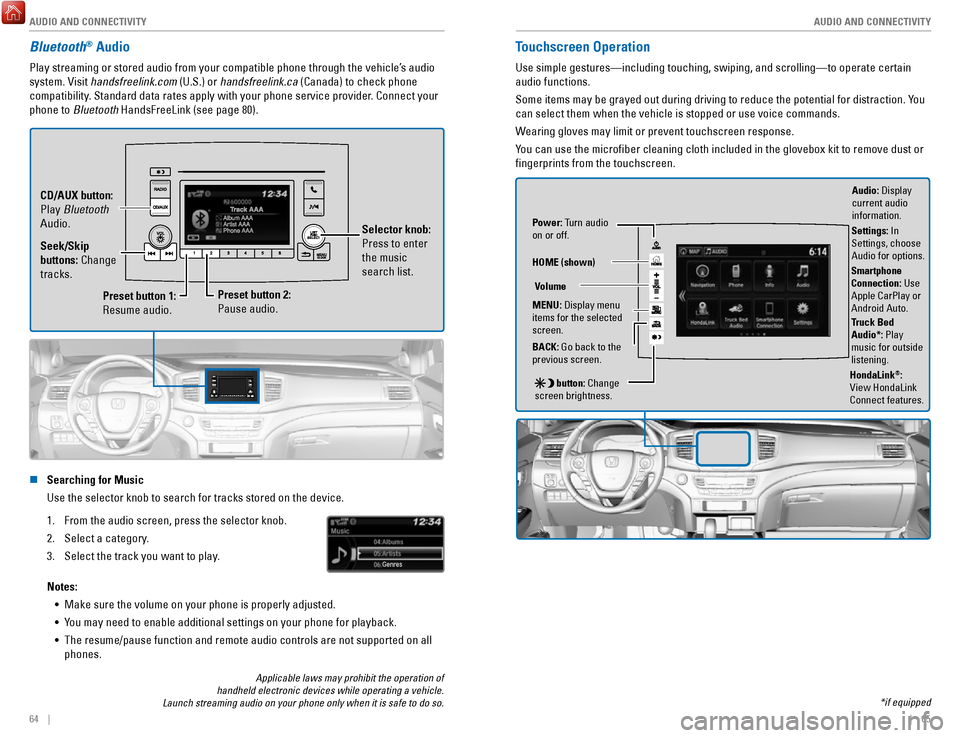
Play streaming or stored audio from your compatible phone through the ve\
hicle’s audio
system. Visit handsfreelink.com (U.S.) or handsfreelink.ca (Canada) to check phone
compatibility. Standard data rates apply with your phone service provider. Connect your
phone to Bluetooth HandsFreeLink (see page 80).
Preset button 1:
Resume audio.
Preset button 2:
Pause audio. Selector knob:
Press to enter
the music
search list.
Seek/Skip
buttons: Change
tracks. CD/AUX button:
Play Bluetooth
Audio.
n Searching for Music
Use the selector knob to search for tracks stored on the device.
1.
From the audio screen, press the selector knob.
2.
Select a category.
3.
Select the track you want to play.
Notes: •
Make sure the volume on your phone is properly adjusted.
•
You may need to enable additional settings on your phone for playback.
•
The resume/pause function and remote audio controls are not supported on\
all
phones.
Touchscreen Operation
Use simple gestures—including touching, swiping, and scrolling—to \
operate certain
audio functions.
Some items may be grayed out during driving to reduce the potential for \
distraction. You
can select them when the vehicle is stopped or use voice commands.
Wearing gloves may limit or prevent touchscreen response.
You can use the microfiber cleaning cloth included in the glovebox kit \
to remove dust or
fingerprints from the touchscreen.
Power: Turn audio
on or off.
HOME (shown)
MENU: Display menu
items for the selected
screen.
BACK: Go back to the
previous screen.
button: Change
screen brightness. Settings: In
Settings, choose
Audio for options.
HondaLink®:
View HondaLink
Connect features.
Volume
Truck Bed
Audio*: Play
music for outside
listening.
Applicable laws may prohibit the operation of
handheld electronic devices while operating a vehicle.
Launch streaming audio on your phone only when it is safe to do so. *if equipped
Audio: Display
current audio
information.
Smartphone
Connection: Use
Apple CarPlay or
Android Auto.
Page 44 of 85

80 || 81
BLUETOOTH® HANDSFREELINK® (HFL)
Learn how to operate the vehicle’s hands-free calling system.
Color Audio System
Basic HFL Operation
Make and receive phone calls using the vehicle’s audio system, without handling your
phone. Visit handsfreelink.com (U.S.) or handsfreelink.ca (Canada) to check phone
compatibility.
To reduce the potential for driver distraction, certain manual functions \
may be
inoperable or grayed out while the vehicle is moving. Stop or pull over \
to perform
the function.
n
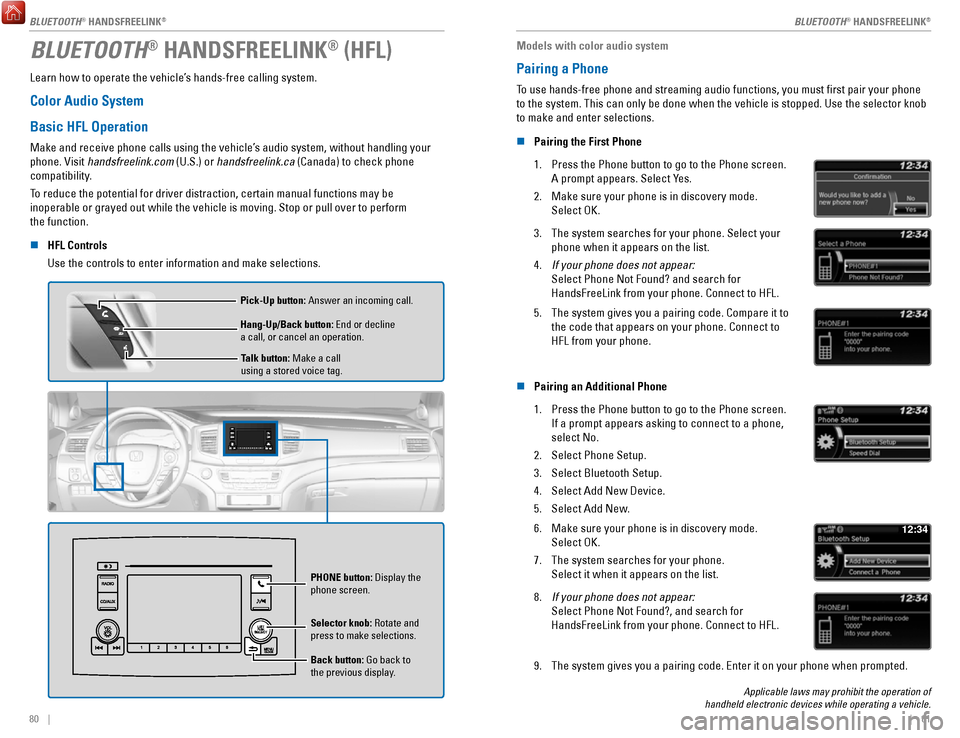
HFL Controls
Use the controls to enter information and make selections.
Talk button: Make a call
using a stored voice tag.
Hang-Up/Back button: End or decline
a call, or cancel an operation. Pick-Up button: Answer an incoming call.
Selector knob: Rotate and
press to make selections.
Back button: Go back to
the previous display. PHONE
button: Display the
phone screen.
Models with color audio system
Pairing a Phone
To use hands-free phone and streaming audio functions, you must first p\
air your phone
to the system. This can only be done when the vehicle is stopped. Use th\
e selector knob
to make and enter selections.
n
Pairing the First Phone
1.
Press the Phone button to go to the Phone screen.
A prompt appears. Select Yes.
2.
Make sure your phone is in discovery mode.
Select OK.
3. The system searches for your phone. Select your
phone when it appears on the list.
4.
If your phone does not appear:
Select Phone Not Found? and search for
HandsFreeLink from your phone. Connect to HFL.
5. The system gives you a pairing code. Compare it to
the code that appears on your phone. Connect to
HFL from your phone.
n Pairing an Additional Phone
1.
Press the Phone button to go to the Phone screen.
If a prompt appears asking to connect to a phone,
select No.
2.
Select Phone Setup.
3.
Select Bluetooth Setup.
4.
Select Add New Device.
5.
Select Add New.
6. Make sure your phone is in discovery mode.
Select OK.
7.
The system searches for your phone.
Select it when it appears on the list.
12:34
8. If your phone does not appear:
Select Phone Not Found?, and search for
HandsFreeLink from your phone. Connect to HFL.
9. The system gives you a pairing code. Enter it on your phone when prompte\
d.
Applicable laws may prohibit the operation of
handheld electronic devices while operating a vehicle.
BLUETOOTH® HANDSFREELINK®
BLUETOOTH® HANDSFREELINK®
BLUETOOTH® HANDSFREELINK®
Page 45 of 85

82 || 83
Models with color audio system
Making a Call
You can make a call using several methods.
n
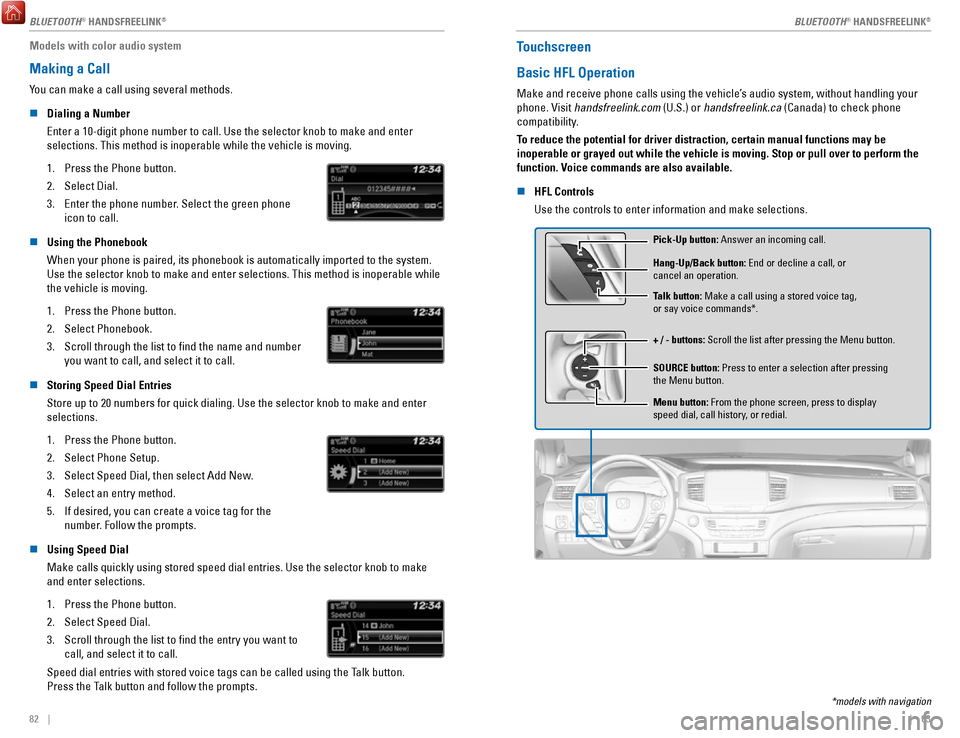
Dialing a Number
Enter a 10-digit phone number to call. Use the selector knob to make and\
enter
selections. This method is inoperable while the vehicle is moving.
1.
Press the Phone button.
2.
Select Dial.
3.
Enter the phone number. Select the green phone
icon to call.
n Using the Phonebook
When your phone is paired, its phonebook is automatically imported to th\
e system.
Use the selector knob to make and enter selections. This method is inope\
rable while the vehicle is moving.
1.
Press the Phone button.
2.
Select Phonebook.
3.
Scroll through the list to find the name and number
you want to call, and select it to call.
n Storing Speed Dial Entries
Store up to 20 numbers for quick dialing. Use the selector knob to make \
and enter selections.
1.
Press the Phone button.
2.
Select Phone Setup.
3.
Select Speed Dial, then select Add New.
4.
Select an entry method.
5.
If desired, you can create a voice tag for the
number. Follow the prompts.
n Using Speed Dial
Make calls quickly using stored speed dial entries. Use the selector kno\
b to make
and enter selections.
1.
Press the Phone button.
2.
Select Speed Dial.
3.
Scroll through the list to find the entry you want to
call, and select it to call.
Speed dial entries with stored voice tags can be called using the Talk button.
Press the Talk button and follow the prompts.
Touchscreen
Basic HFL Operation
Make and receive phone calls using the vehicle’s audio system, without handling your
phone. Visit handsfreelink.com (U.S.) or handsfreelink.ca (Canada) to check phone
compatibility.
To reduce the potential for driver distraction, certain manual functions \
may be
inoperable or grayed out while the vehicle is moving. Stop or pull over \
to perform the
function. Voice commands are also available.
n
HFL Controls
Use the controls to enter information and make selections.
Pick-Up button: Answer an incoming call.
+ / - buttons: Scroll the list after pressing the Menu button. Hang-Up/Back button: End or decline a call, or
cancel an operation.
SOURCE button: Press to enter a selection after pressing
the Menu button. Talk button: Make a call using a stored voice tag,
or say voice commands*.
Menu button: From the phone screen, press to display
speed dial, call history, or redial.
*models with navigation
BLUETOOTH® HANDSFREELINK
Page 49 of 85

NAVIGATION
90 || 91
N
AVIGATION
NAVIGATION*
Learn how to enter a destination and operate the navigation system.
Basic Navigation Operation
A real-time navigation system uses GPS and a map database to show your current
location and help guide you to a desired destination. You can operate the system using
voice commands or the system controls.
To reduce the potential for driver distraction, certain manual functions \
may be
inoperable or grayed out while the vehicle is moving. Voice commands are always
available.
n
Steering Wheel Controls
Use the steering wheel controls to say voice commands.
BACK button: Press to cancel
a command or operation.
TALK button: Press to say
navigation commands.
n Talk Button Tips
•
When using the Talk button, wait for a beep before saying a command.
•
To bypass the system prompts, simply press the Talk button again to say
your command.
•
Speak in a clear, natural voice.
•
Reduce all background noise.
•
Adjust the dashboard vents away from the microphone in the ceiling.
•
Close the windows and moonroof*.
n
System Guidance Volume
Adjust the navigation system volume.
1.
From the Home screen, select Settings.
2.
Select System.
3.
Select the Sound/Beep tab.
4.
Adjust the Guidance Volume level.
5.
Press BACK to exit the menus.
*if equipped
n Navigation Display and Controls
Touch icons on the screen to enter information and make selections.
Navi: Display the
navigation screen.
BACK: Go back to
the previous display. MENU: Display
navigation options. Traffic flow
Current vehicle
position Traffic incident
icon Search icon
Map menu
MAP: Display the
map screen.
Page 55 of 85

DRIVING
102 || 103
D
RIVING
Tongue load
The weight of the tongue with a fully loaded trailer on
the hitch should be approximately:
•
Boat trailers: 5 – 15% of the total trailer weight
•
Other trailers: 10 – 15% of total trailer weight
Total load
Tongue load
Number of AWD models
occupant s2WD models
2600 lbs (272 kg)420 lbs (190 kg )
4570 lbs (259 kg)
5 390 lbs (177 kg
)
495 lbs (224 kg )3 60 lbs (163 kg)
To estimate the tongue load
Excessive tongue load reduces front tire traction and steering control. \
Too little
tongue load can make the trailer unstable and cause it to sway.
You can estimate the tongue load by measuring the trailer hitch height fr\
om the
ground in the following steps:
1.
Park the vehicle on level ground.
2.
Measure the distance between the ground and the bottom of the trailer hi\
tch.
3.
Connect the fully loaded trailer to the hitch.
4.
Measure the distance between the ground and the bottom of the trailer
hitch again.
5.
Subtract the second measurement from the first measurement, then refer\
to the
following table.
If the difference isAWD model s2WD models
1 inches (2.5 cm)150 lbs (68 kg)
1 1/2 inches (3.8 cm )250 lbs (114 kg)
2 inches (5.1 cm)350 lbs (159 kg)
2 3/8 inches (6.0 cm )450 lbs (205 kg)—
2 5/8 inches (6.7 cm )500 lbs (227 kg)—
If the difference becomes more than indicated in the table, distribute t\
he load or
remove cargo as needed. How to weigh the trailer loads using a public scale
Check each weight in the order indicated as shown. Refer to the table be\
low for
each weight’s limit except for the tongue load.
1. Front gross axle weight.
4.Gross combined weight.
2. Gr oss vehicle weight.
3. Rear gross axle weight.
5. Hitched trailer weight.
6. Unhitched trailer weight.
• If you cannot weigh the rear axle, subtract 1 from 2.
•
The maximum gross combined weight (4) decreases by 2% for every 1,000 feet
(305 m) of elevation.
•
To calculate the tongue load, subtract 5 from 6.
•
Refer to the trailer owner’s manual for additional information.
Fully load the vehicle and trailer. An attendant who watches the scale is needed as
all occupants should stay in the vehicle.
If a public scale is not available,
add the estimated weight of
your cargo load to the weight
of your trailer (as quoted by
the manufacturer), and then
measure the tongue load with
an appropriate scale or tongue
gauge or estimate it based on
cargo distribution.
Weight limit for2WD models AWD models
Front gross axle 2,734 lbs
(1,240 kg)(1,295 kg) 2,855 lbs
5,545 lbs
Gross vehicle (2,515 kg) (2,650 kg)
5,842 lbs
2,921 lbs
Rear gross axl e
(1,325 kg)(1,405 kg)3,097 lbs
8,025 lbs
Gross combined (3,640 kg) (4,425 kg)
9,755 lbs
Page 58 of 85

DRIVING
108 || 109
D
RIVING
Braking
Slow down or stop your vehicle, and keep it from moving when parked.
n
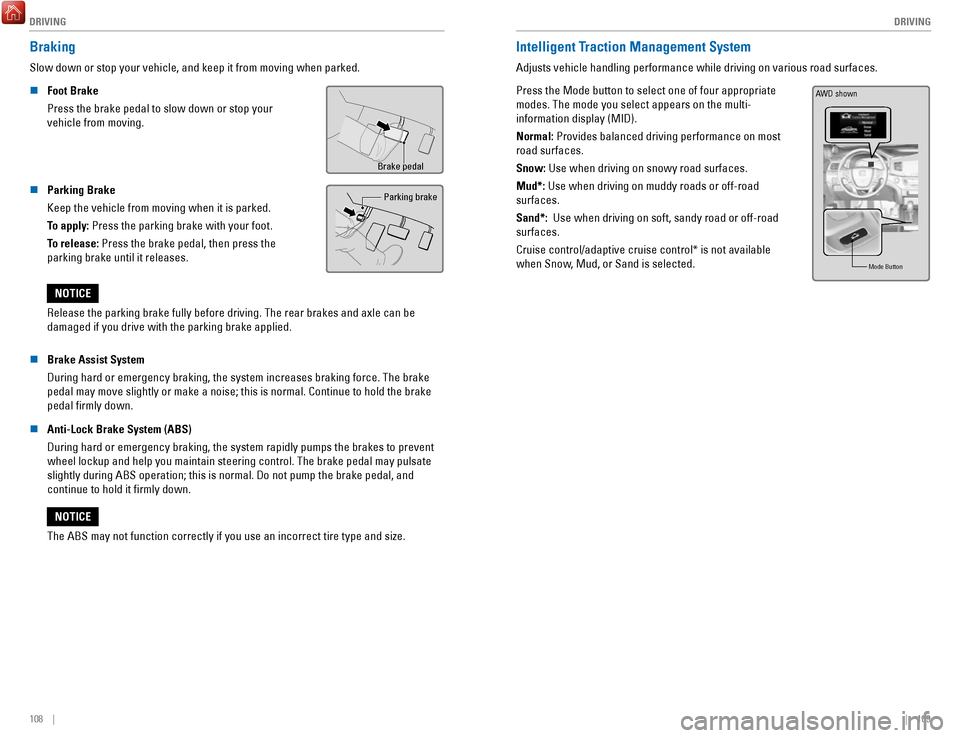
Foot Brake
Press the brake pedal to slow down or stop your
vehicle from moving.
Brake pedal
n Parking Brake
Keep the vehicle from moving when it is parked.
To apply: Press the parking brake with your foot.
To release: Press the brake pedal, then press the
parking brake until it releases. Parking brake
Release the parking brake fully before driving. The rear brakes and axle\
can be
damaged if you drive with the parking brake applied.
NOTICE
n
Brake Assist System
During hard or emergency braking, the system increases braking force. The brake
pedal may move slightly or make a noise; this is normal. Continue to hol\
d the brake
pedal firmly down.
n
Anti-Lock Brake System (ABS)
During hard or emergency braking, the system rapidly pumps the brakes to\
prevent wheel lockup and help you maintain steering control. The brake pedal may\
pulsate
slightly during ABS operation; this is normal. Do not pump the brake ped\
al, and
continue to hold it firmly down.
The ABS may not function correctly if you use an incorrect tire type and\
size.
NOTICE
Intelligent Traction Management System
Adjusts vehicle handling performance while driving on various road surfa\
ces.
Press the Mode button to select one of four appropriate
modes. The mode you select appears on the multi-
information display (MID).
Normal: Provides balanced driving performance on most
road surfaces.
Snow: Use when driving on snowy road surfaces.
Mud*: Use when driving on muddy roads or off-road
surfaces.
Sand*: Use when driving on soft, sandy road or off-road
surfaces.
Cruise control/adaptive cruise control* is not available
when Snow, Mud, or Sand is selected.
Mode Butto n
AWD shown