2017 HONDA RIDGELINE traction control
[x] Cancel search: traction controlPage 59 of 85

DRIVING
110 || 111
D
RIVING
*if equipped
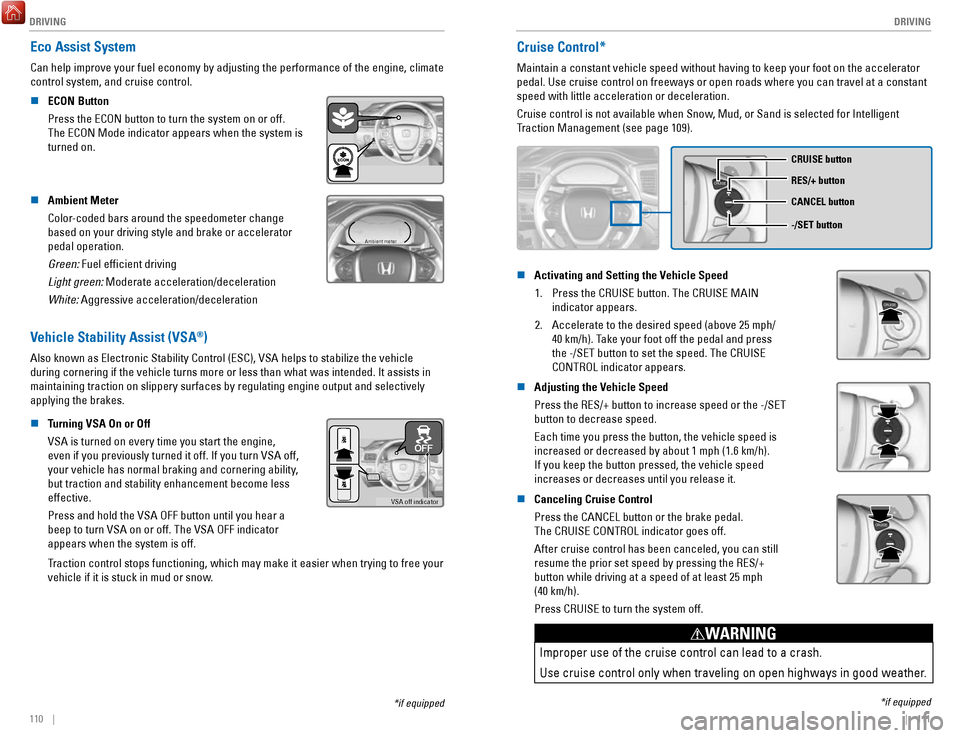
Eco Assist System
Can help improve your fuel economy by adjusting the performance of the e\
ngine, climate
control system, and cruise control.
n
ECON Button
Press the ECON button to turn the system on or off.
The ECON Mode indicator appears when the system is
turned on.
n Ambient Meter
Color-coded bars around the speedometer change
based on your driving style and brake or accelerator
pedal operation.
Green: Fuel efficient driving
Light green: Moderate acceleration/deceleration
White: Aggressive acceleration/deceleration
Ambient meter
Vehicle Stability Assist (VSA®)
Also known as Electronic Stability Control (ESC), VSA helps to stabili\
ze the vehicle
during cornering if the vehicle turns more or less than what was intende\
d. It assists in
maintaining traction on slippery surfaces by regulating engine output an\
d selectively
applying the brakes.
n
Turning VSA On or Off
VSA is turned on every time you start the engine,
even if you previously turned it off. If you turn VSA off,
your vehicle has normal braking and cornering ability,
but traction and stability enhancement become less
effective.
Press and hold the VSA OFF button until you hear a
beep to turn VSA on or off. The VSA OFF indicator
appears when the system is off.
VSA off indicator
Traction control stops functioning, which may make it easier when trying to free your
vehicle if it is stuck in mud or snow.
Cruise Control*
Maintain a constant vehicle speed without having to keep your foot on th\
e accelerator
pedal. Use cruise control on freeways or open roads where you can travel\
at a constant
speed with little acceleration or deceleration.
Cruise control is not available when Snow, Mud, or Sand is selected for Intelligent
Traction Management (see page 109).
CRUISE
CRUISE button
RES/+ button
-/SET button CANCEL button
n Activating and Setting the Vehicle Speed
1.
Press the CRUISE button. The CRUISE MAIN
indicator appears.
2.
Accelerate to the desired speed (above 25 mph/
40 km/h). Take your foot off the pedal and press
the -/SET button to set the speed. The CRUISE
CONTROL indicator appears.
CRUISE
n Adjusting the Vehicle Speed
Press the RES/+ button to increase speed or the -/SET
button to decrease speed.
Each time you press the button, the vehicle speed is
increased or decreased by about 1 mph (1.6 km/h).
If you keep the button pressed, the vehicle speed
increases or decreases until you release it.
n Canceling Cruise Control
Press the CANCEL button or the brake pedal.
The CRUISE CONTROL indicator goes off.
After cruise control has been canceled, you can still
resume the prior set speed by pressing the RES/+
button while driving at a speed of at least 25 mph
(40 km/h).
Press CRUISE to turn the system off.
CRUISE
Improper use of the cruise control can lead to a crash.
Use cruise control only when traveling on open highways in good weather.
WARNING
*if equipped
Page 60 of 85

DRIVING
112 || 113
D
RIVING
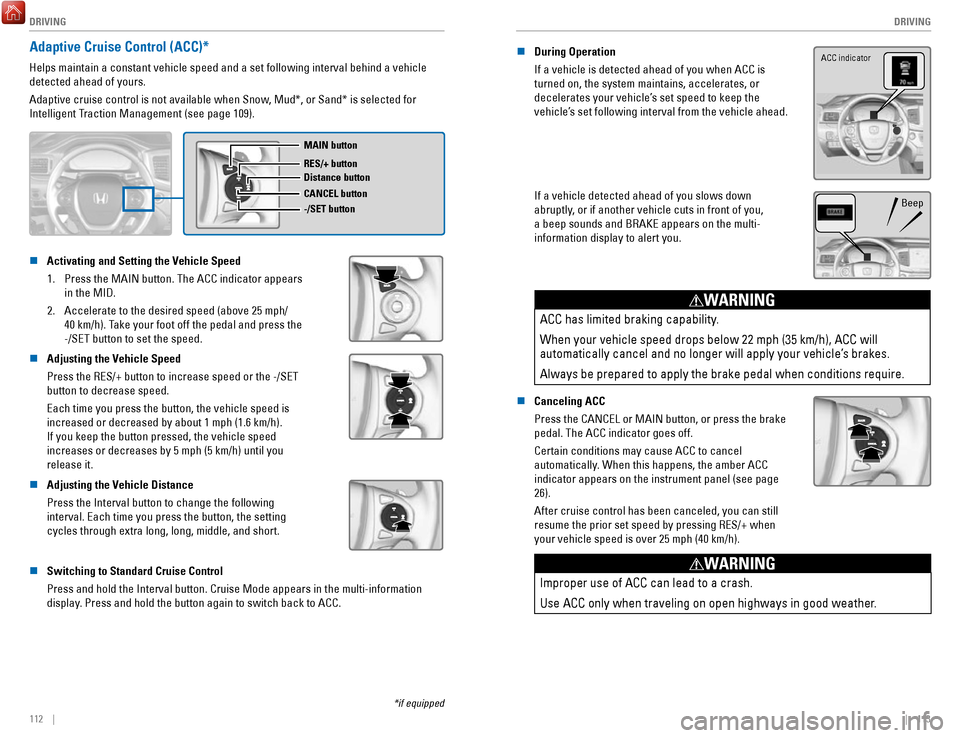
Adaptive Cruise Control (ACC)*
Helps maintain a constant vehicle speed and a set following interval beh\
ind a vehicle
detected ahead of yours.
Adaptive cruise control is not available when Snow, Mud*, or Sand* is selected for
Intelligent Traction Management (see page 109).
MAIN button
RES/+ button
CANCEL button
-/SET button Distance button
n Activating and Setting the Vehicle Speed
1.
Press the MAIN button. The ACC indicator appears
in the MID.
2.
Accelerate to the desired speed (above 25 mph/
40 km/h). Take your foot off the pedal and press the
-/SET button to set the speed.
n Adjusting the Vehicle Speed
Press the RES/+ button to increase speed or the -/SET
button to decrease speed.
Each time you press the button, the vehicle speed is
increased or decreased by about 1 mph (1.6 km/h).
If you keep the button pressed, the vehicle speed
increases or decreases by 5 mph (5 km/h) until you
release it.
n Adjusting the Vehicle Distance
Press the Interval button to change the following
interval. Each time you press the button, the setting
cycles through extra long, long, middle, and short.
n Switching to Standard Cruise Control
Press and hold the Interval button. Cruise Mode appears in the multi-inf\
ormation
display. Press and hold the button again to switch back to ACC.
*if equipped
n During Operation
If a vehicle is detected ahead of you when ACC is
turned on, the system maintains, accelerates, or
decelerates your vehicle’s set speed to keep the
vehicle’s set following interval from the vehicle ahead. ACC indicator
If a vehicle detected ahead of you slows down
abruptly, or if another vehicle cuts in front of you,
a beep sounds and BRAKE appears on the multi-
information display to alert you.Beep
ACC has limited braking capability.
When your vehicle speed drops below 22 mph (35 km/h), ACC will
automatically cancel and no longer will apply your vehicle’s brakes.
Always be prepared to apply the brake pedal when conditions require.
WARNING
n Canceling ACC
Press the CANCEL or MAIN button, or press the brake
pedal. The ACC indicator goes off.
Certain conditions may cause ACC to cancel
automatically. When this happens, the amber ACC
indicator appears on the instrument panel (see page
26).
After cruise control has been canceled, you can still
resume the prior set speed by pressing RES/+ when
your vehicle speed is over 25 mph (40 km/h).
Improper use of ACC can lead to a crash.
Use ACC only when traveling on open highways in good weather.
WARNING
Page 79 of 85

MAINTENANCE
150 || 151
M
AINTENANCE
Tire Labeling
The tires that came on your vehicle have a number of markings. Those you\
should be aware of are described below.
Here is an example of what each marking means:
P235/60R18 102V
•
P: vehicle type (P indicates passenger vehicle)
•
235: tire width in millimeters
•
60: aspect ratio (tire section height as a
percentage of its width)
•
R: tire construction code (radial)
•
18: rim diameter in inches
•
102: load index (code indicating maximum load
tire can carry)
•
V: speed symbol (code indicating maximum
speed rating)
Tire size
Tire
identi�cation
number (TIN)
Maximum
tire load
Maximum
tire pressure
Tire size
n Tire Identification Number (TIN)
The tire identification number
(TIN) is a group of numbers and
letters that look like the example
below. TIN is located on the
sidewall of the tire.DOT B97R FW6X 2209
DOT: This indicates that the tire meets all
requirements of the U.S. Department of
Transportation.
B97R: Manufacturer’s identi�cation mark
FW6X: Tire type code
22 09: Date of Transportation
Year
Week
n Glossary of Tire Terminology
Cold Tire Pressure – The tire air pressure when the vehicle has been parked
for at least three hours or driven less than 1 mile (1.6 km).
Load Rating –
The maximum load that a tire is rated to carry for a given
inflation pressure.
Maximum Inflation Pressure – The maximum tire air pressure that the tire
can hold.
Maximum Load Rating – The load rating for a tire at the maximum
permissible inflation pressure for that tire.
Recommended Inflation Pressure – The cold tire inflation pressure
recommended by the manufacturer.
Treadwear Indicators (TWI) – The projections within the principal grooves
designed to give a visual indication of the degrees of wear of the tread\
.
DOT Tire Quality Grading
The tires on your vehicle meet all U.S. Federal Safety Requirements. All\
tires are also
graded for treadwear, traction, and temperature performance according to Department
of Transportation (DOT) standards. The following explains these gradings.
n
Uniform Tire Quality Grading
Quality grades can be found where applicable on the tire sidewall betwee\
n tread
shoulder and maximum section width.
For example:
Treadwear 200
Traction AA
Temperature A
All passenger car tires must conform to Federal Safety Requirements in a\
ddit
ion to
these grades.
n
Treadwear
The treadwear grade is a comparative rating based on the wear rate of th\
e tire
when tested under controlled conditions on a specified government test\
course. For
example, a tire graded 150 would wear one and one-half (1 1/2) times a\
s well on the
government course as a tire graded 100. The relative performance of tire\
s depends
upon the actual conditions of their use, however, and may depart significantly from
the norm due to variations in driving habits, service practices, and dif\
ferences
in
road characteristics and climate.
n
Traction
The traction grades, from highest to lowest, are AA, A, B, and C. Those \
grades represent the tire’s ability to stop on wet pavement as measured under controlled
conditions on specified government test surfaces of asphalt and concre\
te. A tire
marked C may have poor traction performance.
W
ARNING: The traction grade assigned to this tire is based on straight-ahead
braking traction tests, and does not include acceleration, cornering, hy\
droplaning,
or peak traction characteristics.