2017 HONDA RIDGELINE buttons
[x] Cancel search: buttonsPage 35 of 85

AUDIO AND CONNECTIVITY
62 || 63
A
UDIO AND CONNECTIVITY
USB Flash Drive
Play and operate a USB flash drive through the vehicle’s audio system. Connect your
device (see page 56).
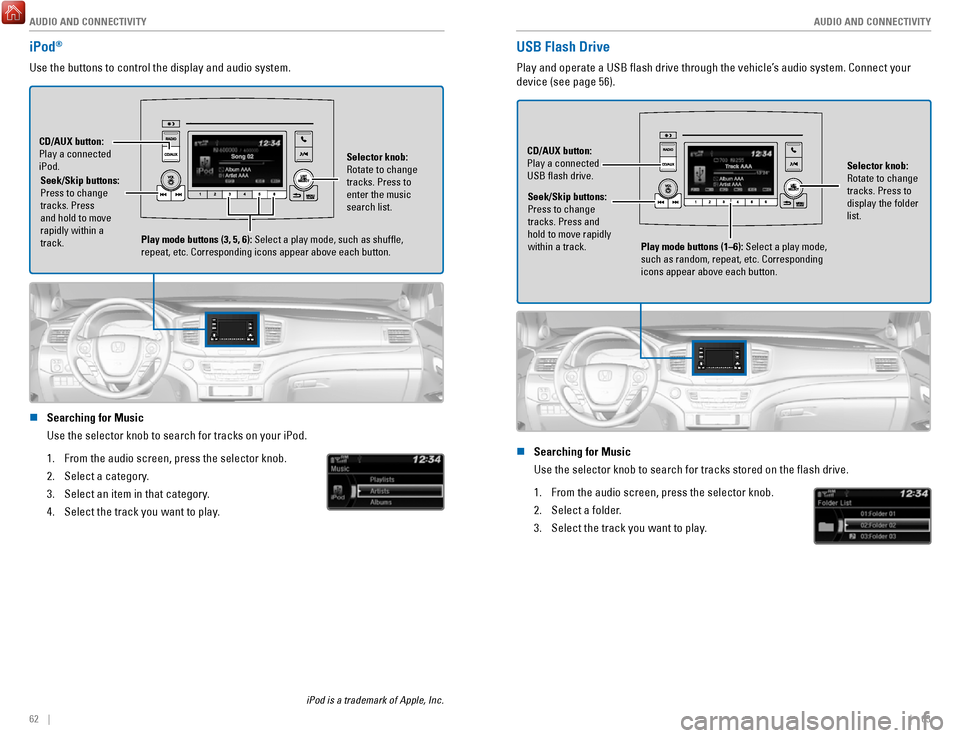
Selector knob:
Rotate to change
tracks. Press to
display the folder
list.
CD/AUX button:
Play a connected
USB flash drive.
Seek/Skip buttons:
Press to change
tracks. Press and
hold to move rapidly
within a track. Play mode buttons (1–6): Select a play mode,
such as random, repeat, etc. Corresponding
icons appear above each button.
n Searching for Music
Use the selector knob to search for tracks stored on the flash drive.
1.
From the audio screen, press the selector knob.
2.
Select a folder.
3.
Select the track you want to play.
iPod®
Use the buttons to control the display and audio system.
Seek/Skip buttons:
Press to change
tracks. Press
and hold to move
rapidly within a
track.
CD/AUX button:
Play a connected
iPod.
Selector knob:
Rotate to change
tracks. Press to
enter the music
search list.
Play mode buttons (3, 5, 6): Select a play mode, such as shuffle,
repeat, etc. Corresponding icons appear above each button.
n Searching for Music
Use the selector knob to search for tracks on your iPod.
1.
From the audio screen, press the selector knob.
2.
Select a category.
3.
Select an item in that category.
4.
Select the track you want to play.
iPod is a trademark of Apple, Inc.
Page 36 of 85

AUDIO AND CONNECTIVITY
64 || 65
A
UDIO AND CONNECTIVITY
Bluetooth® Audio
Play streaming or stored audio from your compatible phone through the ve\
hicle’s audio
system. Visit handsfreelink.com (U.S.) or handsfreelink.ca (Canada) to check phone
compatibility. Standard data rates apply with your phone service provider. Connect your
phone to Bluetooth HandsFreeLink (see page 80).
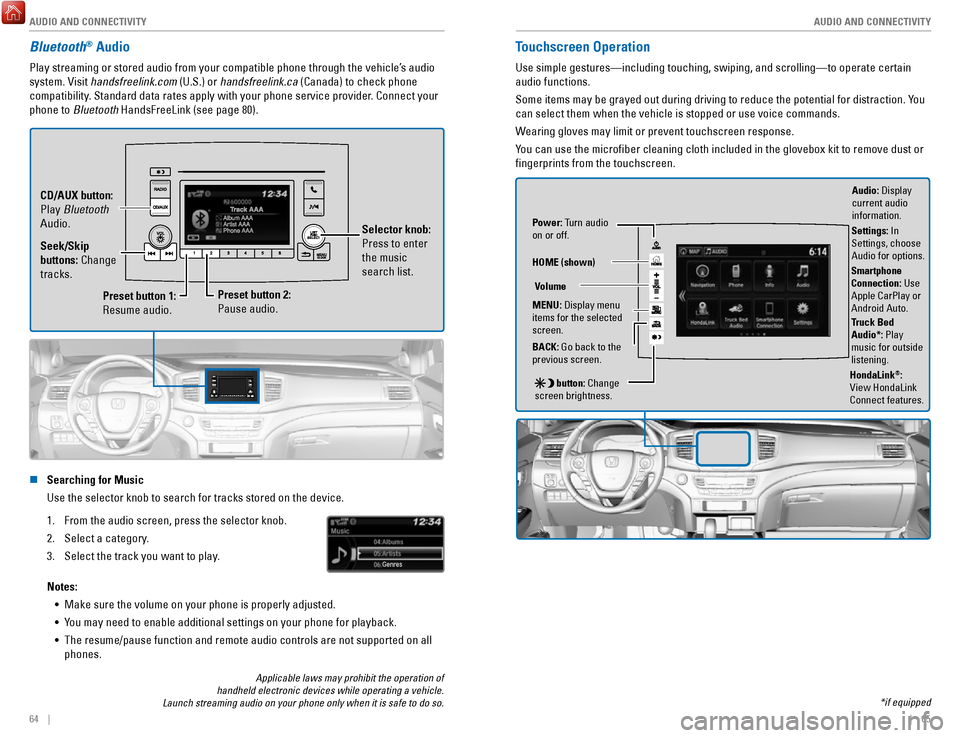
Preset button 1:
Resume audio.
Preset button 2:
Pause audio. Selector knob:
Press to enter
the music
search list.
Seek/Skip
buttons: Change
tracks. CD/AUX button:
Play Bluetooth
Audio.
n Searching for Music
Use the selector knob to search for tracks stored on the device.
1.
From the audio screen, press the selector knob.
2.
Select a category.
3.
Select the track you want to play.
Notes: •
Make sure the volume on your phone is properly adjusted.
•
You may need to enable additional settings on your phone for playback.
•
The resume/pause function and remote audio controls are not supported on\
all
phones.
Touchscreen Operation
Use simple gestures—including touching, swiping, and scrolling—to \
operate certain
audio functions.
Some items may be grayed out during driving to reduce the potential for \
distraction. You
can select them when the vehicle is stopped or use voice commands.
Wearing gloves may limit or prevent touchscreen response.
You can use the microfiber cleaning cloth included in the glovebox kit \
to remove dust or
fingerprints from the touchscreen.
Power: Turn audio
on or off.
HOME (shown)
MENU: Display menu
items for the selected
screen.
BACK: Go back to the
previous screen.
button: Change
screen brightness. Settings: In
Settings, choose
Audio for options.
HondaLink®:
View HondaLink
Connect features.
Volume
Truck Bed
Audio*: Play
music for outside
listening.
Applicable laws may prohibit the operation of
handheld electronic devices while operating a vehicle.
Launch streaming audio on your phone only when it is safe to do so. *if equipped
Audio: Display
current audio
information.
Smartphone
Connection: Use
Apple CarPlay or
Android Auto.
Page 45 of 85

82 || 83
Models with color audio system
Making a Call
You can make a call using several methods.
n
Dialing a Number
Enter a 10-digit phone number to call. Use the selector knob to make and\
enter
selections. This method is inoperable while the vehicle is moving.
1.
Press the Phone button.
2.
Select Dial.
3.
Enter the phone number. Select the green phone
icon to call.
n Using the Phonebook
When your phone is paired, its phonebook is automatically imported to th\
e system.
Use the selector knob to make and enter selections. This method is inope\
rable while the vehicle is moving.
1.
Press the Phone button.
2.
Select Phonebook.
3.
Scroll through the list to find the name and number
you want to call, and select it to call.
n Storing Speed Dial Entries
Store up to 20 numbers for quick dialing. Use the selector knob to make \
and enter selections.
1.
Press the Phone button.
2.
Select Phone Setup.
3.
Select Speed Dial, then select Add New.
4.
Select an entry method.
5.
If desired, you can create a voice tag for the
number. Follow the prompts.
n Using Speed Dial
Make calls quickly using stored speed dial entries. Use the selector kno\
b to make
and enter selections.
1.
Press the Phone button.
2.
Select Speed Dial.
3.
Scroll through the list to find the entry you want to
call, and select it to call.
Speed dial entries with stored voice tags can be called using the Talk button.
Press the Talk button and follow the prompts.
Touchscreen
Basic HFL Operation
Make and receive phone calls using the vehicle’s audio system, without handling your
phone. Visit handsfreelink.com (U.S.) or handsfreelink.ca (Canada) to check phone
compatibility.
To reduce the potential for driver distraction, certain manual functions \
may be
inoperable or grayed out while the vehicle is moving. Stop or pull over \
to perform the
function. Voice commands are also available.
n
HFL Controls
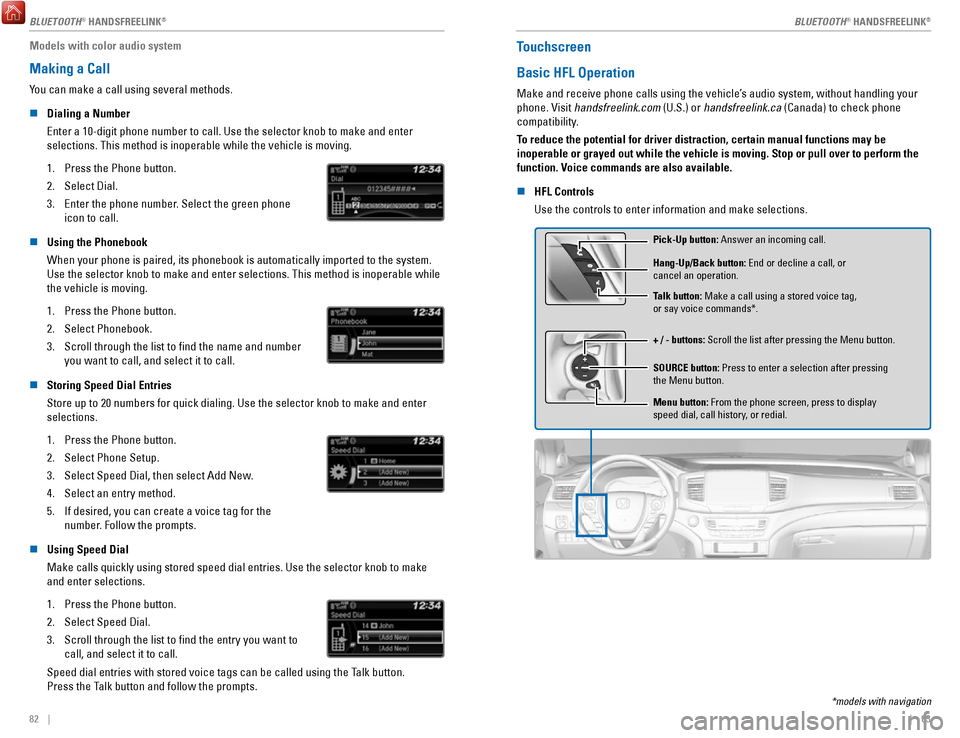
Use the controls to enter information and make selections.
Pick-Up button: Answer an incoming call.
+ / - buttons: Scroll the list after pressing the Menu button. Hang-Up/Back button: End or decline a call, or
cancel an operation.
SOURCE button: Press to enter a selection after pressing
the Menu button. Talk button: Make a call using a stored voice tag,
or say voice commands*.
Menu button: From the phone screen, press to display
speed dial, call history, or redial.
*models with navigation
BLUETOOTH® HANDSFREELINK
Page 75 of 85

MAINTENANCE
142 || 143
M
AINTENANCE
Engine Oil
Park the vehicle on level ground, and wait approximately three minutes after turning the
engine off before you check the oil.
n
Checking the Oil
1.
Remove the dipstick (orange).
2.
Wipe the dipstick with a clean cloth or paper
towel.
3.
Insert the dipstick back all the way into its hole.
4.
Remove the dipstick again, and check the level.
It should be between the upper and lower marks.
Add oil if necessary.
Upper mark
Lower mark
n Recommended Engine Oil •
Genuine Honda Motor Oil
•
Premium-grade 0W-20 detergent oil with
an API Certification Seal on the container
This seal indicates the oil is energy conserving and
that it meets the American Petroleum Institute’s latest
requirements.
Use Honda Genuine Motor Oil or another commercial
engine oil of suitable viscosity for the ambient
temperature as shown.
Ambient temperatureAmbient temperature
You may also use synthetic motor oil if it is labeled with the API Certifi\
cation Seal
and is of the specified viscosity grade. n
Adding Oil
1.
Unscrew and remove the engine oil fill cap.
2.
Add oil slowly.
3.
Reinstall the engine oil fill cap, and tighten it
securely.
4.
Wait for three minutes and recheck the engine
oil dipstick.Engine oil �ll cap
Do not fill the engine oil above the upper mark. Overfilling the eng\
ine oil can result in
leaks and engine damage.
NOTICE
n
Resetting the Engine Oil Life
If you change or replace the vehicle’s engine oil yourself, you must reset the engine
oil life. Use the steering wheel buttons to operate the menu.
1.
Use the Info (/) buttons to scroll to the Vehicle
Settings menu. Press the RESET button to enter
the menu.
2.
Scroll to Maintenance Info, and select it.
3.
Press and hold the RESET button to enter the oil life
reset mode.
4.
Select Reset. The maintenance codes disappear,
and the engine oil life returns to 100%.
Failure to reset the engine oil life after a maintenance service results\
in the system
showing incorrect maintenance intervals, which can lead to serious mecha\
nical
problems.
NOTICE