Page 17 of 78

26 || 27
I NSTRUMENT P
ANELI
NSTRUMENT P
ANEL
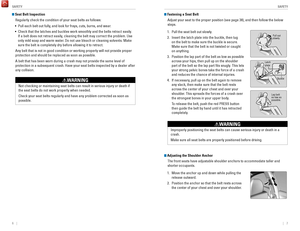
Condition Indicators
These indicators may require you to perform an action.
Parking brake
Release the parking brake before driving. You will hear a beep if you drive
with it not fully released.
Seat belt reminder
Make sure seat belts are fastened for you and all passengers. The indica\
tor
blinks and beeps sound continuously if you or your front passenger has not
fastened your seat belts when you begin driving. If the indicator remain\
s on
after seat belts are fastened, see your dealer.
Door/tailgate open
A door or the tailgate is open.
Low fuel
Refuel as soon as possible. If the indicator blinks, there is a problem \
with the
fuel gauge. See your dealer.
Low tire pressure
Stop in a safe place, check tire pressures, and inflate tire(s) if n\
ecessary. If
the indicator remains on after tire inflation, you need to calibrate t\
he system
(see page 107). The indicator also appears if your vehicle is fitted\
with the
compact spare tire. Have your regular tire repaired or replaced as soon \
as
possible.
Lane Departure Warning (LDW)* (Canadian models only)
(Blinks) Take appropriate action to keep the vehicle within the lane.
Canada
U.S.
*if equipped
Washer fluid level (Canadian models only)
Washer fluid is low. Refill the reservoir (see page 125).
Brake depress
•
During automatic brake hold operation, the automatic brake hold button i\
s
pressed without pressing the brake pedal. Make sure you press the brake \
pedal.
•
(Blinks) Automatic brake hold is canceled during operation. Immediatel\
y
press the brake pedal.
Forward Collision W
arning (FCW)* (Canadian models only)
(Blinks) The system detects a likely collision with a vehicle in front\
of you,
and a beep sounds. Take appropriate action to prevent a collision.
Maintenance Minder
™
Scheduled maintenance for your vehicle is due.
Immobilizer
Your key or remote transmitter cannot be recognized by the vehicle. If th\
e
indicator blinks, you may not be able to start the engine. Turn the vehicle off,
and then on again. If it continues to blink, there may be a problem with\
the
system. See your dealer.
CV T models
MT models
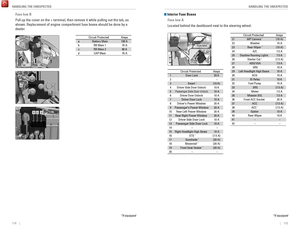
On/Off Indicators
These indicators remind you when an item is on or off.
VSA off
VSA on (blinks)
CRUISE
MAIN on
CRUISE
CONTROL on
Turn signals/hazards on
Fog lights* on
High beams on Exterior lights on
ECON mode* on
Brake hold system on
Brake hold activated
Electric parking brake on
FCW* off
LDW* off
U.S.
Canada
U.S.
Canada
*if equipped
Page 18 of 78

28 || 29
V EHICLE C ONTROLS
I
NSTRUMENT P
ANEL
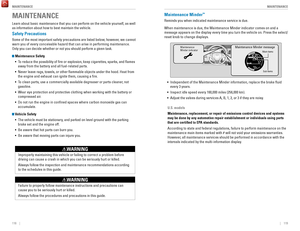
Information Display
Consists of several displays that provide you with useful information.
Press the select/reset knob to change information in the center of the d\
isplay.
Select/reset knobInstant fuel economy
Clock
Outside temperature
Fuel gauge
These items are always displayed.
Odometer
Trip meter A
Engine oil life Range
Trip meter A
Average fuel economy A Trip meter A
Average fuel economy B
Trip meter B
The meter ring illumination in the instrument panel can be changed to a \
color of your
choice. When the vehicle is in the ACCESSORY or OFF mode and the meter r\
ing is
illuminated, press the select/reset knob to cycle through various color \
options. Learn about the various controls necessary for operating and driving the\
vehicle.
Using the Key or Remote Transmitter
Lock or unlock the doors and tailgate.
VEHICLE CONTROLS
*if equipped
Leaving the key or remote transmitter in the vehicle can result in theft\
or
accidental movement of the vehicle. Always take it with you whenever you\
leave
the vehicle unattended.
NOTICE
Unlock button: Press once
to unlock the driver’s door.
Press again to unlock all
doors and the tailgate.
Built-in key: Slide the release
knob on the back of the
transmitter and pull out the
built-in key.
Lock button: Press to lock the
doors and tailgate. Press again
for audible verification.
Panic button: Press and
hold to sound the alarm for
30 seconds. Press again to
cancel.
Release knob
Built-in key
Tailgate button: Press to
unlock the tailgate.
Page 19 of 78
 and it
is outside the vehicle and within")
30 || 31
V EHICLE C ONTROLS
V
EHICLE C ONTROLS
Smart Entry System*
When you carry the remote transmitter (for example, in a pocket or purs\
e) and it
is outside the vehicle and within range (about 32 inches or 80 cm), yo\
u can lock or
unlock the doors and tailgate without handling the transmitter.
Unlocking/Locking the Doors
To unlock: Grab the driver’s door handle when the
vehicle is off to unlock the driver’s door. Grab the
front passenger’s door handle to unlock all doors
and the tailgate.
To lock: Press the door lock button on the front
door handle when the vehicle is off. If the remote
transmitter is inside the vehicle, the doors will not
lock.
Unlocking/Locking the TailgateTo unlock: Press the tailgate release button under
the tailgate handle to unlock the tailgate. The
vehicle can be on or off.
To lock: Press the tailgate lock button to lock the
tailgate and all doors. If the remote transmitter is
inside the vehicle, the tailgate and doors will not
lock.
*if equipped
Door lock
button
Door Operation
Use several methods to lock or unlock the doors.
Using the Lock TabTo unlock: Pull the lock tab rearward. When you
unlock the door using the lock tab on the driver’s
door, only the driver’s door unlocks.
To lock: Push the lock tab forward. When you lock
the door using the lock tab on the driver’s door, all
other doors and the tailgate lock.
Using the Front Door Inner HandleWhen you pull either front door inner handle, the
door unlocks and opens.
Unlocking and opening the driver’s door from the
inner handle unlocks all the other doors.
Using the Master Door Lock SwitchTo unlock: Press the unlock side of the switch to
unlock all doors and the tailgate.
To lock: Press the lock side of the switch to lock all
doors and the tailgate.
You can use the master door lock switch to customize the door locking and\
unlocking settings. See the Owner’s Manual on the Owner Information CD or at
owners.honda.com (U.S.) or myhonda.ca (Canada) for instructions.
Childproof Door LocksThe childproof door locks prevent the rear doors
from being opened from the inside, regardless of the
position of the lock tab.
Slide the lever in the rear door to the lock position,
and close the door.
Open the door using the outer door handle.
Tailgate
release button
Lock button
Lock tabTo lock
To unlock
Inner handle
To lock
To unlock Master door
lock switch
Lock
Unlock
Page 20 of 78

32 || 33
V EHICLE C ONTROLS
V
EHICLE C ONTROLS
Tailgate Operation
Use these methods to operate the tailgate.
Opening the Tailgate
Unlock the tailgate using the remote transmitter. Press
the tailgate release button and lift up the tailgate to
open it.
Closing the TailgateGrab the inner handle and pull the tailgate down.
Push it closed from the outside.
Power Window Operation
The power windows can be opened and closed when the vehicle is on by usi\
ng the
switches on the doors. The switches on the driver’s side can be used to open and
close all the windows.
Automatic OperationTo open: Push the switch down firmly.
To close: Pull the switch up firmly.
The window opens or closes completely. To stop the
window at any time, push or pull the switch again
briefly.
Manual OperationTo open: Push the switch down lightly.
To close: Pull the switch up lightly.
Release the switch when the windows reach the desired position.
Power Window LockPush in the power window lock button so only the driver’s window can be
operated.
Tailgate
release
button
Inner handle
Off
Power window lock button Indicator
Driver’s
window
switch
On
Closing a power window on someone’s hands or fingers can cause serious
injury.
Make sure your passengers are away from the windows before closing them.
WARNING
Page 21 of 78

34 || 35
V EHICLE C ONTROLS
V
EHICLE C ONTROLS
Power Moonroof Operation*
The moonroof can be opened and closed when the vehicle is on by using th\
e switch
on the ceiling.
Automatic Operation
To open: Push the switch back firmly to the second
detent, then release.
To close: Push the switch forward firmly to the second
detent, then release.
The moonroof opens or closes completely. To stop
the moonroof at any time, push the switch briefly.
Manual OperationTo open: Push and hold the switch back to the first detent until the desired p\
osition
is reached.
To close: Push and hold the switch forward to the first detent until the desire\
d
position is reached.
Moonroof TiltTo tilt: Push the center of the switch.
To close: Push the switch forward firmly, then release.
*if equipped
Close Open
Tilt
Interior and Exterior Lights
Operate interior and exterior lights when the vehicle is on or off.
Brightness ControlAdjust instrument panel brightness when the
vehicle is on.
To brighten: Turn the knob to the right.
To dim: Turn the knob to the left.
A beep sounds when the brightness reaches
minimum or maximum.
Interior LightsChange the interior light settings using the switches
on the ceiling.
ON position (rear only): Interior lights remain on.
Door-activated position: Interior lights come on
when any of the doors are opened, the driver’s door
is unlocked, or the vehicle is turned off.
OFF position: Interior lights remain off.
Map LightsPress the front map lights to turn on or off.
Cargo Area LightsLocated on the driver’s side in the cargo area.
ON position: Cargo lights remain on.
OFF position: Cargo area lights remain off.
Off
Door-activated position Front
Off
Rear
Door-activated position
On
Opening the moonroof in below freezing temperatures or when it is covere\
d with
snow or ice can damage the moonroof panel or motor.
NOTICEClosing the moonroof on someone’s hands or fingers can cause serious injury.
Make sure your passengers are away from the moonroof before closing it.
WARNING
Select/reset knob
Model with moonroof shown
OnOff
Page 22 of 78

36 || 37
V EHICLE C ONTROLS
V
EHICLE C ONTROLS
*if equipped
One-Touch Turn Signal
Use this quick and convenient method to signal a lane change.
Lightly push the turn signal lever up or down for a
three-blink sequence.
For a continuous signal, push the lever up or down
until it locks into place.
Wiper Operation
The windshield wipers and washers can be used when the vehicle is on.
Front Wipers
Move the wiper lever up or down to the desired
position.
Headlight-Wiper Integration*When the headlights are in the AUTO position,
they automatically turn on when you operate
the front wipers several times within a certain
interval. The headlights turn off shortly after
the wipers are turned off, or if there is enough
ambient light.
Intermittent Wipers*When you move the lever to the INT position,
the wipers operate based on the wiper delay.
Adjust the wiper delay using the intermittent
time adjustment ring.
Rear WiperWhen you shift to Reverse (R) and the front
wipers are activated, the rear wiper activates
even if the switch is off.
Do not use the wipers when the windshield is dry. The windshield will get
scratched, or the rubber blades will get damaged.
In cold weather, the blades may freeze to the windshield, becoming stuck.
Operating the wipers in this condition may damage the wipers. Use the de\
froster
or heated windshield button* to warm the windshield, or manually clear the
windshield of ice and snow before turning on the wipers.
NOTICE
*if equipped
Intermittent time
adjustment ring Pull to use
washer.
MIST
OFF
INT*: Low speed intermittent
LO: Low speed wipe
HI: High speed wipe
ON
INT: Intermittent wipe
OFF
Washer
Lower speed,
fewer sweeps
Higher speed,
more sweeps
Exterior Lights Rotate the switches on the headlight lever to operate the exterior light\
s. Push the
lever forward to turn on the high beams. Return the lever to its origina\
l position for
low beams.
OFF: All exterior lights are off.
: Turn on exterior lights except headlights.
AUTO: Turn on the automatic lighting feature*.
Headlights turn on or off depending on ambient
brightness when the vehicle is on. Headlights
automatically come on after the wipers are
engaged for a certain time.
: Turn on all exterior lights including headlights.
: Turn fog lights* on or off.
High beams
Low
beams Flash
the high
beams Fog lights*
Left turn Right turn
Page 23 of 78

38 || 39
V EHICLE C ONTROLS
V
EHICLE C ONTROLS
Reclining the seat-back too far can result in serious injury or death in\
a crash.
Adjust the seat-back to an upright position, and sit well back in the se\
at.
WARNING
Adjusting the Seats
Make seat adjustments before driving to ensure the best comfort and safe\
ty.
Adjusting the Front Seats
Adjust the driver’s seat as far back as possible while
allowing you to maintain full control of the vehicle.
You should be able to sit upright and well back in the
seat, adequately press the pedals without leaning
forward, and grip the steering wheel comfortably.
The passenger’s seat should be adjusted so that it
is as far back from the front airbag in the dashboard
as possible.
The National Highway Traffic Safety Administration and Transport Canada
recommend that drivers allow at least 10 inches (25 cm) between the ce\
nter of the
steering wheel and the chest.
Move back and allow sufficient space.
Height adjustment
(Driver’s seat only) Pull up or push down
the lever to raise or lower the seat.
Seat-back angle
adjustment
Pull up the lever to
change the angle.
Horizontal position adjustment
Pull up on the bar to move the
seat, then release the bar.
Sitting improperly or out of position can result in serious injury or de\
ath in a
crash.
Always sit upright, well back in the seat, with your feet on the floor\
.
WARNING
Adjusting the Rear Seats Pull the release lever on the right to change the
angle of the right half of the seat-back. Repeat for
the left seat-back.
Floor MatsPosition the front seat floor mats properly, and
anchor them. If they are not properly positioned,
the floor mats can interfere with the front seat
functions.
Do not put additional floor mats on top of the
anchored mats.
Unlock
Lock
Sitting too close to a front airbag can result in serious injury or deat\
h if the
front airbags inflate.
Always sit as far back from the front airbags as possible while maintain\
ing
control of the vehicle.
WARNING
Release lever
Page 24 of 78

40 || 41
V EHICLE C ONTROLS
V
EHICLE C ONTROLS
Improperly positioning head restraints reduces their effectiveness and
increases the likelihood of serious injury in a crash.
Make sure head restraints are in place and positioned properly before dr\
iving.
WARNING
Failure to reinstall, or correctly reinstall, the head restraints can re\
sult in
severe injury during a crash.
Always replace the head restraints before driving.
WARNING
Adjusting the Head Restraints
Your vehicle is equipped with head restraints in all seating positions. H\
ead
restraints are most effective for protection against whiplash and other \
rear-impact
crash injuries.
The center of the back of the occupant’s head
should rest against the center of the restraint. The
tops of the occupant’s ears should be level with the
center height of the restraint.
To raise the head restraint: Pull it upward.
To lower the head restraint: Push it down while
pressing the release button.
To remove the head restraint: Pull the restraint up as
far as it will go. Then push the release button, and
pull the restraint up and out.
To reinstall a head restraint: Insert the legs back
in place, then adjust the head restraint to an
appropriate height while pressing the release button.
Pull up on the restraint to make sure it is locked in
position.
For the head restraint system to work properly:
•
Do not hang any items on the head restraints, or from the restraint legs\
.
•
Do not place any object between an occupant and the seat-back.
•
Install each restraint in its proper location.
Rear outer
seat shown
Rear Seats
Fold rear seats up or down to allow for additional storage space.
Folding Down Rear Seats1.
Store the center seat belt. Insert the latch plate
into the slot on the side of the anchor buckle.
Retract the seat belt into the holder on the ceiling
(see page 8).
2.
Lower the head restraint to its lowest position.
3.
Pull the release lever and fold down the seat-
back.
Make sure all items in the cargo area or items
extending to the rear seats are properly secured.
Loose items can fly forward if you have to brake
hard.
T
o return the seat to the original position, pull up the
seat-back to the upright position.
Folding Up Rear Seats
1.
Make sure the seat belt buckles are in their loops
on the seat.
2.
Pull up the rear seat cushion.
3.
Fold the seat leg down while pushing the seat
cushion firmly against the seat-back to lock it.
T
o return the seat to its original position, hold the
seat cushion in the upright position, and pull up the
seat leg fully. Slowly put down the seat cushion and
set the seat leg in the floor guide.
Make sure the seat is firmly secured by rocking it
forward and back.
Anchor
buckle Latch plate
Release lever
Loop
Seat leg
Seat leg
Latch
Floor guide