Page 124 of 465
123
uuOperating the Switches Around the Steering Wheel uTurn Signals
Continued
Controls
Turn Signals
The turn signals can be used when the ignition
switch is in ON
(w*1.
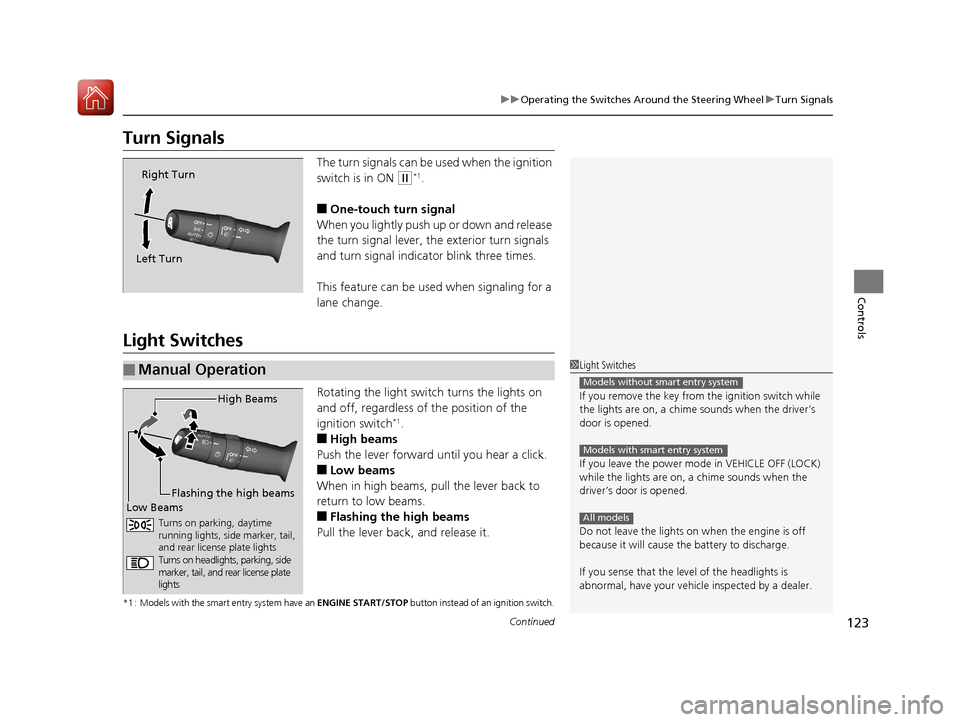
■One-touch turn signal
When you lightly push up or down and release
the turn signal lever, th e exterior turn signals
and turn signal indicator blink three times.
This feature can be used when signaling for a
lane change.
Light Switches
Rotating the light switch turns the lights on
and off, regardless of the position of the
ignition switch
*1.
■High beams
Push the lever forward until you hear a click.
■Low beams
When in high beams, pull the lever back to
return to low beams.
■Flashing the high beams
Pull the lever back, and release it.
*1 : Models with the smart entry system have an ENGINE START/STOP button instead of an ignition switch.
Right Turn
Left Turn
■Manual Operation1 Light Switches
If you remove the key from the ignition switch while
the lights are on, a chime sounds when the driver’s
door is opened.
If you leave the power mode in VEHICLE OFF (LOCK)
while the lights are on, a chime sounds when the
driver’s door is opened.
Do not leave the lights on when the engine is off
because it will cause the battery to discharge.
If you sense that the le vel of the headlights is
abnormal, have your vehicle inspected by a dealer.
Models without smart entry system
Models with smart entry system
All models
High Beams
Flashing the high beams
Low Beams
Turns on parking, daytime
running lights, side marker, tail,
and rear license plate lights
Turns on headlights, parking, side
marker, tail, and rear license plate
lights
17 FIT -31T5A6200.book 123 ページ 2016年5月27日 金曜日 午後6時33分
Page 126 of 465
125
uuOperating the Switches Around the Steering Wheel uLight Switches
Controls
The headlights automatically come on when the wipers are used several times within
a certain intervals with the headlight switch in AUTO.
The headlights automatically go off a few mi nutes later if the wipers are stopped.
The headlights, all other exterior lights, and the instrument panel lights turn off 15
seconds after you remove the key or set the power mode to VEHICLE OFF (LOCK),
take the remote with you, and close the driver's door.
If you turn the igniti on switch to LOCK
(0*1 with the headlight switch on, but do
not open the door, the lights turn off afte r 10 minutes (three minutes, if the switch
is in the AUTO position).
The lights turn on again when you unlock or open the driver's door. If you unlock
the door, but do not open it within 15 seconds, the lights go off. If you open the
driver's door, you will hear a lights on reminder chime.
*1 : Models with the smart entry system have an ENGINE START/STOP button instead of an ignition switch.
■Headlight Integration with Wipers*
■Automatic Lighting Off Feature
1Headlight Integration with Wipers*
This feature activates while the headlights are off in
AUTO .
The instrument panel br ightness does not change
when the headlights come on.
When the ambient light is at dark, the automatic
lighting control feature over rides, and the headlights
come on with or without the wipers sweeping more
than several times.
* Not available on all models
17 FIT -31T5A6200.book 125 ページ 2016年5月27日 金曜日 午後6時33分
Page 130 of 465
129
uuOperating the Switches Around the Steering Wheel uWipers and Washers
Controls
The rear wiper and washer can be used when
the ignition switch is in ON
(w*1.
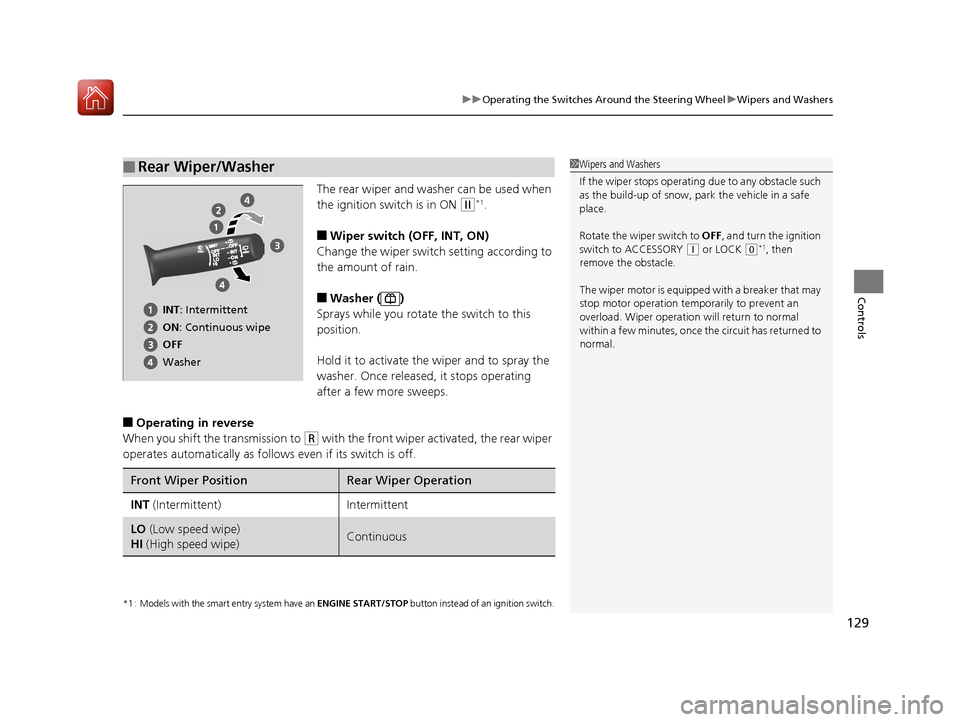
■Wiper switch (OFF, INT, ON)
Change the wiper switch setting according to
the amount of rain.
■Washer ( )
Sprays while you rotate the switch to this
position.
Hold it to activate th e wiper and to spray the
washer. Once released, it stops operating
after a few more sweeps.
■Operating in reverse
When you shift the transmission to
(R with the front wiper activated, the rear wiper
operates automatically as follows even if its switch is off.
*1 : Models with the smart entry system have an ENGINE START/STOP button instead of an ignition switch.
■Rear Wiper/Washer1Wipers and Washers
If the wiper stops operating due to any obstacle such
as the build-up of snow, pa rk the vehicle in a safe
place.
Rotate the wiper switch to OFF, and turn the ignition
switch to ACCESSORY
( q or LOCK (0*1, then
remove the obstacle.
The wiper motor is equipped with a breaker that may
stop motor operation temp orarily to prevent an
overload. Wiper operation will return to normal
within a few minutes, once the circuit has returned to
normal.
INT: Intermittent
ON : Continuous wipe
OFF
Washer
Front Wiper PositionRear Wiper Operation
INT (Intermittent)Intermittent
LO (Low speed wipe)
HI (High speed wipe)Continuous
17 FIT -31T5A6200.book 129 ページ 2016年5月27日 金曜日 午後6時33分
Page 133 of 465
132
uuOperating the Switches Around the Steering Wheel uAdjusting the Steering Wheel
Controls
Adjusting the Steering Wheel
The steering wheel height and distance from your body can be adjusted so that you
can comfortably grip the steering wheel in an appropriate driving posture.
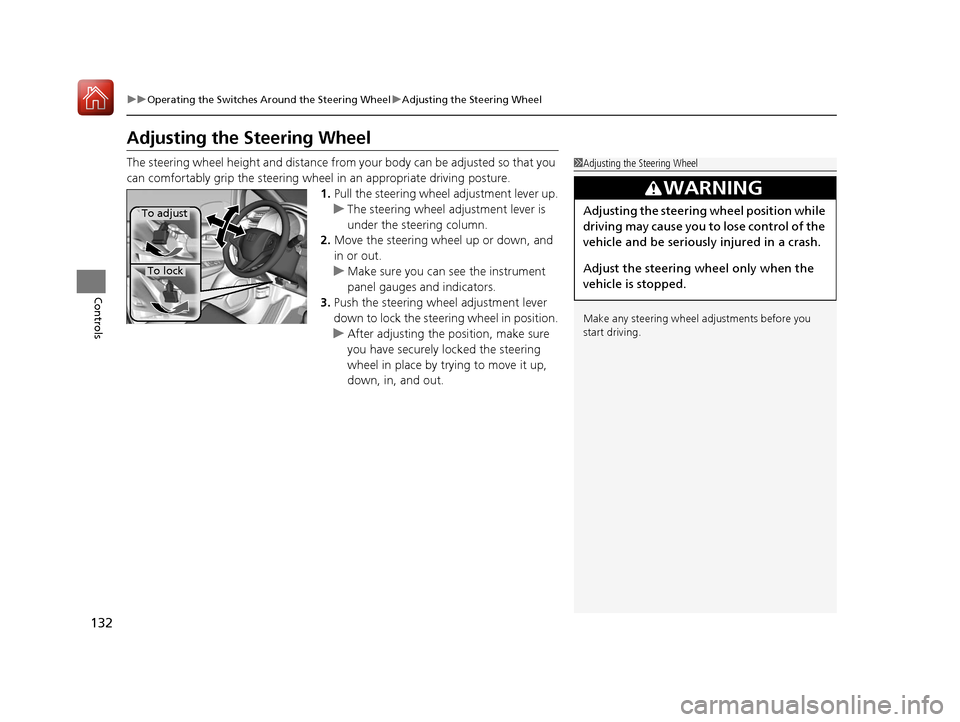
1.Pull the steering wheel adjustment lever up.
u The steering wheel adjustment lever is
under the steering column.
2. Move the steering wheel up or down, and
in or out.
u Make sure you can see the instrument
panel gauges and indicators.
3. Push the steering wheel adjustment lever
down to lock the steering wheel in position.
u After adjusting the position, make sure
you have securely locked the steering
wheel in place by trying to move it up,
down, in, and out.1Adjusting the Steering Wheel
Make any steering wheel adjustments before you
start driving.
3WARNING
Adjusting the steering wheel position while
driving may cause you to lose control of the
vehicle and be seriously injured in a crash.
Adjust the steering wheel only when the
vehicle is stopped.To adjust
To lock
17 FIT -31T5A6200.book 132 ページ 2016年5月27日 金曜日 午後6時33分
Page 137 of 465
uuAdjusting the Seats uFront Seats
136
Controls
■Adjusting the Seat Positions1Adjusting the Seat Positions
Once a seat is adjusted co rrectly, rock it back and
forth to make sure it is locked in position.
Horizontal Position
Adjustment
Pull up on the bar to move the
seat, then release the bar.
Driver’s seat is shown.
Seat-back Angle
Adjustment
Pull up the lever to
change the angle.
Height Adjustment(Driver side only)
Pull up or push down the lever
to raise or lower the seat.
17 FIT -31T5A6200.book 136 ページ 2016年5月27日 金曜日 午後6時33分
Page 141 of 465

uuAdjusting the Seats uRear Seats
140
Controls
The rear seats can be folded down separate ly to allow for additional storage space.
■To fold down the seat
1. Store the center seat belt first. Insert the
latch plate into the slot on the side of the
anchor buckle.
2. Retract the seat belt into the holder on the
ceiling.
2 Seat Belt with Detachable Anchor P. 38
3.Lower the head restra int to its lowest
position.
4. Pull the release lever and fold down the
seat-back.
To return the seat to th e original position, pull
up the seat-back in the upright position.
■Folding Down the Rear Seats1 Folding Down the Rear Seats
Make sure all items in the cargo area or items
extending to the rear seats are properly
secured. Loose items can fly forward if you have
to brake hard.
Remove any items from th e rear seat cushion and
floor before you fold down the rear seat.
To lock the seat-back upri ght, push it backwards until
it locks.
Make sure the seat-back, head restraints and seat
cushion are securely latche d back into place before
driving. Also, make sure all rear shoulder belts are
positioned in front of the seat-back, and the center
shoulder belt is re-posit ioned in the holding slot.
Make sure that the folded seat-back does not press
against the front passenger seat, as this can cause the
weight sensors in the front passenger seat to work
improperly.
2 Passenger Airbag Off Indicator P. 52
Anchor
Buckle
Latch Plate
Release Lever
17 FIT -31T5A6200.book 140 ページ 2016年5月27日 金曜日 午後6時33分
Page 142 of 465
141
uuAdjusting the Seats uRear Seats
Controls
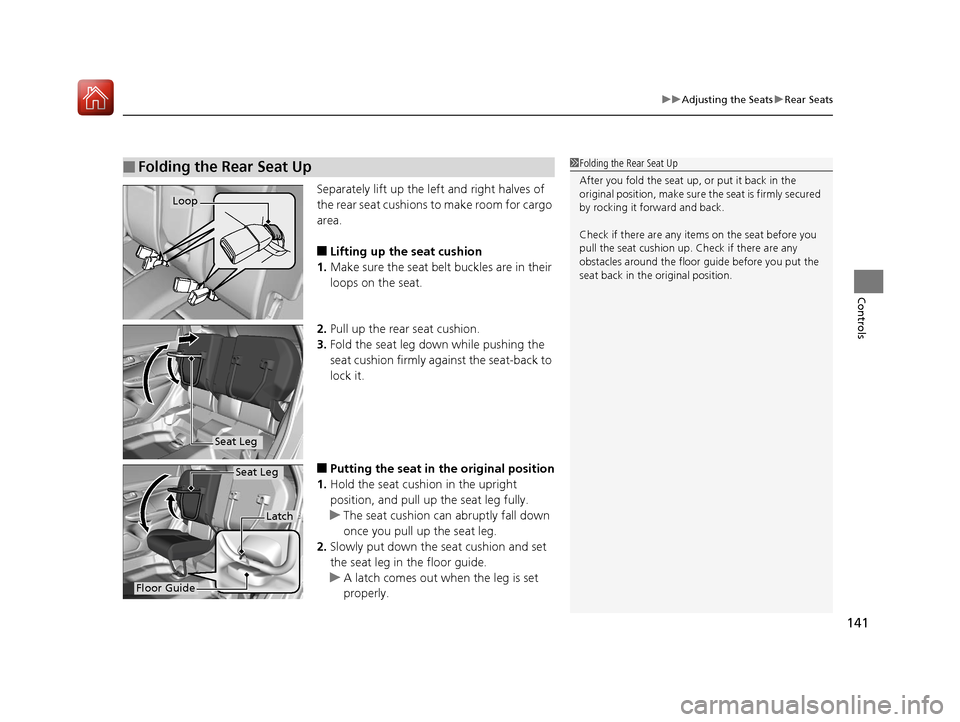
Separately lift up the left and right halves of
the rear seat cushions to make room for cargo
area.
■Lifting up the seat cushion
1. Make sure the seat belt buckles are in their
loops on the seat.
2. Pull up the rear seat cushion.
3. Fold the seat leg do wn while pushing the
seat cushion firmly against the seat-back to
lock it.
■Putting the seat in the original position
1. Hold the seat cushion in the upright
position, and pull up the seat leg fully.
u The seat cushion can abruptly fall down
once you pull up the seat leg.
2. Slowly put down the seat cushion and set
the seat leg in the floor guide.
u A latch comes out when the leg is set
properly.
■Folding the Rear Seat Up1Folding the Rear Seat Up
After you fold the seat up, or put it back in the
original position, make sure the seat is firmly secured
by rocking it forward and back.
Check if there are any items on the seat before you
pull the seat cushion up. Check if there are any
obstacles around the floor guide before you put the
seat back in the original position.
Loop
Seat Leg
Floor Guide
Latch
Seat Leg
17 FIT -31T5A6200.book 141 ページ 2016年5月27日 金曜日 午後6時33分
Page 145 of 465
uuAdjusting the Seats uHead Restraints
144
Controls
Head restraints can be removed for cleaning or repair.
To remove a head restraint:
Pull the restraint up as far as it will go. Then push the release button, and pull the
restraint up and out.
To reinstall a head restraint:
Insert the legs back in place, then adjust the head restraint to an appropriate height
while pressing the release button. Pull up on the restraint to make sure it is locked
in position.
■Removing and Reinstalling the Head Restraints1Removing and Reinstalling the Head Restraints
To remove and install the rear outer head restraint,
recline the seat-back slightly forward as the space
between the ceili ng and the seat-back is limited.
3WARNING
Failure to reinstall, or correctly reinstall, the
head restraints can result in severe injury
during a crash.
Always replace the he ad restraints before
driving.
17 FIT -31T5A6200.book 144 ページ 2016年5月27日 金曜日 午後6時33分