Page 148 of 465

147Continued
Controls
Interior Lights/Interior Convenience Items
Interior Lights
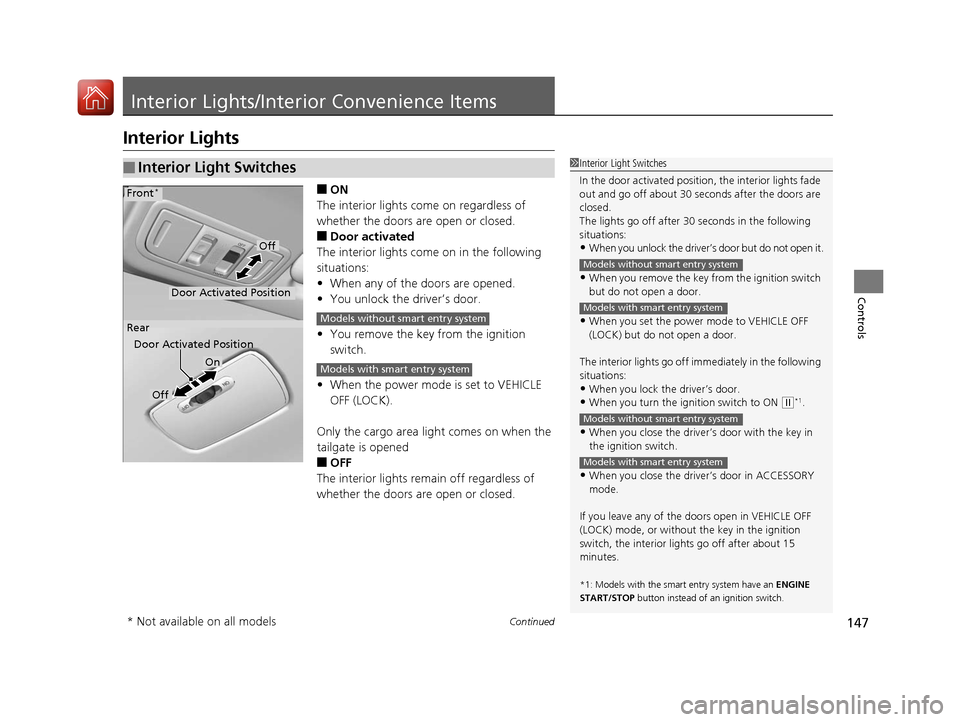
■ON
The interior lights come on regardless of
whether the doors are open or closed.
■Door activated
The interior lights come on in the following
situations:
• When any of the doors are opened.
• You unlock the driver’s door.
• You remove the key from the ignition
switch.
• When the power mode is set to VEHICLE
OFF (LOCK).
Only the cargo area light comes on when the
tailgate is opened
■OFF
The interior lights remain off regardless of
whether the doors are open or closed.
■Interior Light Switches1 Interior Light Switches
In the door activated position, the interior lights fade
out and go off about 30 se conds after the doors are
closed.
The lights go off after 30 seconds in the following
situations:
•When you unlock the driver’s door but do not open it.
•When you remove the key from the ignition switch
but do not open a door.
•When you set the power mode to VEHICLE OFF
(LOCK) but do not open a door.
The interior lights go off i mmediately in the following
situations:
•When you lock the driver’s door.
•When you turn the ignition switch to ON ( w*1.
•When you close the driver’s door with the key in
the ignition switch.
•When you close the driver’s door in ACCESSORY
mode.
If you leave any of the doors open in VEHICLE OFF
(LOCK) mode, or without the key in the ignition
switch, the interior li ghts go off after about 15
minutes.
*1: Models with the sma rt entry system have an ENGINE
START/STOP button instead of an ignition switch.
Models without smart entry system
Models with smart entry system
Models without smart entry system
Models with smart entry system
On
Off
Door Activated Position
Front*
Rear
Door Activated Position
Off
Models without smart entry system
Models with smart entry system
* Not available on all models
17 FIT -31T5A6200.book 147 ページ 2016年5月27日 金曜日 午後6時33分
Page 156 of 465
Continued155
uuInterior Lights/Interior Convenience Items uInterior Convenience Items
Controls
The cargo area cover may be removed to give you more cargo room.
■To remove the cargo area cover
1.Open the tailgate.
2. Remove the strap on each side of the
tailgate.
3. Disengage the support rods, then remove
the cargo area cover.
Reverse this procedure to install the cargo
area cover.
After reinstalling the cargo area cover, make
sure it is latched securely.
■Cargo Area Cover*1 Cargo Area Cover*
Do not place items on the cargo area cover, or stack
objects higher than the top of the back seat. They
could block your view and be thrown about the
vehicle during a crush or sudden stop.
Do not apply excessive pressure to the cover, such as
leaning on it to retrieve an item.
* Not available on all models
17 FIT -31T5A6200.book 155 ページ 2016年5月27日 金曜日 午後6時33分
Page 163 of 465
uuClimate Control System*uUsing Automatic Climate Control
162
Controls
You hear the beep when operating the clim ate control system on the touch screen.
This can be turned on and off. To turn off the beep:
1.Set the power mode to ON.
2. Touch the icon of the temperature
control icon five times while pressing and
holding the icon.
3. Release the icon, after -- blinks five
times and OF is displayed.
To turn on the beep:
1. Set the power mode to ON.
2. Touch the icon of the temperature
control icon five times while pressing and
holding the icon.
3. Release the icon, after OF blinks five
times and -- is displayed.
■Turning On and Off the Touch Screen Beep1Using Automatic Climate Control
If you touch any other icon s during this procedure,
the setting may fail. In th is case, once you set the
power mode to VEHICLE OFF (LOCK), then follow this
procedure again.
17 FIT -31T5A6200.book 162 ページ 2016年5月27日 金曜日 午後6時33分
Page 174 of 465

173
Features
Audio System Basic Operation
To use the audio system, the ignition switch must be in ACCESSORY (q or ON (w.
Use the selector knob or MENU/CLOCK
button to access some audio functions.
Press to switch between the normal and
extended display fo r some functions.
Selector knob: Rotate left or right to scroll
through the available choices. Press to set
your selection.
MENU/CLOCK button: Press to select any
mode.
The available mode in cludes the wallpaper,
display, clock, language setup, and play
modes. Play modes can be also selected from
scan, random, repeat, and so on.
(Back) button: Press to go back to the previous display.
(Sound) button: Press to select the sound setting mode.
(Day/Night) button:
Press to change the audio/information screen brightness.
Press , then adjust the brightness using . u Each time you press , the mode switches between the daytime mode,
nighttime mode and OFF mode.
Models with color audio system1Audio System Basic Operation
These indications are used to show how to operate
the selector knob.
Rotate to select.
Press to enter.
Menu Items 2 Adjust Clock P. 91
2 Wallpaper Setup P. 176
2 Display Setup P. 179
2 Scan P. 181, 184, 190
2 Play Mode P. 184, 187, 190
2 RDS Settings P. 181
2 Bluetooth P. 233, 257
Press the SOURCE , , , or button on the
steering wheel to cha nge any audio setting.
2 Audio Remote Controls
* P. 171
One of the operating system s used in this unit is
eCos.
For software license terms and condition, visit their
website (eCos license URL:
http://ecos.sourceware.org/license-overview.html )
For source code disclo sure and other details
regarding eCos, visit:
http://www.hondaopensource2.com
Models with audio remote controls
(Back)
Button
Selector Knob MENU/
CLOCK
Button
(Day/Night)
Button
(Sound)
Button
Menu Display
* Not available on all models
17 FIT -31T5A6200.book 173 ページ 2016年5月27日 金曜日 午後6時33分
Page 175 of 465
174
uuAudio System Basic Operation uAudio/Information Screen
Features
Audio/Information Screen
Displays the audio status and wallpaper. From this screen, you can go to various
setup options.
■Switching the Display
Audio/Information Screen
Audio
Clock/Wallpaper
17 FIT -31T5A6200.book 174 ページ 2016年5月27日 金曜日 午後6時33分
Page 176 of 465
175
uuAudio System Basic Operation uAudio/Information Screen
Continued
Features
■Audio
Shows the current audio information.
■Clock/Wallpaper
Shows a clock screen or an image you import.
■Change display
1. Press the MENU/CLOCK button.
2. Rotate to select Settings, then press .
3. Rotate to select Display Change, then press .
4. Rotate to select Wallpaper, then press .
u If you want to return to the audio display, select Audio.
17 FIT -31T5A6200.book 175 ページ 2016年5月27日 金曜日 午後6時33分
Page 177 of 465

uuAudio System Basic Operation uAudio/Information Screen
176
Features
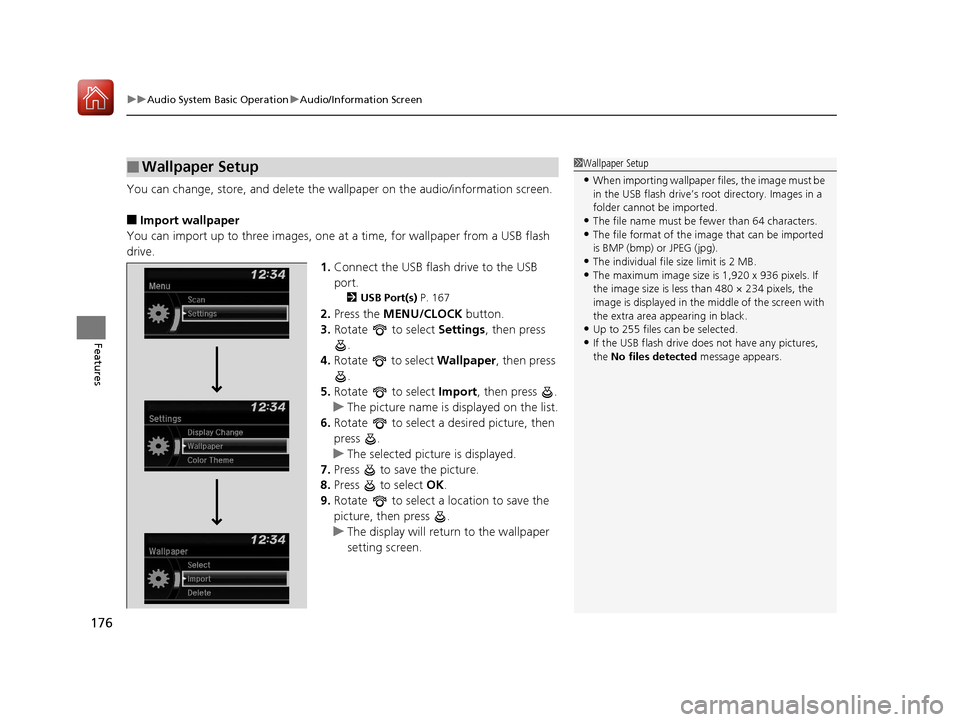
You can change, store, and delete the wallpaper on the audio/information screen.
■Import wallpaper
You can import up to three images, one at a time, for wallpaper from a USB flash
drive.
1.Connect the USB flash drive to the USB
port.
2 USB Port(s) P. 167
2.Press the MENU/CLOCK button.
3. Rotate to select Settings, then press
.
4. Rotate to select Wallpaper , then press
.
5. Rotate to select Import, then press .
u The picture name is displayed on the list.
6. Rotate to select a desired picture, then
press .
u The selected picture is displayed.
7. Press to save the picture.
8. Press to select OK.
9. Rotate to select a location to save the
picture, then press .
u The display will return to the wallpaper
setting screen.
■Wallpaper Setup1Wallpaper Setup
•When importing wallpaper files, the image must be
in the USB flash drive’s root directory. Images in a
folder cannot be imported.
•The file name must be fewer than 64 characters.•The file format of the im age that can be imported
is BMP (bmp) or JPEG (jpg).
•The individual file size limit is 2 MB.•The maximum image size is 1,920 x 936 pixels. If
the image size is less than 480 × 234 pixels, the
image is displayed in the middle of the screen with
the extra area appearing in black.
•Up to 255 files can be selected.
•If the USB flash drive doe s not have any pictures,
the No files detected message appears.
17 FIT -31T5A6200.book 176 ページ 2016年5月27日 金曜日 午後6時33分
Page 178 of 465

177
uuAudio System Basic Operation uAudio/Information Screen
Features
■Select wallpaper
1. Press the MENU/CLOCK button.
2. Rotate to select Settings, then press .
3. Rotate to select Wallpaper, then press .
4. Rotate to select Select, then press .
u The screen changes to the wallpaper list.
5. Rotate to select a desired wallpaper, then press .
■To view wallpaper once it is set
1. Press the MENU/CLOCK button.
2. Rotate to select Settings, then press .
3. Rotate to select Display Change, then press .
4. Rotate to select Wallpaper, then press .
u The screen changes to the wallpaper list.
5. Rotate to select a wallpaper that you want to set, then press .
■Delete wallpaper
1. Press the MENU/CLOCK button.
2. Rotate to select Settings, then press .
3. Rotate to select Wallpaper, then press .
4. Rotate to select Delete, then press .
u The screen changes to the wallpaper list.
5. Rotate to select a wallpaper that you want to delete, then press .
6. Rotate to select Yes, then press .
u The display will return to the wallpaper setting screen.
1Wallpaper Setup
To go back to the previous screen, press the
(Back) button.
When the file size is large, it takes a while to be
previewed.
17 FIT -31T5A6200.book 177 ページ 2016年5月27日 金曜日 午後6時33分