2017 HONDA ACCORD HYBRID change time
[x] Cancel search: change timePage 2 of 80

Devices That Emit Radio WavesThe following products and systems on your vehicle emit radio waves when\
in
operation:
•
Audio system • Immobilizer system
•
Bluetooth® Audio • remote transmitter
•
Bluetooth HandsFreeLink® • Smart entry system
•
HomeLink Universal Transceiver • Wireless charger*
each of the above complies with the appropriate requirements or the requi\
red
standards of the FCC (Federal Communications Commission) and Industry \
Canada,
described below:
As required by the FCC:
This device complies with Part 15 of the FCC rules. Operation is subject\
to the following two conditions: (1) This device may not cause harmful interf\
erence, and
(2) this device must accept any interference received, including inter\
ference that
may cause undesired operation.
Changes or modifications not expressly approved by the party responsib\
le for
compliance could void the user’
s authority to operate the equipment.
As required by Industry Canada:
This device complies with Industry Canada Standard RSS-Gen/210/251/310. \
Operation is subject to the following two conditions: (1) this device \
may not
cause interference, and (2) this device must accept any interference, \
including
interference that may cause undesired operation of the device.
California Perchlorate Contamination Prevention Act The airbags, seat belt tensioners, and C
r-type batteries in this vehicle may
contain perchlorate materials—special handling may apply
. See www.dtsc.
ca.gov/hazardouswaste/perchlorate/ for more information.
California Proposition 65 Warning
WARNING: This product contains or emits chemicals known to the state of
California to cause cancer and birth defects or other reproductive harm.\
DISCLOSURES
Event Data RecordersThis vehicle is equipped with an event data recorder (EDR). The main purpose of
an
eDr is to record, in certain crash or near crash-like situations, such as an air
bag deployment or hitting a road obstacle, data that will assist in unde\
rs
tanding
how a vehicle’s systems performed. The EDR is designed to record data related to
vehicle dynamics and safety systems for a short period of time, typicall\
y
30 seconds or less. The EDR in this vehicle is designed to record such d\
ata as:
•
How various systems in your vehicle were operating;
•
Whether or not the driver and passenger safety belts were buckled/fasten\
ed;
•
How far (if at all) the driver was depressing the accelerator and/or b\
rake
pedal; and,
•
How fast the vehicle was traveling.
These data can help provide a better understanding of the circumstances \
in
which crashes and injuries occur. N
oTe: eDr data are recorded by your vehicle
only if a non-trivial crash situation occurs; no data are recorded by th\
e
eDr under
normal driving conditions and no personal data (e.g., name, gender, age, and
crash location) are recorded. However
, other parties, such as law enforcement,
could combine the
eDr data with the type of personally identifying data routinely
acquired during a crash investigation.
To read data recorded by an
eDr, special equipment is required, and access to
the vehicle or the
eDr is needed. In addition to the vehicle manufacturer, other
parties such as law enforcement that have the special equipment can read\
the
information if they have access to the vehicle or the
eDr.
The data belong to the vehicle owner and may not be accessed by anyone e\
lse
except as legally required or with the permission of the vehicle owner.
Service Diagnostic Recorders This vehicle is equipped with service-related devices that record inform\
ation
about powertrain performance. The data can be used to verify emissions l\
aw
requirements and/or help technicians diagnose and solve service problems. It may
also be combined with data from other sources for research purposes, but\
it remains confidential.
*if equipped
Page 18 of 80

28 || 29
I
NSTRUMENT PANELINSTRUMENT PANEL
On/Off Indicators
These indicators remind you when an item is on or off.
*if equipped
vSA off
vSA engaged (blinking)
CMBS
off
Turn signals/hazards on
High beams on
exterior lights on
Auto High-Beam System* on
eCoN mode on
SP
orT mode on
ev mode on
Multi-Information Display (MID)
Consists of several displays that provide you with useful information.
button:
Changes the display.
Multi-information display
SEL/RESET button:
Enters the selected item.
Main Displays
Press either Info (p/q) button to cycle through the displays shown below.
rang e
elapsed Time
Average Speed
Blank Screen
vehicle
Settings LifeAverage Fuel economy/Instant Fuel economy
engine oil
Average Fuel eco Drive Display economy records
Power Flow
Page 22 of 80

36 || 37
V
EHICLE CONTROLSVEHICLE CONTROLS
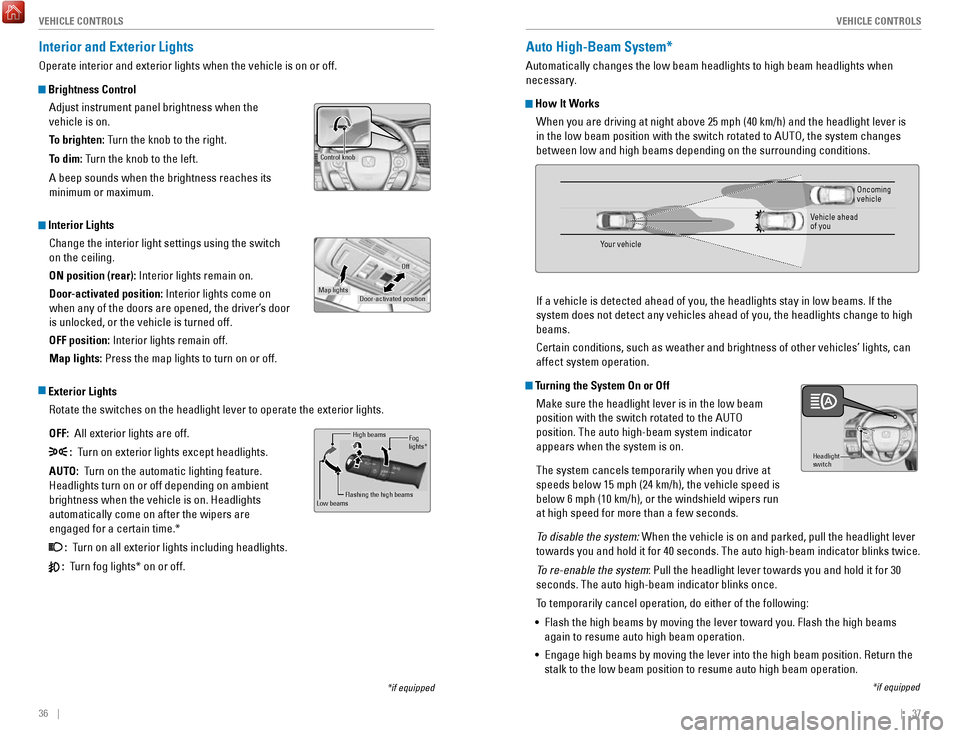
Interior and Exterior Lights
operate interior and exterior lights when the vehicle is on or off.
Brightness Control
Adjust instrument panel brightness when the
vehicle is on.
To brighten: Turn the knob to the right.
To dim: Turn the knob to the left.
A beep sounds when the brightness reaches its
minimum or maximum.
Interior LightsChange the interior light settings using the switch
on the ceiling.
ON position (rear): Interior lights remain on.
Door-activated position: Interior lights come on
when any of the doors are opened, the driver’s door
is unlocked, or the vehicle is turned off.
OFF position: Interior lights remain off.
Map lights: Press the map lights to turn on or off.
Exterior Lights
rotate the switches on the headlight lever to operate the exterior lights\
.
OFF: All exterior lights are off.
: Turn on exterior lights except headlights.
AUTO: Turn on the automatic lighting feature.
Headlights turn on or off depending on ambient
brightness when the vehicle is on. Headlights
automatically come on after the wipers are
engaged for a certain time.*
: Turn on all exterior lights including headlights.
: Turn fog lights* on or off.
*if equipped
Control knob
Door-activated position
Off
Map lights
High beams
Flashing the high beams
Low beamsFog
lights *
Auto High-Beam System*
Automatically changes the low beam headlights to high beam headlights wh\
en
necessary.
How It Works
When you are driving at night above 25 mph (40 km/h) and the headlight\
lever is
in the low beam position with the switch rotated to AUT
o, the system changes
between low and high beams depending on the surrounding conditions.
If a vehicle is detected ahead of you, the headlights stay in low beams.\
If
the
system does not detect any vehicles ahead of you, the headlights change \
to high
beams.
Certain conditions, such as weather and brightness of other vehicles’\
lights, can
affect system operation.
Turning the System On or Off
Make sure the headlight lever is in the low beam
position with the switch rotated to the AUT
o
position. The auto high-beam system indicator
appears when the system is on.
The system cancels temporarily when you drive at
speeds below 15 mph (24 km/h), the vehicle speed is
below 6 mph (10 km/h), or the windshield wipers run
at high speed for more than a few seconds.
To disable the system:
When the vehicle is on and parked, pull the headlight lever
towards you and hold it for 40 seconds. The auto high-beam indicator bli\
nks twice.
To re-enable the system: Pull the headlight lever towards you and hold it for 30
seconds. The auto high-beam indicator blinks once.
To temporarily cancel operation, do either of the following:
•
Flash the high beams by moving the lever toward you. Flash the high beam\
s
again to resume auto high beam operation.
•
engage high beams by moving the lever into the high beam position. return the
stalk to the low beam position to resume auto high beam operation.
Headlight
switch
*if equipped
Your vehicle
oncoming
vehicle
vehicle ahead
of you
Page 23 of 80

38 || 39
V
EHICLE CONTROLSVEHICLE CONTROLS
Wiper Operation
The windshield wipers and washers can be used when the vehicle is on.
Move the wiper lever up or down to the desired position.
Pull toward
you to use
washer.
MIST
OFF
INT* / AUTO*
LO: Low speed wipe
HI: High speed wipe
*if equipped
Intermittent (INT) Wipers*
When you move the lever to the INT position, the
wipers operate based on the delay adjustment.
rotate the adjustment ring to adjust the wiper delay.
Headlight-Wiper Integration*When the headlights are in the AUT
o position, they automatically turn on when
the front wipers operate several times within a certain interval. The he\
adlights
turn off shortly after the wipers are turned off, or if there is enough \
ambient light.
Adjustment rin g
INT
position
Lower speed
Higher speed
Using the Auto High-Beam System
If you find the timing of beam changes inconvenient for driving, chang\
e the
headlight beams manually.
If the Can Not
operate: message appears: park your vehicle in a safe place.
Wipe away debris blocking the windshield, then start driving again. If t\
he message
remains on even after driving for a while with the clean windshield, hav\
e your
vehicle checked by a dealer.
For the auto high-beam system to work properly:
•
Do not place an object that reflects light on the dashboard.
•
Keep the windshield around the camera clean.
•
When cleaning the windshield, be careful not to apply the windshield cle\
anser
to the camera lens.
•
Do not attach an object, sticker or film in the area around the camera\
.
•
Do not touch the camera lens.
•
If the camera receives a strong impact, or repairing of the area near th\
e camera
is required, consult a dealer.
Page 29 of 80

50 || 51
AUDIO AND CONNECTIVITY
V
EHICLE CONTROLS
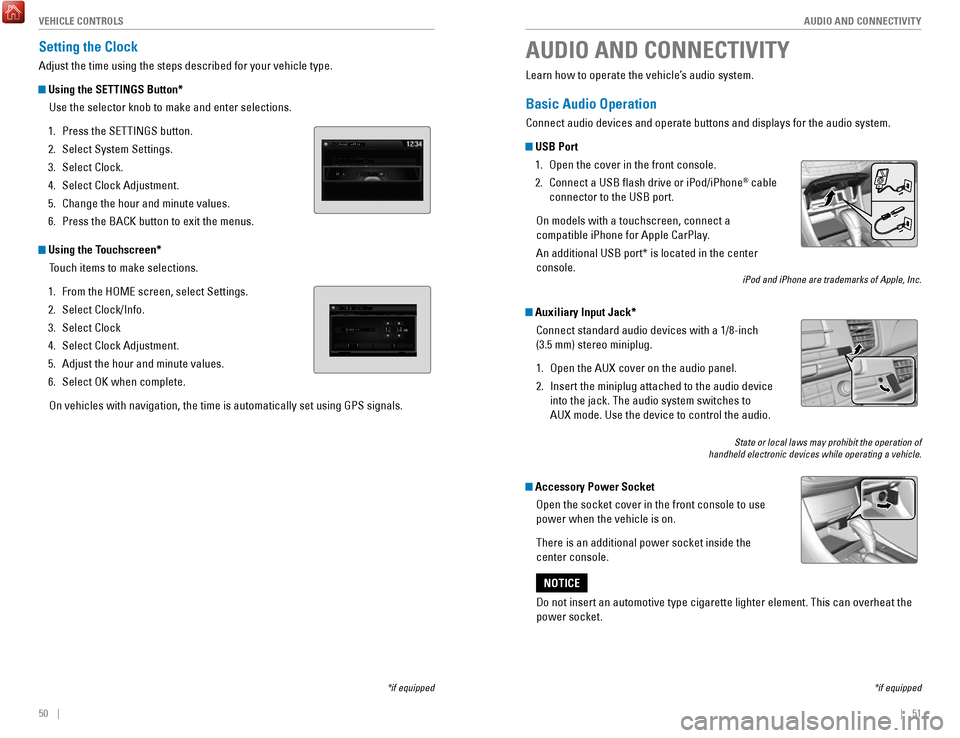
Setting the Clock
Adjust the time using the steps described for your vehicle type.
Using the SETTINGS Button*
Use the selector knob to make and enter selections.
1.
Press the SeTTINGS button.
2.
Select System Settings.
3.
Select Clock.
4.
Select Clock Adjustment.
5.
Change the hour and minute values.
6.
Press the BACK button to exit the menus.
Using the Touchscreen* Touch items to make selections.
1.
From the HoMe screen, select Settings.
2.
Select Clock/Info.
3.
Select Clock
4.
Select Clock Adjustment.
5.
Adjust the hour and minute values.
6.
Select oK when complete.
on vehicles with navigation, the time is automatically set using GPS sign\
als.
*if equipped
AUDIO AND CONNECTIVITY
*if equipped
Learn how to operate the vehicle’s audio system.
Basic Audio Operation
Connect audio devices and operate buttons and displays for the audio sys\
tem.
USB Port 1.
open the cover in the front console.
2.
Connect a USB flash drive or iPod/iPhone® cable
connector to the USB port.
on models with a touchscreen, connect a
compatible iPhone for Apple CarPlay.
An additional USB port* is located in the center
console.
iPod and iPhone are trademarks of Apple, Inc.
Auxiliary Input Jack*
Connect standard audio devices with a 1/8-inch
(3.5 mm) stereo miniplug.
1.
open the AUX cover on the audio panel.
2.
Insert the miniplug attached to the audio device
into the jack. The audio system switches to
AUX
mode. Use the device to control the audio.
State or local laws may prohibit the operation of
handheld electronic devices while operating a vehicle.
Accessory Power Socket
open the socket cover in the front console to use
power when the vehicle is on.
There is an additional power socket inside the
center console.
Do not insert an automotive type cigarette lighter element. This can ove\
rheat the
power socket.
NOTICE
Page 38 of 80

68 || 69
AUDIO AND CONNECTIVITY
AUDIO AND CONNECTIVITY
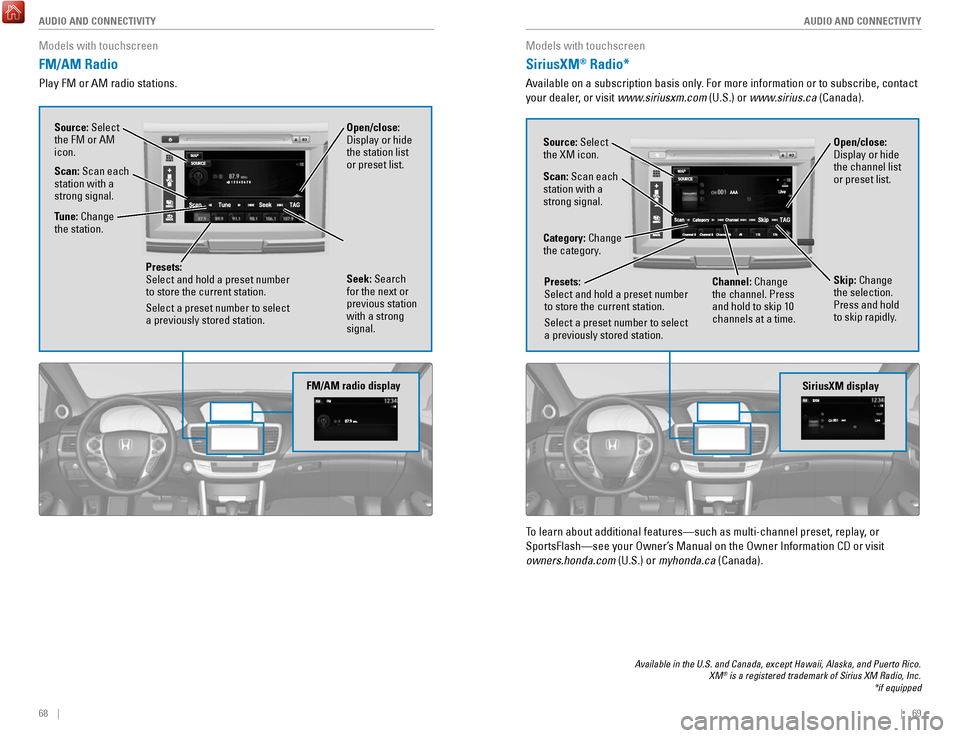
Models with touchscreen
FM/AM Radio
Play FM or AM radio stations.
FM/AM radio display
Source: Select
the FM or AM
icon.
Tune: Change
the station.
Seek: Search
for the next or
previous station
with a strong
signal. Open/close:
Display or hide
the station list
or preset list.
Scan: Scan each
station with a
strong signal.
Presets:
Select and hold a preset number
to store the current station.
Select a preset number to select
a previously stored station.
Models with touchscreen
SiriusXM® Radio*
Available on a subscription basis only. For more information or to subscribe, contact
your dealer, or visit www.siriusxm.com (U.S.) or www.sirius.ca (Canada).
Available in the U.S. and Canada, except Hawaii, Alaska, and Puerto Rico.\
XM® is a registered trademark of Sirius XM Radio, Inc.
*if equipped
To learn about additional features—such as multi-channel preset, repla\
y, or
SportsFlash—see your
owner’s Manual on the owner Information CD or visit
owners.honda.com (U.S.) or
myhonda.ca (Canada).
SiriusXM display
Open/close:
Display or hide
the channel list
or preset list.Source: Select
the XM icon.
Category: Change
the category.
Channel: Change
the channel. Press
and hold to skip 10
channels at a time.
Scan: Scan each
station with a
strong signal.
Presets:
Select and hold a preset number
to store the current station.
Select a preset number to select
a previously stored station.
Skip: Change
the selection.
Press and hold
to skip rapidly.
Page 55 of 80

102 || 103
DRIVING
DRIVING
Braking
Slow down or stop your vehicle, and keep it from moving when parked.
Foot Brake
Press the brake pedal to slow down or stop your
vehicle from moving.
Brake Assist System During hard or emergency braking, the system
increases braking force. The brake pedal may move
slightly or make a noise; this is normal. Continue to
hold the brake pedal firmly down.
Anti-Lock Brake System (ABS) During hard or emergency braking, the system
rapidly pumps the brakes to prevent wheel lockup
and help you maintain steering control. The brake
pedal may pulsate slightly during ABS operation;
this is normal. Do not pump the brake pedal, and
continue to hold it firmly down.
Parking BrakeKeep the vehicle from moving when it is parked.
To apply: Pull the lever up fully without pressing the
release button.
To release: Press and hold the release button, then
lower the lever down all the way.
Brake peda l
Brake pedal
The ABS may not function correctly if you use an incorrect tire type and\
size.
NOTICE
release the parking brake fully before driving. The rear brakes and axle \
can be
damaged if you drive with the parking brake applied.
NOTICE
Acoustic Vehicle Alerting System
Alerts people outside your vehicle when it is powered
solely by electricity and is travelling at about 12 mph
(20 km/h) or less.
Canada models
Press the button to turn the system on and off. The
system defaults to on, even if you turned it off the last
time you drove the vehicle.
Eco Assist System
Can help improve fuel economy by adjusting the performance of the power \
system,
transmission, climate control system, and cruise control.
ECON Button
Press the
eCoN button to turn the system on or off.
The
eCoN Mode indicator and a message in the
multi-information display* appear when the system
is turned on.
Ambient Meter
Color-coded bars change based on your driving
style and brake or accelerator pedal operation.
Green: Fuel-efficient driving
Blue green: Moderate acceleration/deceleration
Blue: Spirited acceleration/deceleration
Ambient Meter
Vehicle Stability Assist (VSA®)
Also known as electronic Stability Control (eSC), vSA helps to stabilize the vehicle
during cornering if the vehicle turns more or less than what was intende\
d. It assists
in maintaining traction on slippery surfaces by regulating power system \
output and
selectively applying the brakes.
Turning VSA On or Off
vSA is turned on every time you start the power
system, even if you previously turned it off. If you
turn
vSA off, your vehicle has normal braking and
cornering ability, but
vSA traction and stability
enhancement become less effective.
Press and hold the
vSA oFF button until you hear
a beep to turn
vSA on or off. The vSA oFF indicator
appears when the system is off.
Traction control becomes less effective, which may make it easier when t
rying to
free your vehicle if it is stuck in mud or snow.
VSA OFF indicator
Page 56 of 80

104 || 105
DRIVING
DRIVING
SPORT Mode
enhances the throttle response for more driving enjoyment. SPorT mode is set to
off every time the vehicle is started. When in SP
orT mode, the ambient meter (see
page 103) changes to blue.
SPORT Button
Press the SP
orT button to turn the mode on or off. A SPorT Mode indicator and a
message in the multi-information display appear when the system is on.
EV Mode
Under certain conditions, the vehicle will operate exclusively on the ba\
tteries and
electric motor.
ev mode will self-cancel if battery, driving or road conditions warrant.
EV Button
Press the
ev button to turn the mode on or off. The ev mode indicator and a
message in the multi-information display appear when the system is on.
Press
Press
Adaptive Cruise Control (ACC)
Helps maintain a constant vehicle speed and a set following interval beh\
ind a
vehicle detected ahead of yours.
Activating and Setting the Vehicle Speed
1.
Press the MAIN button. The ACC indicator appears
in the multi-information display.
2.
Accelerate to the desired speed (above 25 mph/
40 km/h). Take your foot off the pedal and press the
-/S
eT button to set the speed.
Adjusting the Vehicle Speed
Press the
reS/+ button to increase speed or the -/SeT
button to decrease speed.
each time you press the button, the vehicle speed is
increased or decreased by about 1 mph (1.6 km/h). If you
keep the button pressed, the vehicle speed increases or
decreases by 5 mph or 5 km/h until you release it.
Adjusting the Vehicle Distance
Press the Interval button to change the following
interval.
each time you press the button, the setting
cycles through short, middle, long, and extra long.
Switching to Standard Cruise Control
Press and hold the Interval button. Cruise Mode appears
in the multi-information display. Press and hold the button
again to switch back to ACC.
MAIN button
RES/+ button
CANCEL button
-/SET button
Distance button