2017 HONDA ACCORD HYBRID windshield wipers
[x] Cancel search: windshield wipersPage 22 of 80

36 || 37
V
EHICLE CONTROLSVEHICLE CONTROLS
Interior and Exterior Lights
operate interior and exterior lights when the vehicle is on or off.
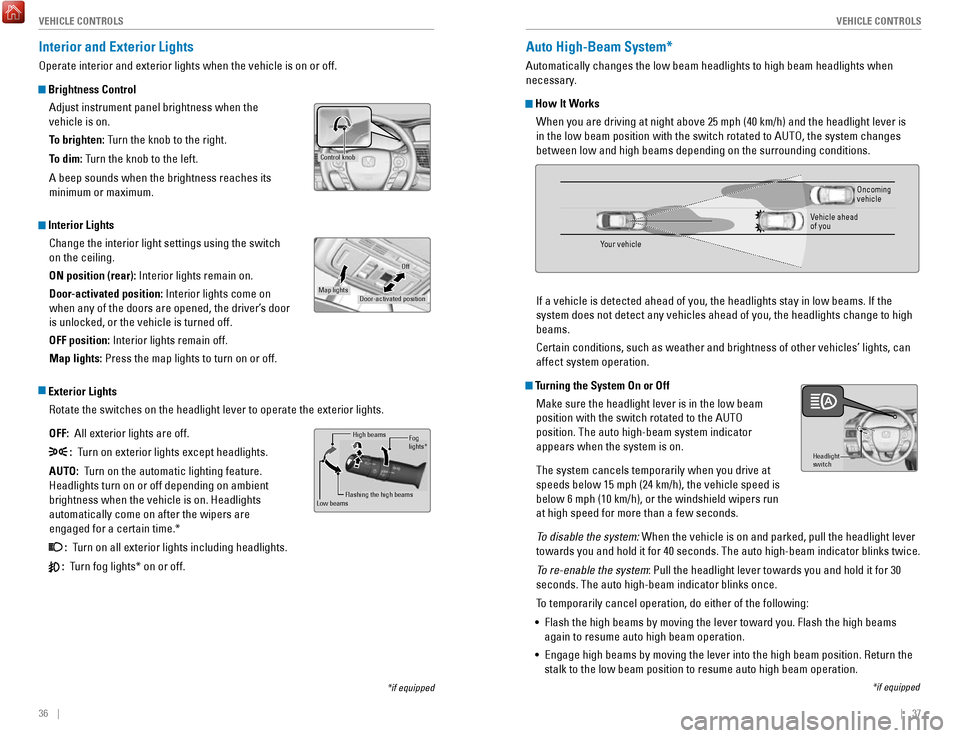
Brightness Control
Adjust instrument panel brightness when the
vehicle is on.
To brighten: Turn the knob to the right.
To dim: Turn the knob to the left.
A beep sounds when the brightness reaches its
minimum or maximum.
Interior LightsChange the interior light settings using the switch
on the ceiling.
ON position (rear): Interior lights remain on.
Door-activated position: Interior lights come on
when any of the doors are opened, the driver’s door
is unlocked, or the vehicle is turned off.
OFF position: Interior lights remain off.
Map lights: Press the map lights to turn on or off.
Exterior Lights
rotate the switches on the headlight lever to operate the exterior lights\
.
OFF: All exterior lights are off.
: Turn on exterior lights except headlights.
AUTO: Turn on the automatic lighting feature.
Headlights turn on or off depending on ambient
brightness when the vehicle is on. Headlights
automatically come on after the wipers are
engaged for a certain time.*
: Turn on all exterior lights including headlights.
: Turn fog lights* on or off.
*if equipped
Control knob
Door-activated position
Off
Map lights
High beams
Flashing the high beams
Low beamsFog
lights *
Auto High-Beam System*
Automatically changes the low beam headlights to high beam headlights wh\
en
necessary.
How It Works
When you are driving at night above 25 mph (40 km/h) and the headlight\
lever is
in the low beam position with the switch rotated to AUT
o, the system changes
between low and high beams depending on the surrounding conditions.
If a vehicle is detected ahead of you, the headlights stay in low beams.\
If
the
system does not detect any vehicles ahead of you, the headlights change \
to high
beams.
Certain conditions, such as weather and brightness of other vehicles’\
lights, can
affect system operation.
Turning the System On or Off
Make sure the headlight lever is in the low beam
position with the switch rotated to the AUT
o
position. The auto high-beam system indicator
appears when the system is on.
The system cancels temporarily when you drive at
speeds below 15 mph (24 km/h), the vehicle speed is
below 6 mph (10 km/h), or the windshield wipers run
at high speed for more than a few seconds.
To disable the system:
When the vehicle is on and parked, pull the headlight lever
towards you and hold it for 40 seconds. The auto high-beam indicator bli\
nks twice.
To re-enable the system: Pull the headlight lever towards you and hold it for 30
seconds. The auto high-beam indicator blinks once.
To temporarily cancel operation, do either of the following:
•
Flash the high beams by moving the lever toward you. Flash the high beam\
s
again to resume auto high beam operation.
•
engage high beams by moving the lever into the high beam position. return the
stalk to the low beam position to resume auto high beam operation.
Headlight
switch
*if equipped
Your vehicle
oncoming
vehicle
vehicle ahead
of you
Page 23 of 80

38 || 39
V
EHICLE CONTROLSVEHICLE CONTROLS
Wiper Operation
The windshield wipers and washers can be used when the vehicle is on.
Move the wiper lever up or down to the desired position.
Pull toward
you to use
washer.
MIST
OFF
INT* / AUTO*
LO: Low speed wipe
HI: High speed wipe
*if equipped
Intermittent (INT) Wipers*
When you move the lever to the INT position, the
wipers operate based on the delay adjustment.
rotate the adjustment ring to adjust the wiper delay.
Headlight-Wiper Integration*When the headlights are in the AUT
o position, they automatically turn on when
the front wipers operate several times within a certain interval. The he\
adlights
turn off shortly after the wipers are turned off, or if there is enough \
ambient light.
Adjustment rin g
INT
position
Lower speed
Higher speed
Using the Auto High-Beam System
If you find the timing of beam changes inconvenient for driving, chang\
e the
headlight beams manually.
If the Can Not
operate: message appears: park your vehicle in a safe place.
Wipe away debris blocking the windshield, then start driving again. If t\
he message
remains on even after driving for a while with the clean windshield, hav\
e your
vehicle checked by a dealer.
For the auto high-beam system to work properly:
•
Do not place an object that reflects light on the dashboard.
•
Keep the windshield around the camera clean.
•
When cleaning the windshield, be careful not to apply the windshield cle\
anser
to the camera lens.
•
Do not attach an object, sticker or film in the area around the camera\
.
•
Do not touch the camera lens.
•
If the camera receives a strong impact, or repairing of the area near th\
e camera
is required, consult a dealer.
Page 24 of 80

40 || 41
V
EHICLE CONTROLSVEHICLE CONTROLS
Always ensure the wiper lever is in the oFF position before entering a car wash to
prevent severe damage to the windshield wiper system.
NOTICE
Do not use the wipers when the windshield is dry. The windshield will get
scratched, or the rubber blades will get damaged.
In cold weather, the blades may freeze to the windshield, becoming stuck.
operating the wipers in this condition may damage the wipers. Use the def\
roster
to warm the windshield, or manually clear the windshield of ice and sno
w before
turning on the wipers.
NOTICE
Automatic (AUTO) Rain-Sensing Wipers*
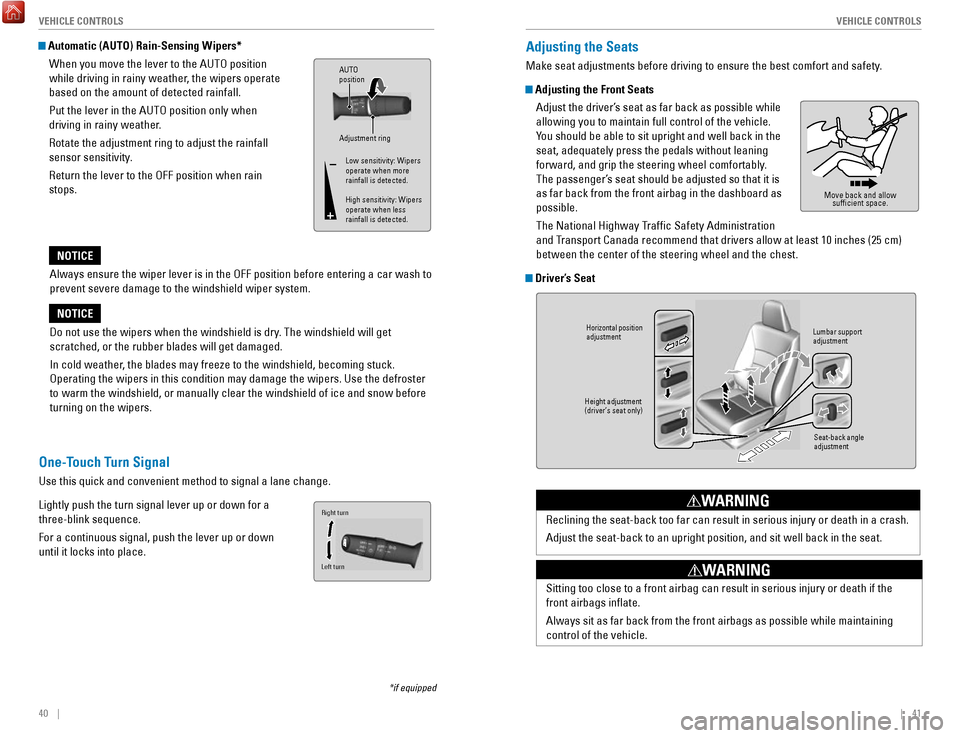
When you move the lever to the AUT
o position
while driving in rainy weather, the wipers operate
based on the amount of detected rainfall.
Put the lever in the AUT
o position only when
driving in rainy weather.
rotate the adjustment ring to adjust the rainfall
sensor sensitivity.
return the lever to the oFF position when rain
stops.
Adjustment ring
AUTO
position
Low sensitivity: Wipers
operate when more
rainfall is detected.
High sensitivity: Wipers
operate when less
rainfall is detected.
*if equipped
One-Touch Turn Signal
Use this quick and convenient method to signal a lane change.
Lightly push the turn signal lever up or down for a
three-blink sequence.
For a continuous signal, push the lever up or down
until it locks into place.
Right turn
Left turn
Adjusting the Seats
Make seat adjustments before driving to ensure the best comfort and safe\
ty.
Adjusting the Front Seats Adjust the driver’s seat as far back as possible while
allowing you to maintain full control of the vehicle.
You should be able to sit upright and well back in the
seat, adequately press the pedals without leaning
forward, and grip the steering wheel comfortably.
The passenger’s seat should be adjusted so that it is
as far back from the front airbag in the dashboard as
possible.
The National Highway Traffic Safety Administration
and Transport Canada recommend that drivers allow at least 10 inches (25 cm)\
between the center of the steering wheel and the chest.
Driver’s Seat
Move back and allow sufficient space.
Horizontal position
adjustment
Height adjustment
(driver’s seat only) Seat-back angle
adjustment
Lumbar support
adjustment
reclining the seat-back too far can result in serious injury or death in \
a crash.
Adjust the seat-back to an upright position, and sit well back in the se\
at.
WARNING
Sitting too close to a front airbag can result in serious injury or deat\
h if the
front airbags inflate.
Always sit as far back from the front airbags as possible while maintain\
ing
control of the vehicle.
WARNING