2017 FORD TAURUS ECU
[x] Cancel search: ECUPage 243 of 504
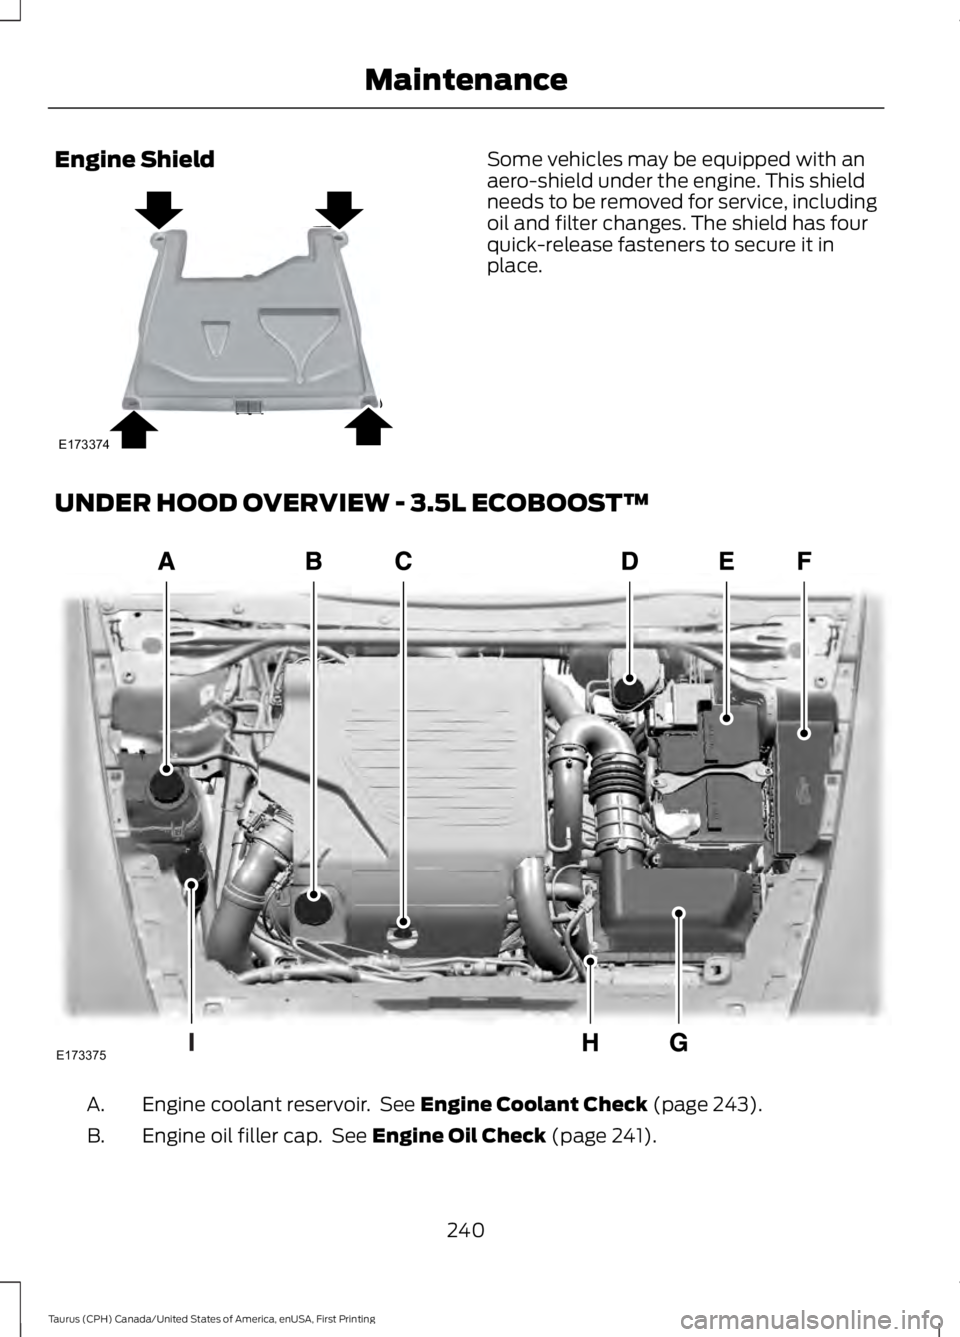
Engine ShieldSome vehicles may be equipped with anaero-shield under the engine. This shieldneeds to be removed for service, includingoil and filter changes. The shield has fourquick-release fasteners to secure it inplace.
UNDER HOOD OVERVIEW - 3.5L ECOBOOST™
Engine coolant reservoir. See Engine Coolant Check (page 243).A.
Engine oil filler cap. See Engine Oil Check (page 241).B.
240
Taurus (CPH) Canada/United States of America, enUSA, First Printing
MaintenanceE173374 E173375
Page 260 of 504

2. Remove the screws that secure thelamp assembly.3. Remove the bulb.
BULB SPECIFICATION CHART
The specified replacement bulbs are in thechart below. Headlamp bulbs must bemarked with an authorized D.O.T.(Department of Transportation) for NorthAmerica to affirm lamp performance, lightbrightness and pattern and safe visibility.The correct bulbs will not damage thelamp assembly or void the lamp assemblywarranty and will provide quality bulb burntime.
Trade numberFunction
D3S* Headlamp (high intensity discharge) Lowand High
LED* Sidemarker - front
LED* Park lamp - front
7444NA* Turn lamp - front
LEDSignal indicator mirror lamp
LEDApproach lamp
LED* Tail and brake lamp
LED* Turn lamp - rear
LED* Backup lamp
257
Taurus (CPH) Canada/United States of America, enUSA, First Printing
MaintenanceE178598 E178599
Page 262 of 504
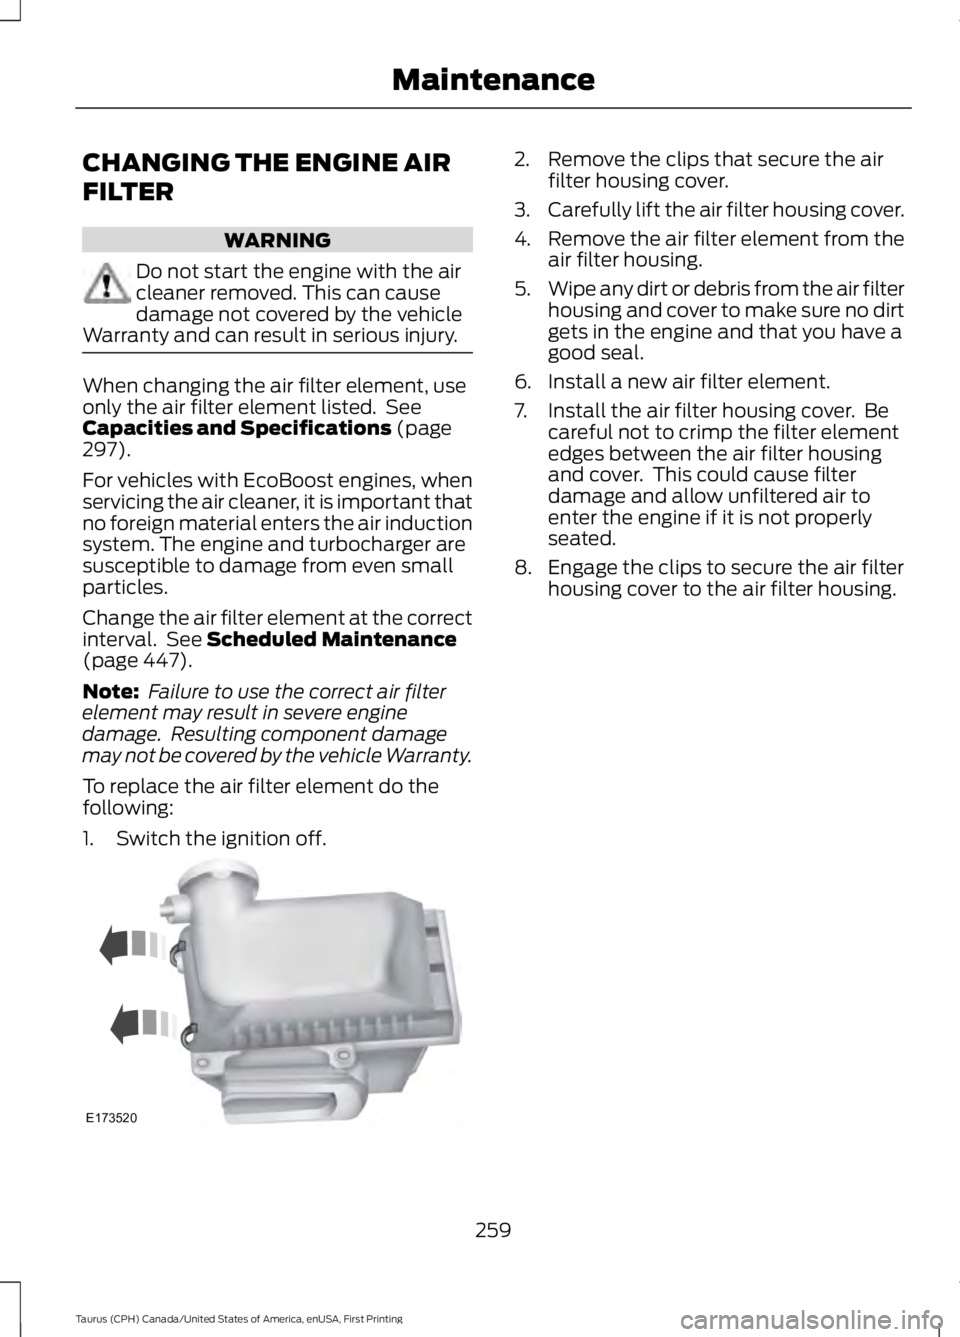
CHANGING THE ENGINE AIR
FILTER
WARNING
Do not start the engine with the aircleaner removed. This can causedamage not covered by the vehicleWarranty and can result in serious injury.
When changing the air filter element, useonly the air filter element listed. SeeCapacities and Specifications (page297).
For vehicles with EcoBoost engines, whenservicing the air cleaner, it is important thatno foreign material enters the air inductionsystem. The engine and turbocharger aresusceptible to damage from even smallparticles.
Change the air filter element at the correctinterval. See Scheduled Maintenance(page 447).
Note: Failure to use the correct air filterelement may result in severe enginedamage. Resulting component damagemay not be covered by the vehicle Warranty.
To replace the air filter element do thefollowing:
1. Switch the ignition off.
2. Remove the clips that secure the airfilter housing cover.
3.Carefully lift the air filter housing cover.
4.Remove the air filter element from theair filter housing.
5.Wipe any dirt or debris from the air filterhousing and cover to make sure no dirtgets in the engine and that you have agood seal.
6. Install a new air filter element.
7. Install the air filter housing cover. Becareful not to crimp the filter elementedges between the air filter housingand cover. This could cause filterdamage and allow unfiltered air toenter the engine if it is not properlyseated.
8. Engage the clips to secure the air filterhousing cover to the air filter housing.
259
Taurus (CPH) Canada/United States of America, enUSA, First Printing
MaintenanceE173520
Page 271 of 504

General Information
WARNING
Failure to follow these guidelinescould result in an increased risk ofloss of vehicle control, injury or death.
Note:Do not use the kit if a tire has becomeseverely damaged by driving the vehicle witha tire that has insufficient air pressure. Onlypunctured areas located within the tire treadcan be sealed with the kit.
Do not attempt to repair punctures largerthan ¼ inch (6 millimeters) or damage tothe tire's sidewall. The tire may notcompletely seal.
Loss of air pressure may adversely affecttire performance. For this reason:
Note:Do not drive the vehicle above50 mph (80 km/h).
Note:Do not drive further than 120 mi(200 km). Drive only to the closestauthorized Ford dealer or tire repair shop tohave your tire inspected.
•Drive carefully and avoid abruptsteering maneuvers.
•Periodically monitor tire inflationpressure in the affected tire. If the tireis losing pressure, have the vehicletowed.
•Read the information in the Tips forUse of the Kit section to make sure safeoperation of the kit and your vehicle.
Tips for Use of the Kit
Read the following list of tips to ensuresafe operation of the kit:
•Before operating the kit, make sureyour vehicle is safely off the road andaway from moving traffic. Turn on thehazard lights.
•Always set the parking brake to ensurethe vehicle does not moveunexpectedly.
•Do not remove any foreign objects,such as nails or screws, from the tire.
•When using the kit, leave the enginerunning (only if the vehicle is outdoorsor in a well-ventilated area) so thecompressor does not drain the vehiclebattery.
•Do not allow the compressor tooperate continuously for more than 15minutes. This will help prevent thecompressor from overheating.
•Never leave the kit unattended whenit is operating.
•Sealant compound contains latex.Make sure that you use the non-latexgloves provided to avoid an allergicreaction.
•Keep the kit away from children.
•Only use the kit when the ambienttemperature is between -22°F (-30°C)and 158°F (70°C).
•Only use the sealing compound beforethe use by date. The use by date is onthe lower right hand corner of the labellocated on the sealant canister(bottle). Check the use by dateregularly and replace the canister afterfour years.
•Do not store the kit unsecured insidethe passenger compartment of thevehicle as it may cause injury during asudden stop or crash. Always store thekit in its original location.
•After sealant use, the tire pressuremonitoring system sensor and valvestem on the wheel must be replacedby an authorized Ford dealer.
268
Taurus (CPH) Canada/United States of America, enUSA, First Printing
Wheels and Tires
Page 272 of 504

•When inflating a tire or other objects,use the black air hose only. Do not usethe transparent hose which is designedfor sealant application only.
•Operating the kit could cause anelectrical disturbance in radio, CD, andDVD player operation.
What to do when a Tire IsPunctured
A tire puncture within the tire tread areacan be repaired in two stages with the kit.
•In the first stage, the tire will bereinflated with a sealing compoundand air. After the tire has beenreinflated, you will need to drive thevehicle a short distance 4 mi (6 km) todistribute the sealant in the tire.
•In the second stage, you will need tocheck the tire pressure and adjust, ifnecessary, to the vehicle tire inflationpressure.
First Stage: Reinflating the Tirewith Sealing Compound and Air
WARNINGS
Do not stand directly over the kitwhile inflating the tire. If you noticeany unusual bulges or deformationsin the tire sidewall during inflation, stopand call roadside assistance.
If the tire does not inflate to therecommended tire pressure within15 minutes, stop and call roadsideassistance.
Preparation: Park the vehicle in a safe, leveland secure area, away from moving traffic.Turn the hazard lights on. Apply the parkingbrake and turn the engine off. Inspect theflat tire for visible damage.
Sealant compound contains latex. Toavoid any allergic reactions, use thenon-latex gloves located in the accessorybox on the underside of the kit housing.
Do not remove any foreign object that haspierced the tire. If a puncture is located inthe tire sidewall, stop and call roadsideassistance.
1. Remove the valve cap from the tirevalve.
2. Unwrap the clear tube from thecompressor housing.
3. Remove the tube cap and fasten themetal connector of the tube to the tirevalve, turning clockwise. Make sure theconnection is tightly fastened.
4. Plug the power cable into the 12-voltpower point in the vehicle.
5. Remove the warning sticker found onthe canister and place it on the top ofthe instrument panel or the center ofthe dash.
6. Start the vehicle only if the vehicle isoutdoors or in a well-ventilated area.
269
Taurus (CPH) Canada/United States of America, enUSA, First Printing
Wheels and TiresE144619
Page 290 of 504
Note:The suspension insulation andbumpers will help prevent vehicle damage.Do not remove these components from yourvehicle when using snow tires and chains.
If the tires on your vehicle have all seasontreads, they will provide traction in rain andsnow. However, in some climates, you mayneed to use snow tires and cables. If youneed to use cables, it is recommended thatsteel wheels (of the same size andspecifications) be used, as cables may chipaluminum wheels.
Follow these guidelines when using snowtires and chains:
•If possible, avoid fully loading yourvehicle.
•Use only SAE Class S snow chains,snow cables or equivalent on the frontaxle for P235/55R18 equipped vehicles.The use of snow chains, snow cablesor other traction assist devices that arelarger than SAE Class S may causedamage to your vehicle’s wheel house,suspension and/or body.
•Do not install tire chains, cables, oroptional traction devices on the reartires. This could cause damage to thevehicle’s wheel house or body.
•Install cable chains securely, verifyingthat the cables do not touch any wiring,brake lines or fuel lines.
•Do not exceed 30 mph (48 km/h) withtire cables on your vehicle.
•Drive cautiously. If you hear the cablesrub or bang against your vehicle, stopand retighten the cables. If this doesnot work, remove the cables to preventdamage to your vehicle.
•Remove the tire cables when they areno longer needed. Do not use tirecables on dry roads.
TIRE PRESSURE MONITORING
SYSTEM
WARNING
The tire pressure monitoring systemis not a substitute for manuallychecking tire pressures. You shouldperiodically check tire pressures using apressure gauge. Failure to correctlymaintain tire pressures could increase therisk of tire failure, loss of control, vehiclerollover and personal injury.
Each tire, including the spare (ifprovided), should be checkedmonthly when cold and inflatedto the inflation pressure recommended bythe vehicle manufacturer on the vehicleplacard or tire inflation pressure label. (Ifyour vehicle has tires of a different sizethan the size indicated on the vehicleplacard or tire inflation pressure label, youshould determine the proper tire inflationpressure for those tires.)
As an added safety feature, your vehiclehas been equipped with a Tire PressureMonitoring System (TPMS) thatilluminates a low tire pressure telltalewhen one or more of your tires issignificantly under-inflated. Accordingly,when the low tire pressure telltaleilluminates, you should stop and checkyour tires as soon as possible, and inflatethem to the proper pressure. Driving on asignificantly under-inflated tire causes thetire to overheat and can lead to tire failure.Under-inflation also reduces fuel efficiencyand tire tread life, and may affect thevehicle’s handling and stopping ability.
287
Taurus (CPH) Canada/United States of America, enUSA, First Printing
Wheels and Tires
Page 295 of 504
2.Full-size dissimilar spare with labelon wheel: This spare tire has a label onthe wheel that states: THIS WHEEL ANDTIRE ASSEMBLY FOR TEMPORARY USEONLY.
When driving with one of the dissimilarspare tires listed above, do not:
•Exceed 50 mph (80 km/h).
•Load the vehicle beyond maximumvehicle load rating listed on the SafetyCompliance Label.
•Tow a trailer.
•Use snow chains on the end of thevehicle with the dissimilar spare tire.
•Use more than one dissimilar spare tireat a time.
•Use commercial car washingequipment.
•Try to repair the dissimilar spare tire.
Use of one of the dissimilar spare tireslisted above at any one wheel location canlead to impairment of the following:
•Handling, stability and brakingperformance.
•Comfort and noise.
•Ground clearance and parking at curbs.
•Winter weather driving capability.
•Wet weather driving capability.
•All-wheel driving capability.
3.Full-size dissimilar spare withoutlabel on wheel
When driving with the full-size dissimilarspare wheel and tire assembly, do not:
•Exceed 70 mph (113 km/h).
•Use more than one dissimilar sparewheel and tire assembly at a time.
•Use commercial car washingequipment.
•Use snow chains on the end of thevehicle with the dissimilar spare wheeland tire assembly.
The usage of a full-size dissimilar sparewheel and tire assembly can lead toimpairment of the following:
•Handling, stability and brakingperformance.
•Comfort and noise.
•Ground clearance and parking at curbs.
•Winter weather driving capability.
•Wet weather driving capability.
•All-wheel driving capability.
When driving with the full-size dissimilarspare wheel and tire assembly additionalcaution should be given to:
•Towing a trailer.
•Driving vehicles equipped with acamper body.
•Driving vehicles with a load on thecargo rack.
Drive cautiously when using a full-sizedissimilar spare wheel and tire assemblyand seek service as soon as possible.
Tire Change Procedure
WARNINGS
When one of the front wheels is offthe ground, the transmission alonewill not prevent the vehicle frommoving or slipping off the jack, even if thetransmission is in park (P).
To help prevent your vehicle frommoving when changing a wheel, shiftthe transmission into park (P), setthe parking brake and use an appropriateblock or wheel chock to secure the wheeldiagonally opposite to the wheel beingchanged. For example, when changing thefront left wheel, place an appropriate blockor wheel chock on the right rear wheel.
Do not work on your vehicle whenthe jack is the only support. If thevehicle slips off the jack, you orsomeone else could be seriously injured.
292
Taurus (CPH) Canada/United States of America, enUSA, First Printing
Wheels and Tires
Page 296 of 504
WARNINGS
Do not attempt to change a tire onthe side of the vehicle close tomoving traffic. Pull far enough off theroad to avoid the danger of being hit whenoperating the jack or changing the wheel.
Always use the jack provided asoriginal equipment with your vehicle.If using a jack other than the oneprovided, make sure the jack capacity isadequate for the vehicle weight, includingany vehicle cargo or modifications. If youare unsure if the jack capacity is adequate,contact the authorized dealer.
Note:Passengers should not remain in yourvehicle when the vehicle is being jacked.
Note:Jack at the specified locations toavoid damage to the vehicle.
1.Park on a level surface, set the parkingbrake and activate the hazard flashers.
2.Place the transmission in park (P) andturn the engine off.
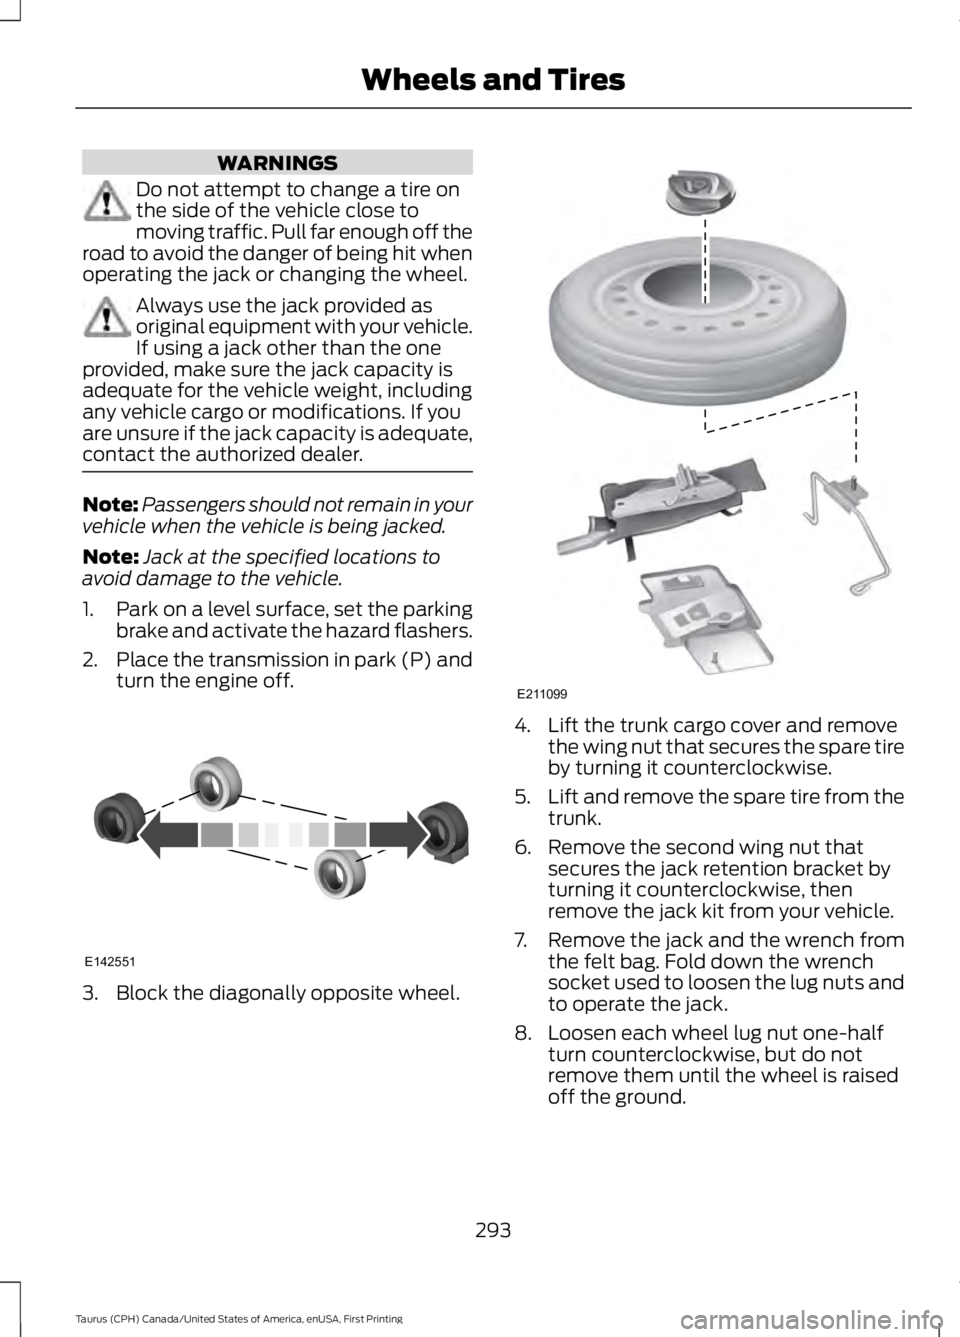
3. Block the diagonally opposite wheel.
4. Lift the trunk cargo cover and removethe wing nut that secures the spare tireby turning it counterclockwise.
5.Lift and remove the spare tire from thetrunk.
6. Remove the second wing nut thatsecures the jack retention bracket byturning it counterclockwise, thenremove the jack kit from your vehicle.
7. Remove the jack and the wrench fromthe felt bag. Fold down the wrenchsocket used to loosen the lug nuts andto operate the jack.
8. Loosen each wheel lug nut one-halfturn counterclockwise, but do notremove them until the wheel is raisedoff the ground.
293
Taurus (CPH) Canada/United States of America, enUSA, First Printing
Wheels and TiresE142551 E211099