2017 FORD TAURUS transmission
[x] Cancel search: transmissionPage 151 of 504

Note:When you insert the correct size fuelpump nozzle a spring loaded inhibitor willopen.
2. Insert the fuel pump nozzle up to thefirst notch on the nozzle A. Keep itresting on the cover of the fuel tankfiller pipe opening.
3. Hold the fuel pump nozzle in positionB when refueling. Holding the fuelnozzle in position A can affect the flowof fuel and shut off the fuel nozzlebefore the fuel tank is full.
4. Operate the fuel pump nozzle withinthe area shown.
5.Slightly raise the fuel pump nozzle andthen slowly remove it.
6. Fully close the fuel tank filler door.
Note: Do not attempt to start the engineif you have filled the fuel tank with incorrectfuel. Incorrect fuel use can cause damagenot covered by the vehicle Warranty. Haveyour vehicle checked immediately.
System Warnings (If Equipped)
If the fuel filler inlet does not fully close awarning message appears in theinformation display.
1. Stop your vehicle as soon as safelypossible and shift the transmission intopark (P) or neutral (N).
2.Apply the parking brake and switch theignition off.
3.Fully open the fuel tank filler door untilit engages.
4. Check the fuel filler inlet and the areaaround it for any items or debris thatmay be obstructing its movement.
148
Taurus (CPH) Canada/United States of America, enUSA, First Printing
Fuel and RefuelingE139202
A E139203
A
B E206912
AB E119081
Page 154 of 504

an emission control device or prevent itfrom working. Information about yourvehicle’s emission system is on the VehicleEmission Control Information Decallocated on or near the engine. This decalalso lists engine displacement.
Please consult your warranty informationfor complete details.
On-Board Diagnostics (OBD-II)
Your vehicle has a computer known as theon-board diagnostics system (OBD-II) thatmonitors the engine’s emission controlsystem. The system protects theenvironment by making sure that yourvehicle continues to meet governmentemission standards. The OBD-II systemalso assists a service technician in properlyservicing your vehicle.
When the service engine soonindicator illuminates, the OBD-IIsystem has detected amalfunction. Temporary malfunctions maycause the service engine soon indicator toilluminate. Examples are:
1. Your vehicle has run out of fuel—theengine may misfire or run poorly.
2. Poor fuel quality or water in thefuel—the engine may misfire or runpoorly.
3. The fuel fill inlet may not have closedproperly. See Refueling (page 147).
4. Driving through deep water—theelectrical system may be wet.
You can correct these temporarymalfunctions by filling the fuel tank withgood quality fuel, properly closing the fuelfill inlet or letting the electrical system dryout. After three driving cycles without theseor any other temporary malfunctions
present, the service engine soon indicatorshould stay off the next time you start theengine. A driving cycle consists of a coldengine startup followed by mixed city andhighway driving. No additional vehicleservice is required.
If the service engine soon indicator remainson, have your vehicle serviced at the firstavailable opportunity. Although somemalfunctions detected by the OBD-II maynot have symptoms that are apparent,continued driving with the service enginesoon indicator on can result in increasedemissions, lower fuel economy, reducedengine and transmission smoothness andlead to more costly repairs.
Readiness for Inspection andMaintenance (I/M) Testing
Some state and provincial and localgovernments may haveInspection/Maintenance (I/M) programsto inspect the emission control equipmenton your vehicle. Failure to pass thisinspection could prevent you from gettinga vehicle registration.
If the service engine soonindicator is on or the bulb doesnot work, your vehicle may needservice. See On-Board Diagnostics.
Your vehicle may not pass the I/M test ifthe service engine soon indicator is on ornot working properly (bulb is burned out),or if the OBD-II system has determinedthat some of the emission control systemshave not been properly checked. In thiscase, the vehicle is not ready for I/Mtesting.
If the vehicle’s engine or transmission hasjust been serviced, or the battery hasrecently run down or been replaced, theOBD-II system may indicate that thevehicle is not ready for I/M testing. Todetermine if the vehicle is ready for I/Mtesting, turn the ignition key to the on
151
Taurus (CPH) Canada/United States of America, enUSA, First Printing
Fuel and Refueling
Page 156 of 504
AUTOMATIC TRANSMISSION
WARNINGS
Always fully apply the parking brakeand make sure you shift into park (P).Switch the ignition off and removethe key whenever you leave your vehicle.
Do not apply the brake pedal andaccelerator pedal simultaneously.Applying both pedals simultaneouslyfor more than a few seconds will limitengine performance, which may result indifficulty maintaining speed in traffic andcould lead to serious injury.
Understanding the Positions ofYour Automatic Transmission
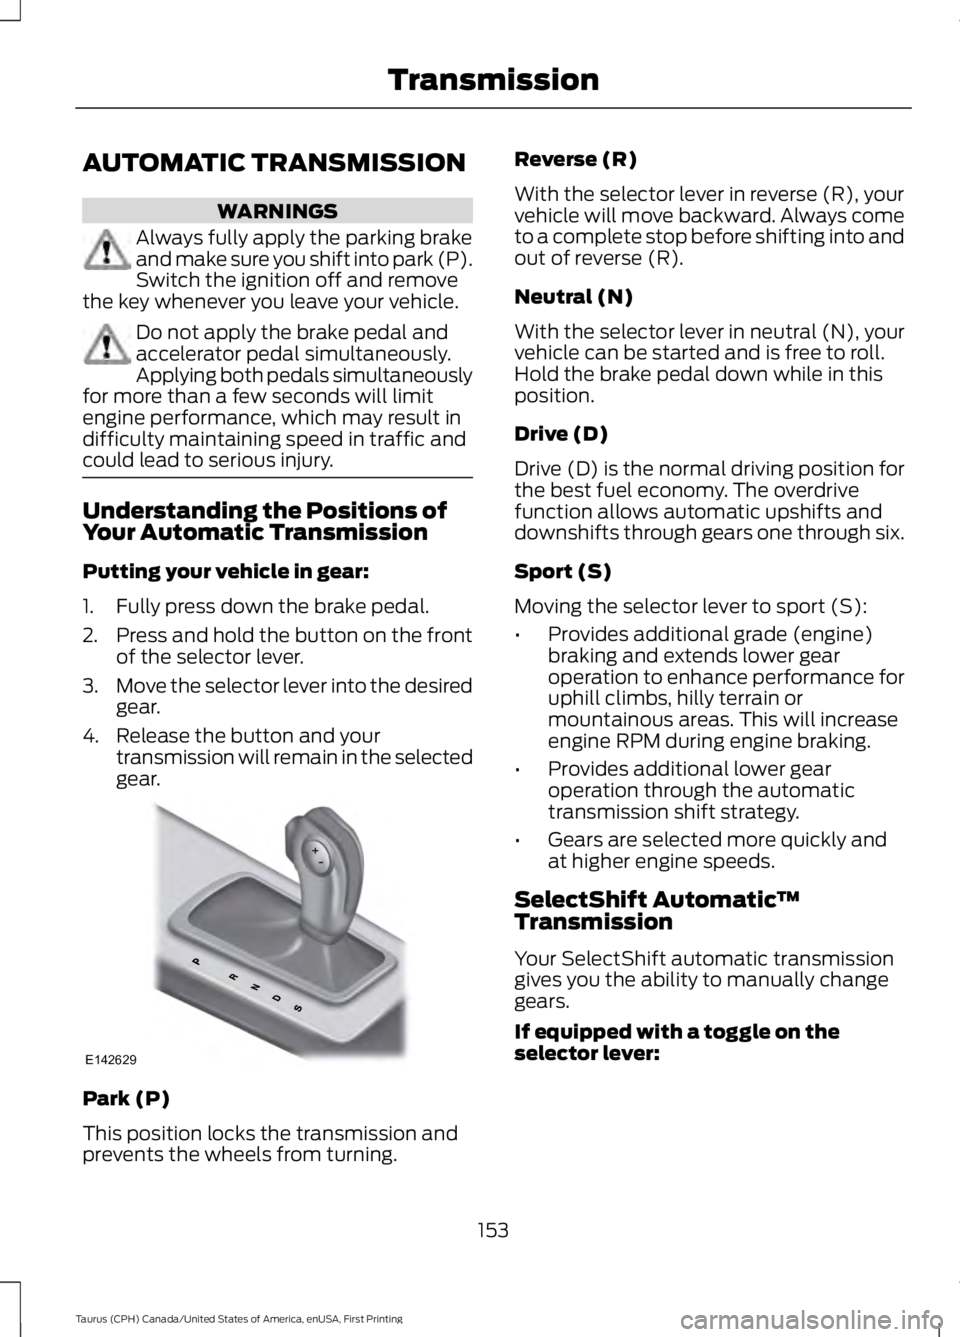
Putting your vehicle in gear:
1. Fully press down the brake pedal.
2.Press and hold the button on the frontof the selector lever.
3.Move the selector lever into the desiredgear.
4. Release the button and yourtransmission will remain in the selectedgear.
Park (P)
This position locks the transmission andprevents the wheels from turning.
Reverse (R)
With the selector lever in reverse (R), yourvehicle will move backward. Always cometo a complete stop before shifting into andout of reverse (R).
Neutral (N)
With the selector lever in neutral (N), yourvehicle can be started and is free to roll.Hold the brake pedal down while in thisposition.
Drive (D)
Drive (D) is the normal driving position forthe best fuel economy. The overdrivefunction allows automatic upshifts anddownshifts through gears one through six.
Sport (S)
Moving the selector lever to sport (S):
•Provides additional grade (engine)braking and extends lower gearoperation to enhance performance foruphill climbs, hilly terrain ormountainous areas. This will increaseengine RPM during engine braking.
•Provides additional lower gearoperation through the automatictransmission shift strategy.
•Gears are selected more quickly andat higher engine speeds.
SelectShift Automatic™Transmission
Your SelectShift automatic transmissiongives you the ability to manually changegears.
If equipped with a toggle on theselector lever:
153
Taurus (CPH) Canada/United States of America, enUSA, First Printing
TransmissionE142629
Page 157 of 504
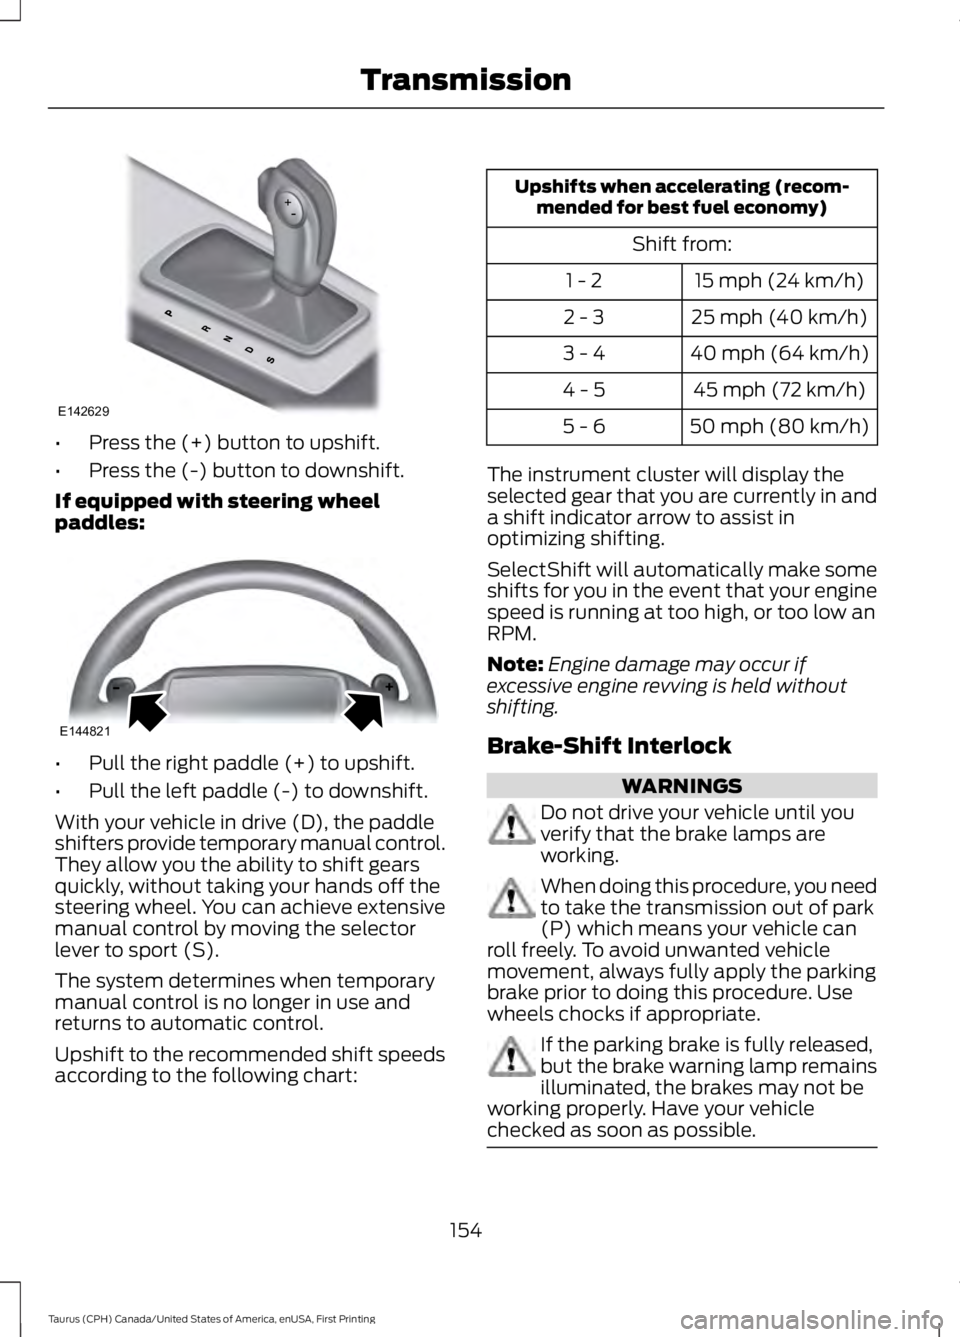
•Press the (+) button to upshift.
•Press the (-) button to downshift.
If equipped with steering wheelpaddles:
•Pull the right paddle (+) to upshift.
•Pull the left paddle (-) to downshift.
With your vehicle in drive (D), the paddleshifters provide temporary manual control.They allow you the ability to shift gearsquickly, without taking your hands off thesteering wheel. You can achieve extensivemanual control by moving the selectorlever to sport (S).
The system determines when temporarymanual control is no longer in use andreturns to automatic control.
Upshift to the recommended shift speedsaccording to the following chart:
Upshifts when accelerating (recom-mended for best fuel economy)
Shift from:
15 mph (24 km/h)1 - 2
25 mph (40 km/h)2 - 3
40 mph (64 km/h)3 - 4
45 mph (72 km/h)4 - 5
50 mph (80 km/h)5 - 6
The instrument cluster will display theselected gear that you are currently in anda shift indicator arrow to assist inoptimizing shifting.
SelectShift will automatically make someshifts for you in the event that your enginespeed is running at too high, or too low anRPM.
Note:Engine damage may occur ifexcessive engine revving is held withoutshifting.
Brake-Shift Interlock
WARNINGS
Do not drive your vehicle until youverify that the brake lamps areworking.
When doing this procedure, you needto take the transmission out of park(P) which means your vehicle canroll freely. To avoid unwanted vehiclemovement, always fully apply the parkingbrake prior to doing this procedure. Usewheels chocks if appropriate.
If the parking brake is fully released,but the brake warning lamp remainsilluminated, the brakes may not beworking properly. Have your vehiclechecked as soon as possible.
154
Taurus (CPH) Canada/United States of America, enUSA, First Printing
TransmissionE142629 E144821
Page 158 of 504
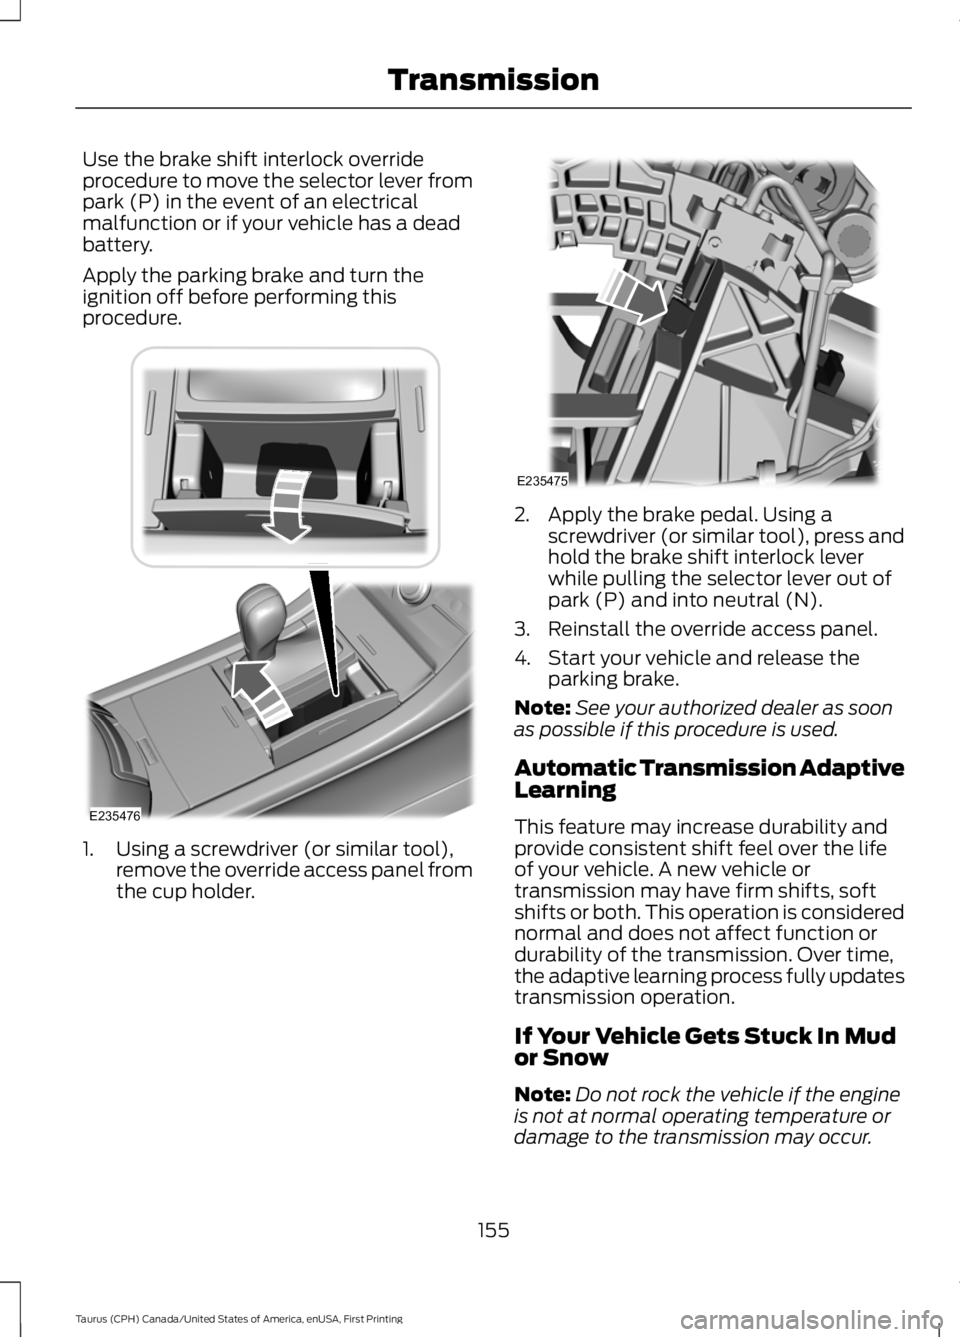
Use the brake shift interlock overrideprocedure to move the selector lever frompark (P) in the event of an electricalmalfunction or if your vehicle has a deadbattery.
Apply the parking brake and turn theignition off before performing thisprocedure.
1. Using a screwdriver (or similar tool),remove the override access panel fromthe cup holder.
2. Apply the brake pedal. Using ascrewdriver (or similar tool), press andhold the brake shift interlock leverwhile pulling the selector lever out ofpark (P) and into neutral (N).
3. Reinstall the override access panel.
4. Start your vehicle and release theparking brake.
Note:See your authorized dealer as soonas possible if this procedure is used.
Automatic Transmission AdaptiveLearning
This feature may increase durability andprovide consistent shift feel over the lifeof your vehicle. A new vehicle ortransmission may have firm shifts, softshifts or both. This operation is considerednormal and does not affect function ordurability of the transmission. Over time,the adaptive learning process fully updatestransmission operation.
If Your Vehicle Gets Stuck In Mudor Snow
Note:Do not rock the vehicle if the engineis not at normal operating temperature ordamage to the transmission may occur.
155
Taurus (CPH) Canada/United States of America, enUSA, First Printing
TransmissionE235476 E235475
Page 159 of 504
Note:Do not rock the vehicle for more thana minute or damage to the transmission andtires may occur, or the engine may overheat.
If your vehicle gets stuck in mud or snow,it may be rocked out by shifting betweenforward and reverse gears, stoppingbetween shifts in a steady pattern. Presslightly on the accelerator in each gear.
156
Taurus (CPH) Canada/United States of America, enUSA, First Printing
Transmission
Page 162 of 504
Operating AWD Vehicles WithMismatched Tires
WARNINGS
Only use replacement tires andwheels that are the same size, loadindex, speed rating and type (suchas P-metric versus LT-metric or all-seasonversus all-terrain) as those originallyprovided by Ford. The recommended tireand wheel size may be found on either theSafety Compliance Certification Label(affixed to either the door hinge pillar,door-latch post, or the door edge thatmeets the door-latch post, next to thedriver's seating position), or the Tire Labelwhich is located on the B-Pillar or edge ofthe driver's door. If this information is notfound on these labels, then you shouldcontact your authorized dealer as soon aspossible. Use of any tire or wheel notrecommended by Ford can affect thesafety and performance of your vehicle,which could result in an increased risk ofloss of vehicle control, vehicle rollover,personal injury and death.
The use of non-recommended tiresand wheels could cause steering,suspension, axle, transfer case orpower transfer unit failure. If you havequestions regarding tire replacement,contact your authorized dealer as soon aspossible.
Major dissimilar tire sizes between the frontand rear axles (for example, 17 inch lowprofile tires on the front axle and 22 inchhigh profile tires on the rear axle) couldcause the AWD system to stop functioningand default to front-wheel drive or damagethe AWD system. However, the AWDsystem is capable of tolerating anycombination of new and worn tires of thesame original tire size. For example, using3 worn tread tires and 1 new tread tire allof the same original tire size, can betolerated by the AWD system.
Driving In Special Conditions WithAll-Wheel Drive (AWD)
AWD vehicles are equipped for driving onsand, snow, mud and rough roads and haveoperating characteristics that aresomewhat different from conventionalvehicles, both on and off the highway.
When driving at slow speeds in deep sandunder high outside temperatures, use a lowgear when possible. Lower gear operationwill maximize the engine and transmissioncooling capability.
Under severe operating conditions, the A/Cmay cycle on and off to protectoverheating of the engine.
Basic operating principles in specialconditions
•Drive slower in strong crosswinds whichcan affect the normal steeringcharacteristics of your vehicle.
•Be extremely careful when driving onpavement made slippery by loose sand,water, gravel, snow or ice.
159
Taurus (CPH) Canada/United States of America, enUSA, First Printing
All-Wheel Drive (If Equipped)
Page 163 of 504

If Your Vehicle Goes Off the Edge of thePavement
•If your vehicle goes off the edge of thepavement, slow down, but avoid severebrake application, ease the vehicleback onto the pavement only afterreducing your speed. Do not turn thesteering wheel too sharply whilereturning to the road surface.
•It may be safer to stay on the apron orshoulder of the road and slow downgradually before returning to thepavement. You may lose control if youdo not slow down or if you turn thesteering wheel too sharply or abruptly.
•It often may be less risky to strike smallobjects, such as highway reflectors,with minor damage to your vehiclerather than attempt a sudden return tothe pavement which could cause thevehicle to slide sideways out of controlor rollover. Remember, your safety andthe safety of others should be yourprimary concern.
If Your Vehicle Gets Stuck
WARNINGS
Always fully apply the parking brakeand make sure you shift into park (P).Switch the ignition off and removethe key whenever you leave your vehicle.
If the parking brake is fully released,but the brake warning lamp remainsilluminated, the brakes may not beworking properly. Have your vehiclechecked as soon as possible.
Do not spin the wheels at over34 mph (55 km/h). The tires may failand injure a passenger or bystander.
Note:Do not rock the vehicle if the engineis not at normal operating temperature ordamage to the transmission may occur.
Note:Do not rock the vehicle for more thana few minutes or damage to thetransmission and tires may occur or theengine may overheat.
If your vehicle gets stuck in mud or snow itmay be rocked out by shifting betweenforward and reverse gears, stoppingbetween shifts, in a steady pattern. Presslightly on the accelerator in each gear.
If your vehicle is equipped withAdvanceTrac® with Roll StabilityControl™, it may be beneficial todisengage the AdvanceTrac® with RollStability Control™ system whileattempting to rock the vehicle.
Emergency Maneuvers
•In an unavoidable emergency situationwhere a sudden sharp turn must bemade, remember to avoid"over-driving" your vehicle (that is, turnthe steering wheel only as rapidly andas far as required to avoid theemergency). Excessive steering willresult in less vehicle control, not more.Additionally, smooth variations of theaccelerator and/or brake pedalpressure should be utilized if changesin vehicle speed are called for. Avoidabrupt steering, acceleration or brakingwhich could result in an increased riskof loss of vehicle control, vehiclerollover and/or personal injury. Use allavailable road surface to return thevehicle to a safe direction of travel.
•In the event of an emergency stop,avoid skidding the tires and do notattempt any sharp steering wheelmovements.
•If the vehicle goes from one type ofsurface to another (that is, fromconcrete to gravel) there will be achange in the way the vehicle respondsto a maneuver (steering, accelerationor braking). Again, avoid these abruptinputs.
160
Taurus (CPH) Canada/United States of America, enUSA, First Printing
All-Wheel Drive (If Equipped)