2017 FORD TAURUS battery
[x] Cancel search: batteryPage 154 of 504

an emission control device or prevent itfrom working. Information about yourvehicle’s emission system is on the VehicleEmission Control Information Decallocated on or near the engine. This decalalso lists engine displacement.
Please consult your warranty informationfor complete details.
On-Board Diagnostics (OBD-II)
Your vehicle has a computer known as theon-board diagnostics system (OBD-II) thatmonitors the engine’s emission controlsystem. The system protects theenvironment by making sure that yourvehicle continues to meet governmentemission standards. The OBD-II systemalso assists a service technician in properlyservicing your vehicle.
When the service engine soonindicator illuminates, the OBD-IIsystem has detected amalfunction. Temporary malfunctions maycause the service engine soon indicator toilluminate. Examples are:
1. Your vehicle has run out of fuel—theengine may misfire or run poorly.
2. Poor fuel quality or water in thefuel—the engine may misfire or runpoorly.
3. The fuel fill inlet may not have closedproperly. See Refueling (page 147).
4. Driving through deep water—theelectrical system may be wet.
You can correct these temporarymalfunctions by filling the fuel tank withgood quality fuel, properly closing the fuelfill inlet or letting the electrical system dryout. After three driving cycles without theseor any other temporary malfunctions
present, the service engine soon indicatorshould stay off the next time you start theengine. A driving cycle consists of a coldengine startup followed by mixed city andhighway driving. No additional vehicleservice is required.
If the service engine soon indicator remainson, have your vehicle serviced at the firstavailable opportunity. Although somemalfunctions detected by the OBD-II maynot have symptoms that are apparent,continued driving with the service enginesoon indicator on can result in increasedemissions, lower fuel economy, reducedengine and transmission smoothness andlead to more costly repairs.
Readiness for Inspection andMaintenance (I/M) Testing
Some state and provincial and localgovernments may haveInspection/Maintenance (I/M) programsto inspect the emission control equipmenton your vehicle. Failure to pass thisinspection could prevent you from gettinga vehicle registration.
If the service engine soonindicator is on or the bulb doesnot work, your vehicle may needservice. See On-Board Diagnostics.
Your vehicle may not pass the I/M test ifthe service engine soon indicator is on ornot working properly (bulb is burned out),or if the OBD-II system has determinedthat some of the emission control systemshave not been properly checked. In thiscase, the vehicle is not ready for I/Mtesting.
If the vehicle’s engine or transmission hasjust been serviced, or the battery hasrecently run down or been replaced, theOBD-II system may indicate that thevehicle is not ready for I/M testing. Todetermine if the vehicle is ready for I/Mtesting, turn the ignition key to the on
151
Taurus (CPH) Canada/United States of America, enUSA, First Printing
Fuel and Refueling
Page 158 of 504
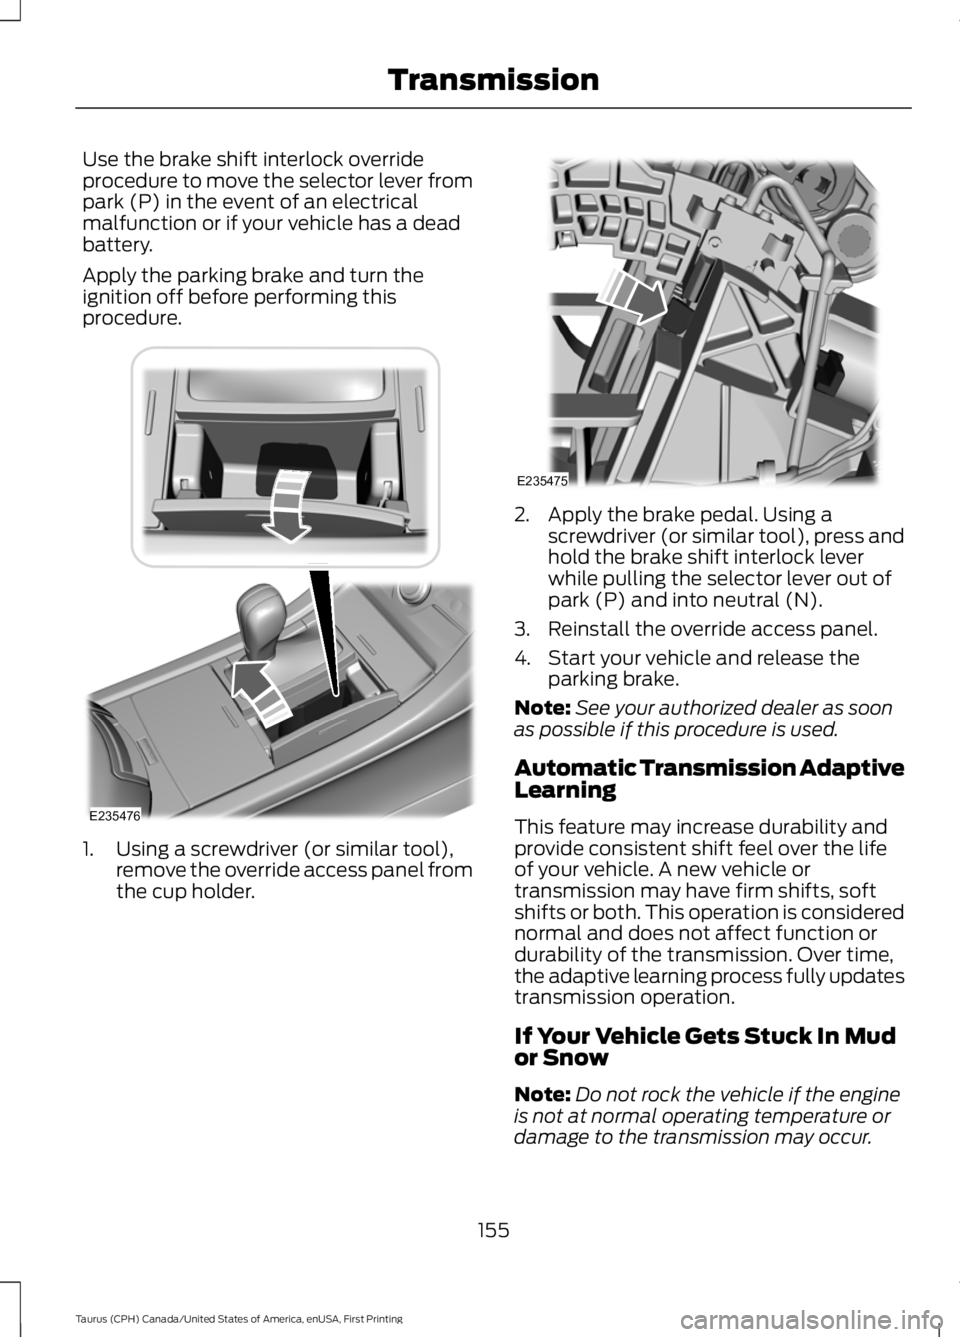
Use the brake shift interlock overrideprocedure to move the selector lever frompark (P) in the event of an electricalmalfunction or if your vehicle has a deadbattery.
Apply the parking brake and turn theignition off before performing thisprocedure.
1. Using a screwdriver (or similar tool),remove the override access panel fromthe cup holder.
2. Apply the brake pedal. Using ascrewdriver (or similar tool), press andhold the brake shift interlock leverwhile pulling the selector lever out ofpark (P) and into neutral (N).
3. Reinstall the override access panel.
4. Start your vehicle and release theparking brake.
Note:See your authorized dealer as soonas possible if this procedure is used.
Automatic Transmission AdaptiveLearning
This feature may increase durability andprovide consistent shift feel over the lifeof your vehicle. A new vehicle ortransmission may have firm shifts, softshifts or both. This operation is considerednormal and does not affect function ordurability of the transmission. Over time,the adaptive learning process fully updatestransmission operation.
If Your Vehicle Gets Stuck In Mudor Snow
Note:Do not rock the vehicle if the engineis not at normal operating temperature ordamage to the transmission may occur.
155
Taurus (CPH) Canada/United States of America, enUSA, First Printing
TransmissionE235476 E235475
Page 177 of 504

Certain vehicle conditions can alsodeactivate the system, such as:
•Traction control has activated on aslippery or loose surface.
•There is an anti-lock brake systemactivation or failure.
•Something touches the steering wheel.
If a problem occurs with the system, awarning message is displayed, followedby a chime. Occasional system messagesmay occur in normal operation. Forrecurring or frequent system faults, contactan authorized dealer to have your vehicleserviced.
Troubleshooting the System
The system does not look for a space
The traction control system may be off.
The transmission is in reverse (R); your vehicle must be moving forward to detect aparking space.
The system does not offer a particular space
The sensors may be covered (for example, snow, ice or dirt buildup). Covered sensorscan affect the system's functionality
There is not enough room in the parking space for your vehicle to safely park.
There is not enough space for the parking maneuver on the opposite side of the parkingspace.
The parking space is farther than 5 ft (1.5 m) or closer than 16 in (40 cm) away.
Your vehicle is going faster than 22 mph (35 km/h).
You may have recently disconnected or replaced the battery. After a battery disconnect,the vehicle must be driven on a straight road at a speed greater than 12 mph (20 km/h)for up to 30 seconds.
The system does not position your vehicle where I want in the space
Your vehicle is rolling in the opposite direction of the transmission (rolling forward whenreverse [R] is selected).
An irregular curb along the parking space prevents the system from aligning your vehicleproperly.
Vehicles or objects bordering the space may not be positioned correctly.
Your vehicle was pulled too far past the parking space.
174
Taurus (CPH) Canada/United States of America, enUSA, First Printing
Parking Aids
Page 200 of 504
Steering Tips
If the steering wanders or pulls, check for:
•Correct tire pressures.
•Uneven tire wear.
•Loose or worn suspensioncomponents.
•Loose or worn steering components.
•Improper vehicle alignment.
Note:A high crown in the road or highcrosswinds may also make the steeringseem to wander or pull.
Adaptive Learning
The electronic power steering systemadaptive learning helps correct roadirregularities and improves overall handlingand steering feel. It communicates withthe brake system to help operateadvanced stability control and accidentavoidance systems. Additionally, wheneverthe battery is disconnected or a newbattery installed, you must drive yourvehicle a short distance before the systemrelearns the strategy and reactivates allsystems.
COLLISION WARNING SYSTEM
(If Equipped)
PRINCIPLE OF OPERATION
WARNINGS
This system is designed to be asupplementary driving aid. It is notintended to replace the driver’sattention, and judgment, or the need toapply the brakes. This system does NOTactivate the brakes automatically. Failureto press the brake pedal to activate thebrakes may result in a collision.
WARNINGS
The collision warning system withbrake support cannot help preventall collisions. Do not rely on thissystem to replace driver judgment and theneed to maintain distance and speed.
Note:The system does not detect, warn orrespond to potential collisions with vehiclesto the rear or sides of the vehicle.
Note:The collision warning system is activeat speeds above approximately 5 mph(8 km/h).
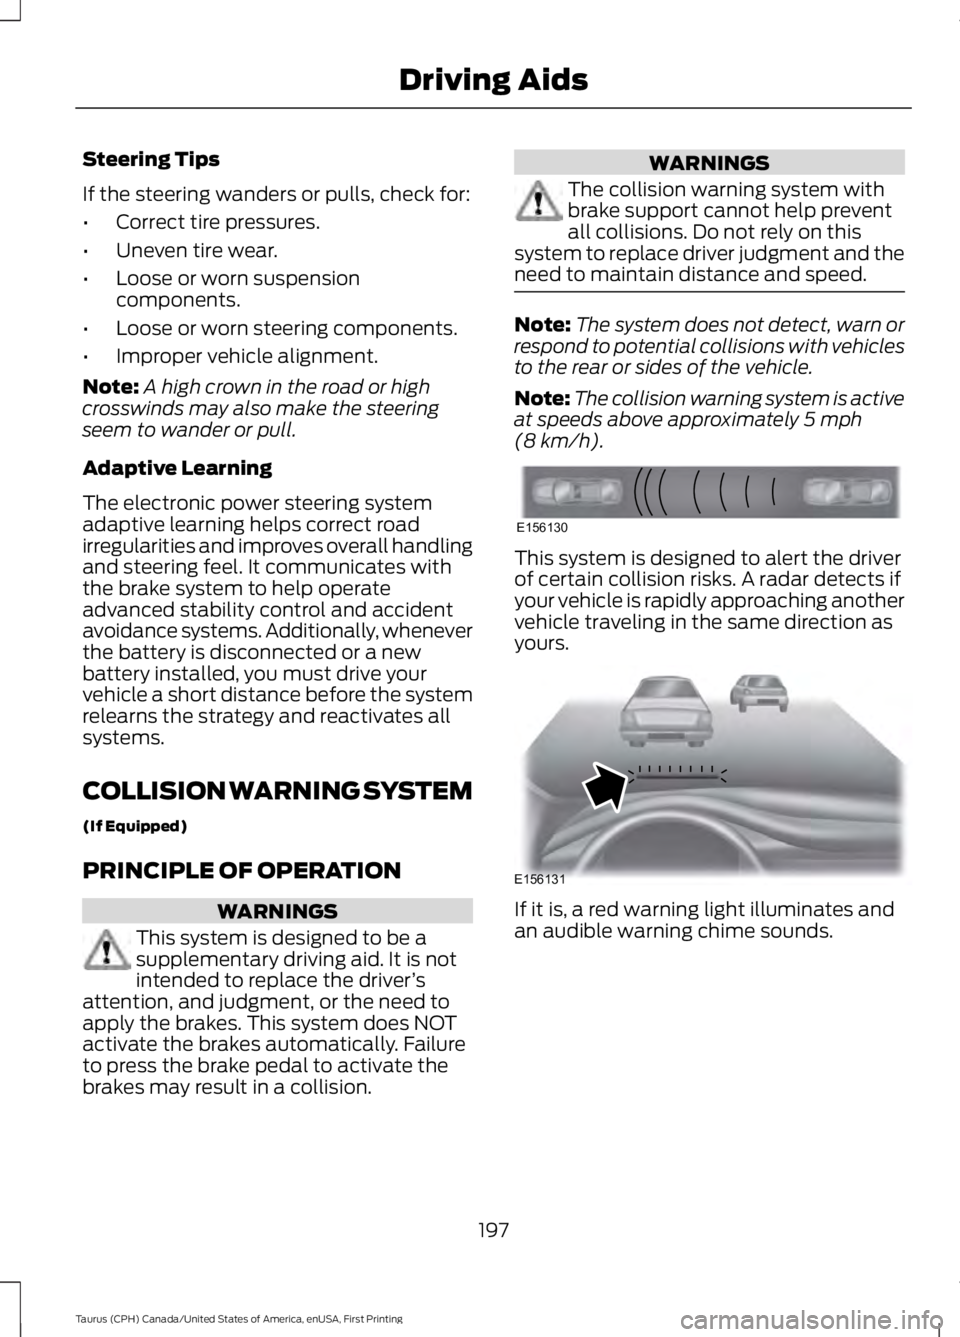
This system is designed to alert the driverof certain collision risks. A radar detects ifyour vehicle is rapidly approaching anothervehicle traveling in the same direction asyours.
If it is, a red warning light illuminates andan audible warning chime sounds.
197
Taurus (CPH) Canada/United States of America, enUSA, First Printing
Driving AidsE156130 E156131
Page 217 of 504
ROADSIDE ASSISTANCE
Vehicles Sold in the United States:Getting Roadside Assistance
To fully assist you should you have avehicle concern, Ford Motor Companyoffers a complimentary roadsideassistance program. This program isseparate from the New Vehicle LimitedWarranty. The service is available:
•24 hours a day, seven days a week.
•For the coverage period listed on theRoadside Assistance Card included inyour Owner's Manual portfolio.
Roadside Assistance covers:
•A flat tire change with a good spare, ifprovided with the vehicle (exceptvehicles supplied with a tire inflationkit).
•Battery jump start.
•Lock-out assistance (key replacementcost is the customer's responsibility).
•Fuel delivery — independent servicecontractors, if not prohibited by state,local or municipal law, shall deliver upto 2 gal (7.6 L) of gasoline or 5 gal(18.9 L) of diesel fuel to a disabledvehicle. Roadside Assistance limits fueldelivery service to two no-chargeoccurrences within a 12-month period.
•Winch out — available within 100 ft(30.5 m) of a paved or countymaintained road, no recoveries.
•Towing — independent servicecontractors, if not prohibited by state,local or municipal law, shall tow Fordeligible vehicles to an authorized dealerwithin 35 mi (56 km) of thedisablement location or to the nearest
authorized dealer. If a memberrequests a tow to an authorized dealerthat is more than 35 mi (56 km) fromthe disablement location, the membershall be responsible for any mileagecosts in excess of 35 mi (56 km).
Roadside Assistance includes up to $200for a towed trailer if the disabled eligiblevehicle requires service at the nearestauthorized dealer. If the towing vehicle isoperational but the trailer is not, then thetrailer does not qualify for any roadsideservices.
Vehicles Sold in the United States:Using Roadside Assistance
Complete the roadside assistanceidentification card and place it in yourwallet for quick reference. This card is inthe owner's information portfolio in theglove compartment.
United States Ford vehicle customers whorequire Roadside Assistance, call1-800-241-3673.
If you need to arrange roadside assistancefor yourself, Ford Motor Companyreimburses a reasonable amount fortowing to the nearest dealership within35 mi (56 km). To obtain reimbursementinformation, United States Ford vehiclecustomers call 1-800-241-3673.Customers need to submit their originalreceipts.
Vehicles Sold in Canada: GettingRoadside Assistance
To fully assist you should you have avehicle concern, Ford Motor Company ofCanada, Limited offers a complimentaryroadside assistance program. This programis eligible within Canada or the continentalUnited States.
214
Taurus (CPH) Canada/United States of America, enUSA, First Printing
Roadside Emergencies
Page 218 of 504
This program is separate from the NewVehicle Limited Warranty, but the coverageis concurrent with the powertrain coverageperiod of your vehicle.
Canadian customers who require roadsideassistance, call 1-800-665-2006.
Vehicles Sold in Canada: UsingRoadside Assistance
Complete the roadside assistanceidentification card and place it in yourwallet for quick reference.
In Canada, this card is found in theWarranty Guide in the glove compartmentof your vehicle.
Vehicles Sold in Canada: RoadsideAssistance Program Coverage
The service is available 24 hours a day,seven days a week.
Canadian roadside coverage and benefitsmay differ from the U.S. coverage.
For complete program coverage detailsyou may contact your dealer, you can callus in Canada at 1-800-665-2006, or visitour website at www.ford.ca.
HAZARD WARNING FLASHERS
Note:If used when the vehicle is notrunning, the battery will lose charge. Theremay be insufficient power to restart yourvehicle.
The hazard warning button islocated on the instrument panel.Use it when your vehicle iscreating a safety hazard for othermotorists.
•Press the button to turn on the hazardwarning function, and the front andrear direction indicators will flash.
•Press the button again to turn themoff.
FUEL SHUTOFF
WARNING
Failure to inspect and, if necessary,repair fuel leaks after a collision mayincrease the risk of fire and seriousinjury. Ford Motor Company recommendsthat the fuel system be inspected by anauthorized dealer after any collision.
In the event of a moderate to severecollision, this vehicle includes a fuel pumpshutoff feature that stops the flow of fuelto the engine. Not every impact will causea shutoff.
Should your vehicle shut off after acollision, you may restart your vehicle. Forvehicles equipped with a key system:
1. Switch off the ignition.
2. Switch on the ignition.
3. Repeat Steps 1 and 2 to re-enable thefuel pump.
For vehicles equipped with a push buttonstart system:
1. Press the START/STOP button toswitch off the ignition.
2. Press the brake pedal and press theSTART/STOP button to switch on theignition.
3.Remove your foot from the brake pedaland press the START/STOP buttonto switch off the ignition.
4. You can either attempt to start theengine by pressing the brake pedal andthe START/STOP button, or switchon the ignition only by pressing theSTART/STOP button withoutpressing the brake pedal. Both waysre-enable the fuel system.
215
Taurus (CPH) Canada/United States of America, enUSA, First Printing
Roadside Emergencies
Page 219 of 504
Note:When you try to restart your vehicleafter a fuel shutoff, the vehicle makes surethat various systems are safe to restart.Once your vehicle determines that thesystems are safe, then the vehicle will allowyou to restart.
Note:In the event that your vehicle doesnot restart after your third attempt, contactan authorized dealer.
JUMP STARTING THE VEHICLE
WARNINGS
Batteries normally produce explosivegases which can cause personalinjury. Therefore, do not allowflames, sparks or lighted substances tocome near the battery. When working nearthe battery, always shield your face andprotect your eyes. Always provide correctventilation.
Keep batteries out of reach ofchildren. Batteries contain sulfuricacid. Avoid contact with skin, eyes orclothing. Shield your eyes when workingnear the battery to protect against possiblesplashing of acid solution. In case of acidcontact with skin or eyes, flushimmediately with water for a minimum of15 minutes and get prompt medicalattention. If acid is swallowed, call aphysician immediately.
Use only adequately sized cableswith insulated clamps.
Preparing Your Vehicle
Do not attempt to push-start yourautomatic transmission vehicle.
Note:Attempting to push-start a vehiclewith an automatic transmission may causetransmission damage.
Note:Use only a 12-volt supply to start yourvehicle.
Note:Do not disconnect the battery of thedisabled vehicle as this could damage thevehicle electrical system.
Park the booster vehicle close to the hoodof the disabled vehicle, making sure thetwo vehicles do not touch.
Connecting the Jumper Cables
WARNINGS
Do not attach the cables to fuel lines,engine rocker covers, the intakemanifold or electrical componentsas grounding points. Stay clear of movingparts. To avoid reverse polarityconnections, make sure that you correctlyidentify the positive (+) and negative (-)terminals on both the disabled and boostervehicles before connecting the cables.
Do not attach the end of the positivecable to the studs or L-shaped eyeletlocated above the positive (+)terminal of your vehicle’s battery. Highcurrent may flow through and causedamage to the fuses.
Do not connect the end of thesecond cable to the negative (-)terminal of the battery to be jumped.A spark may cause an explosion of thegases that surround the battery.
Note:In the illustration, the bottom vehiclerepresents the booster vehicle.
216
Taurus (CPH) Canada/United States of America, enUSA, First Printing
Roadside Emergencies
Page 220 of 504
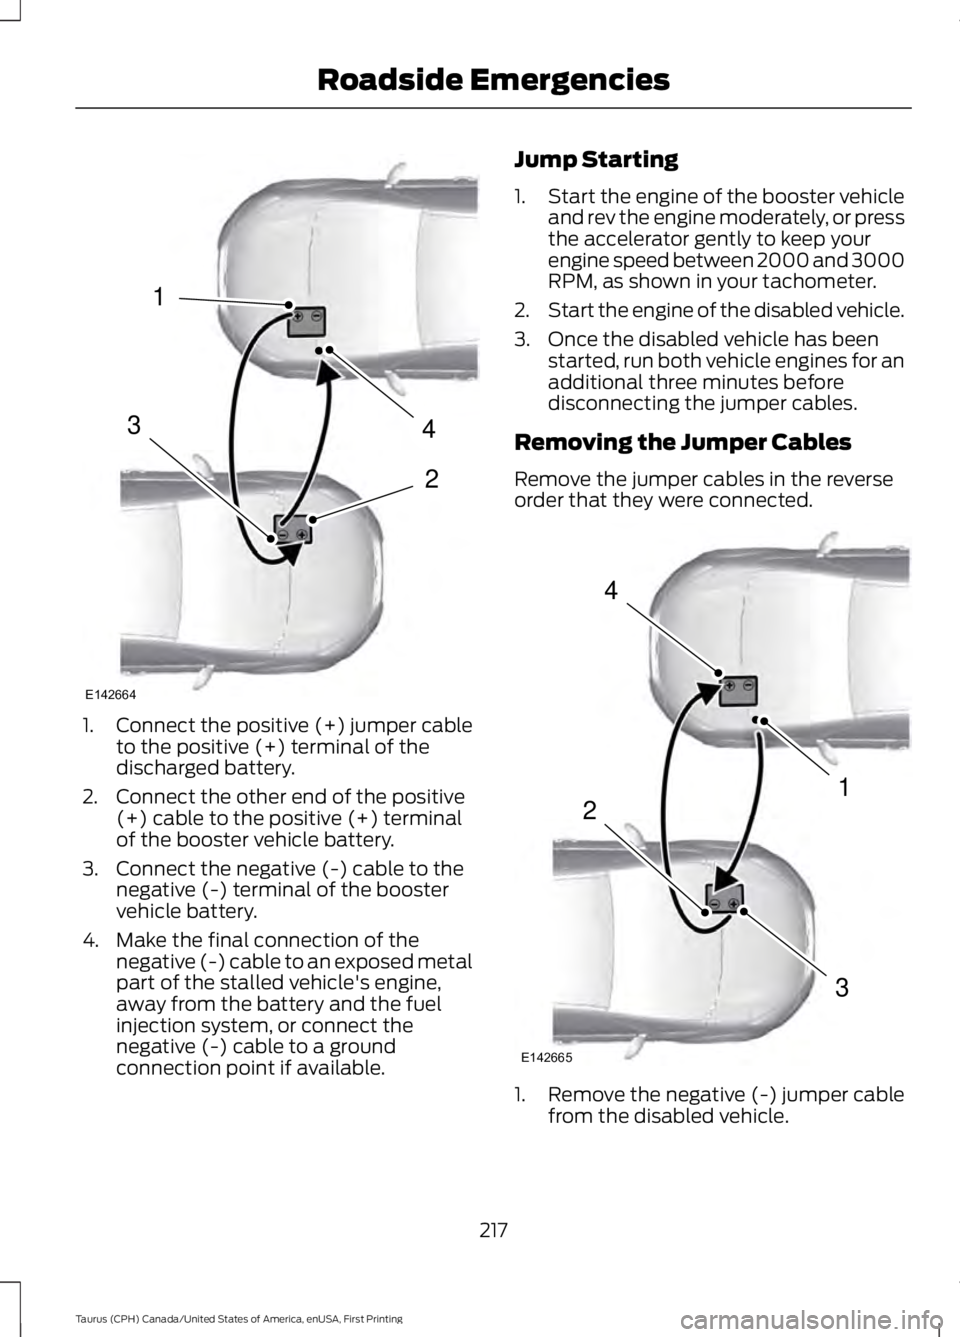
1.Connect the positive (+) jumper cableto the positive (+) terminal of thedischarged battery.
2. Connect the other end of the positive(+) cable to the positive (+) terminalof the booster vehicle battery.
3. Connect the negative (-) cable to thenegative (-) terminal of the boostervehicle battery.
4. Make the final connection of thenegative (-) cable to an exposed metalpart of the stalled vehicle's engine,away from the battery and the fuelinjection system, or connect thenegative (-) cable to a groundconnection point if available.
Jump Starting
1.Start the engine of the booster vehicleand rev the engine moderately, or pressthe accelerator gently to keep yourengine speed between 2000 and 3000RPM, as shown in your tachometer.
2.Start the engine of the disabled vehicle.
3. Once the disabled vehicle has beenstarted, run both vehicle engines for anadditional three minutes beforedisconnecting the jumper cables.
Removing the Jumper Cables
Remove the jumper cables in the reverseorder that they were connected.
1. Remove the negative (-) jumper cablefrom the disabled vehicle.
217
Taurus (CPH) Canada/United States of America, enUSA, First Printing
Roadside Emergencies4
2
1
3
E142664 4
1
3
2
E142665